• Skip to primary navigation
  • Skip to main content
  • Skip to primary sidebar
  • Skip to footer

The Nifty Foodie

  • Home
  • About
  • Recipes
    • Appetizers
    • Beverages
    • Breads/Muffins
    • Breakfast
    • Canning
    • Desserts
    • Dog Treats
    • Entertaining/Parties
    • Fruit
    • Holiday Recipes
    • Louisiana Cuisine
    • Main Dishes
    • Mexican
    • Nifty Foodie Original
    • Nifty Tricks
    • Project Food Blog
    • Pumpkin
    • Salads
    • Sauces/Dips
    • Side Dishes
    • Skinny
    • Slow Cooker
    • Spices
    • Stews/Soups
    • The Disasters
  • My Weight Loss Journey
    • Races
    • Running
    • Weight Loss Milestones
  • Crafts
  • Contact Me

Giveaways/Reviews

Breakfast Night with Krusteaz

February 14, 2018 by Amy Leave a Comment

IMG_1348

Disclosure: This is a sponsored post for Krusteaz. All opinions are 100% my own.

Happy Valentine’s Day, y’all! I hope each of you has a wonderful day, whether it be with your significant other or whether it be a day where you treat yourself – I hope you enjoy it!

My husband and I typically do not go out for Valentine’s Day. Spending hours waiting at a crowded restaurant isn’t really our cup of tea, and we realized that quickly into our relationship. We simply are all about enjoying each other’s company, eating a home-cooked meal and watching a movie. It’s about comfort with us, and of course, we are most comfortable at home.

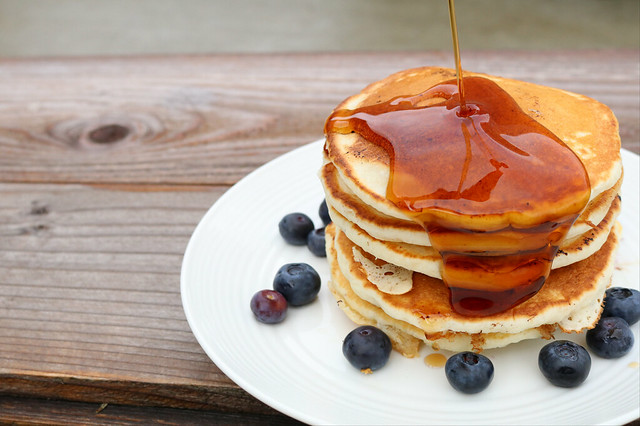
I know that sounds extremely boring to some of you, but as an introvert, being home is where I’m most happy. While we don’t always have dinners planned out, I know that an old favorite is breakfast for dinner. I especially love EASY breakfasts at night, like a couple of scrambled eggs with freshly made pancakes. For pancakes, one of my latest favorites is Krusteaz’s Buttermilk Pancake mix. You don’t have to worry about going to the store to grab ingredients to add to the mix…all you need is water!

IMG_1350

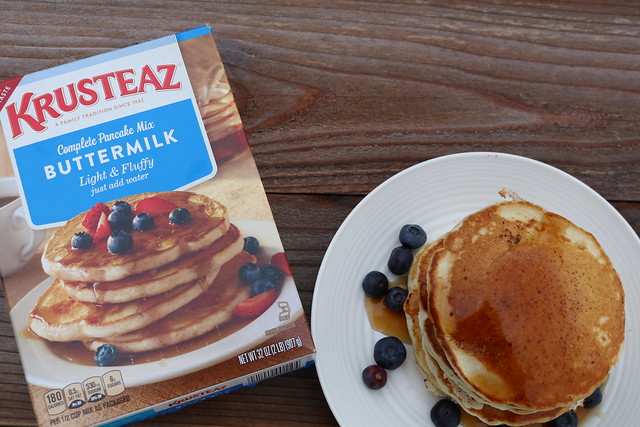
I’ll admit…I was a little leery about a mix that just needed water, but these pancakes turn out to be SO fluffy and tasty. It’s such a no-brainer to mix up the pancake batter, let it sit for a couple of minutes while the griddle is pre-heating, and get to cooking! This mix is also easy to add mix-ins. I added blueberries to our pancakes (right after you scoop the batter onto the griddle), but you could just as easily add bananas, strawberries, chocolate chips (hello, dessert!)…really, the sky is the limit to customize these to your family’s preferences, if you’d like!

With the month of February being National Hot Breakfast month, I just wanted to share with y’all the idea of an easy Breakfast for Dinner (or brinner, as a lot of people call it haha!). It’s a great way to get the family in the kitchen together, and with easy products like Krusteaz’s pancake or waffle mix around, it won’t take long for you to get dinner on the table. 🙂

Filed Under: Breakfast, Giveaways/Reviews

Butcher Box Review

December 21, 2016 by Amy Leave a Comment

Disclosure: Butcher Box provided me with products at no cost to me, in exchange for a fair and honest review. All opinions are 100% my own.

ButcherBox_2016

Steak night. There’s just something special about steak nights in our house. A few years ago, we went to our first steakhouse dinner, and we quickly realized what we were missing when it came to a perfectly cooked steak. Super thick cuts of meat, seared perfectly, resulting in a melt in your mouth-type of dinner. It was just outstanding, and because of that experience, our steak purchases were forever changed.

When we first got married, we used to buy whatever steaks were on sale at the grocery store. It didn’t matter the cut…as long as it was beef, we were game for it. I remember looking at the price of ribeye and filet, and thinking really? Is it worth it? It’s all cow. Ignorant ignorant ignorant. Y’all…yes, it’s worth it!

Now that my husband has a nice grill, I especially love steak nights. He can somehow grill a killer crust on a steak, and I’m a medium-rare/medium steak gal myself. He gets it perfectly every.single.time. Steakhouse at home? Yes, indeed!

The folks at Butcher Box reached out to me, and asked if I’d like to give one of their monthly deliveries a try. I had a choice between All Beef, Mixed (Beef/Chicken/Pork), Beef & Chicken or Beef & Pork. I just HAD to get the All Beef box….we cook chicken all the time in our house, so beef is a nice change. 🙂

I was so impressed with the care that they took in the shipment. The beef was still frozen solid (thanks to dry ice), and everything was vacuum packaged for us to throw into the freezer.

Butcher Box Review

Our package contained grass-fed beef strip steaks, top sirloins, tri-tip steaks, thinly sliced beef, ground beef and a package of bacon. That’s enough for several meals in our 2-person household. Our package also included recipe cards to use with their products! It’s just a well done (ha, I crack myself up!) package.

So far, all of the meat we have tried has been fantastic. I find that grass-fed beef is more flavorful, and the quality of the meat is great! All of the steaks are good, thick cuts of steak, too. Perfect for grilling!

I love what Butcher Box offers. First of all, you don’t have to source out your meat. They deliver 100% grass-fed beef, organic chicken, and all-natural pork straight to your door. I also appreciate that it’s pre-portioned out for easy freezing. Also, shipping is included in the cost, so you know exactly what you’re paying when you choose a subscription box.

Also, if you’re looking for a last-minute gift idea, Butcher Box offers gift subscriptions. I think that’s a really neat, out-of-the-box idea. I know of a few people in my life who would love something like this (think of the person who has it all…what a unique gift idea, right?).

Filed Under: Beef, Giveaways/Reviews

Mamma Chia’s Chia & Greens Beverage Review (+ Giveaway)

May 19, 2016 by Amy 15 Comments

Disclosure: Mamma Chia provided me with free samples, and they are also providing the prize pack for the giveaway, in exchange for a post. All opinions are 100% my own.

Mamma Chia Chia&Green

For the past few months, I’ve been struggling with my weight loss journey. I originally lost 20 lbs. within the first two months, and then Easter happened. How come it only takes one thing for me to totally derail? I gained back a few of those pounds, but I purchased a new workout program online and I’m ready to get back to it!

I knew things were a little out of control when I (the person who no longer drinks soda) was craving a coke icee, and well…I had one. I KNOW. I KNOW.

I told myself that no matter what…those coke icees aren’t happening again. The other day, I was having that same craving again, but this time I grabbed one of these – Mamma Chia’s new Chia & Greens beverages. Mamma Chia generously offered to send me a sampling of their new Chia & Greens beverages, along with other Mamma Chia products that I just LOVE!

Mamma Chia Chia&Green

Their Chia & Greens beverages contain the lowest amounts of sugar, along with the highest amounts of nutrients (each bottle contains 2500 mg of Omega-3s, 4 grams of complete protein, 7 grams of fiber, 25% RDA of Vitamin A and 95 mg of calcium)! How are they packed with so many nutrients? Well, each drink has organic chia seeds and organic power veggies (like kale, spinach and broccoli).

I’m not going to lie…I was worried that it wasn’t going to calm down my craving for a sweet drink, but I was surprised that I really liked these! The Beet & Ginger was my favorite, because it sort of reminded me of a ginger ale flavor, which is close to soda, right?

The Chia & Greens beverages are available in four flavors:

  • Joyful Greens (Ginger & Lemongrass)
  • Soulful Greens (Cayenne & Lemon)
  • Love Greens (Beet & Ginger)
  • Grateful Greens (Kale & Mint)

If you like Mamma Chia’s Vitality beverages, you might want to give these a try. They aren’t as sweet as their fruity vitality beverages, but they still have that fun chia seed texture.

The generous folks at Mamma Chia are offering one lucky reader of The Nifty Foodie a prize pack, which includes their new Chia & Greens beverages, as well as other great Mamma Chia products and/or coupons!

Enter the giveaway using the Rafflecopter widget below (continental US readers only):

a Rafflecopter giveaway

Note: This giveaway is supplied by Mamma Chia, and is open to readers in the continental US only. Entries will be accepted until May 25th, 2016 at 11:59pm (central standard time). Winner will be emailed (make sure you leave an email address in the form), and will have 48 hours to respond or another winner will be chosen.

Filed Under: Giveaways/Reviews

PEEPS Butterscotch Nests + GIVEAWAY!

March 18, 2016 by Amy 5 Comments

Disclosure: Quarto Publishing Group provided me with a copy of the book, as well as one to giveaway, in exchange for a post. All opinions are 100% my own.

Peeps Butterscotch Nests

I absolutely love Spring. 🙂 The warmer weather, more daylight, pretty flowers and of course, I’ve professed my love for Easter candy! I’m a sucker for pastels, and Easter candy is everything pastel. Plus, there’s PEEPS!

I know a lot of people either hate or love PEEPS, and for me, I LOVE them! It’s kind of a childhood nostalgia thing. I have to get a pack (or three) every Easter. So, when I was offered a review copy of Just Born’s latest book Peeps-a-licious!, I was so excited to flip through this book! Not only are these recipes from Just Born, but quite a few food bloggers contributed their recipes to the book, too. There’s recipes from cute butterscotch nests to s’mores brownies and creme brulee. I also love that there are different holiday PEEPS featured throughout the book, like Christmas and Halloween. To me, it’s a really cute/fun book, and if you’re a PEEPS lover, I think you’ll enjoy it. 🙂

Peeps

I decided to make the butterscotch nests, because I thought it would be a simple, festive recipe to share with coworkers. All you have to do is melt the butterscotch chips, and the rest is mixing/assembling. They are just too adorable. The original recipe calls for jelly beans to be the eggs in the nest, but you can really use any egg-shaped candy.

PEEPS Butterscotch Nests
Source: Peeps-a-licious

Ingredients:

  • 11 oz. bag butterscotch morsels
  • 1/4 cup smooth peanut butter
  • 1 1/2 packages (18 oz.) crispy chow mein noodles
  • 15-20 PEEPS Marshmallow chicks (assorted colors)
  • 1-2 packages of egg-shaped candy

Directions:

  1. Melt the bag of butterscotch morsels in a medium microwave-safe bowl, in 30 second increments (being sure to stir the morsels after every microwave cycle).
  2. Once the morsels are fully melted, mix in the smooth peanut butter, until it’s a smooth consistency. In a large bowl, add the crispy chow mein noodles, and then drizzle the butterscotch/peanut butter mixture over it. Carefully mix everything together, until the noodles are well-coated in the butterscotch/peanut butter mixture.
  3. Prepare a sheet pan by lining it with wax paper or parchment paper. Then, spoon about 2 tbsp. of the mixture onto the wax paper sheet, shaping it into a nest shape (with a slight indentation in the middle).  Repeat until the all of the mixture is used up.
  4. Refrigerate the nests for about 30 minutes, until the butterscotch mixture has set. To assemble the nests, place 3-4 egg-shaped candies in the middle of the nest and place a PEEP chick on top. Repeat until all of the nests are assembled. Enjoy!

Do you want to win a copy of Peeps-a-licious? The generous folks at Quarto Publishing Group are offering a copy to one lucky reader of The Nifty Foodie!

To enter to win, use the Rafflecopter widget below (continental US readers only):

a Rafflecopter giveaway

Note: This giveaway is supplied by the publisher and is open to readers in the continental US only. Entries will be accepted until March 25th, 2016 at 11:59pm (central standard time). Winner will be emailed (make sure you leave an email address in the form), and will have 48 hours to respond or another winner will be chosen.

Filed Under: Candy, Desserts, Giveaways/Reviews, Holiday Recipes

Mamma Chia Vitality Bar Review & A GIVEAWAY

February 17, 2016 by Amy 9 Comments

Disclosure: Mamma Chia provided me with free samples, and they are also providing the prize pack for the giveaway, in exchange for a post. All opinions are 100% my own.

Mamma Chia

Now that life is quieting down again, I decided that it was finally time to focus on the same thing I focused on three years ago: my health.

Do y’all remember this?

Randoms

Picture collage made by Fit For a Bride

It’s been a while, and I’ll admit…most of my hard work from 2-3 years ago is gone. I’ve gained all of my weight back (and then some).

As of this week, I got back on track, and I’m motivated as all heck. I have a closet full of clothes in my previous sizes, and I cannot wait to be able to wear them again!

Since I’m back to eating better, I’m constantly on the search for healthier/grab-and-go snacks. The folks at Mamma Chia sent me an assortment of their new Vitality Bars to try. I’m a big fan of Mamma Chia products, and these bars were no exception.

Mamma Chia

I mean…these bars are seriously chocolate-y. Pictured is their coconut almond & dark chocolate flavor.

These bars are available in four flavors:

  • Blueberry & Dark Chocolate
  • Cherry & Dark Chocolate
  • Coconut Almond & Dark Chocolate
  • Peanut & Dark Chocolate

My favorite flavor is their peanut and dark chocolate….I’m a big fan of the chocolate + peanut combination. 🙂

What I love about Mamma Chia products is that not only are they fairly low in calories, but they are full of nutritional benefits. Each Vitality Bar includes 1000 mg of Omega-3s, 3-6 grams of protein (soy and dairy-free), and 3-4 grams of fiber. Also, if you are avoiding gluten, these bars are gluten-free!

I especially love their Vitality Bars for something to enjoy in the afternoon. Not only do they taste good, I feel like the bars take care of my sweets cravings (which are always raging after work).

The generous folks at Mamma Chia are offering one lucky reader of The Nifty Foodie a prize pack, which includes their new Chia Vitality Bars, as well as other great Mamma Chia products and/or coupons!

Enter the giveaway using the Rafflecopter widget below (continental US readers only):

a Rafflecopter giveaway

Note: This giveaway is supplied by Mamma Chia, and is open to readers in the continental US only. Entries will be accepted until February 24th, 2016 at 11:59pm (central standard time). Winner will be emailed (make sure you leave an email address in the form), and will have 48 hours to respond or another winner will be chosen.

Filed Under: Giveaways/Reviews

Thanksgiving Throwback & GIVEAWAY!

November 11, 2015 by Amy 18 Comments

Disclosure: Butterball provided me with a turkey gift check, as well as two other turkey gift checks to giveaway, in exchange for a post. All opinions are 100% my own.

Y’all.

Thanksgiving is almost two weeks away. Yep…two weeks. I know I say this a lot, but holy cow…this year is FLYING.

I truly love this time of the year. Family gatherings mean so much to me, because as the years pass, it seems like we get busier and busier. Thanksgiving is just one of those times where we can all sit around the table and catch up on each other’s year. It’s so different from our Thanksgiving dinners from 15-20 years ago.

When we were younger, the adults would have their own table and the kids would have their own table. The adults would serve themselves on china, and the kids would eat on disposable plates. I mean, I totally understand why. I also understand why we didn’t get a tablecloth at the kid table. We sort of made a mess. 😛 Now, we all eat at the same table, and I nervously/carefully eat my meal on china (a clumsy person’s nightmare).

The food has changed as we’ve gotten older, too. Of course, there was (and still is) Butterball turkey and cornbread dressing as the main components of the meal. However, the picky kid palates are no more, so we’ve gone from mac & cheese (from a box) to cheesy cauliflower and sweet potato casserole to sweet potato souffle. While the general ideas are the same, it’s interesting to see how things have changed.

Even the topics of conversation have morphed from report card grades and what we’re asking Santa for this Christmas, to college/careers, sports and politics. With so many adults at one table now, the volume of conversation starts at a normal volume, and seemingly gets louder and louder until you can no longer hear the football game that is on TV in the background. It can be a bit overwhelming to an outsider, but I mean…that’s just how my family is. 🙂

Now, before any of the family conversations happen, Thanksgiving starts early in the morning simply with a turkey. Turkey for us is the heart of our Thanksgiving meal…it just wouldn’t be Thanksgiving without the turkey. Butterball is all about being a part of your family’s Thanksgiving. From quality turkey to great recipes and helpful turkey advice/how-to articles (hello, turkey calculator!), Butterball is there to help you host an amazing Thanksgiving gathering.

This year, Butterball is embracing the throwback, made popular by Throwback Thursday (#TBT). Butterball is encouraging families and friends this year to throwback and recall favorite Thanksgiving moments by sharing Thanksgiving family photos, memories and favorite (or not-so-favorite) vintage dishes on their Facebook page. Butterball is also bringing past Thanksgivings into the present by opening the Butterball archives and sharing their favorite throwback recipes. And of course, there’s always the help from the Turkey Talk-Line experts, who have been around for 30+ years, offering home cooks turkey-related advice around the November/December holiday season.

To gear up for the upcoming holidays, the generous folks at Butterball are offering a $20 turkey gift check to TWO readers of The Nifty Foodie.

Butterball #TBT

Enter the giveaway using the Rafflecopter widget below (continental US readers only):

a Rafflecopter giveaway

Note: This giveaway is supplied by Butterball, and is open to readers in the continental US only. Entries will be accepted until November 15th, 2015 at 11:59pm (central standard time). Winner will be emailed (make sure you leave an email address in the form), and will have 48 hours to respond or another winner will be chosen.


Filed Under: Giveaways/Reviews

Greek Yogurt Pumpkin Pie + GIVEAWAY!

November 5, 2015 by Amy 7 Comments

Disclosure: The folks at Greek Gods yogurt sent me product coupons to develop this recipe. They are also providing the giveaway prize within this post. All opinions are 100% my own.

Greek Yogurt Pumpkin Pie

I’m not necessarily the strongest cook in my family. Most of the time, I can nail a recipe, but there are times when I totally have a fail.

For example, I burnt a batch of white rice in the rice cooker this weekend. Yep….rice.

Whenever stuff like this happens, I have to get back into baking again. I’m less likely to have a baking fail vs. a cooking fail, so it’s a bit of a boost when I whip up something delicious after a silly fail like that. 😛

The folks at Greek Gods yogurt reached out to me, asking me to somehow incorporate greek yogurt into a pie, since Thanksgiving is just around the corner. I’ve used yogurt substitutions before in baking with great results, so I was excited to try this out on a true classic: pumpkin pie.

When we tried this pie the other night, you couldn’t even tell that it wasn’t the traditional pumpkin pie. It was a lovely, smooth texture, and it still had that delicious pumpkin pie flavor that I’ve grown to know and love. The recipe is pretty simple…for the filling, you just dump everything in a bowl, mix and add to the pie crust. And if you don’t have time to make a crust, you can totally use a store-bought pie shell.

Greek Yogurt Pumpkin Pie
Source: an original

Ingredients:

  • 1 batch of pie crust (you will only need one pie crust for this recipe)
  • 15 oz. canned pumpkin puree
  • 1/2 cup The Greek Gods plain greek yogurt
  • 3/4 cup granulated sugar
  • 2 eggs
  • 1/4 tsp. salt
  • 1 tsp. vanilla extract
  • 2 tsp. pumpkin pie spice
  • 2 tbsp. heavy cream

Directions:

  1. Preheat the oven to 425 degrees F.
  2. Roll out the pie crust enough to fill a pie dish. Carefully place the rolled out dough in the pie dish, pressing gently against the bottom and sides of the dish to line the pie dish.
  3. In a large bowl, add the pumpkin puree, greek yogurt, granulated sugar, eggs, salt, vanilla extract, pumpkin pie spice and heavy cream. Mix everything together for a couple of minutes, until well-mixed.
  4. Carefully pour the pie filling into the pie dish, smoothing out the top. Place the pie in the oven, and bake for 15 minutes at 425. Then, reduce the temperature to 350 degrees F, and bake for 45-55 minutes. Halfway through the baking process, you will want to add foil on top of the pie crust edges, to avoid burning.
  5. Allow the pie to cool for 2 hours. Serve warm or place in the fridge until you are ready to serve. Enjoy!

For other great recipes that use greek yogurt, check out Greek Gods yogurt’s Facebook page. They have quite a few great holiday recipe ideas, ranging from a Pumpkin Pie Trifle to Greek Yogurt Biscuits!

The generous folks at Greek Gods yogurt are offering one reader of The Nifty Foodie 10 free product coupons (approximate value, up to $50) to get you started with your holiday pie baking.

Enter the giveaway using the Rafflecopter widget below (continental US readers only):

a Rafflecopter giveaway

Note: This giveaway is supplied by Greek Gods yogurt, and is open to readers in the continental US only. Entries will be accepted until November 12th, 2015 at 11:59pm (central standard time). Winner will be emailed (make sure you leave an email address in the form), and will have 48 hours to respond or another winner will be chosen.


Filed Under: Giveaways/Reviews, Nifty Foodie Original, Pies, Pumpkin

Chocolate-Dipped Cocoa Marshmallows + GIVEAWAY

October 13, 2015 by Amy 4 Comments

Disclosure: I was sent a review copy of this book from the publisher at no cost to me for a fair and honest review. The giveaway book is also supplied by the publisher. All opinions are 100% my own.

Chocolate-Dipped Cocoa Marshmallows

With the holidays fast approaching, it’s time for me to start brainstorming for homemade holiday gifts. I usually make dozens of various cookies, but this year, since we’re in the process of building a house, things will be scaled back a bit.

Sure, I’ll probably bake up a few things, but I want to try to branch out a little bit. So, when I was approached to review a book about candy-making, I was totally eager to try it. Sally of Sally’s Baking Addiction just released a new cookbook: Sally’s Candy Addiction.

Chocolate-Dipped Cocoa Marshmallows

Now, while candy-making can be fairly intimidating, I’m noticing that most of these recipes are fairly approachable. There’s a section which explains candy-making basics, to help you understand the supplies that are needed, as well as the different stages of cooking sugar. As far as the recipes go, there’s a nice variety of recipes included…from fudge to caramels to truffles and taffy. I think it would be an awesome cookbook to have if you want to get started with candy-making, especially with the holiday season coming up!

While sifting through the cookbook, these chocolate-dipped cocoa marshmallows caught my eye. I thought that they would be perfect to try before the holidays, since you can pretty much top them with any candy or sprinkles after you dip them in chocolate. For the upcoming holidays, I thought it would be festive to crush up some peppermint candies!

Chocolate-Dipped Cocoa Marshmallows

Chocolate-Dipped Cocoa Marshmallows
Source: Sally’s Candy Addiction
(Recipe shared with permission from the publisher.)

Ingredients:

  • 2/3 cup natural unsweetened or Dutch-process cocoa powder, divided
  • 1/4 cup confectioners’ sugar
  • 2 tbsp. cornstarch
  • 1 1/3 cups cold water, divided
  • 3 x 1/4 oz. packages unflavored gelatin
  • 1 cup light corn syrup
  • 1 1/2 cups granulated sugar
  • 1/4 tsp. salt
  • 1 tsp. vanilla extract
  • 16 oz. semi-sweet chocolate, coarsely chopped
  • sprinkles or crushed candies (for topping)

Directions:

  1. Prepare a 9×13 inch glass or ceramic baking pan by lining it with non-stick foil or parchment and spraying the inside with non-stick cooking spray (just an added step to make absolutely sure that nothing will stick). Set the pan aside. Sift half of the cocoa powder (1/3 cup), confectioners’ sugar, and cornstarch together in a small bowl, and using a fine sieve, very lightly sprinkle some of the mixture around the prepared pan. There will be a good bit of the mixture left for later on in the recipe.
  2. Place the remaining 1/3 cup of cocoa powder and 1/3 cup of water in a heatproof bowl or mug. Microwave the mixture on high power for 90 seconds. Stir the hot mixture very well until combined and set aside.
  3. Place the gelatin and 1/2 cup of the water in a bowl of a stand mixer, fitted with the whisk attachment. Whisk the mixture on low speed for 1 minute to briefly combine. Add the hot cocoa powder/water mixture to the gelatin mix and whisk on low speed for another 30 seconds. Allow the mixture to sit in the mixer as you cook the sugar syrup, being sure to stir the mixture for 20 seconds every 3 minutes or so.
  4. To cook the sugar syrup, place the last 1/2 cup of water, corn syrup, granulated sugar and salt in a 3 quart heavy-duty saucepan over medium heat. Stir the mixture with a wooden spoon until the sugar has completely dissolved. Then, attach a candy thermometer to the pan. Make sure you don’t let the thermometer touch the bottom of the pan, as that can give a false reading. As the sugar syrup begins to cook, brush down the sides of the pan with a water-moistened pastry brush to prevent crystallization. Cook the sugar syrup, being sure not to stir the mixture, until the temperature reaches 240°F (116°C; soft ball stage).
  5. Turn the stove off and remove the pan from heat. Turn the mixer on the lowest speed and slowly (and carefully, since the syrup is extremely hot) pour in the hot syrup to the gelatin/cocoa mixture.
  6. Gradually increase the mixer speed until the mixer is on high speed. Whip the marshmallow mixture for 10-15 minutes, or until the mixture is light brown, thick and appears to be shiny.
  7. Working swiftly (since the mixture cools down and sets fast), pour/spoon the marshmallow mixture into the prepared baking pan and smooth out the top with a rubber spatula. Allow the marshmallows to sit uncovered at room temperature for at least 6 hours, preferably overnight.
  8. Once the marshmallows are completely firm and set, get a work station ready for cutting the marshmallows. Cover the surface of your counter with wax or parchment paper. Sprinkle the cocoa/confectioners’ sugar/cornstarch mixture on the surface, as well as on top of the marshmallow.
  9. Using a pizza cutter or sharp knife coated with some of the cocoa/confectioners’ sugar/cornstarch mixture, cut the marshmallow into 2 inch squares. If it starts sticking even more, run the blade of the cutter under hot water and wipe dry with a paper towel. Roll the cut edges of the marshmallows in the cocoa mixture to ensure that they will no longer be sticky.
  10. Line 2 large baking sheets with parchment paper or silicone baking mats and set aside. Melt/temper the chopped semi-sweet chocolate, and dip each marshmallow halfway into the warm chocolate. Lift out the marshmallow and gently shake off the excess chocolate. Carefully place the marshmallow onto the prepared baking sheet and top with the toppings of choice. Repeat with the rest of the marshmallows, and allow the chocolate to completely set before serving. (If you don’t eat the marshmallows immediately, layer the marshmallows between sheets of parchment or wax paper in an airtight container and store at room temperature in a cool/dry place. They will keep for about a week.)

Would you like to win a copy? The publishers of this book are offering ONE lucky reader of The Nifty Foodie a copy of “Sally’s Candy Addiction”!

To enter the giveaway, just use the Rafflecopter widget below.

a Rafflecopter giveaway

Note: This giveaway is supplied by the publisher and is open to readers in the continental US only. Entries will be accepted until October 20th, 2015 at 11:59pm (central standard time). Winner will be emailed (make sure you leave an email address in the form), and will have 48 hours to respond or another winner will be chosen.

Filed Under: Candy, Chocolate, Giveaways/Reviews

Mixed Conference Ticket Giveaway!

September 14, 2015 by Amy 3 Comments

Disclosure: The wonderful folks who coordinate Mixed Conference are hosting this giveaway. I purchased my ticket on my own. All opinions are 100% my own.

One of my favorite things about having a food blog is meeting others who have the same passion for cooking and baking as I do. I’ve attended two different food blog conferences before, and I feel like I’ve left each one with new friends and a new way to approach my blog. I usually try to attend one each year, and this year, I decided to attend Mixed.

mixed_logo

Image Source: Mixed

While I’ve never been to Mixed, I have read recaps and always wanted to go. However, it always seemed like the date conflicted with something, and I just couldn’t swing it. This year, the stars sort of aligned for me. Not only is it on a good weekend for me, but it’s also just outside of Houston (which makes it driving distance for me). I saw it as a sign and immediately purchased my ticket when registration opened. 🙂

I honestly can’t believe that it’s in less than three weeks! The conference will be taking place the weekend of October 2-4, 2015 at The Woodlands Conference Center and Resort.

The line-up of sessions (and speakers) sounds fantastic! There will be sessions on food styling, food photography, videography, Pinterest, working with brands, how to make your own backdrop boards and a demonstration on how to add flair to your desserts.

The schedule is jam-packed with great sessions, delicious meals (thanks to generous sponsors) and of course, plenty of opportunities to hang out with other food bloggers. 🙂

The amazing folks who are coordinating Mixed are offering ONE conference ticket to TWO fellow bloggers who read The Nifty Foodie! Each ticket is a $199 value. (Crazy generous, right?!)

The conference ticket includes:

  • admission to the sessions for the conference
  • meals during the conference
  • admission to conference parties/entertainment
  • SWAG bag!

Before entering, please make sure you are available to attend (October 2-4, 2015 at The Woodlands Resort & Conference Center in The Woodlands, Texas) and that you understand that this contest is just for the tickets to the conference. You are responsible for your travel, hotel accommodations and incidentals.

To enter the giveaway, check out the Rafflecopter widget below:

a Rafflecopter giveaway

Note: This giveaway is supplied by the folks who coordinate Mixed Conference and is open to readers in the continental US only. Entries will be accepted until September 20th, 2015 at 11:59am (central standard time). Must be 18 years of age or older to enter.
The conference ticket includes admission to the sessions for the conference, meals during the conference, admission to conference parties/entertainment and of course, a conference SWAG bag!
Please make sure you are available to attend (October 2-4, 2015 at The Woodlands Resort & Conference Center in The Woodlands, Texas) and that you understand this contest is just for the tickets to the conference. You are responsible for your travel, hotel accommodations and incidentals.
If you have already purchased a ticket for Mixed, you would not get a refund on your already purchased ticket. This is for those who haven’t purchased a ticket yet.
Winner will be emailed (make sure you leave an email address in the form), and will have 48 hours to respond or another winner will be chosen.


Filed Under: Conferences, Giveaways/Reviews

April Showers…and May Showers…

May 15, 2015 by Amy Leave a Comment

Disclosure: This post is sponsored by OXO. I received gardening tools, in exchange for a fair review on the blog. All opinions are 100% my own.

About a month ago, we took a weekend to basically spring-ify everything around the house. I cleaned out the beds, and planted annuals and vegetables/herbs. I also purchased a new blood orange tree. We have a whole mess of citrus trees in the backyard now. 🙂

Spring Gardening

I planted cherry tomatoes, bell peppers, poblano peppers, jalapeno peppers, and of course, basil. I’ve found over the years that these plants are no-fail for me. I wanted to plant green bean seeds, but I just haven’t found the time yet. It’ll happen soon, though! I love roasted green beans in the summer months.

In fact, since I planted everything a month ago, I haven’t done anything to the garden. We’ve had quite a bit of rain around here, and so I haven’t really gone in the backyard to give everything a closer look. Well, after rain, rain and more rain, I need to clean everything out again.

Thankfully, OXO sent me a fun package of outdoor gardening tools recently.

Spring Gardening

Included in the package was their trowel, plow, hand rake, outdoor pour & store watering can, cultivator, and bypass pruners.

…

Read More »

Filed Under: Gardening, Giveaways/Reviews

  • Go to page 1
  • Go to page 2
  • Go to page 3
  • Interim pages omitted …
  • Go to page 7
  • Go to Next Page »

Primary Sidebar

Hey Y’all!

Image Credit: Leslie Pendleton Photography


Hey y’all!

Thanks so much for reading! I’m Amy, and I live in south Louisiana with my husband and our rescue dog. I enjoy sharing my love for cooking, baking, crafts & more! Follow my daily adventures on social media!

Follow my Daily Adventures

  • Email
  • Facebook
  • Instagram
  • Pinterest
  • Twitter

Footer

  • Email
  • Facebook
  • Instagram
  • Pinterest
  • Twitter

Archives

Copyright © 2023 · Foodie Pro Theme by Shay Bocks · Built on the Genesis Framework · Powered by WordPress