• Skip to primary navigation
  • Skip to main content
  • Skip to primary sidebar
  • Skip to footer

The Nifty Foodie

  • Home
  • About
  • Recipes
    • Appetizers
    • Beverages
    • Breads/Muffins
    • Breakfast
    • Canning
    • Desserts
    • Dog Treats
    • Entertaining/Parties
    • Fruit
    • Holiday Recipes
    • Louisiana Cuisine
    • Main Dishes
    • Mexican
    • Nifty Foodie Original
    • Nifty Tricks
    • Project Food Blog
    • Pumpkin
    • Salads
    • Sauces/Dips
    • Side Dishes
    • Skinny
    • Slow Cooker
    • Spices
    • Stews/Soups
    • The Disasters
  • My Weight Loss Journey
    • Races
    • Running
    • Weight Loss Milestones
  • Crafts
  • Contact Me

Pasta/Rice

Beef Enchilada Rice Bake

December 9, 2015 by Amy 4 Comments

Disclaimer: I received a copy of Dinner for Two, in exchange for a fair and honest review. All opinions are 100% my own.

Beef Enchilada Rice Bake

House stuff is really starting to get hectic for us. With Christmas just around the corner, and this big move about to happen, I honestly just want to go home after work and be lazy. I don’t want to pack boxes or worry about cooking dinner. I just want to chill…I really miss my afternoon naps, y’all. 😛 Adult problems.

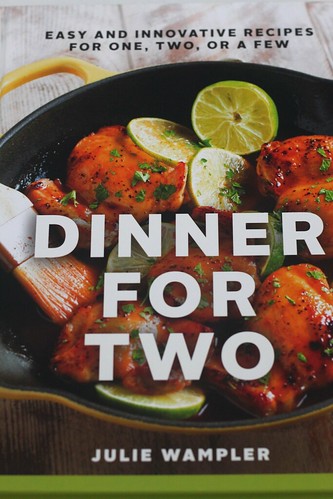
Since we alternate cooking nights with family that we live with, I’m always looking for something quick and easy to make after work. (It also has to taste good, of course.) I have quite a few go-to recipes, but I’m always looking for something different to add to my usual recipes. When I was offered to review Julie Wampler’s (of Table for Two) new book, Dinner for Two, I had to jump at the chance to give this book a try. Dinner for Two has 70 quick and easy dinner for two recipes (50 of which are dinner entrees and 20 are breakfast for dinner entrees). Quick and easy recipes…you had my attention, Julie. 🙂

Dinner for Two

I met Julie at Food Blog Forum in 2013, and ever since then, I’ve been a fan of her blog. She has gorgeous food photography, and she features a little bit of everything in her blog. One of the first recipes I tried from her blog was her Slow-Cooker Chicken Tikka Masala (which was delicious….I never blogged about it, but if y’all love chicken tikka masala, you have to try that recipe!).

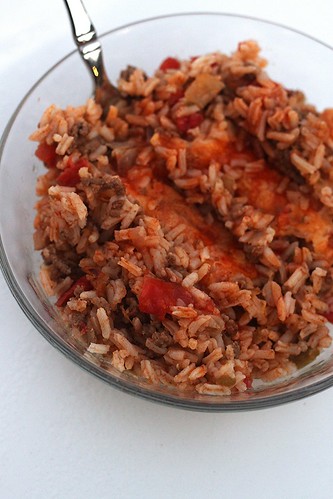
Once I received her book in the mail, I immediately put post-it flags all over this book…there’s so many great dinner ideas! The first recipe we tried was this Beef Enchilada Rice Bake, and y’all…this recipe was so easy to throw together. Since it calls for cooked rice, I had the rice cooking while I was prepping and cooking through the first couple of steps. The timing worked out perfectly for me, since our rice cooker has rice ready in about 15 minutes.

As far as taste goes, this dish was super flavorful, and since I used a medium heat Ro*Tel, it had a good kick to it, too. My husband is pretty particular about recipes too, and he told me to add this to the (recipe) list. That’s when you know the recipe is a winner! 🙂

After flipping through Dinner for Two a few times, this book would make a wonderful gift this holiday season (it’s under $20 on Amazon right now). It’s perfect for anyone looking for quick and easy dinner ideas. I love that this book revolves around portions for two people…it’s just my husband and I, and we don’t need a ridiculous amount of leftovers we end up with after making some of my go-tos.

If you want more of a sneak peek of the book and to check out the recipes other bloggers are making out of Dinner for Two, check out Julie’s Virtual Date Night-In!

Beef Enchilada Rice Bake
Source: Dinner for Two cookbook

Ingredients:
  • 2 tsp. vegetable oil
  • 1 medium onion, diced (about 3/4 cup)
  • 1 green bell pepper, diced (about 3/4 cup)
  • 1 garlic clove, finely minced
  • 1 tsp. ground cumin
  • 1 tsp. kosher salt
  • 1/2 tsp. ground black pepper
  • 1/2 lb. 80/20 ground beef
  • 1 (10 oz.) can diced tomatoes and green chiles (Ro*Tel), drained well
  • 2 cups cooked white rice
  • 1/2 cup red enchilada sauce, plus more for drizzling
  • 1 1/2 cups shredded mexican cheese
Directions:
  1. Preheat the oven to 375°F.
  2. In a large skillet, over medium-high heat, add the vegetable oil. Once the oil is heated, add the onion, green bell pepper and garlic. Saute the mixture for 5 minutes, stirring often. Stir in the cumin, salt and black pepper.
  3. Place the beef into the skillet and thoroughly cook the beef, breaking it up into pieces with a wooden spoon or spatula.
  4. Stir in the tomatoes/green chiles, and remove the skillet from heat. Add in the rice to the skillet, and stir everything together until everything is evenly distributed. Stir in the enchilada sauce, until just incorporated.
  5. Place the mixture into a 2.5 quart oven-safe casserole dish. Sprinkle the cheese evenly over the rice.
  6. Bake the casserole in the oven on the middle rack, uncovered, for 20 minutes.
  7. Carefully remove the casserole from the oven and drizzle on more enchilada sauce, if desired. Enjoy!

The generous publishers of Julie’s book want to offer one lucky reader of The Nifty Foodie a copy of Dinner for Two!

To enter for a chance to win a copy, use the Rafflecopter widget below:

a Rafflecopter giveaway

Note: This giveaway is supplied by the publisher and is open to readers in the continental US only. Entries will be accepted until December 16th, 2015 at 11:59pm (central standard time). Winner will be emailed (make sure you leave an email address in the form), and will have 48 hours to respond or another winner will be chosen.  

Filed Under: Beef, Mexican, Pasta/Rice, Review

One-Pot Cheesy Sausage Pasta

November 19, 2015 by Amy Leave a Comment

Cheesy Sausage Pasta

Since daylight savings time ended a couple of weeks ago, it seems like my evenings are flying by. It doesn’t help that it’s dark just after 5pm…it just mentally throws me off to where I feel behind, no matter what time I start cooking. So lately, I’m a fan of quicker meals.

I’m pretty sure I’ve made this dish at least a handful of times the past couple of months. It’s a quicker recipe, and you only need one (oven-safe pot) to make it happen. I didn’t think I’d really like this dish, but the combination of flavors and the subtle richness from the heavy cream, makes for a quick comfort food (perfect for weeknights).

You can also lighten the recipe up with a few adaptations. I sometimes substitute regular sausage with chicken or turkey sausage. I also have used whole wheat pasta with success. However, I haven’t messed with the heavy cream in the recipe. I feel like it’s such a small amount for the entire dish, and it just goes well with the cheese in the recipe to make for a wonderfully creamy dish.

One-Pot Cheesy Sausage Pasta
Source: mildly adapted from Kevin & Amanda, originally from America’s Test Kitchen

Ingredients:

  • 1 tbsp. canola oil
  • 1 lb. smoked sausage
  • 1 medium yellow onion, diced
  • 3 cloves garlic, grated or minced
  • 15 oz. can low-sodium chicken broth
  • 10 oz. can Rotel tomatoes and green chiles (mild or regular, depending on how spicy you want it)
  • 1/2 cup heavy cream
  • 8 oz. penne pasta
  • 1 tsp. cajun seasoning
  • 1 cup shredded monterey jack cheese
  • 1/3 cup thinly sliced green onions

Directions:

  1. Add the canola oil to an oven-safe large skillet over medium-high heat. Add the sausage and onions, and cook the mixture, stirring often until lightly browned, about 5 minutes. Add and stir in the garlic, and cook until fragrant (about 30 seconds).
  2. Add the chicken broth, tomatoes, cream, pasta and cajun seasoning to the mixture. Stir everything together well, and bring the mixture to a boil. Then, reduce the heat to medium-low and cover the skillet. Simmer the pasta until tender, about 15 minutes, uncovering and stirring every minute or so to make sure the mixture doesn’t stick to the bottom of the pan.
  3. Remove the skillet from the heat and stir in 1/2 cup of the shredded monterey jack cheese. Top the pasta with the remaining cheese, as well as the sliced green onions. Place the pan in the broiler (or at a super high heat, like 450°F), and broil the pasta until the cheese is melty and starting to brown. Enjoy!

Filed Under: Pasta/Rice, Pork/Ham/Bacon, Poultry

Chicken Pizzaiola with Mozzarella and Pepperoni

October 1, 2015 by Amy Leave a Comment

Chicken Pizzaiola

Since we moved out of our house and into where we temporarily live, I find that we’re cooking a lot more than usual. As much as I love cooking/baking, doing it on weeknights was always a chore. One of the last things I want to do after a busy work day is go straight to the kitchen and spend an hour or so cooking. So, I’ve been looking for recipes that are on the simpler side, but are still delicious and comforting.

When I cook, I usually go by what meat is on sale at the grocery store. The week I made this, chicken breasts were on serious sale. I’ve had this recipe bookmarked for a while, so I thought why not give this a try? I really wasn’t expecting much, since there weren’t that many ingredients. However, this was absolutely delicious! The parmesan and pepperoni flavored the chicken breasts so well, which is usually a challenge with boneless chicken breasts, and then topping it all off with mozzarella? Oh man…this recipe is definitely a keeper.

Chicken Pizzaiola with Mozzarella and Pepperoni
Source: America’s Test Kitchen (as seen on Pinch of Yum)

Ingredients:

  • 3 cups of spaghetti sauce
  • 1 cup shredded parmesan cheese
  • 4 boneless skinless chicken breasts
  • 1 cup shredded mozzarella cheese
  • 2 oz. sliced pepperoni
  • 8 oz. spaghetti
  • salt and pepper

Directions:

  1. For the chicken, preheat the oven to 450 degrees F. Evenly spread the tomato sauce into a 9×13 inch baking dish (one that can withstand higher oven temperatures). In another shallow dish, spread the parmesan cheese.
  2. Prepare the chicken by pounding the meat to an even thickness (don’t pound it thin, just make the thickness even) and pat the chicken dry with paper towels. Sprinkle some salt and pepper on the chicken and then coat with parmesan cheese. Lay the chicken on top of the spaghetti sauce and bake for 15 minutes.
  3. While the chicken is baking, bring 4 quarts of water to a boil in a large pot. Add the pasta, as well as a tbsp. of salt and cook the pasta (stirring often) until it’s al dente. Reserve 1/2 cup of cooking water, drain the pasta and return it to the pot.
  4. Once the chicken has finished baking for the 15 minutes, remove the chicken from the oven, and raise the oven temperature to 475 degrees. Place pepperoni slices over the chicken breasts and sprinkle the mozzarella sauce over the chicken. Bake the chicken for about another 5 minutes, until the cheese is melted.
  5. Add some spaghetti sauce from the baking dish into the pasta and toss well to combine. If necessary, add the reserved pasta cooking water as needed. Serve the pasta with chicken and the remaining sauce.


Filed Under: Pasta/Rice, Poultry

Skillet Baked Ziti

April 17, 2015 by Amy Leave a Comment

Skillet Baked Ziti

Even though I’m back to calorie counting, I just love a good, comforting meal sometimes. I try to limit my splurges to one splurge meal per week, eating something I normally wouldn’t want to admit to MyFitnessPal :-). I made this dish for the first time last fall, and I was shocked at how flavorful it was for being a fairly simple recipe. I ended up making two batches of this ziti, one for us and one for my dear friend, who had just had a baby. She and her husband absolutely loved the dish, as well and ended up asking for the recipe! I consider that the biggest compliment of all!

This dish is a dream for clean-up…you make everything in the skillet from start to finish. I ended up making this in a braiser pan, and it worked just fine. This also makes a good bit of food…we had leftovers for a couple of days between my husband and I (and we totally went for seconds the first night). It was SO good, and I shouldn’t be surprised…it was from America’s Test Kitchen, and also, one of my favorite bloggers, Pink Parsley, blogged about it before (which is where I originally read about the recipe first).

Skillet Baked Ziti

Skillet Baked Ziti
Source: Pink Parsley, originally from America’s Test Kitchen

Ingredients:

  • 1 lb. sweet or hot Italian sausage, casings removed
  • 6 cloves garlic, minced
  • 1/4 tsp. red pepper flakes
  • kosher salt and freshly ground black pepper
  • 1 (28-oz.) can crushed tomatoes
  • 3 cups water
  • 12 oz. ziti
  • 1/2 cup heavy cream
  • 3/4 cup Parmesan cheese
  • 1/4 cup chopped fresh basil
  • 4 oz. (about 1 cup) freshly grated mozzarella cheese

Directions:

  1. Preheat the oven to 475 degrees F. In a 12-inch oven-safe skillet (I used a 3 1/2 qt. braiser pan), brown the sausage over medium-high heat, breaking up the large pieces with a wooden spoon, until no longer pink (about 4 minutes). Stir in the garlic and red pepper flakes, cooking for about a minute (until fragrant). Add in the crushed tomatoes, as well as 1/2 tsp. of kosher salt. Reduce the heat to medium-low and simmer everything gently for 8-10 minutes.
  2. Add in the water and ziti, then carefully stir everything to combine. Cover the pan, increase the heat to medium, and cook at a simmer, stirring often for about 15-18 minutes, until the pasta is just tender/al dente in texture.
  3. Remove the mixture from heat, and stir in the cream, 1/2 cup of parmesan cheese, and 3 tbsp. of basil. Season with salt and pepper, to taste. Sprinkle in the mozzarella, as well as the remaining 1/4 cup of parmesan on top of the pasta. Transfer the pan to the oven, and bake until the cheese has melted/browned, and the sauce is bubbling (about 10-15 minutes). Before serving, sprinkle with the remaining tbsp. of basil. Enjoy!

Filed Under: Pasta/Rice, Pork/Ham/Bacon

Spinach Yogurt Pesto Pasta with Chicken

January 27, 2014 by Amy 17 Comments

spinachyogurtpesto

Thanks so much for your comments in my blogiversary post! It seems like quite a few of you would love more ideas for healthier dinners, and I’m happy to oblige! I’ve been meaning to get back into meal planning, and so here’s the start of more savory dishes on this blog. 🙂

This recipe is part of a virtual cooking party that Jessica of My Baking Heart is hosting, along with the folks at Stonyfield Yogurt. Ever since I started my weight loss journey, I’ve been slowly, but surely paying more attention to what I’m eating. One of my biggest struggles is with snacking, so I try to keep our fridge full of fresh fruits, vegetables, and greek yogurt. Greek yogurt is actually one of the easiest snacks for me, since I can just grab a container and go to town. Some fruits are grab and eat, too, but I find that greek yogurt is filling (seriously, check out how much protein is in greek yogurt!) and takes care of my sweet tooth. I recently noticed that Stonyfield has a greek yogurt line, and gave it a try. It was absolutely tasty, and a bonus–it’s organic!

I’ve recently become more aware of organic foods, and one thing that I found interesting is the difference between “natural” and “organic” on food labels (this is with the exception of meats). I always thought natural was a good thing, but not necessarily. For example, foods that may contain pesticides, growth hormones or GMO can still be labeled as “natural”, but it cannot be labeled as “organic”. It’s really interesting — here’s an infographic about it.

Besides just grabbing a container of yogurt to have as a snack, I really like using greek yogurt in my cooking and baking. Personally, I really don’t like mayonnaise. If a recipe calls for mayonnaise, I usually can replace it with plain greek yogurt (hello, chicken salad!). I also use it in baking, and I’ve noticed it works especially well in quick breads/muffins. This recipe uses greek yogurt to make pesto into a creamy sauce, and it works beautifully. The greek yogurt addition to the spinach pesto makes it seem more like a pesto alfredo sauce (without the added cream/butter). I decided to add some grilled chicken to the pasta, and it made for the perfect weeknight dinner. If you wanted, you could even make the spinach yogurt pesto sauce in advance (up to 3 days), and all you would need to do is grill the chicken and boil the pasta. Easy peasy!

Spinach Yogurt Pesto Pasta with Chicken
Source: adapted from My Baking Heart

Ingredients:

  • 3 boneless/skinless chicken breasts
  • 8 oz. organic Italian dressing
  • Cajun seasoning
  • 1 tbsp. canola oil
  • 4 cloves garlic, coarsely chopped
  • 1 1/2 cups baby spinach leaves
  • 3/4 cup tightly packed fresh basil leaves
  • 1/2 cup toasted pine nuts
  • 1 tbsp. fresh lemon juice
  • 1/2 tsp. lemon zest
  • 1/2 cup extra-virgin olive oil
  • 1/2 cup freshly-grated Parmesan cheese
  • 1/2 cup plain Stonyfield Greek yogurt
  • 3/4 tsp. kosher salt
  • 1/2 tsp. freshly-ground black pepper
  • 1 lb. organic whole wheat pasta

Directions:

  1. Marinate the chicken in the Italian dressing for 2-4 hours.
  2. Once the chicken has marinated, sprinkle Cajun seasoning over both sides of the chicken breasts. Preheat the oven to 350 degrees.
  3. Place 1 tbsp. canola oil in a cast iron skillet or grill pan, and wipe the oil with a paper towel to evenly distribute the oil over the surface of the pan. Preheat a cast iron skillet or grill pan over medium heat, until hot. Gently place the chicken on the cast iron skillet, and sear the chicken for 2-3 minutes on each side. Using oven mitts, place foil over the cast iron pan and then place the pan in the oven for 25-30 minutes, until the chicken is cooked all the way through.
  4. While the chicken is cooking in the oven, bring a large pot of salted water to a boil. While the water is coming to temperature, make the spinach yogurt pesto sauce. Place the garlic, spinach, basil, pine nuts, lemon juice & zest in the bowl of a food processor or blender and chop the mixture until everything is finely chopped. You may have to stop to scrape down the bowl a couple of times. Once the mixture is finely chopped, allow the processor or blender to run on low, and slowly add in the olive oil. Pour the mixture into a small bowl, and add in the Parmesan cheese and yogurt. Season the pesto with salt and pepper. Cover the pesto with plastic wrap and refrigerate.
  5. By now, the pot of water should be boiling. Add in your pasta, and cook the pasta until al dente (following the directions on the box for your specific pasta). Before draining the pasta, reserve 1/2 cup of the pasta water. Then, drain the pasta and return the pasta to the pot, tossing in the pesto sauce. If the pasta appears to be too dry, add in the reserved pasta water, 1 tbsp. at a time.
  6. To serve, place some pesto pasta on a plate, slice up 1/2 of a chicken breast and place that on top. Garnish the dish with either some lemon zest or Parmesan cheese. (Serves 6.)

Since this is a virtual cooking party, there are 5 other bloggers who made this dish as well, putting their own unique spins on the recipe. Don’t they all sound delicious?

My Baking Heart – Garlicky Shrimp & Pasta with Spinach Yogurt Pesto
Kasey’s Kitchen – Spinach Yogurt Pesto Pasta over Chicken Milanese
Apple a Day – Penne with Spinach Yogurt Pesto, White Beans & Tomatoes
Mrs. Regueiro’s Plate – Spinach Yogurt Pesto Pasta with Sausages
Sunny Side Up – Chicken and Spinach Yogurt Pesto Pasta

Also, it wouldn’t be much of a party without something fun for you guys, right?

The generous folks at Stonyfield want to offer one lucky reader of The Nifty Foodie a case of their yogurt and a cookbook!

It’s a giveaway prize that would definitely get me excited about cooking with yogurt (or hey, I wouldn’t blame you if you want the yogurt to snack on…have you seen the new Cafe Latte flavor? I feel like I NEED to find it in my store to try it!)

To enter, use the Rafflecopter widget below:

a Rafflecopter giveaway

Note: This giveaway is sponsored by Stonyfield and is open to readers in the continental US only. Entries will be accepted until February 4th at 12:00am (central standard time). Winner will be emailed (make sure you leave an email address in the form), and will have 48 hours to respond or another winner will be chosen.

DISCLOSURE: Stonyfield supplied me with free products in exchange for a post in the Virtual Cooking Party, as well as the prize being offered in the giveaway. All opinions are 100% my own.

Filed Under: Giveaways/Reviews, Main Dishes, Pasta/Rice, Poultry, Skinny

Crawfish Fettuccine

May 22, 2012 by Amy 3 Comments

Crawfish Fettuccine

My husband is not a big pasta person. He could eat rice for days, but pasta? He has to be in the mood for it. I’m the opposite. If you told me I had to eat pasta every day for the rest of my life, I would think I died and went to heaven. I LOVE pasta. I’m all about it. So, when crawfish went on sale on weekend, instead of making the usual etouffee, I hoped that my husband would be in a pasta-loving mood that day, because crawfish fettuccine was on my mind. 🙂

Well, as you can see, we had crawfish fettuccine that evening. 😛 And it was every bit as delicious as I had hoped. We ended up halving the recipe, since the original recipe would make way too much food for just my husband and I.

I do want to note that this recipe does contain Velveeta. If you aren’t OK with using processed foods, you may be able to substitute freshly grated cheese, since this recipe’s directions reminded me a lot of making a bechamel sauce. However, I personally didn’t try that to tell you if it works out the same way.

Crawfish Fettuccine
Source: adapted from Holly Clegg

Ingredients:

  • 1/2 lb. fettuccine
  • 2 tbsp. butter
  • 1 small onion, finely chopped
  • 1 green bell pepper, seeded and chopped
  • 2 cloves garlic
  • 2 tbsp. all-purpose flour
  • 3/4 cup skim milk
  • 1 lb. light Velveeta, cut into small cubes
  • 1 lb. crawfish tails (make sure they are cleaned)
  • 1 tbsp. chopped parsley
  • 1/4 cup green onions, chopped
  • 1 1/2 tsp. worcestershire sauce
  • pinch cayenne pepper

Directions:

  1. Cook the fettuccine in boiling water until al dente. Do not add oil or salt to the pot. Drain the pasta, wash in cool water to make sure the pasta doesn’t stick together as it sits, and set aside.
  2. In a large pot, melt the butter and saute the onions, green bell peppers, and garlic until translucent and tender. Add the flour and stir well until everything is mixed.
  3. Gradually add the milk, stirring at the same time, until the mixture is smooth. Add the cheese cubes, stirring the sauce until all of the cheese has melted.
  4. Add in the crawfish tails, parsley, green onions, worcestershire sauce and cayenne pepper and mix everything together gently.
  5. Add in the pasta, and using tongs, toss everything together until well-combined. Heat the fettuccine well and serve.

Filed Under: Louisiana Cuisine, Pasta/Rice, Seafood

Top 10 Recipes of 2011

December 29, 2011 by Amy 6 Comments

Am I the only person who is shocked that Christmas just passed? I can’t believe it. Neighbors are taking down lights, and our tree looks SO empty without gifts under it. My favorite holiday is over, and crazy enough, it’s time for a new year. 2012.

Time to take the shrink wrap off of the new planner and get used to writing “2012” on papers/emails/etc. This is just crazy.

Also crazy…sometime in 2012, my 4 year blogiversary is happening and my 3 year wedding anniversary is happening too. WHAT?

It’s a lot to look forward to, but before everyone rings in the new year, I just wanted to share with y’all the top 10 posts of 2011. 🙂

Yellow Cupcakes w/ Strawberry Swiss Meringue Buttercream

10. Strawberry Swiss Meringue Buttercream – This was my first time making SMBC, and I swear, if you haven’t tried SMBC before, just do it. Please?

Pecan Pie Macarons

9. Pecan Pie Macarons – Gotta love macarons. These were really a huge favorite for Thanksgiving, and the star shape (which was a happy accident) made them super cute and festive!

Queso Blanco

8. Restaurant Style Queso Blanco – This is it. The ultimate queso blanco. If you’re as addicted to queso as me, you’d understand how wonderful it is to FINALLY have a recipe for this!

Strawberry Cream Cake

7. Strawberry Cream Cake – I’m actually glad I compiled this top 10, because I sort of forgot about this cake. Since it’s currently strawberry season in Louisiana, I think I MUST make this cake again. Yum!

Peppermint Bark Cheesecake Truffles

6. Peppermint Bark Cheesecake Truffles – This is the recipe that made my year, basically. I still can’t believe I won that recipe contest, and I’ve been told by a few friends who made this that these little truffles were a hit at their holiday parties! So happy to hear that!

Banana Nutella "Ice Cream"

5. Banana Nutella “Ice Cream” – Two ingredient “ice cream”. It’s basically awesome and couldn’t be any easier. Your food processor does all the work!

Corn Grits

4. Grilled Corn Grits – I can’t be from the South, and not have a post about grits. I promise you if you make this, your hips may never be the same again, but your taste buds will tell you it’s completely worth it!

3. Easy Pasta Salad – My first (and so far, only) vlog. I might get the courage to make one again, since you guys seemed to like it so much!

Diet Cupcakes

2. Cooking For Kids – The infamous post. Yup, who’da thought that a soda cupcake would get so much response from you guys (both good and bad)…yikes!

Homemade S'mores

1. S’mores for a Shower – Nutella S’mores. I can see why you guys loved this one so much. I’m sort of craving s’mores right now, actually. 😛

I hope you have a wonderful New Year with your family and friends, and thank you so much for reading The Nifty Foodie! See y’all in 2012!

Filed Under: Cakes/Cupcakes, Candy, Chocolate, Cookies, Frozen Desserts, Fruit, Other, Pasta/Rice, Sauces/Dips, Side Dishes

Light Chicken Parmesan

August 26, 2010 by Amy 6 Comments

Light Chicken Parm

It’s very rare that we go out for Italian food. While I absolutely LOVE Italian cuisine, the hubs isn’t a really huge fan and totally has to be in the right mood for it. When I was thinking of a new recipe to try in the house, I thought, well, why not make the hubs’ favorite dish: chicken parmesan?

However, I really despise frying. Everytime I try to fry something, I can’t quite control the oil and it either ends up undercooked or burnt. Plus, I end up burnt too from the oil splatters..it’s a crappy situation. Oh yeah, and since I’m trying to lose weight, well, frying isn’t in my vocabulary for the moment.

So, I found a Cooks Illustrated recipe, which really has never steered me wrong when it comes to baking food dishes that are traditionally fried, and I tried this. It really didn’t take that long to throw together, and the hubs really enjoyed it. Yay!

Lighter Chicken Parmesan
Source: Cooks Illustrated 

Ingredients:

  • 1 1/2 cups panko (Japanese-style bread crumbs)
  • 1 tablespoon olive oil
  • 1 ounce grated Parmesan cheese (about 1/2 cup), plus extra for serving
  • 1/2 cup unbleached all-purpose flour
  • 1 1/2 teaspoons garlic powder
  • Table salt and ground black pepper
  • 3 large egg whites
  • 1 tablespoon water
  • Vegetable cooking spray
  • 3 large boneless, skinless chicken breasts (about 8 ounces each), trimmed of excess fat and sliced into cutlets
  • 2 cups tomato sauce , warmed (see below)
  • 3 ounces shredded part-skim mozzarella cheese (about 3/4 cup)
  • 1 tablespoon minced fresh basil

Tomato Sauce

  • 1 (28-ounce) can diced tomatoes
  • 4 medium cloves garlic , minced or pressed through a garlic press (about 4 teaspoons)
  • 1 tablespoon tomato paste
  • 1 teaspoon olive oil
  • 1/8 teaspoon red pepper flakes
  • 1 tablespoon minced fresh basil leaves
  • Table salt and ground black pepper

Directions:

  1. Pulse the tomatoes in a food processor until mostly smooth, about ten 1-second pulses; set aside. Cook the garlic, tomato paste, oil, and pepper flakes in a medium saucepan over medium heat until the tomato paste begins to brown, about 2 minutes. Stir in the pureed tomatoes and cook until the sauce is thickened and measures 2 cups, about 20 minutes. Off the heat, stir in the basil and season with salt and pepper to taste. Cover and set aside until needed.
  2. Adjust an oven rack to the middle position and heat the oven to 475 degrees. Combine the bread crumbs and oil in a 12-inch skillet and toast over medium heat, stirring often, until golden, about 10 minutes. Spread the bread crumbs in a shallow dish and cool slightly; when cool, stir in the Parmesan.
  3. In a second shallow dish, combine the flour, garlic powder, 1 tablespoon salt, and 1/2 teaspoon pepper together. In a third shallow dish, whisk the egg whites and water together.
  4. Line a rimmed baking sheet with foil, place a wire rack on top, and spray the rack with vegetable oil spray. Pat the chicken dry with paper towels, then season with salt and pepper. Lightly dredge the cutlets in the flour, shaking off the excess, then dip into the egg whites, and finally coat with the bread crumbs, Press on the bread crumbs to make sure they adhere. Lay the chicken on the wire rack.
  5. Spray the tops of the chicken with vegetable oil spray. Bake until the meat is no longer pink in the center and feels firm when pressed with a finger, about 15 minutes.

Filed Under: Pasta/Rice, Poultry

Foodbuzz 24×24: The Best Things We Ever Ate

June 27, 2010 by Amy 15 Comments

IMG_1943

Summer officially started last Monday. However, being in Louisiana, we’ve been feeling summer-like weather since May. With the heat index hitting 110 degrees sometimes, we wanted to throw a summer party that was most definitely indoors!

I watch entirely too much Food Network. If it wasn’t for Food Network and reading food blogs, I’m fairly certain my husband and I would be living off of Hamburger Helper and take-out. One of my favorite shows lately has been The Best Thing I Ever Ate. Every show has a theme, and it features the cooks/hosts on Food Network and their favorite eats in that theme. So, when Foodbuzz emailed about this month’s 24×24 proposals, I figured it would be a fun party to feature the best things our families have eaten! Thanks so much to Foodbuzz for sponsoring this party! 🙂

To come up with the menu, I sent out an email to our families asking for their favorites in each category.

  • On the Grill (recipes that are done on the BBQ)
  • Dangerously Cheesy (major cheese in a dish)
  • No Utensils (finger foods/apps)
  • Keep it Comfy (comfort food)
  • Frozen Treats (any dessert from the freezer)
  • Mix it Up (a food that requires using a mixer—doesn’t have to be a sweet)
  • Louisiana’s Best (Louisiana food)
  • Cold and Colorful (like a salad or cold app with lots of veggies or fruit)
  • Under the Sea (favorite seafood dish)
  • Classic American (with 4th of July approaching, tell me a dish that screams American)

After getting many responses, here is the menu we came up with:

Drinks:
Strawberry Lemonade
Strawberry Daiquiris

Appetizers:
Cheese Fondue with Vegetables/Bread*
Bruschetta*
Boudin Balls

Entrees:
Steak Skewers with Chimichurri, Onion Cheese Sauce and Compound Butter*
Spicy BBQ Shrimp Skewers*

Sides:
Crawfish Fettuccine
Macaroni and Cheese
Vegetable Skewers*
Grilled Corn
Lettuce Greens with Honey Lime Vinaigrette

Desserts:
Strawberry Cake*
Assorted Cupcakes
Cinnamon Crumb Apple Pie
Fresh Berries with Ice Cream

* recipes will be featured in the blog in future posts

I will admit, I’m still getting the hang of entertaining for a large number of people. Despite doing a lot of prep, I felt fairly stressed in the last hour. Since the party was for family, though, I had loads of help at the last minute. 🙂 Whew!

The fondue was an absolute hit. I was nervous to make this myself, but this recipe came together beautifully! I served the fondue with day old po’boy bread, carrots and broccoli.

IMG_1962

We purchased the boudin balls at a local joint, since they are pretty much my husband’s favorite. The bruschetta was a lighter alternative to the other appetizers. I was super excited to use basil from our garden for this dish!

Appetizers

I need to thank the hubs for braving the sweltering disgusting heat to cook up this magic on the grill. The steak, especially was a real winner to family!

kabobs

We made 3 sauces available for people to dip/cover their skewers in: a chimichurri, onion blue cheese (not pictured) and a worchestershire chive butter. The chimichurri ended up being a huge hit (and I used parsley from the garden for it)!

Steak Butter/Chimichurri

Here is some lovely grilled corn that survived a few flare-ups on the grill. 🙂

Grilled Corn

Here is a semi-decent picture of the crawfish fettuccine before everyone digged in. The hubs’ parents made this dish and it was delicious. Perfect flavor with a little Louisiana kick!

Crawfish Fettucine

This is some macaroni and cheese that is my mother-in-law’s favorite. It was definitely pretty tasty (not to mention, cheesy). 🙂

Mac and Cheese

After enjoying some serious eats, we waited a good while before putting out desserts and just chatted, watched TV and played some games.

I will say the desserts were absolutely amazing.

Fresh berries (and ice cream, not pictured)

berries

Strawberry Cake (inspired by a local bakery). I would have just purchased one, but I had no idea an 8″ cake was over $30. What the heck?! I guess I’m just used to baking my own cakes to realize how expensive cakes have gotten!

Strawberry Cake

This was a welcomed surprise. A local cupcake bakery occasionally has giveaways on Twitter, and I won some cupcakes! They were seriously delish! Thank you Sweet Wishes Cafe!

Cupcakes

Here is the cinnamon crumb apple pie. This is one of those frozen pies you can find in the grocery store, but has quickly become a favorite with my hubs’ family.

apple pie

Of course, our puppy was very excited to get all of the attention she got at the party, and thanks to my mom, she tried a piece of steak for the first time. I think she enjoyed it. 🙂

IMG_1965

And of course, it wouldn’t be a party without family! Here are some pictures of our family.

Mom and Sis

family

IMG_1974

It was a great time to be had by everyone, especially in the milder indoors. Thank you so much to Foodbuzz again for the party! Everyone had a blast! 🙂

Filed Under: Appetizers, Beef, Cakes/Cupcakes, Entertaining/Parties, Frozen Desserts, Fruit, Louisiana Cuisine, Pasta/Rice, Pies, Sauces/Dips, Seafood, Side Dishes

Spaghetti and (Turkey) Meatballs

September 23, 2009 by Amy 1 Comment

spaghetti

I love meatballs and spaghetti. It’s one of my childhood favorites, but it’s not a regular on the dinner menu since I’m a huge pasta lover and it’s not exactly diet friendly. I was thawing ground turkey with absolutely NO idea on what to make. I wasn’t in the mood for burgers or tacos, so my husband brought up meatballs and spaghetti. Since he’s not much of a pasta fan, this was a surprise to me, but man, hearing that brought on a huge craving. I had to make it!

I’m all about shortcuts on a weeknight, so I bought canned marinara. I mixed Classico’s Cabernet Marinara with Target brand’s Three Cheese and just spiced it from there.  For the pasta, we used Ronzoni’s Smart Taste pasta.

As far as meatballs go, here is my recipe, which is a definite winner…even my husband loved them! I adapted it from a recipe I found on Aimee’s Adventures, which is a W/W friendly recipe website, and it came out wonderful!

Turkey Meatballs
adapted from Aimee’s Adventures

Ingredients:

  • 1 lb. ground turkey breast
  • 1/2 cup italian breadcrumbs
  • 1/4 cup grated Parmesan cheese
  • 1/4 cup chopped fresh parsley
  • 1/4 cup finely diced onion
  • 2 garlic cloves, minced
  • 1 egg
  • 1/2 tsp salt
  • 1/4 tsp pepper

Directions:

  1. Preheat oven to 350 degrees.
  2. Place all ingredients in a large bowl and mix together. Form into appx. 1 inch balls and place on a baking sheet.
  3. Bake for 18-20 minutes or until fully cooked.

The Skinny – per meatball, Makes 22-24 meatballs (calculated at 22 meatballs)

Calories: 50.2
Fat:  2.6 g
Fiber: 0.1 g

Filed Under: Pasta/Rice, Poultry, Skinny

  • Go to page 1
  • Go to page 2
  • Go to Next Page »

Primary Sidebar

Hey Y’all!

Image Credit: Leslie Pendleton Photography


Hey y’all!

Thanks so much for reading! I’m Amy, and I live in south Louisiana with my husband and our rescue dog. I enjoy sharing my love for cooking, baking, crafts & more! Follow my daily adventures on social media!

Follow my Daily Adventures

  • Email
  • Facebook
  • Instagram
  • Pinterest
  • Twitter

Footer

  • Email
  • Facebook
  • Instagram
  • Pinterest
  • Twitter

Archives

Copyright © 2025 · Foodie Pro Theme by Shay Bocks · Built on the Genesis Framework · Powered by WordPress