• Skip to primary navigation
  • Skip to main content
  • Skip to primary sidebar
  • Skip to footer

The Nifty Foodie

  • Home
  • About
  • Recipes
    • Appetizers
    • Beverages
    • Breads/Muffins
    • Breakfast
    • Canning
    • Desserts
    • Dog Treats
    • Entertaining/Parties
    • Fruit
    • Holiday Recipes
    • Louisiana Cuisine
    • Main Dishes
    • Mexican
    • Nifty Foodie Original
    • Nifty Tricks
    • Project Food Blog
    • Pumpkin
    • Salads
    • Sauces/Dips
    • Side Dishes
    • Skinny
    • Slow Cooker
    • Spices
    • Stews/Soups
    • The Disasters
  • My Weight Loss Journey
    • Races
    • Running
    • Weight Loss Milestones
  • Crafts
  • Contact Me

Skinny

Roasted Cauliflower

March 19, 2014 by Amy 2 Comments

Untitled

I love my job. I’ve been making maps for almost 7 years now, and while it’s a small little niche to be in, I just love it. At first when I entered this field, I was scared out of my mind. I was no longer a student, which I was very comfortable with since I had been one for 18 years. I remember my first day at my first “real world” job. While I took classes to prepare me for my job, I was afraid that all of my college years were a lie. I’d walk into my job and be completely lost. Those first few days were pretty darn nerve-wracking and sort of embarrassing. I’d ask my boss all the time…um, how do you do this? (feeling completely stupid) However, my boss was super patient and had no issues reminding me about a certain tool in the software or what this acronym meant, etc…..and for that, I’m super thankful. I loved my first job…loved it, but since an hour plus commute/day wouldn’t be fun once I moved to where my (now) husband lived, I had to leave it. It just made sense. I won’t go into why I left my job before this one, but I’ll just say I’m super thankful that I found a new job where I can still work in the field that I enjoy.

Now that I’ve been doing this for quite a few years, while I don’t know it all (honestly, in my tech-y map field, not many people, with the exception of the software developers, do), I feel like I know a good bit. I will admit that I had a good bit of nerves walking into this new job on day 1, but I feel like I’m getting the hang of things here with a lot more ease versus previous jobs. The software I worked in never changed….just the work type and the standards. I feel a sense of belonging when I’m asked if I know how to do this in the software, and I can say “yes”. While I’m still very much the new person, and I still have a lot to learn, I feel like the transition hasn’t been too too bad. 🙂 I finally feel comfortable working in my field, just like I was comfortable being a student back in college. 🙂

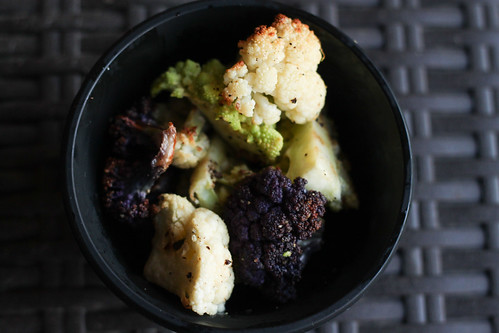
Now, I know roasted cauliflower isn’t comfort food…at all. However, when it came to cooking plain vegetables, I usually steamed them. It’s what I thought was the only way to prepare vegetables in a healthy way, and well, it never crossed my mind to roast vegetables, but after reading multiple blogs where everyone was like YES…MUST TRY ::insert veggie name:: ROASTED. It was new to me, like say…a new job? (Heehee…trying to link stories here, but failing miserably.) Anyway, roasted is my favorite way to prepare most vegetables now. This is one of those posts where a recipe isn’t really needed, but I’m gonna share it anyway. It’s a technique worth trying! I love the roasted flavor of veggies, and I’ve done this with cauliflower, broccoli, sweet potatoes (cut in chunks) and fresh green beans, to name a few. I recently got another fun shipment of produce from Frieda’s Produce, and included in the shipment was cauliflower (white and purple) and romanesco (sort of a greenish cauliflower, but different shape). I just had to roast it up to see how pretty it would all turn out. 🙂

If you roast different quantities of vegetables from time to time, you will want to adjust the oil and spices accordingly. It’s not an exact science by any means….I use just enough oil to coat the veggies and sort of gauge out the spices as I see fit. 🙂

Roasted Cauliflower
Source: adapted from Simply Recipes

Ingredients:

  • 1 head of cauliflower, broken up into florets
  • 1 tsp. garlic powder (adjust this based on the amount of vegetables)
  • olive oil
  • coarse salt and freshly ground pepper

Directions:

  1. Preheat the oven to 400 degrees F. Place the cauliflower florets in an oven-proof baking pan or dish, and spread them into an even, single layer. Sprinkle the garlic powder evenly over the cauliflower, as well as the salt and pepper. Drizzle the vegetables with olive oil and toss to coat the cauliflower evenly in spices and oil.
  2. Once the oven has reached temperature, place the baking pan/dish in the oven and roast the vegetables, uncovered, for 25-30 minutes, until the tops of the vegetables are just turning brown. Enjoy!

Disclosure: The cauliflower and romanesco were sent at no cost to me by Frieda’s Produce.

Filed Under: Side Dishes, Skinny

Spinach Yogurt Pesto Pasta with Chicken

January 27, 2014 by Amy 17 Comments

spinachyogurtpesto

Thanks so much for your comments in my blogiversary post! It seems like quite a few of you would love more ideas for healthier dinners, and I’m happy to oblige! I’ve been meaning to get back into meal planning, and so here’s the start of more savory dishes on this blog. 🙂

This recipe is part of a virtual cooking party that Jessica of My Baking Heart is hosting, along with the folks at Stonyfield Yogurt. Ever since I started my weight loss journey, I’ve been slowly, but surely paying more attention to what I’m eating. One of my biggest struggles is with snacking, so I try to keep our fridge full of fresh fruits, vegetables, and greek yogurt. Greek yogurt is actually one of the easiest snacks for me, since I can just grab a container and go to town. Some fruits are grab and eat, too, but I find that greek yogurt is filling (seriously, check out how much protein is in greek yogurt!) and takes care of my sweet tooth. I recently noticed that Stonyfield has a greek yogurt line, and gave it a try. It was absolutely tasty, and a bonus–it’s organic!

I’ve recently become more aware of organic foods, and one thing that I found interesting is the difference between “natural” and “organic” on food labels (this is with the exception of meats). I always thought natural was a good thing, but not necessarily. For example, foods that may contain pesticides, growth hormones or GMO can still be labeled as “natural”, but it cannot be labeled as “organic”. It’s really interesting — here’s an infographic about it.

Besides just grabbing a container of yogurt to have as a snack, I really like using greek yogurt in my cooking and baking. Personally, I really don’t like mayonnaise. If a recipe calls for mayonnaise, I usually can replace it with plain greek yogurt (hello, chicken salad!). I also use it in baking, and I’ve noticed it works especially well in quick breads/muffins. This recipe uses greek yogurt to make pesto into a creamy sauce, and it works beautifully. The greek yogurt addition to the spinach pesto makes it seem more like a pesto alfredo sauce (without the added cream/butter). I decided to add some grilled chicken to the pasta, and it made for the perfect weeknight dinner. If you wanted, you could even make the spinach yogurt pesto sauce in advance (up to 3 days), and all you would need to do is grill the chicken and boil the pasta. Easy peasy!

Spinach Yogurt Pesto Pasta with Chicken
Source: adapted from My Baking Heart

Ingredients:

  • 3 boneless/skinless chicken breasts
  • 8 oz. organic Italian dressing
  • Cajun seasoning
  • 1 tbsp. canola oil
  • 4 cloves garlic, coarsely chopped
  • 1 1/2 cups baby spinach leaves
  • 3/4 cup tightly packed fresh basil leaves
  • 1/2 cup toasted pine nuts
  • 1 tbsp. fresh lemon juice
  • 1/2 tsp. lemon zest
  • 1/2 cup extra-virgin olive oil
  • 1/2 cup freshly-grated Parmesan cheese
  • 1/2 cup plain Stonyfield Greek yogurt
  • 3/4 tsp. kosher salt
  • 1/2 tsp. freshly-ground black pepper
  • 1 lb. organic whole wheat pasta

Directions:

  1. Marinate the chicken in the Italian dressing for 2-4 hours.
  2. Once the chicken has marinated, sprinkle Cajun seasoning over both sides of the chicken breasts. Preheat the oven to 350 degrees.
  3. Place 1 tbsp. canola oil in a cast iron skillet or grill pan, and wipe the oil with a paper towel to evenly distribute the oil over the surface of the pan. Preheat a cast iron skillet or grill pan over medium heat, until hot. Gently place the chicken on the cast iron skillet, and sear the chicken for 2-3 minutes on each side. Using oven mitts, place foil over the cast iron pan and then place the pan in the oven for 25-30 minutes, until the chicken is cooked all the way through.
  4. While the chicken is cooking in the oven, bring a large pot of salted water to a boil. While the water is coming to temperature, make the spinach yogurt pesto sauce. Place the garlic, spinach, basil, pine nuts, lemon juice & zest in the bowl of a food processor or blender and chop the mixture until everything is finely chopped. You may have to stop to scrape down the bowl a couple of times. Once the mixture is finely chopped, allow the processor or blender to run on low, and slowly add in the olive oil. Pour the mixture into a small bowl, and add in the Parmesan cheese and yogurt. Season the pesto with salt and pepper. Cover the pesto with plastic wrap and refrigerate.
  5. By now, the pot of water should be boiling. Add in your pasta, and cook the pasta until al dente (following the directions on the box for your specific pasta). Before draining the pasta, reserve 1/2 cup of the pasta water. Then, drain the pasta and return the pasta to the pot, tossing in the pesto sauce. If the pasta appears to be too dry, add in the reserved pasta water, 1 tbsp. at a time.
  6. To serve, place some pesto pasta on a plate, slice up 1/2 of a chicken breast and place that on top. Garnish the dish with either some lemon zest or Parmesan cheese. (Serves 6.)

Since this is a virtual cooking party, there are 5 other bloggers who made this dish as well, putting their own unique spins on the recipe. Don’t they all sound delicious?

My Baking Heart – Garlicky Shrimp & Pasta with Spinach Yogurt Pesto
Kasey’s Kitchen – Spinach Yogurt Pesto Pasta over Chicken Milanese
Apple a Day – Penne with Spinach Yogurt Pesto, White Beans & Tomatoes
Mrs. Regueiro’s Plate – Spinach Yogurt Pesto Pasta with Sausages
Sunny Side Up – Chicken and Spinach Yogurt Pesto Pasta

Also, it wouldn’t be much of a party without something fun for you guys, right?

The generous folks at Stonyfield want to offer one lucky reader of The Nifty Foodie a case of their yogurt and a cookbook!

It’s a giveaway prize that would definitely get me excited about cooking with yogurt (or hey, I wouldn’t blame you if you want the yogurt to snack on…have you seen the new Cafe Latte flavor? I feel like I NEED to find it in my store to try it!)

To enter, use the Rafflecopter widget below:

a Rafflecopter giveaway

Note: This giveaway is sponsored by Stonyfield and is open to readers in the continental US only. Entries will be accepted until February 4th at 12:00am (central standard time). Winner will be emailed (make sure you leave an email address in the form), and will have 48 hours to respond or another winner will be chosen.

DISCLOSURE: Stonyfield supplied me with free products in exchange for a post in the Virtual Cooking Party, as well as the prize being offered in the giveaway. All opinions are 100% my own.

Filed Under: Giveaways/Reviews, Main Dishes, Pasta/Rice, Poultry, Skinny

Pumpkin Apple Cranberry Baked Oatmeal

October 11, 2013 by Amy 6 Comments

Pumpkin, Apple, Cranberry Baked Oatmeal

Life is such a roller coaster. A couple of months ago, lightning hit our house and turned so much of our lives upside down. Then, we had some really terrible news in our family that just made me question how much worse things can get. (Don’t do that, by the way.) It was tough not to cry at random times, which was so embarrassing when it happened at work (especially since I work with guys, which was probably super uncomfortable for them…ahh, tech field). I tried to use the allergy excuse, but they knew what was going on. Things were just broken….our house, our hearts…I really had no idea when good things would happen again, but that was the only thing that kept me going. Good things had to come for us. Soon.

Now, we’re painting new sheet rock in our house. The house that we could have completely lost, but we didn’t. As tedious as painting is, I appreciate that we have walls to paint. We pulled out Halloween decorations, which were right next to where the fire started. I can’t look at the attic the same way again, but taking out these goofy decorations make me realize that we’re very lucky right now. We’re doing normal things again, like planting fall flowers, cutting grass that is still growing like a weed and loading dishes in the dishwasher. While those tasks aren’t really super fun, I take a step back and think that I didn’t have to replace those plates that I’m rinsing out, I didn’t have to walk through a house full of water/smoke/fire damage and just think about everything we lost. I’ve had those nightmares lately….multiple times, and waking up in my bed makes me smile and count my blessings.

We’re so lucky. I’m so lucky that I can blog about this baked oatmeal. I’m sitting in our living room, blogging, staring at my sofa full of clean clothes that I’ve yet to fold, and watching my dog attempt to steal a sock from the pile to rip to shreds. I’m so lucky.

Now, this baked oatmeal is simply fall. When it was baking in our kitchen, it just smelled amazing. Pumpkin, apples, cranberry, cinnamon….it’s a perfect fall breakfast. This is one of those dishes that make you want to curl up in a blanket, sip on a cup of coffee and just embrace the season.

Pumpkin Apple Cranberry Baked Oatmeal
Source: adapted from My Kitchen Addiction

Ingredients:

  • 2 1/4 cups old fashioned oats
  • 1/3 cup light brown sugar, packed
  • 1 tsp. cinnamon
  • 1/4 tsp. salt
  • 1 tsp. baking powder
  • 1/2 cup dried cranberries
  • 1 1/2 cups milk
  • 1/2 cup pumpkin puree
  • 1 1/2 tbsp. unsalted butter, melted & cooled
  • 1 large egg
  • 1 teaspoon vanilla extract
  • 1 medium apple, cored and cubed

Directions:

  1. Preheat the oven to 375 degrees F. Line an 8×8 inch baking pan with parchment paper or spray the inside with cooking spray and set aside.
  2. In a large bowl, add the oatmeal, brown sugar, cinnamon, salt, baking powder and dried cranberries, and stir everything until combined. In another bowl, add the milk, pumpkin, melted butter, egg and vanilla, and whisk the mixture well.
  3. Add the wet mixture, as well as the chopped apples, to the dry mixture and stir until thoroughly combined. Pour the mixture into the baking pan, and spread the mixture evenly in the pan. Bake the oatmeal for 20-25 minutes, or until the top is golden and the liquid is absorbed.

Filed Under: Breakfast, Fruit, Pumpkin, Skinny

My first Vlog entry: Easy Pasta Salad!

March 12, 2011 by Amy 16 Comments

You may not know this, but in real life, I’m a fairly shy person. I love blogging because my voice comes across in my writing, however, the subject of vlogging has always made me nervous.

I will say, though, I really do love watching vlogs from bloggers I’ve followed for a while. I always have an idea in my head about how people’s voices sound, and usually I’m wrong. It’s always a fun surprise to actually hear a blogger for the first time, you know?

Well, I definitely had to bite the bullet when Foodbuzz informed me that a recipe idea I submitted for their Tastemaker’s Program was accepted! The criteria was to make a vlog featuring my simple (30 minute or less) recipe that uses Newman’s Own products. I couldn’t believe it when I saw the package at my door!! It included quite a few salad dressings, pasta sauces, and ::gasp:: a FLIP CAMERA!! So, thank you so much Foodbuzz and Newman’s Own for this amazing opportunity. You helped me take the giant leap into vlogging. 🙂

Hope y’all don’t laugh at me too much. I stumbled on my words a few times, but I think I actually want to do this again!

FTC disclosure: I was supplied Newman’s Own products and a Flip camera for free, but my opinions of this recipe are completely my own.

Filed Under: Poultry, Side Dishes, Skinny

Spicy BBQ Shrimp Skewers

July 9, 2010 by Amy 2 Comments

kabobs

For our party, we knew we wanted to do something summery and fun. Skewers/kabobs were our main meats and ended up a hit! We had shrimp skewers, because we knew that shrimp prices would be shooting up any day now, because of the oil “spill”, and wanted to make sure we enjoyed Gulf shrimp at least one more time. This shrimp skewer was delicious and very easy to put together.

Spicy BBQ Shrimp Skewers
Source: Emeril Lagasse

Ingredients:

  • 1/4 cup vegetable or olive oil
  • 1 tablespoon minced garlic
  • 1 tablespoon fresh thyme
  • 1 tablespoon chopped cilantro leaves, plus more, for garnish
  • 1 jalapeno, seeded and minced
  • 1 teaspoon paprika
  • 1 teaspoon salt
  • 1 teaspoon light brown sugar or honey
  • 1 teaspoon ground cumin
  • 1/2 teaspoon Worcestershire sauce
  • 1/2 teaspoon cayenne pepper
  • 1/2 teaspoon red pepper flakes
  • 1 lime, juiced
  • 2 pounds large shrimp, peeled

Directions:

If using bamboo skewers, soak them in water for about an hour before starting on the recipe.

  1. In a large bowl, combine all ingredients except the shrimp and the relish mix well to combine. Add the shrimp to the seasoning paste, and toss to thoroughly coat with the seasoning mixture. Let the shrimp sit in the seasoning mixture while you prepare the grill.
  2. Prepare a grill and thread the shrimp onto 4 or 6 skewers, depending on their size. Place shrimp skewers on the grill and cook for about 3 minutes on each side, or until the shrimp turn pink and are lightly charred on both sides. Do not overcook!

Filed Under: Seafood, Skinny

Burgers and Fries

June 22, 2010 by Amy 10 Comments

Baked Oven Fries

Oh yes, the classic burger and fries. It reminds me so much of when I was a kid. Dad would grill the burgers and Mom would fry the fries. Mom would always make sure we had a good TV show playing since we liked to usually run around the house and accidents were normal during those times. Mom didn’t want grease burn accidents, so it was either Nickelodeon or our favorite Disney movie. It kept us 4 kids quiet long enough.

When dinner was ready, we used to race to the plates and get our fix. Burger night was awesome!

Now that the hubs and I are trying to eat better, burgers and fries just weren’t on our mind. I’ve tried the whole oven fries thing before, but with tasty but mushed up results. After reading a few raves about a recipe that Annie of Annie’s Eats featured, I decided to try this technique. What would it hurt, right?

The results? The crispy flavorful fries that I remember, except, well Ore-Ida didn’t make these. 🙂 This recipe was easy and just plain delicious. Best of all? Only 5 tablespoons of oil are used for the whole recipe! Awesome. Definitely Weight Watchers friendly. 🙂

Another great thing about this meal? The burger buns. These were provided to me for free by Nature’s Pride and Foodbuzz as a part of the Tastemaker program. My husband and I were sent a pack of these to sample, and we were thrilled to get something whole wheat. They were delicious!

Baked Oven Fries
Source: adapted from Annie’s Eats (originally by Cooks Illustrated)

Ingredients:

  • 3 russet potatoes (about 24 oz. total), peeled and cut lengthwise into even sized wedges
  • 5 tbsp. vegetable, canola or peanut oil, divided
  • 3/4 tsp. kosher salt, plus more to taste
  • 1/4 tsp. freshly ground black pepper, plus more to taste
  • 1 tsp. cajun seasoning, plus more to taste (like Tony Chachere’s)

Directions:

  1. Preheat the oven to 475˚ F.  Place the potato wedges in a large mixing bowl.  Cover with hot water; soak for 10-30 minutes.  Put 4 tablespoons of the oil onto a heavy, rimmed baking sheet.  Tilt the sheet side to side to evenly coat the pan with oil (a pastry brush can also help with this).  Sprinkle the pan evenly with the salt and pepper.  Set aside.
  2. Drain the potatoes.  Spread the wedges out on layers of paper towels or on clean kitchen towels.  Pat dry with additional towels.  Wipe out the now empty bowl so it is dry.  Return the potatoes to the bowl and toss with the remaining 1 tablespoon of oil.  Arrange the potato wedges on the prepared baking sheet in a single layer.  Cover tightly with foil and bake for 5 minutes.  Remove the foil and continue to bake until the bottoms of the potatoes are spotty golden brown, 15-20 minutes, rotating the baking sheet after 10 minutes.  Using a metal spatula and tongs, flip each potato wedge keeping them in a single layer.  Continue baking until the fries are golden and crisp, 5 -15 minutes.  Rotate the pan as needed to ensure even browning.
  3. When the fries are finished baking, transfer to a paper-towel lined plate to drain some of the grease.  Season with the cajun seasoning, to taste.  Serve warm.

Filed Under: Side Dishes, Skinny

Garlic Lemon Chicken Kabobs

May 18, 2010 by Amy 11 Comments

Garlic Lemon Chicken Kabobs w/ Roasted Vegetables

I love the idea of food on a stick. It’s so amazingly convenient to not get your hands or utensils dirty. Popsicles, corn dogs, roasted marshmallows…and now, kabobs. I’ve never had a kabob before, and it’s not because I was intimidated, it’s just something I don’t think much about. I’m more of a comfort food gal.

Nowadays though, my husband and I have a friendly bet going on. We’re challenging ourselves to lose as much weight as we can in 6 months. The motivation? A $300 prize. We each put in $150 of our own “fun” money for this, and now it’s time to bring on the competition. So, because of the bet (and the need to eat healthier), we are looking for better food options to help with the weight loss. Bye bye comfort food!

I saw this recipe on Annie’s Eats, and knew this would be a good dinner to cook since it’s light, involves garlic and is something new to try (kabobs). This chicken turned out flavorful and moist. The marinade is so simple to put together too! I think this would be a great weeknight dinner, especially for the summer. I served the chicken with onion/bell pepper kabobs too as a side, although, for next time, I’m gonna need a better, more filling side dish. If anyone has suggestions, please give me some ideas!

Garlic Lemon Chicken Kabobs
Source: Annie’s Eats (adapted from Williams Sonoma)

Ingredients:

  • 3 tbsp. extra-virgin olive oil
  • Zest of 1 lemon
  • 3 cloves garlic, minced or pressed
  • 1 tbsp. minced fresh parsley
  • 1 tsp. kosher salt
  • ½ tsp. ground black pepper
  • 1 lb. boneless, skinless chicken breasts, cut into Âľ-inch pieces

Directions:

  1. In a medium bowl, whisk together the olive oil, lemon zest, garlic, parsley, salt and pepper.  Add the chicken pieces to the bowl and mix to coat with the marinade.  Cover and refrigerate for at least 2 hours and up to 8 hours.
  2. Prepare a medium fire in a grill.  If using wooden skewers, soak them in water for at least 20 minutes before use.
  3. Thread the chicken pieces onto skewers and discard the excess marinade.  Lightly oil the grill grates.  Place the kabobs on the grill, cover, and cook until the chicken is opaque throughout, about 8-12 minutes, turning once or twice during cooking.  Transfer to a warmed platter and serve immediately.

Filed Under: Poultry, Skinny

Banana Chocolate Chip Bread

May 13, 2010 by Amy 4 Comments

Banana Choc. Chip Bread

When I was a cashier in high school, we had to learn PLU (product look up) codes to ring up produce. The first code I knew was bananas (it is 4011 in case you are wondering…type that code in at a self check-out and see what happens). Why? Because almost every shopping cart has bananas. They are delicious, cheap and very nutritious.

Every week, I buy my husband and I a bunch of bananas. Most of the time, we finish them, but sometimes, I forget about them. Of course when I forget about them, they become this unappetizing brown color from overriping, but fear not, when they are that overripe, they are PERFECT for baking!

This past week, we had 3 bananas that got too ripe for snacking on, and I decided to made some banana bread. I’ve made it before, but decided to give Baking Illustrated’s version a shot, since they never steer me wrong. This was the winner. If you want to try a banana bread recipe from this blog, make this one first! It’s so unbelievably moist, flavorful and light (since I subbed the butter out for applesauce). Plus, this is another recipe that you don’t need the KA for. A simple wooden spoon and 2 bowls will suffice. Your breakfast will never be the same either.

Banana Chocolate Chip Bread
Source: adapted from Baking Illustrated

Ingredients:

  • 2 cups unbleached all-purpose flour, plus more for dusting the pan
  • 3/4 cup sugar
  • 3/4 teaspoon baking soda
  • 1/2 teaspoon salt
  • 3 very ripe, soft, darkly speckled large bananas, mashed well (about 1 1/2 cups)
  • 1/4 cup mini chocolate chips
  • 1/4 cup vanilla yogurt
  • 2 large eggs, beaten lightly
  • 3/4 cup applesauce
  • 1 teaspoon vanilla extract

Directions:

  1. Adjust an oven rack to the lower-middle position and heat the oven to 350°F (175°C) degrees. Grease the bottom and sides of a 9 by 5-inch loaf pan; dust with flour, tapping out the excess.
  2. Whisk the flour, sugar, baking soda, salt, and chocolate chips together in a large bowl; set aside.
  3. Mix the bananas, yogurt, eggs, butter, and vanilla with a wooden spoon in a medium bowl. Lightly fold the banana mixture into the dry ingredients with a rubber spatula until just combined and the batter looks thick and chunky. Do NOT overmix! Scrape the batter into the prepared loaf pan.
  4. Bake until the loaf is golden brown and a toothpick inserted in the center comes out clean, about 55 minutes. Cool in the pan for 5 minutes, then transfer to a wire rack. Serve warm or at room temperature. (The bread can be wrapped with plastic wrap and stored at room temperature for up to 3 days.)

Filed Under: Breads/Muffins, Chocolate, Fruit, Skinny

Roasted Tomato Salsa

February 8, 2010 by Amy 4 Comments

My husband and I planned on doing a Superbowl Mexican feast (for 2), so I was searching for salsa recipes. I happened to come across this recipe on Delish Blog, and was intrigued. Roasted vegetables are always awesome, so roasted salsa had to be all sorts of amazing.

Roasting all of the vegetables made the house smell so yummy, and I just couldn’t wait to dig into this! It had amazing flavor, but my husband and I agreed that our tomatoes probably weren’t ripe enough. We were craving a more rich tomato flavor in the salsa. I can’t wait to try this again in the summer with fresh local tomatoes!

Roasted Tomato Salsa
Source: Delish Blog

Ingredients:

  • 1 1/2 pounds tomatoes, cut in half lengthwise
  • 1/2 large white onion
  • 4-6 cloves roasted garlic
  • 2-3 large jalapenos, deseeded & deveined, cut in half lengthwise
  • freshly ground black pepper & kosher salt
  • Extra-virgin olive oil
  • 1/4 – 1/2 cup cilantro, roughly chopped

Directions:

  1. Heat oven to 400°F . Gently toss the tomatoes, onions, garlic, jalapenos with the olive oil in a large bowl. Alternatively, use spray oil to gently coat the veggies (You just don’t want it to burn). Season with a little freshly ground black pepper. After they are nicely coated arrange in a single layer, tomatoes cut-side facing up, across a parchment or foil-lined baking sheet, roast in the oven for 40-50 minutes, (depending upon the size of your tomatoes). You’ll know they’re ready to come out when they start to get a nice color and the tomatoes start to collapse. Remove from the oven and cool.
  2. Puree cooled tomatoes, onion, garlic, and jalapenos. Alternatively, puree half of the veggies and hand chop the remainder and combine. Season with salt and stir in the cilantro. Refrigerate.

Filed Under: Mexican, Sauces/Dips, Skinny

Herb Roasted Chicken Breast

January 8, 2010 by Amy 4 Comments

Since my husband and I are trying to eat healthier, I thought a simple roasted chicken would work well for dinner. I didn’t really follow a recipe at all this time, so I guess you could say this is an original. It does involve butter, but hey, it’s not that much really. The skin does come out super crispy, but I opted not to eat mine. This is for two people, but this can easily be doubled, tripled, whatever. It’s a really flexible recipe and easy to do!

Herb Roasted Chicken Breast

Ingredients:

  • 2 bone-in chicken breasts
  • 2 tbsp. butter (Edit: The second time, I used canola oil instead since butter seemed to smoke up the house. It worked MUCH better.)
  • 3 tbsp. freshly chopped basil
  • 3 tbsp. freshly chopped parsley
  • 2 tsp. salt
  • 2 tsp. freshly ground black pepper
  • 1 tsp. onion powder
  • 1 tsp. garlic powder

Directions:

  1. Preheat your oven to 400 degrees.
  2. Wash and dry chicken in the sink. Add salt/pepper under and over the skin of the chicken.
  3. Knead the butter in your hands until it is fairly soft. Add in the basil, parsley, onion powder and garlic powder. Mix until thoroughly combined.
  4. Add herbed butter to the chicken under and over the skin of the chicken
  5. Bake for 1 hr or until juices run clear on the chicken.

The Skinny (with skin/no skin) – per serving, serves 2:
Calories: 262.9/191.3
Fat: 19.7 g/12.5 g
Fiber 0.5 g/ 0.5 g

Filed Under: Nifty Foodie Original, Poultry, Skinny

  • Go to page 1
  • Go to page 2
  • Go to page 3
  • Interim pages omitted …
  • Go to page 8
  • Go to Next Page »

Primary Sidebar

Hey Y’all!

Image Credit: Leslie Pendleton Photography


Hey y’all!

Thanks so much for reading! I’m Amy, and I live in south Louisiana with my husband and our rescue dog. I enjoy sharing my love for cooking, baking, crafts & more! Follow my daily adventures on social media!

Follow my Daily Adventures

  • Email
  • Facebook
  • Instagram
  • Pinterest
  • Twitter

Footer

  • Email
  • Facebook
  • Instagram
  • Pinterest
  • Twitter

Archives

Copyright © 2025 · Foodie Pro Theme by Shay Bocks · Built on the Genesis Framework · Powered by WordPress