• Skip to primary navigation
  • Skip to main content
  • Skip to primary sidebar
  • Skip to footer

The Nifty Foodie

  • Home
  • About
  • Recipes
    • Appetizers
    • Beverages
    • Breads/Muffins
    • Breakfast
    • Canning
    • Desserts
    • Dog Treats
    • Entertaining/Parties
    • Fruit
    • Holiday Recipes
    • Louisiana Cuisine
    • Main Dishes
    • Mexican
    • Nifty Foodie Original
    • Nifty Tricks
    • Project Food Blog
    • Pumpkin
    • Salads
    • Sauces/Dips
    • Side Dishes
    • Skinny
    • Slow Cooker
    • Spices
    • Stews/Soups
    • The Disasters
  • My Weight Loss Journey
    • Races
    • Running
    • Weight Loss Milestones
  • Crafts
  • Contact Me

Nifty Foodie Original

Peppermint Bark Cheesecake Truffles

December 15, 2011 by Amy 16 Comments

Peppermint Bark Cheesecake Truffles

I absolutely love making holiday treats. You know it’s the holiday season in our house when our fridge has at least 5 lbs. of butter, 8-10 packages of cream cheese at any given time and 2 extra bags of flour and sugar in the pantry to ensure that I don’t run out of the essentials. 🙂

The big bake-palooza (as I like to call it) is this weekend. There’s quite a few coworker and neighbor gifts to make this year, which has me super excited! This year’s packages are going to have some old favorites and new ones too, which I plan on sharing with y’all next week.

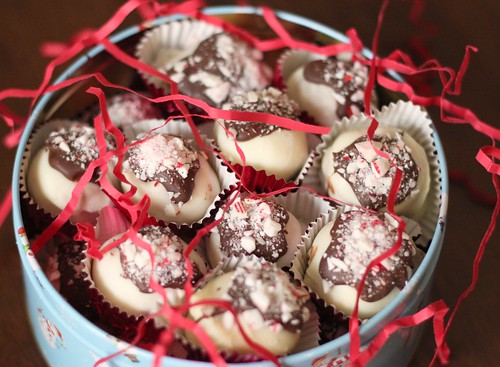
While this particular recipe won’t be with the gifts this year (since they need to be refrigerated), I wanted to share these truffles with y’all, since this is still a delicious recipe if you’re looking for something to include with your holiday parties. I came up with this recipe for a local recipe contest with the newspaper. I was actually torn between an eggnog inspired dessert and a peppermint bark inspired dessert. This recipe idea won out though, because after asking some friends, it seems like a peppermint bark inspired recipe would be more popular, since quite a few people hate eggnog. Fair enough.

The great thing about these truffles is that they come together pretty quickly. It’s definitely an easy dessert recipe to add to your holiday menu! Just keep in mind since the recipe involves cream cheese, these truffles can’t sit out for too long without needing to be refrigerated. They actually taste a lot better cold anyway.

So, I’m sure you’re wondering how these little truffles did in the recipe contest! I won first place! FIRST PLACE! I still can’t believe it. The prize was a big deal too… $1000 to a local furniture store! (I can’t wait to share with y’all what we used that generous prize on, but I’ll save that for another post once it’s delivered.)

I’m also supposed to be in the paper tomorrow. Crazy, right? I’m completely giddy about that! I’m sure I’ll buy multiple copies for family. 🙂

Peppermint Bark Cheesecake Truffles
Source: an original

Ingredients:

For the filling:

  • 1 pkg cream cheese, slightly softened
  • 5 candy canes
  • 1/4 cup confectioner’s sugar
  • 1 cup (appx. 6 large) ground graham crackers
  • 1/4 cup white chocolate chips, chopped

For the coating:

  • 2 cups of white chocolate chips or almond bark
  • 1/2 cup of semi-sweet or milk chocolate chips
  • 2 crushed candy canes

Directions:

  1. With a spatula, whip up the cream cheese to a stirrable consistency.
  2. Using a food processor, grind 3 of your candy canes to a powder. Stir the ground candy canes, powdered sugar and ground graham crackers into the cream cheese with a spatula until everything is well-incorporated.
  3. Place the last two candy canes in a quart sized plastic ziploc-type bag, and using a heavy bowl, crush up the candy canes into small pieces (not quite a powder, since you want these to add a bit of a crunch to your truffles). Add the candy canes, along with the chopped white chocolate to your cream cheese truffle mixture.
  4. Chill the mixture well, for four hours or overnight.
  5. When ready to assemble the truffles, divide the mixture into tbsp. sized balls and put the balls on a cookie sheet. By the time you’re done making the truffle balls, the mixture probably warmed up a bit, so place the cheesecake balls in the freezer for 5-10 minutes to firm up.
  6. In the meantime, melt your white chocolate for the coating (either in the microwave or with a double boiler).
  7. Take your cheesecake balls out of the freezer, and individually dip each ball in the white chocolate mixture. Place the finished dipped balls on a cookie sheet lined with wax paper for the chocolate to set.
  8. Once the white chocolate has set, melt your milk or semi-sweet chocolate chips and add a small amount on top of each truffle, along with some crushed candy canes for decoration.
  9. Enjoy these cheesecake truffles right out of the refrigerator and keep the truffles cold, since there is cream cheese in the recipe.

Filed Under: Candy, Chocolate, Holiday Recipes, Nifty Foodie Original

Strawberry Orange Frozen Yogurt

April 3, 2011 by Amy 3 Comments

Strawberry Brown Sugar Yogurt

This past weekend, I bought a flat of strawberries. Since it’s the peak of the season, how could I not? It took me about an hour to slice up a flat of strawberries, and as delicious as they are on their own, I figured I had to make SOMETHING with them!

Well, a couple of weeks ago, one of my awesome food blogger friends, Serena of Big Apple Nosh, filled me in on a new challenge that she’s doing on her blog: The NoshGirl Chef Challenge! The challenge features two common ingredients, and each blogger has to come up with a recipe idea using those ingredients. The two ingredients for the challenge were plain yogurt and brown sugar. Since I had these strawberries on hand, I definitely wanted to also feature them in my recipe.

I really didn’t come up with the idea until this morning. Talk about last minute! I was debating between a coffee cake, a cookie or something frozen. Well, it’s already feeling like summer out here, so I had to do the frozen idea. I was worried about using brown sugar instead of regular sugar, but it really goes well with the strawberries. The addition of orange zest and juice also brings out the flavor of the strawberries really well. I really love how this turned out!

Strawberry-Orange Frozen Yogurt
Source: an original

Ingredients:

  • 1 lb. strawberries, chopped and hulled
  • 1 5 oz. container of plain greek yogurt
  • 1/4 cup heavy cream
  • 1/3 cup light brown sugar
  • 1 tsp. orange zest
  • 1 tsp. orange juice
  • 1 tsp. vodka

Directions:

  1. Place the chopped strawberries and brown sugar in a bowl, stir the mixture together and allow to chill in the refrigerator for about an hour for the sugar to sort of dissolve into the strawberries.
  2. Place the strawberry mixture, yogurt, heavy cream, zest, juice and vodka in a blender and blend until pureed.
  3. Pour the mixture in an ice cream maker and mix according to the manufacturer’s instructions.
  4. Let the frozen yogurt set in the freezer for a couple of hours, and enjoy! (Note: If you serve this a couple of hours out of the freezer, it will be the perfect texture. I found that the longer I left it in the freezer, the icier the frozen yogurt became, because strawberries tend to contain a lot of water and can contribute to an icier texture when pureed.)

Filed Under: Frozen Desserts, Fruit, Nifty Foodie Original

Warm Bacon Vinaigrette

November 30, 2010 by Amy 5 Comments

Warm Bacon Vinaigrette

A few weeks ago, Justin of Marx Foods asked for bloggers who would be interested in developing a recipe using Mangalitsa pork products. (The winner would move onto another challenge issued by Marx Foods!) I’ve never heard of this before, but I was intrigued, so of course, I sent an email. Before I knew it, I had a slab of Mangalitsa bacon in front of me, begging to be made into something.

I asked my Twitter friends what they would prefer: sweet or savory. It was close, but savory had the most requests. 🙂

So, I brainstormed. I didn’t want to do a breakfast item, since that’s what bacon is known to be used in. I wanted to do something a tad different, and I remember having a spinach salad with bacon vinaigrette at a restaurant a while back. It was absolutely delicious, so I thought this would be a good thing to try to replicate in the kitchen.

I’m not the best cook in the world when I wing it, but for some reason, this dressing came out really awesome on the first try! The bacon lends a very mild flavor, but is still prominent in the dressing. I really enjoyed it!

Warm Bacon Vinaigrette
an original

Ingredients:

  • 1 slice thick cut bacon (I used mangalitsa bacon), cut into small cubes
  • 1 small shallot, finely diced
  • 1 clove garlic, finely diced
  • 1 tsp. honey
  • 1 tsp. dijon mustard
  • 4 tbsp. red wine vinegar
  • 1/4 cup olive oil
  • salt and pepper to taste

Directions:

  1. Cook the bacon on medium heat until done. Set the bacon to the side and pour off all but appx. 1 tbsp. bacon fat.
  2. Cook the shallot and garlic in the same pan (with the 1 tbsp. bacon fat) for about 5 minutes on medium low heat until it’s cooked down.
  3. Turn heat to low. Add in red wine vinegar, honey, dijon mustard and whisk well.
  4. Whisk in the olive oil, a little at a time until well blended.
  5. Serve over a salad of greens or spinach and enjoy!

Filed Under: Nifty Foodie Original, Sauces/Dips

Bananas Foster Milkshake

October 14, 2010 by Amy 5 Comments

Banana Milkshake

I’m sure you can tell I’m sort of in love with bananas foster. I’m from New Orleans, so I guess you can say I’m pretty hooked to the stuff. I don’t really remember the first time I had it, but I know it was love at first bite!

I’m also greatly in love with ice cream…I gave it up for a month for a personal junk food detox to prepare me for the 10 week weight loss challenge I’m participating in. 🙂 Before my personal little detox, I used to have a bowl almost daily. It was low-fat ice cream, so no guilt right? Psh, unfortunately those 150 calories daily added up, and I blame the hot summer for the crazy weight gain I’ve experienced. Darn you hot summers and refreshing ice cream!! 🙂

So, naturally when I heard that Foodbuzz and Lactaid were hosting a smoothie/milkshake recipe contest, I couldn’t pass up the opportunity to enter my idea: a bananas foster milkshake. I know milkshakes are a huge diet no-no, but hey, I can practice portion control here, right?

After submitting my idea to Foodbuzz, I found out that my idea was one of the 12 chosen to participate in this contest. 🙂 Wahoo!!

Now, I’m sure you’re wondering what the prize for this fabulous contest is, right? It’s a trip to this year’s Foodbuzz Festival!! So, cross your fingers for me, y’all. This would be an amazing opportunity for me, and I think I would just go nuts if I won (in a good way, I promise).

Now, since this is a contest for Lactaid, I couldn’t just make any milkshake. Rather, this milkshake had to be lactose-free AND unique! Quite a challenge, no?

Now, I knew Lactaid made milk, because I was graciously given a coupon to get a Lactaid milk product for free to make this recipe happen. However, my two other worries were ice cream (of course, a milkshake staple) and butter (a main ingredient in authentic bananas foster).

After perusing Lactaid’s site, I found that Lactaid makes an ice cream product. Bonus? A store really close to my house carries all Lactaid products, so the products are easy to find. If it’s in my town, it’s probably in your town. Yay for availability! Also, Lactaid products are very reasonable in price. I know not everyone can pay mega bucks for groceries, so it’s wonderful that Lactaid keeps costs fairly low for their products. 🙂

Milkshake Ingredients

Now, for the butter, I took a risk and used a little bit of oil with water rather than butter. I thought this would work well, because I interchange oil and butter in most of my cooking, so why not? Thankfully, the flavors worked out, the shake ended up not tasting oily, and it worked beautifully in making the infamous bananas foster sauce. 🙂

On a side note, I have to hand it to the folks at Lactaid. When I was a kid, I think I was a little lactose intolerant (never was diagnosed). I used to have major stomach pains after drinking milk, and the sad thing was, I used to drink chocolate milk anyway. I know…you think I must be crazy! To me, the pain was totally worth it. I was completely addicted to chocolate milk!  And yes, while I had stomach cramps, I like to think my addiction to milk had to contribute to my 5’10” frame. Haha! Now, don’t worry…the good news for me is sometime in my teenage years, I grew out of the intolerance I had. Yay!

However, not everyone ends up so lucky. So, it’s good to know that those who are lactose intolerant can still enjoy cow’s milk now, get the same nutrients from regular milk, and hey, they can even make milkshakes, root beer floats, enjoy sundaes…the list is endless!

Lactaid has really taken it upon themselves to make lactose intolerance less daunting. They have a huge array of lactose-free products, and offer a new website, called MooVision, which is to bring awareness to lactose intolerance and to showcase their product line. They have some fun features on the site too, which include:

  • Moolah!, a trivia contest about lactose-free milk (you can win Amazon.com gift cards here!)
  • Gourmoo cookoff, which is a competition with recipes featuring lactose-free milk
  • Moo News, which is a mockumentary style news show for milk lovers

So, using Lactaid’s ice cream and milk products, I came up with this milkshake. I’m sure you’re wondering if there’s a difference in consistency or taste with these products. Good news peeps…I really didn’t notice a difference, which is awesome.

The verdict? The taste of this shake came out perfectly, as expected. 🙂 Heck, bananas foster is typically served with a scoop of vanilla ice cream anyway. Why not combine it into a tasty drink? You might noticed that I didn’t make traditional bananas foster with alcohol. I did this, because it’s not a huge flavor difference to me, and because of the lack of alcohol, this becomes a shake you can make for the kids, too! 🙂

And, in case you’re wondering, I only drank 12 oz. of the stuff. This shake made it really hard to practice portion control too…so tasty! I kind of don’t want to calculate the calories, but in hindsight, with a 48 oz. pitcher next to me, I could have done much worse damage.

Disclosure: I received a free sample of Lactaid milk for this recipe, and this recipe serves as my entry for a contest to attend the Foodbuzz Festival.

Bananas Foster Milkshake
Source: an original

Ingredients:

  • 3 bananas, sliced
  • 3/4 cup brown sugar
  • 1 tsp. cinnamon
  • 3 tbsp. oil
  • appx. 1/4 cup water
  • 12 oz. Lactaid milk (we used 2% reduced fat)
  • 1 quart Lactaid vanilla ice cream

Directions:

  • Place oil in a medium skillet and bring the heat to medium heat.
  • Add brown sugar and cinnamon. Stir and slowly add water until it forms a sauce. Lower the heat to medium-low heat.
  • Add the sliced bananas to the pan, stirring occasionally.  Cook this down for about 5 minutes. You know it’s done when you can smell it and the bananas are really soft!
    Bananas Foster
  • Remove the bananas and place them in a bowl in a larger bowl with an ice bath to cool down. Reserve the sauce in the skillet.
  • Once the bananas foster has cooled, blend the milk and ice cream together until well blended. Then add the bananas foster and blend. If you think the shake is too thick for your liking, you can add some milk, a little at a time.
  • To serve, drizzle bananas foster sauce in a glass, pour in the shake and drizzle more sauce on top. Enjoy!

Makes appx. 48 ouncesBananas Foster Milkshake

Thanks again to the folks at Foodbuzz and Lactaid for allowing me to participate in this contest. 🙂

Filed Under: Beverages, Fruit, Nifty Foodie Original

Bananas Foster French Toast “Muffins”

September 27, 2010 by Amy 13 Comments

Bananas Foster French Toast "Muffins"

Just a little blurb: If you’d like to see me move on to Round 3 of Project Food Blog, I’d really appreciate your vote here! You can check out my round 2 entry here. Thanks so much y’all!! 🙂

I tend to LOVE sweet breakfasts. Give me a stack of pancakes, some french toast, donuts, waffles…whatever. As long as it’s sweet! Don’t get me wrong, I love a good plate of scramble bambles (eggs- as my mom called them) or some crusty hashbrowns, but man, something about a sweet breakfast makes me drool. 🙂

This past weekend, I couldn’t stand it. I had to make some french toast. Not just any french toast, though. I had ripe bananas begging to be cooked into SOMETHING, so I decided to make bananas foster french toast.

Bananas Foster is a very popular dessert in New Orleans. It’s one of those dishes that is a ::must eat:: at Brennan’s Restaurant. They make it right in front of you, and it’s just so delicious. So, I figured this would be PERFECT in french toast, especially for my sweet tooth! You’ll notice that this recipe has no alcohol in it. It still comes out pretty tasty, I promise!

This recipe is another submission for the Nature’s Pride Bread Ambassador contest. They will be choosing 6 recipes/bloggers to represent them at the Foodbuzz Fest this year! I made two other recipe entries, which are here and here. As you can tell, the sweet tooth influenced these recipes heavily. 🙂

The verdict? OMG…delicious! It was so easy to put together and the little “muffin” servings help with portion control. That is, until you find yourself eating 3-4 of these with no remorse. 😉

Bananas Foster French Toast “Muffins”
Source: an original

makes 12 servings

Ingredients:

French Toast:

  • 12 slices Nature’s Pride Honey Wheat bread
  • 4 large eggs
  • 1 cup milk
  • 2 tbsp. granulated sugar
  • 1 tsp. cinnamon
  • pinch of salt

Bananas Foster:

  • 1/2 stick butter
  • 3/4 cup brown sugar
  • 1 tsp. cinnamon
  • 3 ripe bananas, cut in half lengthwise

Directions:

  1. Preheat oven to 350 degrees.
  2. Mix eggs, milk, sugar, cinnamon and salt in a bowl. Add bread in and break it up into pieces as it absorbs the mixture. Let sit.
  3. In the meantime, melt butter in a large pan and add brown sugar/cinnamon. Stir until all sugar dissolves.
  4. Add in bananas and cook them down for a few minutes. Remove bananas from the pan and allow to cool. Set sauce to the side.
  5. Once the bananas are cool, add them to the bread mixture and mix by hand. Scoop the combined mixture into greased muffin pans and bake for 15-20 minutes (until a toothpick comes out clean).
  6. Serve with bananas foster sauce on top and enjoy!!

Disclaimer: As part of the Foodbuzz Tastemaker’s Program, Foodbuzz offered a coupon for a free Nature’s Pride product in exchange for making up a little ol’ recipe highlighting Nature’s Pride bread.  

Filed Under: Breakfast, Fruit, Nifty Foodie Original

Caramel Apple Pie A La Mode Bites

September 21, 2010 by Amy 19 Comments

Caramel Apple Pie A La Mode Bites

Since the Summer is winding down, it’s time to say goodbye to fresh, sweet berries and hello to juicy, flavorful apples. A great way to celebrate the season is with apple pie, of course.

Instead of making a pie, I wanted to make another recipe highlighting Nature’s Pride bread! This is another entry for the Nature’s Pride bread ambassador contest.

Note: As part of the Foodbuzz Tastemaker’s Program, Foodbuzz offered a coupon for a free Nature’s Pride product in exchange for making up a little ol’ recipe highlighting Nature’s Pride bread.  Six bloggers’ recipes will be chosen to be an ambassador for Nature’s Pride at this year’s Foodbuzz Festival!

Can you tell I’d really like to go to Foodbuzz Festival this year? 🙂

I took apple pie a few steps further and made this into a caramel apple pie a la mode bite. Talk about DELICIOUS and perfect for a party! 🙂

I’m sure you’re curious about the crust. The crust is simply sliced Honey Wheat bread, and it comes out perfectly crispy and sweet, which is great for a dessert crust! To do this, I used a 2″ circle cutter to cut out the crusts and pressed them into a mini muffin pan to shape them! I took a couple of pictures, since I’m a visual person, and thought pictures would help.

Crust how-to

Super easy, right? Definitely give these a try! You’ll be glad that you did!

Caramel Apple Pie A La Mode Bites
Source: an original

makes 24 bites

Ingredients:

Crust:

  • 12 slices of Nature’s Pride honey wheat bread
  • 1/2 cup granulated sugar
  • 1 1/4 tsp. cinnamon
  • 3 tbsp. melted butter

Apple Filling:

  • 2 granny smith apples, peeled, cored and diced finely
  • 1/2 stick butter
  • 5 tbsp. brown sugar
  • 2 tsp. cinnamon
  • 3/4 tsp. nutmeg
  • 1 1/2 tsp. flour

Additional toppings:

  • vanilla ice cream
  • caramel sundae topping

Directions:

  1. Preheat your oven to 400 degrees.
  2. Using a 2″-3″ circle cookie cutter, cut out circles in the bread. I was able to get 2 per slice.
  3. Press each circle into a mini muffin pan, making sure it’s pressed well against the edges to form into a good crust. (see above picture)
  4. Brush melted butter on the tops of the crusts.
  5. Combine sugar and cinnamon. Sprinkle liberally over the buttered crusts.
  6. Bake for 5-8 minutes, until the crusts brown. Allow to cool.
  7. To make the apple filling, melt the 1/2 stick butter in a small pot and add apples. Then, add brown sugar, cinnamon and nutmeg. Cook down for about 5 minutes on low/med-low heat. Add flour to thicken the sauce and cook another 5 minutes or until tender. Allow to cool until apple filling is just warm.
  8. To assemble the bites, add about 2 tsp. of ice cream to each of the crusts (just eyeball it). Add a tsp. of apple filling and then drizzle with caramel sundae topping. Serve immediately. 🙂

Filed Under: Entertaining/Parties, Fruit, Nifty Foodie Original, Pies

Berry Mash Bruschetta

September 9, 2010 by Amy 12 Comments

Berry Mash Bruschetta

You know when people say, “OMG this is the best thing since sliced bread!”? Whenever someone says that, I always think about how sliced bread is actually pretty boring. Don’t get me wrong here, because I love a good sandwich, but sliced bread in a bag isn’t something (bread-wise) that I consider to be the “best thing”. In fact, the thought of sliced bread brings me back to school lunch days when I would push through trying to eat a soggy turkey sandwich, and growing envious of those who got to bring the fancy awesome Lunchables. (Mom, if you are reading this, I love you and realize how stupidly expensive Lunchables are now.)

A while back, Foodbuzz sent me some samples of Nature’s Pride bread. I wasn’t expecting to be really wow-ed by the bread, but I will say that this bread is sort of our staple now. I especially love the honey wheat and the wheat hamburger buns. They don’t have that gross, dry texture that other wheat breads in store have, and for that, we are a Nature’s Pride convert. 🙂

As part of the Foodbuzz Tastemaker’s Program, Foodbuzz offered a coupon for a free Nature’s Pride product in exchange for making up a little ol’ recipe highlighting Nature’s Pride bread.  Six bloggers’ recipes will be chosen to be an ambassador for Nature’s Pride at this year’s Foodbuzz Festival! ::crosses fingers::

I think I would go happy-crazy if I were chosen. I’ve never been to California before, and I’d love to meet/greet other food bloggers! 😀

Anyway, back to the post. I figured since I buy the bread every week, I’ll just make a recipe before the coupon comes in. 🙂

I definitely wanted to make sliced bread not-so-boring, so I kept the idea in my mind to make a recipe with sliced sandwich bread! I sort of just thought up this recipe in my head: cinnamon toast, cream cheese spread, fresh mashed berries and a nutella drizzle on top. What’s not to like?

This recipe is insanely delicious and sinful. The crunchy toasty bread and the juicy berries with chocolate and cream cheese made a perfect little dessert bite (or two). It’s also ridiculously easy. You could totally make this for a party, and impress the guests.

Berry Mash Bruschetta
Source: an original

Ingredients:

  • 6 slices Nature’s Pride Honey Wheat sliced bread
  • Unsalted butter (softened)
  • 1/2 cup granulated sugar
  • 1 1/4 tsp. cinnamon
  • 4 oz. cream cheese (softened)
  • 1/4 cup nutella
  • 2 tbsp. milk
  • 1 cup strawberries
  • 1/2 cup blueberries
  • 1/4 cup raspberries

Directions:

  1. Preheat the oven to 425 degrees.
  2. Slice the bread into fourths and place on the baking sheet.
  3. While waiting for the oven to preheat, mix the granulated sugar with the cinnamon in a bowl. Set aside.
  4. Mix the nutella and milk in another bowl to make the nutella drizzle. Set aside.
  5. Mix the cream cheese with 1 1/2 tbsp. of the cinnamon sugar mixture in another bowl. Set aside.
  6. Rinse berries and then place them in a bowl and mash them with a fork.
  7. Place the sliced bread pieces in the oven for 5-7 minutes, or until a golden, toasty brown. Turn off the oven. Immediately add a thin layer of butter and then liberally sprinkle with the cinnamon sugar. Place back in the oven for an additional 2 minutes to ensure that the butter/cinnamon sugar set in.
  8. Take the bread out and let it cool for about 5 minutes.
  9. Now, assemble your bruschettas. 🙂 Add a thin layer of the cinnamon cream cheese to the bread slice, add about 1 tbsp. of the berry mash on top (making sure not to avoid adding too much berry juice), and drizzle nutella on top! Enjoy!

Makes 24.

Note: You may have some berries leftover, but there’s nothing wrong with that, right?

Filed Under: Chocolate, Fruit, Nifty Foodie Original

Crawfish Boiled Mashed Potatoes

September 6, 2010 by Amy 2 Comments

Meatloaf/Potatoes

“Hey, uh, Amy? You’ve posted this picture before. You know that, right?” I’m sure you guys are thinking that, but this time I’m going to rave about what’s on the right side of that plate. Oh yes, those potatoes.

These aren’t your ordinary mashed potatoes. They are spicy, flavorful and make you want to start peeling crawfish at a newspaper-lined dinner table. Delicious!

I had a similar tasting dish at a local chain that, as a Louisianian, had me thinking, “Why didn’t I think of doing this?” It’s so simple and such a great idea!

Basically, at a crawfish boil, there is more than crawfish there. You have boiled veggies, like corn, potatoes, onions, garlic, etc. This recipe takes those potatoes to a dinner plate-worthy level, if you get my drift. Oh, and you can easily make these in the kitchen. No need for the 100 gallon pots here, folks!

Crawfish Boiled Mashed Potatoes
Source: an original

Ingredients:

  • 3 lbs. small red potatoes
  • 1/8 cup crawfish boil seasoning
  • 4 tbsp. butter
  • Milk (as needed)

Directions:

  1. Fill a pot with water and add pre-washed red potatoes and seasoning.
  2. Bring to a boil for about 20-25 minutes or until fork tender.
  3. Let the potatoes sit in the water for 5-10 minutes to absorb the seasoning. (We did 10 minutes. Husband loved them…I thought WAY too spicy, but I’m a wuss!)
  4. Take the potatoes out and put them in a large bowl. Mash them with the butter added in. If you find this too thick, add milk, a little at a time until you reach the desired consistency.

Filed Under: Louisiana Cuisine, Nifty Foodie Original, Side Dishes

Herb Roasted Chicken Breast

January 8, 2010 by Amy 4 Comments

Since my husband and I are trying to eat healthier, I thought a simple roasted chicken would work well for dinner. I didn’t really follow a recipe at all this time, so I guess you could say this is an original. It does involve butter, but hey, it’s not that much really. The skin does come out super crispy, but I opted not to eat mine. This is for two people, but this can easily be doubled, tripled, whatever. It’s a really flexible recipe and easy to do!

Herb Roasted Chicken Breast

Ingredients:

  • 2 bone-in chicken breasts
  • 2 tbsp. butter (Edit: The second time, I used canola oil instead since butter seemed to smoke up the house. It worked MUCH better.)
  • 3 tbsp. freshly chopped basil
  • 3 tbsp. freshly chopped parsley
  • 2 tsp. salt
  • 2 tsp. freshly ground black pepper
  • 1 tsp. onion powder
  • 1 tsp. garlic powder

Directions:

  1. Preheat your oven to 400 degrees.
  2. Wash and dry chicken in the sink. Add salt/pepper under and over the skin of the chicken.
  3. Knead the butter in your hands until it is fairly soft. Add in the basil, parsley, onion powder and garlic powder. Mix until thoroughly combined.
  4. Add herbed butter to the chicken under and over the skin of the chicken
  5. Bake for 1 hr or until juices run clear on the chicken.

The Skinny (with skin/no skin) – per serving, serves 2:
Calories: 262.9/191.3
Fat: 19.7 g/12.5 g
Fiber 0.5 g/ 0.5 g

Filed Under: Nifty Foodie Original, Poultry, Skinny

  • « Go to Previous Page
  • Go to page 1
  • Go to page 2

Primary Sidebar

Hey Y’all!

Image Credit: Leslie Pendleton Photography


Hey y’all!

Thanks so much for reading! I’m Amy, and I live in south Louisiana with my husband and our rescue dog. I enjoy sharing my love for cooking, baking, crafts & more! Follow my daily adventures on social media!

Follow my Daily Adventures

  • Email
  • Facebook
  • Instagram
  • Pinterest
  • Twitter

Footer

  • Email
  • Facebook
  • Instagram
  • Pinterest
  • Twitter

Archives

Copyright © 2026 · Foodie Pro Theme by Shay Bocks · Built on the Genesis Framework · Powered by WordPress