• Skip to primary navigation
  • Skip to main content
  • Skip to primary sidebar
  • Skip to footer

The Nifty Foodie

  • Home
  • About
  • Recipes
    • Appetizers
    • Beverages
    • Breads/Muffins
    • Breakfast
    • Canning
    • Desserts
    • Dog Treats
    • Entertaining/Parties
    • Fruit
    • Holiday Recipes
    • Louisiana Cuisine
    • Main Dishes
    • Mexican
    • Nifty Foodie Original
    • Nifty Tricks
    • Project Food Blog
    • Pumpkin
    • Salads
    • Sauces/Dips
    • Side Dishes
    • Skinny
    • Slow Cooker
    • Spices
    • Stews/Soups
    • The Disasters
  • My Weight Loss Journey
    • Races
    • Running
    • Weight Loss Milestones
  • Crafts
  • Contact Me

Our Holiday Moving Announcements

December 14, 2015 by Amy Leave a Comment

Disclosure: Minted.com is compensating me for writing this post in the form of a credit on their website, in exchange for this post. All opinions are 100% my own.

These past few months have just flown by. My work weeks have been pretty busy, and on weekends, our focus is to see the progress of the new house. It blows my mind that our dream home is pretty much done and ready for us to make this new house into a home. 🙂

Our usual holiday cards feature Millie, but with the big move about to happen, I thought it would be fun (and hey, pretty darn efficient) to mention our move with our holiday cards. Thankfully, the designers at Minted already have this covered…there’s a whole category of holiday moving announcements on their site!

Some of my favorite options in the category included:

MintedOption1
Source: Minted

MintedOption2
Source: Minted

I honestly loved both of these cards, but it was a bit hard to figure out when we would be able to take a picture of us with Millie in front of the house. We would have had to wait until the house was done to get a picture taken, since a dog + a construction site is simply not a good idea.

Then, I started to look into non-photo options. There were SO many great cards!

MintedOption3
Source: Minted

MintedOption4
Source: Minted

OurMintedChoice
Source: Minted

It was really hard for us to choose, but after going back and forth with H about it, we decided on the Yule Haul card!

Along with the option for many different types of cards, I love that Minted also has a few color choices once you choose the card you like. We went with the cranberry Yule Haul card, which looks fantastic!

Once we selected the card we liked, we were able to get a live preview of the card before placing the order, which was helpful. Our new address is a bit on the long side, so the option to alter the font sizes was really great. Also, once we placed our order, we were sent a proof to approve before the card went to print. You pretty much know what your cards will look like before you receive them in the mail.

Minted also has a great, new option to make holiday cards even easier: recipient addressing (at no extra charge!). All you have to do is download their excel file template, fill it in with your address book and save it. Then, you upload that table, and then Minted autofills in your addressing information on their envelopes! I think that’s pretty awesome!

As far as my experience goes, I was thrilled with the way the cards came out. Granted, I really can’t show them to you all (since they contain my address), but I wanted to show you how much care goes into their packaging.
Minted Review

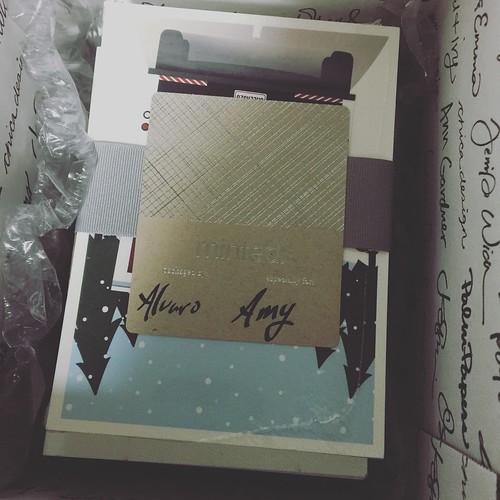
Everything was bubble-wrapped, so there were no bent envelopes or bent corners in the cards. I also appreciated that the quality of the cardstock and envelopes are great. I’ve purchased holiday cards from other companies before, and the cardstock/envelopes from Minted are by far, the best quality.

I can’t wait for our friends and family to receive our cards this year. It’s an exciting time for us, and I really feel that these cards are such a fun way to announce the upcoming move!

Filed Under: Holiday, Review

Beef Enchilada Rice Bake

December 9, 2015 by Amy 4 Comments

Disclaimer: I received a copy of Dinner for Two, in exchange for a fair and honest review. All opinions are 100% my own.

Beef Enchilada Rice Bake

House stuff is really starting to get hectic for us. With Christmas just around the corner, and this big move about to happen, I honestly just want to go home after work and be lazy. I don’t want to pack boxes or worry about cooking dinner. I just want to chill…I really miss my afternoon naps, y’all. 😛 Adult problems.

Since we alternate cooking nights with family that we live with, I’m always looking for something quick and easy to make after work. (It also has to taste good, of course.) I have quite a few go-to recipes, but I’m always looking for something different to add to my usual recipes. When I was offered to review Julie Wampler’s (of Table for Two) new book, Dinner for Two, I had to jump at the chance to give this book a try. Dinner for Two has 70 quick and easy dinner for two recipes (50 of which are dinner entrees and 20 are breakfast for dinner entrees). Quick and easy recipes…you had my attention, Julie. 🙂

Dinner for Two

I met Julie at Food Blog Forum in 2013, and ever since then, I’ve been a fan of her blog. She has gorgeous food photography, and she features a little bit of everything in her blog. One of the first recipes I tried from her blog was her Slow-Cooker Chicken Tikka Masala (which was delicious….I never blogged about it, but if y’all love chicken tikka masala, you have to try that recipe!).

Once I received her book in the mail, I immediately put post-it flags all over this book…there’s so many great dinner ideas! The first recipe we tried was this Beef Enchilada Rice Bake, and y’all…this recipe was so easy to throw together. Since it calls for cooked rice, I had the rice cooking while I was prepping and cooking through the first couple of steps. The timing worked out perfectly for me, since our rice cooker has rice ready in about 15 minutes.

As far as taste goes, this dish was super flavorful, and since I used a medium heat Ro*Tel, it had a good kick to it, too. My husband is pretty particular about recipes too, and he told me to add this to the (recipe) list. That’s when you know the recipe is a winner! 🙂

After flipping through Dinner for Two a few times, this book would make a wonderful gift this holiday season (it’s under $20 on Amazon right now). It’s perfect for anyone looking for quick and easy dinner ideas. I love that this book revolves around portions for two people…it’s just my husband and I, and we don’t need a ridiculous amount of leftovers we end up with after making some of my go-tos.

If you want more of a sneak peek of the book and to check out the recipes other bloggers are making out of Dinner for Two, check out Julie’s Virtual Date Night-In!

Beef Enchilada Rice Bake
Source: Dinner for Two cookbook

Ingredients:
  • 2 tsp. vegetable oil
  • 1 medium onion, diced (about 3/4 cup)
  • 1 green bell pepper, diced (about 3/4 cup)
  • 1 garlic clove, finely minced
  • 1 tsp. ground cumin
  • 1 tsp. kosher salt
  • 1/2 tsp. ground black pepper
  • 1/2 lb. 80/20 ground beef
  • 1 (10 oz.) can diced tomatoes and green chiles (Ro*Tel), drained well
  • 2 cups cooked white rice
  • 1/2 cup red enchilada sauce, plus more for drizzling
  • 1 1/2 cups shredded mexican cheese
Directions:
  1. Preheat the oven to 375°F.
  2. In a large skillet, over medium-high heat, add the vegetable oil. Once the oil is heated, add the onion, green bell pepper and garlic. Saute the mixture for 5 minutes, stirring often. Stir in the cumin, salt and black pepper.
  3. Place the beef into the skillet and thoroughly cook the beef, breaking it up into pieces with a wooden spoon or spatula.
  4. Stir in the tomatoes/green chiles, and remove the skillet from heat. Add in the rice to the skillet, and stir everything together until everything is evenly distributed. Stir in the enchilada sauce, until just incorporated.
  5. Place the mixture into a 2.5 quart oven-safe casserole dish. Sprinkle the cheese evenly over the rice.
  6. Bake the casserole in the oven on the middle rack, uncovered, for 20 minutes.
  7. Carefully remove the casserole from the oven and drizzle on more enchilada sauce, if desired. Enjoy!

The generous publishers of Julie’s book want to offer one lucky reader of The Nifty Foodie a copy of Dinner for Two!

To enter for a chance to win a copy, use the Rafflecopter widget below:

a Rafflecopter giveaway

Note: This giveaway is supplied by the publisher and is open to readers in the continental US only. Entries will be accepted until December 16th, 2015 at 11:59pm (central standard time). Winner will be emailed (make sure you leave an email address in the form), and will have 48 hours to respond or another winner will be chosen.  

Filed Under: Beef, Mexican, Pasta/Rice, Review

Spiced Cranberry White Chocolate Cookies

December 4, 2015 by Amy Leave a Comment

Disclosure: OXO sent me an illuminating hand mixer, in exchange for a fair and honest review. All opinions are 100% my own.

Spiced Cranberry White Chocolate Cookies

Today, I went to our local party/baking supply store to stock up on holiday gift packaging. I honestly can’t believe it’s December. I know I say that a lot, but the whole house building process has just thrown me off, time-wise. My life is measured by the house countdown, because well…I’m pretty darn excited about it!

This year, I’m not going to do my usual bake-palooza. Since we live with relatives while the house is being built, I just don’t feel right taking over their entire kitchen for a full weekend (which is what I usually do). I’m going to scale back and make some candy (fudge, caramels), as well as these cookies.

Spiced Cranberry White Chocolate Cookie

I love the combination of dried cranberries with white chocolate. The chewy, tart berries, combined with sweet white chocolate works so well together, and to top these cookies off, I rolled part of the dough in a cinnamon/sugar combination to add a little crunchiness to the cookies. When I brought these to work, I kept getting compliments on how great they tasted, which made me think that I definitely have to make these again for holiday gifts. 🙂

To make these cookies, I put away the stand mixer and used OXO’s Illuminating Digital Hand Mixer.

Spiced Cranberry White Chocolate Cookies

While I love using my stand mixer for baking, this hand mixer is pretty awesome. It worked like a dream when I was mixing this cookie dough, and the illuminating feature is something I would have never thought was handy until I used it. I also love the digital control….it’s a simple up or down button to change the speed of the mixer. OXO also took care to make sure that storage was a cinch. The cord wraps around the unit, and there’s a special cap for you to snap the beaters into. It just goes neatly into the cabinet, which is a nice added touch (at least it is to me). I’m definitely going to use this hand mixer more often, especially for quicker baking recipes like this one!

Spiced Cranberry White Chocolate Cookies
Source: an original

Ingredients:

  • 2 1/4 cup all-purpose flour
  • 3/4 tsp. baking soda
  • 3/4 tsp. salt
  • 1/2 tsp. cinnamon
  • 12 tbsp. (1 1/2 sticks) unsalted butter, melted and cooled
  • 3/4 cup light brown sugar, lightly packed
  • 3/4 cup granulated sugar
  • 1 large egg + 1 large egg yolk
  • 2 tsp. vanilla extract
  • 1/2 cup white chocolate chips
  • 1/2 cup dried cranberries

For rolling:

  • 1/4 cup granulated sugar
  • 1 1/2 tsp. cinnamon

Directions:

  1. Preheat the oven to 325°F.
  2. Whisk the flour, baking soda, salt and cinnamon together in a medium-sized bowl.
  3. Using a mixer in a large bowl, mix the butter and sugars together until well-mixed. Beat in the egg/egg yolk and vanilla extract until well-mixed.
  4. Add the dry ingredients to the wet ingredients, and mix on low until just combined. Using a spoon or spatula, mix in the white chocolate chips and dried cranberries.
  5. Mix together the granulated sugar and cinnamon in a separate small bowl for rolling. Roll the dough into balls (about 2 tbsp. in size) and dip one half of each dough ball into the sugar/cinnamon mixture.
  6. Place each dough ball on a cookie sheet, about 2 inches apart, with the un-sugared side down. Bake the cookies for 12-15 minutes, until the edges are starting to brown, being sure to turn the pans halfway through the baking process. After the cookies have cooled for about 10 minutes, transfer the cookies to fully cool on a cooling rack. Enjoy!

Filed Under: Chocolate, Cookies, Desserts, Fruit, Review

One-Pot Cheesy Sausage Pasta

November 19, 2015 by Amy Leave a Comment

Cheesy Sausage Pasta

Since daylight savings time ended a couple of weeks ago, it seems like my evenings are flying by. It doesn’t help that it’s dark just after 5pm…it just mentally throws me off to where I feel behind, no matter what time I start cooking. So lately, I’m a fan of quicker meals.

I’m pretty sure I’ve made this dish at least a handful of times the past couple of months. It’s a quicker recipe, and you only need one (oven-safe pot) to make it happen. I didn’t think I’d really like this dish, but the combination of flavors and the subtle richness from the heavy cream, makes for a quick comfort food (perfect for weeknights).

You can also lighten the recipe up with a few adaptations. I sometimes substitute regular sausage with chicken or turkey sausage. I also have used whole wheat pasta with success. However, I haven’t messed with the heavy cream in the recipe. I feel like it’s such a small amount for the entire dish, and it just goes well with the cheese in the recipe to make for a wonderfully creamy dish.

One-Pot Cheesy Sausage Pasta
Source: mildly adapted from Kevin & Amanda, originally from America’s Test Kitchen

Ingredients:

  • 1 tbsp. canola oil
  • 1 lb. smoked sausage
  • 1 medium yellow onion, diced
  • 3 cloves garlic, grated or minced
  • 15 oz. can low-sodium chicken broth
  • 10 oz. can Rotel tomatoes and green chiles (mild or regular, depending on how spicy you want it)
  • 1/2 cup heavy cream
  • 8 oz. penne pasta
  • 1 tsp. cajun seasoning
  • 1 cup shredded monterey jack cheese
  • 1/3 cup thinly sliced green onions

Directions:

  1. Add the canola oil to an oven-safe large skillet over medium-high heat. Add the sausage and onions, and cook the mixture, stirring often until lightly browned, about 5 minutes. Add and stir in the garlic, and cook until fragrant (about 30 seconds).
  2. Add the chicken broth, tomatoes, cream, pasta and cajun seasoning to the mixture. Stir everything together well, and bring the mixture to a boil. Then, reduce the heat to medium-low and cover the skillet. Simmer the pasta until tender, about 15 minutes, uncovering and stirring every minute or so to make sure the mixture doesn’t stick to the bottom of the pan.
  3. Remove the skillet from the heat and stir in 1/2 cup of the shredded monterey jack cheese. Top the pasta with the remaining cheese, as well as the sliced green onions. Place the pan in the broiler (or at a super high heat, like 450°F), and broil the pasta until the cheese is melty and starting to brown. Enjoy!

Filed Under: Pasta/Rice, Pork/Ham/Bacon, Poultry

Quick Dinner Rolls

November 17, 2015 by Amy Leave a Comment

Quick Rolls

This past week, the temperatures finally dipped into the 40s for us. I know that’s not really cold for those of you up north, but for me, all I could think about was SWEATERS…BOOTS…FALL! Finally!

As you may remember, we’re living with my husband’s parents while our house is being built. When the temperature dropped last week, his mom let us know she was cooking gumbo for dinner one evening, so of course, I had to make bread. Dipping bread in gumbo is one of my favorites, especially when it’s homemade bread.

Since it was a weeknight, I needed a quicker recipe, and this recipe from King Arthur Flour was perfect. In about an hour, the bread was ready for baking. The rolls were so tasty, too! I’m already considering the idea of making these for Thanksgiving…this quick(er) recipe would be perfect for a holiday dinner, since it makes 24 rolls. 🙂

Quick Dinner Rolls
Source: King Arthur Flour

Ingredients:

  • 1/2 cup lukewarm water
  • 2 cups warm milk (100-110° F)
  • 3 tbsp. unsalted butter, melted and cooled until lukewarm
  • 2 tbsp. granulated sugar
  • 1 tbsp. salt
  • 2 1/2 tbsp. instant yeast
  • 6-7 cups unbleached all-purpose flour

Directions:

  1. Place the water, milk, butter, sugar, salt and yeast in the bowl of a stand mixer. Stir everything together, and let it sit for 6-8 minutes (until the yeast begins to foam).
  2. Add 5 cups of all purpose flour to the bowl and mix with a paddle attachment (or by hand) on low, until the dough forms a rough mass. Change the attachment on the mixer to the dough hook, turn the mixer on low. Add more flour, 1/2 cup at a time, until a smooth ball of dough starts to form. Knead for 4-5 minutes in the mixer (or by hand for 10 minutes), until a soft, smooth ball of dough has formed. The ball of dough should feel elastic and slightly tacky to the touch.
  3. Lightly spray the inside of a large bowl with cooking spray and place the dough in the bowl. Lightly spray the top of the dough with cooking spray, and cover the dough lightly with plastic wrap. Allow the dough to rise for 20 minutes at room temperature, until the dough appears to be full and puffy.
  4. Gently deflate the dough and pat out the dough into a rough rectangle, about 8×12 inches in size. Cut the dough into 4 long strips, and then divide the strip into 6 portions, making 24 dough portions. Shape the portions into round balls, and if necessary, lightly spray cooking spray on your hands to prevent sticking.
  5. Place the rolls in either one half-sheet baking pan, two quarter-sheet baking pans, two 9×13″ baking pans or four 8-9″ round baking pans. Preheat the oven to 350°F. Once the rolls are in the pans, cover the pans in plastic wrap, and allow the rolls to rise at room temperature for another 20-25 minutes.
  6. Once the oven has preheated, bake the rolls for 20-25 minutes, until the tops are golden brown and an internal thermometer reads 190°F. An optional step is to brush the baked rolls with melted butter. Serve warm. If you have leftover rolls, store the rolls in a plastic bag for up to 3 days.

Filed Under: Breads/Muffins, Holiday Recipes

Thanksgiving Throwback & GIVEAWAY!

November 11, 2015 by Amy 18 Comments

Disclosure: Butterball provided me with a turkey gift check, as well as two other turkey gift checks to giveaway, in exchange for a post. All opinions are 100% my own.

Y’all.

Thanksgiving is almost two weeks away. Yep…two weeks. I know I say this a lot, but holy cow…this year is FLYING.

I truly love this time of the year. Family gatherings mean so much to me, because as the years pass, it seems like we get busier and busier. Thanksgiving is just one of those times where we can all sit around the table and catch up on each other’s year. It’s so different from our Thanksgiving dinners from 15-20 years ago.

When we were younger, the adults would have their own table and the kids would have their own table. The adults would serve themselves on china, and the kids would eat on disposable plates. I mean, I totally understand why. I also understand why we didn’t get a tablecloth at the kid table. We sort of made a mess. 😛 Now, we all eat at the same table, and I nervously/carefully eat my meal on china (a clumsy person’s nightmare).

The food has changed as we’ve gotten older, too. Of course, there was (and still is) Butterball turkey and cornbread dressing as the main components of the meal. However, the picky kid palates are no more, so we’ve gone from mac & cheese (from a box) to cheesy cauliflower and sweet potato casserole to sweet potato souffle. While the general ideas are the same, it’s interesting to see how things have changed.

Even the topics of conversation have morphed from report card grades and what we’re asking Santa for this Christmas, to college/careers, sports and politics. With so many adults at one table now, the volume of conversation starts at a normal volume, and seemingly gets louder and louder until you can no longer hear the football game that is on TV in the background. It can be a bit overwhelming to an outsider, but I mean…that’s just how my family is. 🙂

Now, before any of the family conversations happen, Thanksgiving starts early in the morning simply with a turkey. Turkey for us is the heart of our Thanksgiving meal…it just wouldn’t be Thanksgiving without the turkey. Butterball is all about being a part of your family’s Thanksgiving. From quality turkey to great recipes and helpful turkey advice/how-to articles (hello, turkey calculator!), Butterball is there to help you host an amazing Thanksgiving gathering.

This year, Butterball is embracing the throwback, made popular by Throwback Thursday (#TBT). Butterball is encouraging families and friends this year to throwback and recall favorite Thanksgiving moments by sharing Thanksgiving family photos, memories and favorite (or not-so-favorite) vintage dishes on their Facebook page. Butterball is also bringing past Thanksgivings into the present by opening the Butterball archives and sharing their favorite throwback recipes. And of course, there’s always the help from the Turkey Talk-Line experts, who have been around for 30+ years, offering home cooks turkey-related advice around the November/December holiday season.

To gear up for the upcoming holidays, the generous folks at Butterball are offering a $20 turkey gift check to TWO readers of The Nifty Foodie.

Butterball #TBT

Enter the giveaway using the Rafflecopter widget below (continental US readers only):

a Rafflecopter giveaway

Note: This giveaway is supplied by Butterball, and is open to readers in the continental US only. Entries will be accepted until November 15th, 2015 at 11:59pm (central standard time). Winner will be emailed (make sure you leave an email address in the form), and will have 48 hours to respond or another winner will be chosen.


Filed Under: Giveaways/Reviews

Halloween Candy Muddy Buddies

November 6, 2015 by Amy Leave a Comment

Halloween Candy Muddy Buddies
Last week, our Trick or Treat night was moved to Friday night. We’ve been having some crazy rain lately, so they wanted to allow the families to enjoy Halloween with nicer weather (which Friday night was forecasted to be rain-free).

I had some grand plans of sitting out on the patio, and giving the neighborhood kids fun little treats. However, by the time the work week was over, and I had fought crazy Friday afternoon traffic, I was pretty much done. We picked up dinner, and turned off the front porch lights. LOL.

So, needless to say…leftover Halloween candy is a biggie this year in our house. I’m probably going to throw quite a bit of the chocolate in brownies for our coworkers (as usual), but I also thought that chopping it up and adding it to a batch of muddy buddies would be an easy way to get the leftover candy out of our house.

I’m surprised that I’ve never shared muddy buddies with y’all before. They’re a great, simple party food/snack, and each batch makes a LOT. With the addition of leftover Halloween candy, this batch filled up a huge party bowl, and almost all of it was gone by the end of the day. 🙂

Halloween Candy Muddy Buddies
Source: mildly adapted from Chex

Ingredients:

  • 9 cups of Chex cereal (rice, corn, and/or chocolate)
  • 1 cup semisweet chocolate chips
  • 1/2 cup peanut butter
  • 1/4 cup butter
  • 1 tsp. vanilla extract
  • 1 1/2 cups confectioners sugar
  • 1-2 cups of chocolate candy, chopped

Directions:

  1. Place the cereal in a large bowl and set aside. Line a baking sheet with wax or parchment paper and set aside.
  2. In a microwave-safe medium-sized bowl, add the chocolate chips, peanut butter and butter. Microwave the mixture for 1 minute on high. Stir the mixture well, until smooth. If you need to heat up the mixture more, microwave the mixture for 30 more seconds and stir (repeat if necessary). Stir in the vanilla extract.
  3. Pour the chocolate/peanut butter mixture over the cereal, as well as the chopped chocolate candies, and gently stir until the cereal is evenly coated in the mixture. Add the mixture evenly to two 1-gallon plastic resealable food-storage bags.
  4. Add half of the confectioners sugar to each bag, and seal each bag well. Shake each bag until the mixtures in each bag are well-coated.
  5. Spread the muddy buddies evenly onto the baking sheet, and allow the mixture to cool. Store in an airtight container in the fridge, until you are ready to serve. Enjoy!

Filed Under: Candy, Chocolate, Desserts

Greek Yogurt Pumpkin Pie + GIVEAWAY!

November 5, 2015 by Amy 7 Comments

Disclosure: The folks at Greek Gods yogurt sent me product coupons to develop this recipe. They are also providing the giveaway prize within this post. All opinions are 100% my own.

Greek Yogurt Pumpkin Pie

I’m not necessarily the strongest cook in my family. Most of the time, I can nail a recipe, but there are times when I totally have a fail.

For example, I burnt a batch of white rice in the rice cooker this weekend. Yep….rice.

Whenever stuff like this happens, I have to get back into baking again. I’m less likely to have a baking fail vs. a cooking fail, so it’s a bit of a boost when I whip up something delicious after a silly fail like that. 😛

The folks at Greek Gods yogurt reached out to me, asking me to somehow incorporate greek yogurt into a pie, since Thanksgiving is just around the corner. I’ve used yogurt substitutions before in baking with great results, so I was excited to try this out on a true classic: pumpkin pie.

When we tried this pie the other night, you couldn’t even tell that it wasn’t the traditional pumpkin pie. It was a lovely, smooth texture, and it still had that delicious pumpkin pie flavor that I’ve grown to know and love. The recipe is pretty simple…for the filling, you just dump everything in a bowl, mix and add to the pie crust. And if you don’t have time to make a crust, you can totally use a store-bought pie shell.

Greek Yogurt Pumpkin Pie
Source: an original

Ingredients:

  • 1 batch of pie crust (you will only need one pie crust for this recipe)
  • 15 oz. canned pumpkin puree
  • 1/2 cup The Greek Gods plain greek yogurt
  • 3/4 cup granulated sugar
  • 2 eggs
  • 1/4 tsp. salt
  • 1 tsp. vanilla extract
  • 2 tsp. pumpkin pie spice
  • 2 tbsp. heavy cream

Directions:

  1. Preheat the oven to 425 degrees F.
  2. Roll out the pie crust enough to fill a pie dish. Carefully place the rolled out dough in the pie dish, pressing gently against the bottom and sides of the dish to line the pie dish.
  3. In a large bowl, add the pumpkin puree, greek yogurt, granulated sugar, eggs, salt, vanilla extract, pumpkin pie spice and heavy cream. Mix everything together for a couple of minutes, until well-mixed.
  4. Carefully pour the pie filling into the pie dish, smoothing out the top. Place the pie in the oven, and bake for 15 minutes at 425. Then, reduce the temperature to 350 degrees F, and bake for 45-55 minutes. Halfway through the baking process, you will want to add foil on top of the pie crust edges, to avoid burning.
  5. Allow the pie to cool for 2 hours. Serve warm or place in the fridge until you are ready to serve. Enjoy!

For other great recipes that use greek yogurt, check out Greek Gods yogurt’s Facebook page. They have quite a few great holiday recipe ideas, ranging from a Pumpkin Pie Trifle to Greek Yogurt Biscuits!

The generous folks at Greek Gods yogurt are offering one reader of The Nifty Foodie 10 free product coupons (approximate value, up to $50) to get you started with your holiday pie baking.

Enter the giveaway using the Rafflecopter widget below (continental US readers only):

a Rafflecopter giveaway

Note: This giveaway is supplied by Greek Gods yogurt, and is open to readers in the continental US only. Entries will be accepted until November 12th, 2015 at 11:59pm (central standard time). Winner will be emailed (make sure you leave an email address in the form), and will have 48 hours to respond or another winner will be chosen.


Filed Under: Giveaways/Reviews, Nifty Foodie Original, Pies, Pumpkin

Pumpkin Marble Cupcakes

October 27, 2015 by Amy Leave a Comment

Disclosure: I wrote this post as a part of OXO’s Bake a Difference for Cookies for Kids’ Cancer (#OXOGoodCookies) campaign. I received no compensation for this post, but was given OXO products to use to make this recipe.

Pumpkin Marble Cupcakes

I have never been much of a stereotypical Halloween person. Costume parties make me cringe, because my cheap self refuses to purchase a costume that I’ll just wear one day out of the year. Haunted houses….well, you couldn’t pay me enough to go to a haunted house. Scary movies? Um…no.

I’m in the minority here. The only side of Halloween I like is the whimsical “Merry, Not Scary” side of Halloween. I like cute jack o’ lanterns, boo-ing neighbors/coworkers, Hocus Pocus (on repeat!), and ok…Trick or Treaters are pretty much adorable. So, when it comes to making something festive for Halloween, I always lean towards the cute side.

When I went to Hobby Lobby a while back, I saw these adorable jumbo candy eyes in the cake decorating section. I thought they would be perfect for a festive Halloween cupcake! And what’s more festive than pumpkin right now? These cupcakes are basic pumpkin cupcakes swirled with chocolate flavor and topped with a simple vanilla buttercream.

I made these cupcakes to Bake a Difference with OXO for Cookies for Kids’ Cancer. This fall, keep your eyes peeled for certain OXO products with this sticker on the tag.

oxo
Source: OXO (Image used with permission)

OXO sent me some of their latest cupcake products, including:

  • Non-Stick Pro 12 Cup Muffin Pan: http://us.oxo.com/bfmNQ
  • Cupcake Icing Knife: http://us.oxo.com/bfmP3
  • 4 Piece Baker’s Silicone Decorating Bottle Kit: http://us.oxo.com/bfmPh

When I received the OXO products, I was so impressed, especially with the cupcake pan! The cupcake pan is heavy duty…like, really heavy duty. I don’t think I’ll ever be able to use my regular pans again! The cupcake icing knife was nice to use. It’s perfectly sized for frosting cupcakes. Now, while the silicone decorating kit is really great, (especially since it’s dishwasher safe) I sort of wish it was double the capacity. I like to use a lot of frosting for cupcakes, and refilling this for every other cupcake was sort of a pain. However, I think it will work perfectly for filling cupcakes or it may be better suited for cookies, where you don’t use a ton of frosting.

Pumpkin Marble Cupcakes
Source: an original

Ingredients:

For the cupcakes:

  • 2 cups all-purpose flour
  • 1 tsp. baking soda
  • 1 tsp. baking powder
  • 1/2 tsp. salt
  • 2 1/2 tsp. pumpkin pie spice
  • 1 cup packed light-brown sugar
  • 1 cup granulated sugar
  • 1 cup (2 sticks) unsalted butter, melted and cooled
  • 4 large eggs, lightly beaten
  • 1 15 oz. can of pumpkin puree
  • 3 tbsp. cocoa powder

For the buttercream:

  • 1 recipe easy vanilla buttercream

Optional: Jumbo Candy Eye sprinkles

Directions:

  1. Preheat the oven to 350 degrees. Line your cupcake pans with cupcake liners and set aside.
  2. In a medium sized bowl, add the flour, baking soda, baking powder, salt, and pumpkin spice Whisk the ingredients together until well-combined and set aside.
  3. In the bowl of a stand mixer, mix the sugars, butter and eggs together until fully mixed. Add in the dry ingredients, and mix on low until the mixture is smooth. Scrape down the bowl. Add in the can of pumpkin puree, and mix until everything is well-combined.
  4. Place half of the cupcake batter in another bowl, and mix in the cocoa powder.
  5. Fill each cupcake liner about halfway full, alternating the pumpkin and pumpkin chocolate batters, and then, using a toothpick, carefully swirl the batters in the cupcake liners. Bake the cupcakes for about 20-25 minutes, rotating once after 10 minutes. You’ll know the cupcakes are done baking when  a toothpick inserted in the center of the cupcakes comes out clean. Allow the cupcakes to cool completely.

Pumpkin Marble Cupcakes

To decorate, there’s two ways to go about it (which are pictured above). The quicker/easier method to frost them is to spread on a thick, even layer of frosting, using a cupcake icing knife. If you wanted to go a little more detailed, first spread on a thin layer of frosting, using the cupcake icing knife. Then, using the baker’s silicone decorating bottle kit (with the star tip), pipe on little dollops of frosting all over the top of the cupcake. After the cupcakes are frosted, top each cupcake with two jumbo candy eyes. Serve and enjoy!

Notes:
  • Cookies for Kids’ Cancer is a recognized 501c(3) public charity duly incorporated under the laws of the state of New Jersey. Your donations are tax deductible to the fullest extent allowable by law. 100% of proceeds raised by Cookies for Kids’ Cancer fund pediatric cancer research.
  • OXO will be donating $100 to Cookies for Kids’ Cancer for each blog post dedicated to this campaign in October (up to our $100,000 commitment*.)
  • *In 2015, OXO will donate up to $100,000 to Cookies for Kids’ Cancer through product proceeds, bake sale matches and other fundraising efforts

Filed Under: Cakes/Cupcakes, Chocolate, Nifty Foodie Original, Pumpkin

Chocolate-Dipped Cocoa Marshmallows + GIVEAWAY

October 13, 2015 by Amy 4 Comments

Disclosure: I was sent a review copy of this book from the publisher at no cost to me for a fair and honest review. The giveaway book is also supplied by the publisher. All opinions are 100% my own.

Chocolate-Dipped Cocoa Marshmallows

With the holidays fast approaching, it’s time for me to start brainstorming for homemade holiday gifts. I usually make dozens of various cookies, but this year, since we’re in the process of building a house, things will be scaled back a bit.

Sure, I’ll probably bake up a few things, but I want to try to branch out a little bit. So, when I was approached to review a book about candy-making, I was totally eager to try it. Sally of Sally’s Baking Addiction just released a new cookbook: Sally’s Candy Addiction.

Chocolate-Dipped Cocoa Marshmallows

Now, while candy-making can be fairly intimidating, I’m noticing that most of these recipes are fairly approachable. There’s a section which explains candy-making basics, to help you understand the supplies that are needed, as well as the different stages of cooking sugar. As far as the recipes go, there’s a nice variety of recipes included…from fudge to caramels to truffles and taffy. I think it would be an awesome cookbook to have if you want to get started with candy-making, especially with the holiday season coming up!

While sifting through the cookbook, these chocolate-dipped cocoa marshmallows caught my eye. I thought that they would be perfect to try before the holidays, since you can pretty much top them with any candy or sprinkles after you dip them in chocolate. For the upcoming holidays, I thought it would be festive to crush up some peppermint candies!

Chocolate-Dipped Cocoa Marshmallows

Chocolate-Dipped Cocoa Marshmallows
Source: Sally’s Candy Addiction
(Recipe shared with permission from the publisher.)

Ingredients:

  • 2/3 cup natural unsweetened or Dutch-process cocoa powder, divided
  • 1/4 cup confectioners’ sugar
  • 2 tbsp. cornstarch
  • 1 1/3 cups cold water, divided
  • 3 x 1/4 oz. packages unflavored gelatin
  • 1 cup light corn syrup
  • 1 1/2 cups granulated sugar
  • 1/4 tsp. salt
  • 1 tsp. vanilla extract
  • 16 oz. semi-sweet chocolate, coarsely chopped
  • sprinkles or crushed candies (for topping)

Directions:

  1. Prepare a 9×13 inch glass or ceramic baking pan by lining it with non-stick foil or parchment and spraying the inside with non-stick cooking spray (just an added step to make absolutely sure that nothing will stick). Set the pan aside. Sift half of the cocoa powder (1/3 cup), confectioners’ sugar, and cornstarch together in a small bowl, and using a fine sieve, very lightly sprinkle some of the mixture around the prepared pan. There will be a good bit of the mixture left for later on in the recipe.
  2. Place the remaining 1/3 cup of cocoa powder and 1/3 cup of water in a heatproof bowl or mug. Microwave the mixture on high power for 90 seconds. Stir the hot mixture very well until combined and set aside.
  3. Place the gelatin and 1/2 cup of the water in a bowl of a stand mixer, fitted with the whisk attachment. Whisk the mixture on low speed for 1 minute to briefly combine. Add the hot cocoa powder/water mixture to the gelatin mix and whisk on low speed for another 30 seconds. Allow the mixture to sit in the mixer as you cook the sugar syrup, being sure to stir the mixture for 20 seconds every 3 minutes or so.
  4. To cook the sugar syrup, place the last 1/2 cup of water, corn syrup, granulated sugar and salt in a 3 quart heavy-duty saucepan over medium heat. Stir the mixture with a wooden spoon until the sugar has completely dissolved. Then, attach a candy thermometer to the pan. Make sure you don’t let the thermometer touch the bottom of the pan, as that can give a false reading. As the sugar syrup begins to cook, brush down the sides of the pan with a water-moistened pastry brush to prevent crystallization. Cook the sugar syrup, being sure not to stir the mixture, until the temperature reaches 240°F (116°C; soft ball stage).
  5. Turn the stove off and remove the pan from heat. Turn the mixer on the lowest speed and slowly (and carefully, since the syrup is extremely hot) pour in the hot syrup to the gelatin/cocoa mixture.
  6. Gradually increase the mixer speed until the mixer is on high speed. Whip the marshmallow mixture for 10-15 minutes, or until the mixture is light brown, thick and appears to be shiny.
  7. Working swiftly (since the mixture cools down and sets fast), pour/spoon the marshmallow mixture into the prepared baking pan and smooth out the top with a rubber spatula. Allow the marshmallows to sit uncovered at room temperature for at least 6 hours, preferably overnight.
  8. Once the marshmallows are completely firm and set, get a work station ready for cutting the marshmallows. Cover the surface of your counter with wax or parchment paper. Sprinkle the cocoa/confectioners’ sugar/cornstarch mixture on the surface, as well as on top of the marshmallow.
  9. Using a pizza cutter or sharp knife coated with some of the cocoa/confectioners’ sugar/cornstarch mixture, cut the marshmallow into 2 inch squares. If it starts sticking even more, run the blade of the cutter under hot water and wipe dry with a paper towel. Roll the cut edges of the marshmallows in the cocoa mixture to ensure that they will no longer be sticky.
  10. Line 2 large baking sheets with parchment paper or silicone baking mats and set aside. Melt/temper the chopped semi-sweet chocolate, and dip each marshmallow halfway into the warm chocolate. Lift out the marshmallow and gently shake off the excess chocolate. Carefully place the marshmallow onto the prepared baking sheet and top with the toppings of choice. Repeat with the rest of the marshmallows, and allow the chocolate to completely set before serving. (If you don’t eat the marshmallows immediately, layer the marshmallows between sheets of parchment or wax paper in an airtight container and store at room temperature in a cool/dry place. They will keep for about a week.)

Would you like to win a copy? The publishers of this book are offering ONE lucky reader of The Nifty Foodie a copy of “Sally’s Candy Addiction”!

To enter the giveaway, just use the Rafflecopter widget below.

a Rafflecopter giveaway

Note: This giveaway is supplied by the publisher and is open to readers in the continental US only. Entries will be accepted until October 20th, 2015 at 11:59pm (central standard time). Winner will be emailed (make sure you leave an email address in the form), and will have 48 hours to respond or another winner will be chosen.

Filed Under: Candy, Chocolate, Giveaways/Reviews

  • « Go to Previous Page
  • Go to page 1
  • Interim pages omitted …
  • Go to page 4
  • Go to page 5
  • Go to page 6
  • Go to page 7
  • Go to page 8
  • Interim pages omitted …
  • Go to page 85
  • Go to Next Page »

Primary Sidebar

Hey Y’all!

Image Credit: Leslie Pendleton Photography


Hey y’all!

Thanks so much for reading! I’m Amy, and I live in south Louisiana with my husband and our rescue dog. I enjoy sharing my love for cooking, baking, crafts & more! Follow my daily adventures on social media!

Follow my Daily Adventures

  • Email
  • Facebook
  • Instagram
  • Pinterest
  • Twitter

Footer

  • Email
  • Facebook
  • Instagram
  • Pinterest
  • Twitter

Archives

Copyright © 2026 · Foodie Pro Theme by Shay Bocks · Built on the Genesis Framework · Powered by WordPress