• Skip to primary navigation
  • Skip to main content
  • Skip to primary sidebar
  • Skip to footer

The Nifty Foodie

  • Home
  • About
  • Recipes
    • Appetizers
    • Beverages
    • Breads/Muffins
    • Breakfast
    • Canning
    • Desserts
    • Dog Treats
    • Entertaining/Parties
    • Fruit
    • Holiday Recipes
    • Louisiana Cuisine
    • Main Dishes
    • Mexican
    • Nifty Foodie Original
    • Nifty Tricks
    • Project Food Blog
    • Pumpkin
    • Salads
    • Sauces/Dips
    • Side Dishes
    • Skinny
    • Slow Cooker
    • Spices
    • Stews/Soups
    • The Disasters
  • My Weight Loss Journey
    • Races
    • Running
    • Weight Loss Milestones
  • Crafts
  • Contact Me

Nifty Foodie Original

Blueberry Margaritas + Blue Cheese Guacamole!

May 5, 2016 by Amy Leave a Comment

Disclosure: This is a sponsored post, on behalf of Corralejo Tequila and Cheese of Europe. I was compensated for this post, and all opinions are 100% my own. Please drink responsibly.

IMG_9402

Happy Cinco de Mayo, y’all! I’m not sure how we got to May, but I’m not complaining! We’re so close to summer, and while I’m no longer in school, I’m looking forward to no more school traffic and a happy thing for food bloggers — more sunlight!

IMG_9417

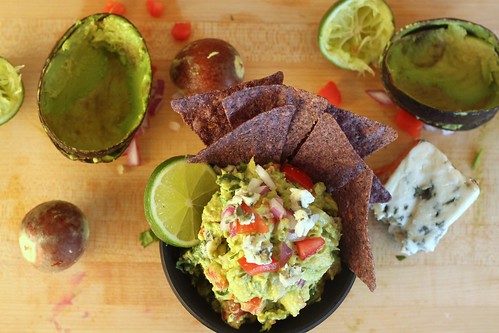
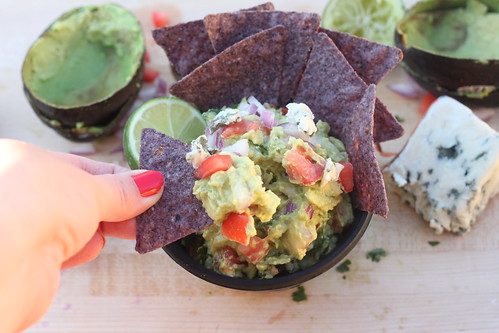
When it comes to Cinco de Mayo, I have to have something tex-mex. It just feels right. So, I made some guacamole and not just any guacamole…I made blue cheese guacamole!

I just love a good, chunky guacamole. This recipe is a twist on a classic — just crumbling in some tangy, slightly-spicy Roquefort (blue) cheese brings this guacamole to a whole different level! It’s fantastic, and it couldn’t be easier to make.

IMG_9427

Blue Cheese Guacamole
Source: an original

Ingredients:

  • 2 large Hass avocados, peeled and pitted
  • 1 medium roma tomato, seeded and chopped
  • 1/4 cup chopped red onion
  • 2 cloves garlic, minced
  • 2 tbsp. chopped fresh cilantro
  • 1/4 cup crumbled Roquefort cheese
  • juice of one lime
  • 1 tsp. salt
  • 1/2 tsp. black pepper

Directions:

  1. Place the avocados in a medium-sized bowl and mash the avocados with a fork. Place the rest of the ingredients in the bowl with the avocado, and mix until everything is well-combined.
  2. Enjoy!

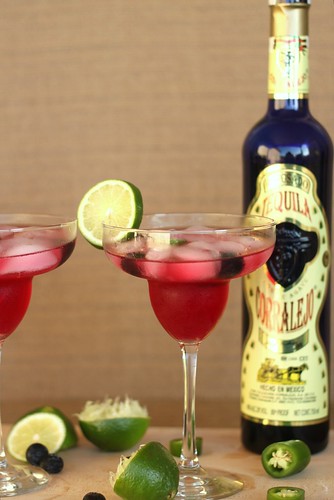
Since it’s Cinco de Mayo, you know I was itching to make a margarita. Since I was already working with BLUE cheese, my silly self thought…why not make BLUEberry margaritas? (Get it? I crack myself up!) And to give it a little extra kick, I added in a little jalapeno. 🙂

This is the first time I’ve ever had Corralejo tequila, and their Reposado paired really well with blueberry. Confession time: I didn’t really know much about how tequilas were made until recently. Corralejo Reposado is aged four months in barrels, which are made from three types of wood including French, American and Mexican Oak. Corralejo Silver is bottled fresh from the distillery.

Now, as far as the margarita goes, this margarita didn’t have a jalapeno flavor…rather, it just gave the drink a slightly spicy kick. To make the drink, I made a blueberry simple syrup, and added that to the tequila/triple sec/lime/jalapeno. That way, you can easily control how sweet/blueberry-ish you want your margarita to be.

IMG_9408

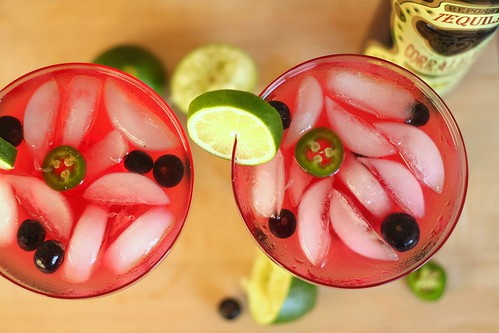
Blueberry Jalapeno Margarita
Source: an original

Ingredients:

To make the blueberry simple syrup:

  • 1 cup fresh blueberries
  • 1 cup sugar
  • 1 cup water

To make the margarita:

  • 4 oz. Corralejo Reposado Tequila
  • 2 oz. Triple Sec
  • 1/4 to 1/3 sliced jalapeno (depending on how much of a kick you want)
  • juice of 3 limes
  • 2-3 oz. blueberry simple syrup (depending on how sweet you want the drink to be)
  • Optional: salt for the rim, fresh blueberries and lime slices for garnish

Directions:

  1. To make the simple syrup, heat the blueberries, sugar and water together in a medium saucepan, stirring and mashing the berries as the mixture cooks. Cook the simple syrup until the sugar has fully dissolved. Turn off the heat and set aside until fully cooled. Once the mixture has cooled, put the blueberry simple syrup through a strainer and into a large jar. Discard the blueberries that strain out.
  2. Place the tequila, triple sec, jalapeno slices, lime juice, and blueberry simple syrup into a cocktail shaker over ice. Cover the shaker and shake the mixture well. Pour the margarita into glasses over ice and enjoy! (Please drink responsibly.)

Filed Under: Appetizers, Beverages, Entertaining/Parties, Fruit, Mexican, Nifty Foodie Original

Spicy Chipotle Taco Soup

February 25, 2016 by Amy Leave a Comment

Disclosure: OXO sent me free products, in exchange for a fair and honest review. All opinions are 100% my own.

Spicy Chipotle Taco Soup

Since we moved to the new house, we have been using the kitchen quite a bit. Honestly, the kitchen is what made me fall for the floor plan, so of course, I was going to go a little crazy. After a couple of weeks, however, we were definitely missing our old vented kitchen. So, we had someone come out and take care of venting the kitchen for us.

I can’t even begin to explain how nice it is to have a venting kitchen again. A lot of Louisiana comfort food revolves around cooking with onions/bell peppers/celery to start out the dishes, and while it smells good when you’re cooking, I really don’t want to smell it the next morning haha! It’s so nice to no longer deal with that…in fact, when I was cooking this soup, H commented that he could barely smell it (and y’all know that tex-mex spices, like cumin, are strong)! So, I’m definitely in my happy place when I’m in our kitchen now. 🙂

OXO sent me some of their newest products to try out, and I couldn’t help but think about making a hearty soup with some of their tools. I was sent the Ground Meat Chopper and Turner, Silicone Ladle, and the
Vegetable Chopper with Easy-Pour Opening.

OXO

I decided to make a spicy chipotle taco soup the other night. After having a smoky tortilla soup at a local tex-mex place, I so wanted to replicate the broth as closely as I could. One thing I didn’t expect was for H to love it as much as he did. He’s usually adding more spices to whatever I make, and I’m pretty sure he didn’t add anything to this soup! I will mention that this soup is pretty darn spicy, so I added some avocado slices to my bowl to help with the heat from this soup. If you don’t want it to be very spicy, you can use less chipotle peppers (or remove the seeds) or use a milder Rotel in the recipe (I used original). I also wanted to mention that while it’s delicious the day you make it, it’s even MORE flavorful the next day. Look at how hearty this soup is!

OXO

I have to admit, this recipe is pretty darn quick to throw together. Prep was very easy, thanks to the OXO Vegetable chopper. Chopping the onion and bell pepper was a breeze!

OXO

Also, I was surprised at how helpful the OXO Ground Meat Chopper was. I’m used to chopping things up with a spatula, but this made the meat break up so easily and quickly.

OXO

I think this recipe is perfect for weeknight cooking. You don’t have to prep too much, and a good bit of the ingredients involve cans of vegetables to add into the recipe. So simple and super delicious!

Spicy Chipotle Taco Soup

Spicy Chipotle Taco Soup
Source: an original

Ingredients:

  • 1 lb. lean ground beef (at least 90% lean)
  • 1 medium yellow onion, chopped
  • 1 green bell pepper, chopped
  • 3/4 tsp. chili powder
  • 1 tsp. cumin
  • 1/2 tsp. smoked paprika
  • 1/2 tsp. salt
  • 3 cloves garlic, minced
  • 1 chipotle pepper (from a can of chipotle peppers in adobo sauce), finely chopped
  • 2 tbsp. adobo sauce
  • 2 10.5 oz. cans of Rotel, with juice (I used medium…if you want it not as spicy, use mild)
  • 1 15 oz. can of yellow corn, rinsed and drained
  • 1 15 oz. can of black beans, rinsed and drained
  • 32 oz. chicken stock
  • 1/4 cup heavy cream
  • Optional toppings: sliced avocado, cheese, broken-up tortilla chips

Directions:

  1. In a large, heavy stockpot (at least 5 quarts in size) over medium-high heat, brown the lean ground beef until it’s fully cooked.
  2. Add in the chopped onion and bell pepper, cooking until the onions are translucent. Reduce the heat to medium. Then, add in the cumin, smoked paprika, salt, garlic cloves, chipotle pepper and adobo sauce, and stir/cook for about another minute, until fragrant.
  3. Add in the Rotel, yellow corn, black beans and chicken stock. Stir and reduce the heat to a simmer. Once it reaches a simmer, place the lid on the pot, and allow the soup to simmer for 20-30 minutes. When the soup has finished simmering, slowly pour and mix in the heavy cream. Enjoy!


Filed Under: Beef, Mexican, Nifty Foodie Original, Review, Stews/Soups

Greek Yogurt Pumpkin Pie + GIVEAWAY!

November 5, 2015 by Amy 7 Comments

Disclosure: The folks at Greek Gods yogurt sent me product coupons to develop this recipe. They are also providing the giveaway prize within this post. All opinions are 100% my own.

Greek Yogurt Pumpkin Pie

I’m not necessarily the strongest cook in my family. Most of the time, I can nail a recipe, but there are times when I totally have a fail.

For example, I burnt a batch of white rice in the rice cooker this weekend. Yep….rice.

Whenever stuff like this happens, I have to get back into baking again. I’m less likely to have a baking fail vs. a cooking fail, so it’s a bit of a boost when I whip up something delicious after a silly fail like that. 😛

The folks at Greek Gods yogurt reached out to me, asking me to somehow incorporate greek yogurt into a pie, since Thanksgiving is just around the corner. I’ve used yogurt substitutions before in baking with great results, so I was excited to try this out on a true classic: pumpkin pie.

When we tried this pie the other night, you couldn’t even tell that it wasn’t the traditional pumpkin pie. It was a lovely, smooth texture, and it still had that delicious pumpkin pie flavor that I’ve grown to know and love. The recipe is pretty simple…for the filling, you just dump everything in a bowl, mix and add to the pie crust. And if you don’t have time to make a crust, you can totally use a store-bought pie shell.

Greek Yogurt Pumpkin Pie
Source: an original

Ingredients:

  • 1 batch of pie crust (you will only need one pie crust for this recipe)
  • 15 oz. canned pumpkin puree
  • 1/2 cup The Greek Gods plain greek yogurt
  • 3/4 cup granulated sugar
  • 2 eggs
  • 1/4 tsp. salt
  • 1 tsp. vanilla extract
  • 2 tsp. pumpkin pie spice
  • 2 tbsp. heavy cream

Directions:

  1. Preheat the oven to 425 degrees F.
  2. Roll out the pie crust enough to fill a pie dish. Carefully place the rolled out dough in the pie dish, pressing gently against the bottom and sides of the dish to line the pie dish.
  3. In a large bowl, add the pumpkin puree, greek yogurt, granulated sugar, eggs, salt, vanilla extract, pumpkin pie spice and heavy cream. Mix everything together for a couple of minutes, until well-mixed.
  4. Carefully pour the pie filling into the pie dish, smoothing out the top. Place the pie in the oven, and bake for 15 minutes at 425. Then, reduce the temperature to 350 degrees F, and bake for 45-55 minutes. Halfway through the baking process, you will want to add foil on top of the pie crust edges, to avoid burning.
  5. Allow the pie to cool for 2 hours. Serve warm or place in the fridge until you are ready to serve. Enjoy!

For other great recipes that use greek yogurt, check out Greek Gods yogurt’s Facebook page. They have quite a few great holiday recipe ideas, ranging from a Pumpkin Pie Trifle to Greek Yogurt Biscuits!

The generous folks at Greek Gods yogurt are offering one reader of The Nifty Foodie 10 free product coupons (approximate value, up to $50) to get you started with your holiday pie baking.

Enter the giveaway using the Rafflecopter widget below (continental US readers only):

a Rafflecopter giveaway

Note: This giveaway is supplied by Greek Gods yogurt, and is open to readers in the continental US only. Entries will be accepted until November 12th, 2015 at 11:59pm (central standard time). Winner will be emailed (make sure you leave an email address in the form), and will have 48 hours to respond or another winner will be chosen.


Filed Under: Giveaways/Reviews, Nifty Foodie Original, Pies, Pumpkin

Pumpkin Marble Cupcakes

October 27, 2015 by Amy Leave a Comment

Disclosure: I wrote this post as a part of OXO’s Bake a Difference for Cookies for Kids’ Cancer (#OXOGoodCookies) campaign. I received no compensation for this post, but was given OXO products to use to make this recipe.

Pumpkin Marble Cupcakes

I have never been much of a stereotypical Halloween person. Costume parties make me cringe, because my cheap self refuses to purchase a costume that I’ll just wear one day out of the year. Haunted houses….well, you couldn’t pay me enough to go to a haunted house. Scary movies? Um…no.

I’m in the minority here. The only side of Halloween I like is the whimsical “Merry, Not Scary” side of Halloween. I like cute jack o’ lanterns, boo-ing neighbors/coworkers, Hocus Pocus (on repeat!), and ok…Trick or Treaters are pretty much adorable. So, when it comes to making something festive for Halloween, I always lean towards the cute side.

When I went to Hobby Lobby a while back, I saw these adorable jumbo candy eyes in the cake decorating section. I thought they would be perfect for a festive Halloween cupcake! And what’s more festive than pumpkin right now? These cupcakes are basic pumpkin cupcakes swirled with chocolate flavor and topped with a simple vanilla buttercream.

I made these cupcakes to Bake a Difference with OXO for Cookies for Kids’ Cancer. This fall, keep your eyes peeled for certain OXO products with this sticker on the tag.

oxo
Source: OXO (Image used with permission)

OXO sent me some of their latest cupcake products, including:

  • Non-Stick Pro 12 Cup Muffin Pan: http://us.oxo.com/bfmNQ
  • Cupcake Icing Knife: http://us.oxo.com/bfmP3
  • 4 Piece Baker’s Silicone Decorating Bottle Kit: http://us.oxo.com/bfmPh

When I received the OXO products, I was so impressed, especially with the cupcake pan! The cupcake pan is heavy duty…like, really heavy duty. I don’t think I’ll ever be able to use my regular pans again! The cupcake icing knife was nice to use. It’s perfectly sized for frosting cupcakes. Now, while the silicone decorating kit is really great, (especially since it’s dishwasher safe) I sort of wish it was double the capacity. I like to use a lot of frosting for cupcakes, and refilling this for every other cupcake was sort of a pain. However, I think it will work perfectly for filling cupcakes or it may be better suited for cookies, where you don’t use a ton of frosting.

Pumpkin Marble Cupcakes
Source: an original

Ingredients:

For the cupcakes:

  • 2 cups all-purpose flour
  • 1 tsp. baking soda
  • 1 tsp. baking powder
  • 1/2 tsp. salt
  • 2 1/2 tsp. pumpkin pie spice
  • 1 cup packed light-brown sugar
  • 1 cup granulated sugar
  • 1 cup (2 sticks) unsalted butter, melted and cooled
  • 4 large eggs, lightly beaten
  • 1 15 oz. can of pumpkin puree
  • 3 tbsp. cocoa powder

For the buttercream:

  • 1 recipe easy vanilla buttercream

Optional: Jumbo Candy Eye sprinkles

Directions:

  1. Preheat the oven to 350 degrees. Line your cupcake pans with cupcake liners and set aside.
  2. In a medium sized bowl, add the flour, baking soda, baking powder, salt, and pumpkin spice Whisk the ingredients together until well-combined and set aside.
  3. In the bowl of a stand mixer, mix the sugars, butter and eggs together until fully mixed. Add in the dry ingredients, and mix on low until the mixture is smooth. Scrape down the bowl. Add in the can of pumpkin puree, and mix until everything is well-combined.
  4. Place half of the cupcake batter in another bowl, and mix in the cocoa powder.
  5. Fill each cupcake liner about halfway full, alternating the pumpkin and pumpkin chocolate batters, and then, using a toothpick, carefully swirl the batters in the cupcake liners. Bake the cupcakes for about 20-25 minutes, rotating once after 10 minutes. You’ll know the cupcakes are done baking when  a toothpick inserted in the center of the cupcakes comes out clean. Allow the cupcakes to cool completely.

Pumpkin Marble Cupcakes

To decorate, there’s two ways to go about it (which are pictured above). The quicker/easier method to frost them is to spread on a thick, even layer of frosting, using a cupcake icing knife. If you wanted to go a little more detailed, first spread on a thin layer of frosting, using the cupcake icing knife. Then, using the baker’s silicone decorating bottle kit (with the star tip), pipe on little dollops of frosting all over the top of the cupcake. After the cupcakes are frosted, top each cupcake with two jumbo candy eyes. Serve and enjoy!

Notes:
  • Cookies for Kids’ Cancer is a recognized 501c(3) public charity duly incorporated under the laws of the state of New Jersey. Your donations are tax deductible to the fullest extent allowable by law. 100% of proceeds raised by Cookies for Kids’ Cancer fund pediatric cancer research.
  • OXO will be donating $100 to Cookies for Kids’ Cancer for each blog post dedicated to this campaign in October (up to our $100,000 commitment*.)
  • *In 2015, OXO will donate up to $100,000 to Cookies for Kids’ Cancer through product proceeds, bake sale matches and other fundraising efforts

Filed Under: Cakes/Cupcakes, Chocolate, Nifty Foodie Original, Pumpkin

Citrus Berry Avocado Salad with Orange Basil Vinaigrette

June 18, 2014 by Amy Leave a Comment

Citrus Berry Avocado Salad with Orange Basil Vinaigrette

I’m absolutely loving the summer flavors lately. I currently can’t get enough avocado in my life, and a bowl full of fresh berries is my ultimate craving. Comfort food is great and all, but when the summer is around, I just want to live in the produce aisle.

Currently, our veggie garden is thriving. Our jalapenos are growing like crazy, and I’m fairly tempted to make more jalapeno pepper jelly to use some of them up. I just dug up some garlic that I planted last July as well and can’t wait for it to dry out, and also, our basil plant just won’t stop growing! I’m going to have to take a weekend to make a large freezer batch of pesto!

Now, when it comes to basil, I’ve been looking for more ways to use it up (no offense to pesto), and I thought about adding it into my salads. I love a good, herby vinaigrette and thought that combined with orange, it would be a great combination. This salad is a great way to use up leftover chicken or rotisserie chicken from the store, and because of that, it’s a meal that comes together very quickly. It’s also very colorful, which makes for a fun presentation.

Citrus Berry Avocado Salad with Orange Basil Vinaigrette
Source: an original

Ingredients:

For the salad:

  • 1 9 oz. bag baby spinach
  • 1 cup fresh blueberries
  • 1 cup canned mandarin oranges, strained (preserved in water, not syrup)
  • 1 Haas avocado, cut in large cubes
  • 1/2 cup crumbled feta cheese
  • 1/4 cup sliced almonds
  • 1 cup chopped rotisserie chicken

For the Dressing:

  • 1/4 cup fresh orange juice (juice of one large orange)
  • 1/4 tsp. orange zest
  • 6 basil leaves
  • 2 tbsp. red wine vinegar
  • 5 tbsp. extra virgin olive oil
  • 1/2 tsp. salt
  • 1/4 tsp. black pepper
  • 1 tsp. granulated sugar

Directions:

  1. To assemble the salad, place the baby spinach in a large bowl. Sprinkle the blueberries, oranges, feta cheese, avocado and chicken on top.
  2. To make the dressing, place all ingredients in a blender and blend until everything is well mixed and the basil is finely chopped. Pour the dressing over the salad, and sprinkle the almonds on top. Toss the salad well and enjoy!

Filed Under: Fruit, Nifty Foodie Original, Poultry, Salads

Bananas Foster a la Mode Cups & A Giveaway!

September 18, 2013 by Amy 32 Comments

bananasfosteralamode2

A couple of months ago, my husband and I went to a restaurant in New Orleans. When it came time for dessert, we decided to split something, but the problem with splitting with my husband is the dessert cannot contain any chocolate, caramel or peanut butter (he hates it all). I know…poor guy doesn’t know what he’s missing! Luckily, this particular restaurant had a bananas foster torte, so I knew we were set. It was absolutely delicious, indulgent and rich. In fact, I’m SO glad we split it, because there was no way I could eat the whole thing. Ever since then, bananas foster has been fresh on my mind. I had to make a fun recipe with this classic New Orleans favorite.

I’m thrilled to be working with Calphalon again to review their brand new Elite Nonstick cookware, which is sold exclusively at Williams-Sonoma. It’s currently for sale on their website, and will be in stores on September 27th. I’m sure you guys know that I love using nonstick cookware, but one of the biggest issues I’ve faced is being limited to wooden or silicone utensils. This line is safe for metal utensils (fork out your whisks!). Yep…I’m serious! This cookware also comes with a textured sear surface, which is awesome because you can get the sear that you usually get from stainless steel, but with the convenience (hello, easy clean-up) of a nonstick pan. This line of cookware is also dishwasher safe.

Calphalon sent me this 3 piece set to review, and asked me to create a modern twist on a classic recipe, using one of the pans. With that in mind, I grabbed the 10″ pan, some bananas and got to work! The end result is homemade bananas foster ice cream, topped with warm bananas foster, contained in a cinnamon sugar wonton cup. I hope you like bananas for this one, y’all, because there is plenty of sweet banana flavor in this recipe!

bananasfosteralamode

For the ice cream, I omitted the rum, because even though the alcohol cooks off, I didn’t want to chance the ice cream not setting up properly. I suggest making the ice cream one day before you plan on serving these desserts, so the ice cream can be a scoop-able consistency.

…

Read More »

Filed Under: Desserts, Frozen Desserts, Fruit, Giveaways/Reviews, Nifty Foodie Original

Turkey Tex-Mex Sloppy Joe Quesadillas & Calphalon GIVEAWAY

July 2, 2013 by Amy 211 Comments

sloppyjoequesadillas

Well, HELLO JULY! So many wonderful things going on this month: July 4th, my best friend’s wedding (OMG…hope my bridesmaid dress still fits after the 4th haha!)…well, that’s basically it. However, those are two HUGE events to me. I love the 4th of July. LOVE. The fireworks, the smell of the grills going crazy in our neighborhood and celebrating the holiday with All-American classic dishes. It’s just great. I’m pretty sure I wake up on July 4th craving food from the grill. Wonder if my husband would grill breakfast for me….LOL!

One of my favorite All-American dishes is sloppy joes. My Mom used to make sloppy joes a lot when we were kids, and the klutzy person in me loves the fact that the food is naturally sloppy. Whenever I go out to eat, I end up with a line of food around my plate. I’m not a neat eater at all. I’m sort of a disaster in public…I’m surprised people take me anywhere. Any food that says it’s sloppy means no judgement if I make a mess, right? Right.

…

Read More »

Filed Under: Appetizers, Giveaways/Reviews, Nifty Foodie Original

Strawberry Margarita Cupcakes

May 1, 2013 by Amy 3 Comments

strawberrymargaritacupcakes

I was a huge *NSYNC fan back in the day, and every year, I get a real kick out of the “It’s Gonna Be May” meme. Seeing it 2390859 times on Facebook this week made me watch the video again, and it reminded me of the days when I would get to drive my Mom’s minivan and would blast *NSYNC’s “Pop” CD in the old Discman (with the cassette tape attachment), since the minivan only had a cassette player. Ahh…how times have changed, y’all!

(Please tell me someone else attached their Discman to the car stereo with the cassette tape adapter…)

Anyway…it’s May (whoa..). And well, since it’s May, Cinco de Mayo is just around the corner. Usually the tex-mex places appeal to me with their food and margarita specials for the day, but lately, I’m not that much of a drinker since I started calorie counting. Give me ice cream over a 1,000 calorie cocktail. I know…I’m weird. We actually purchased alcohol on our cruise in December, and this is the first time I opened the tequila we bought there. We’re kind of boring in this house. 😛

I’ve been wanting to make these cupcakes for a while, but the boozy aspect is what got to me. I can’t exactly do my usual baking routine of baking a recipe and bringing it to coworkers. I’m pretty sure HR would be at my desk within 2 hours, so I’ve never made them. However, these are for a celebration for a good friend of mine, and since she’s a big fan of everything tex-mex, I thought these would be the perfect cupcake to celebrate. 🙂

I ended up adapting a strawberry cupcake recipe by adding lime juice and zest, as well as brushing the tops of the cupcakes with tequila (which I found this idea on another blog). The frosting is a simple buttercream with strained strawberry puree, lime zest and of course, tequila. The combination of these flavors are just awesome. I hope she enjoys these! 🙂

Strawberry Margarita Cupcakes
Source: cupcake recipe adapted from Martha Stewart, technique from Confections of a Foodie Bride, frosting is a Nifty Foodie Original

Ingredients:

For the cupcakes:

  • 1 1/2 cups all-purpose flour
  • 1 1/2 cups cake flour
  • 1 tbsp. baking powder
  • 1 tsp. salt
  • 1 cup (2 sticks) unsalted butter, room temperature
  • 1 3/4 cups sugar
  • 4 large eggs
  • 2 tsp. pure vanilla extract
  • juice and zest of one lime
  • 1 1/4 cups milk
  • 10 oz. strawberries, hulled and diced finely
  • 1/4 cup tequila

For the buttercream:

  • 1 cup (2 sticks) unsalted butter, room temperature
  • 3-4 cups of confectioners sugar, divided
  • zest of one lime
  • 1 tbsp. tequila
  • 1/4 cup strained strawberry puree (puree in a blender, put in a sieve over a bowl to let excess liquid drain for appx. 30 minutes)

Directions:

  1. Preheat your oven to 350 degrees, and prepare 2 cupcake pans by lining them with paper liners. Set aside.
  2. In a medium bowl, sift together the two flours, baking powder and salt. Set aside.
  3. In the bowl of an electric mixer (using the paddle attachment), beat the butter and sugar for 3-4 minutes, until light and fluffy. Scrape down the bowl, and beat in the eggs one at a time, until well-mixed. Add in the vanilla, as well as the lime juice/zest, and mix until just combined. Put the mixer on low speed, and add 1/3 of the flour mixture (mixing until combined) and then 1/3 of the milk (also mixing until combined), repeating until everything is in the batter. Fold in the strawberries.
  4. Fill the cupcake liners 2/3 of the way full. Bake the cupcakes, rotating the pan halfway through baking (at the 10 minute mark), for 20 minutes (or until a toothpick inserted in the center of the cupcake comes out clean). Immediately brush the cupcake tops with tequila (using a pastry brush), and then transfer the pans to a cooling rack to cool for 5 minutes, and then remove the cupcakes from the pan to finish cooling on the wire racks.
  5. While the cupcakes are cooling, make the buttercream. Cream the butter for 3 minutes, until light and fluffy. Add in 3 cups of confectioners sugar, and beat well until the mixture is sort of crumbly. Add the lime zest, tequila and strawberry puree, and beat the mixture for 2 minutes. If the buttercream appears to be too wet for piping, add more confectioners sugar (1/4 cup at a time), beating for about a minute after each addition.
  6. To serve, pipe or spread the buttercream on completely cooled cupcakes. Enjoy!

Filed Under: Cakes/Cupcakes, Fruit, Nifty Foodie Original

Peanut Butter & Jelly Protein Shake

March 22, 2013 by Amy 1 Comment

Peanut Butter & Jelly Protein Shake

This past week, I’ve been spending my afternoons prepping the gardens/weeding/planting annuals. Wasn’t it just Christmas? Man…can’t believe it’s almost April, y’all! With the weather starting to warm up over here, the colder the beverages, the better. I started making iced coffees a couple of weeks ago, and now, I just can’t get enough of smoothies/shakes.

As far as this shake goes, peanut butter and jelly is a favorite of mine. Move over ham sandwiches…if you offer me a PB&J, I’m going for it! I wanted to try these flavors in a shake, and while I used frozen fruit instead of jelly, the flavors (strawberry/peanut butter) work beautifully together. This was so refreshing, and filling (thanks to the protein powder). It’s definitely a goodie!

Peanut Butter & Jelly Protein Shake
Source: an original

Ingredients:

  • 1 cup ice
  • 1 cup water
  • 1 scoop vanilla protein powder
  • 1 cup frozen strawberries
  • 1 1/2 tbsp. peanut butter

Directions:

  1. Place all ingredients in a blender, and blend on high until everything is smooth (about 2 minutes).

Filed Under: Beverages, Fruit, Nifty Foodie Original, Peanut Butter

Blackberry Basil Popsicles

August 24, 2012 by Amy 6 Comments


Blackberry Basil Popsicles

A few weeks ago, our basil was absolutely booming. I ended up making a huge batch of pesto, but I also wanted to try something sweet with the basil. I know that strawberry basil is a popular combination, so I figured why not try something with blackberries?

When I was a kid, I remember going to my grandma’s house, and picking a bowl full of these near the ditch by her house. They grew like crazy out there, and as kids, it was the coolest thing to pick your own food and bring it back for everyone to enjoy for dessert. Every time I eat blackberries, I’m always reminded of grandma’s house. 🙂

These popsicles are simple to throw together, and they are insanely good. You only need your blender or a food processor, and you’re good to go. I made these in those tiny bathroom cups (I think they’re 3 oz) and stuck a paper straw in there, since I couldn’t find popsicle sticks at the store. I think it makes them look more fun anyway. 🙂

Blackberry Basil Popsicles
Source: an original

Ingredients:

  • 1.5 cups fresh blackberries, rinsed
  • one heaping handful of fresh basil, rinsed
  • 1/4 cup honey
  • juice of one lemon

Directions:

  1. Add the berries, basil, honey and lemon to your food processor or blender and puree the ingredients until well combined. (Optional: strain out the seeds, if you’d like.)
  2. Add the mixture to popsicle molds or 3 oz. cups. If you’re using cups, allow the popsicles to freeze for about 30 minutes before putting the popsicle sticks in, so they stay put.
  3. Freeze for about 8 hours or overnight. Enjoy!

Filed Under: Frozen Desserts, Fruit, Nifty Foodie Original

  • Go to page 1
  • Go to page 2
  • Go to Next Page »

Primary Sidebar

Hey Y’all!

Image Credit: Leslie Pendleton Photography


Hey y’all!

Thanks so much for reading! I’m Amy, and I live in south Louisiana with my husband and our rescue dog. I enjoy sharing my love for cooking, baking, crafts & more! Follow my daily adventures on social media!

Follow my Daily Adventures

  • Email
  • Facebook
  • Instagram
  • Pinterest
  • Twitter

Footer

  • Email
  • Facebook
  • Instagram
  • Pinterest
  • Twitter

Archives

Copyright © 2025 · Foodie Pro Theme by Shay Bocks · Built on the Genesis Framework · Powered by WordPress