• Skip to primary navigation
  • Skip to main content
  • Skip to primary sidebar
  • Skip to footer

The Nifty Foodie

  • Home
  • About
  • Recipes
    • Appetizers
    • Beverages
    • Breads/Muffins
    • Breakfast
    • Canning
    • Desserts
    • Dog Treats
    • Entertaining/Parties
    • Fruit
    • Holiday Recipes
    • Louisiana Cuisine
    • Main Dishes
    • Mexican
    • Nifty Foodie Original
    • Nifty Tricks
    • Project Food Blog
    • Pumpkin
    • Salads
    • Sauces/Dips
    • Side Dishes
    • Skinny
    • Slow Cooker
    • Spices
    • Stews/Soups
    • The Disasters
  • My Weight Loss Journey
    • Races
    • Running
    • Weight Loss Milestones
  • Crafts
  • Contact Me

Frozen Desserts

Summer Sangria Ice Pops

July 15, 2016 by Amy Leave a Comment

Summer Sangria Pops
Please drink (or eat ice pops) responsibly!

Whew, y’all! It’s been a while since I posted on here!

We’re still working on making the new house pretty (we just bought curtains this month), and while I spend a good bit of time cooking, I just haven’t made the time to blog anything lately.

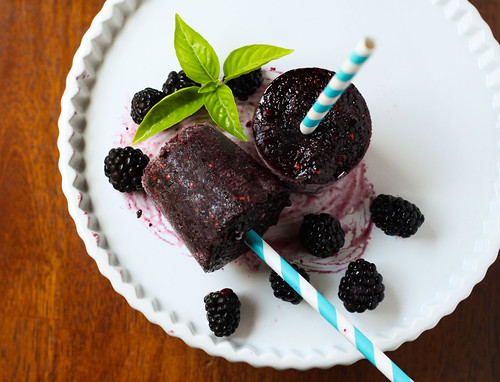
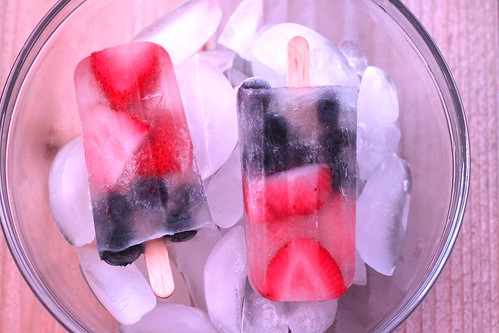
On Father’s Day, we made lunch for both families. We recently got a new grill, and what better way to break it in than to host a BBQ! We got steaks for our dads, and we grilled burgers/sausages/hot dogs for the families. For dessert, I made these summer sangria ice pops. 🙂

In hindsight, these ice pops sort of had a 4th of July theme going on, but really…with summer berries going strong, I couldn’t help myself! These are just so great for a summer-y dessert (for adults, of course)! The recipe is a few ingredients, and you could pretty much use any of your favorite fruits with the sangria base. 🙂

Summer Sangria Ice Pops
mildly adapted from The Brewer & The Baker

Ingredients:

  • 1/2 cup sugar
  • 1/2 cup water
  • 1 bottle of dry, white wine
  • 1/2 cup orange liqueur
  • 1 lemon
  • 1 orange
  • 2 cups chopped fruit (I used strawberries and blueberries)

Directions:

  1. Place the sugar and water in a small pot, and cook on medium, until the sugar has fully dissolved. Set aside to cool.
  2. Add the wine, orange liqueur, juice of one lemon, juice of one orange and chopped fruit into a large pitcher. Once the syrup has cooled, add 1/2 cup of the simple syrup into the pitcher. Stir all ingredients together.
  3. Pour the sangria mixture (making sure to stuff it with the fruit) into an ice pop mold, filling just below the edge of the mold. (Side note: The mold I have has the molds with a cover that has slots cut into it for you to place the wooden sticks.) So, if you have a similar mold, after you pour in the sangria mixture, cover the pops, and place the wooden sticks in the slots, until it’s almost at the bottom of the pop mold.
  4. Freeze for 5-6 hours or overnight, until everything is solid.
  5. Enjoy!


Filed Under: Beverages, Desserts, Frozen Desserts, Fruit

White Chocolate Peppermint Mousse Pie

November 21, 2014 by Amy 13 Comments

Disclosure: I received a copy of “Southern Living Christmas All Through the South” at no cost to me, for a fair and honest review. Southern Living/YC Media is providing the giveaway item. All opinions are 100% my own.

White Chocolate Peppermint Mousse Pie

I’ve had a really rough past week. Two deaths in my family (one being my grandmother and the other being the family dog) happened, and I just don’t know how to stop randomly crying when I start thinking about a world without either of them. I know that humans > dog, and my grandmother and family dog don’t compare. They don’t. Just two large pieces of bad news, and I’m terrible at grieving. I do know that they are both no longer suffering ,and that gives me a bit of solace. It’s just really hard with the holidays around the corner.

I’m an early holiday celebrator. I just love the holidays, as I’m sure this is no secret to y’all. However, when my husband offered to take down the decorations this week (the same husband who is firmly in the post-Thanksgiving decorating camp), I said no. I’m just not feeling the holiday spirit right now. The idea of taking everything down and making the house Christmas-y is suddenly making me a bit overwhelmed. Honestly, I’m starting to wonder if I would be perfectly content just taking down the gift wrap and not decorating at all this year. This is so not like me. I’ve tried watching “Christmas Vacation”, listening to Christmas Pandora, and I’m just meh about it all. I know this has a lot to do with our family’s losses, so I’m hoping my mini holiday funk will pass.

In another attempt to get the holiday spirit back, I decided to make something with holiday flavors. I was sent a review copy of Southern Living Christmas All Through the South, and I picked out the most seasonal sounding recipe to me at the time to whip up: White Chocolate-Peppermint Mousse Pie. Peppermint Bark is one of my favorites around the holidays, and I thought with the chocolate cookie crust and white chocolate peppermint mousse, I couldn’t go wrong with this recipe. Something about whipping egg whites and heavy cream into fluffy goodness is oddly therapeutic. Just watching the components come together distracted me enough to forget about the bad news for a while. It was really pleasant…

Hopefully, I’ll shake out of this mini funk soon. I’m just going to take this weekend to relax a bit, since I feel like this has been the longest week ever. I need Monday.

…

Read More »

Filed Under: Chocolate, Frozen Desserts, Giveaways/Reviews, Holiday Recipes, Pies

Watermelon Strawberry Sorbet

May 9, 2014 by Amy Leave a Comment

Watermelon Strawberry Sorbet

I’m really not that much of a fan of the summer. The 100 degree weather with humidity is no fun….at all. However, I’m a big fan of warm weather produce. Louisiana strawberry season is coming to a close (boo), but watermelon season is just gearing up. I had a flat of strawberries in the fridge, and really wanted to make a sorbet out of the berries again. I was flipping through my cookbooks, and came across this recipe in John Besh’s “My New Orleans” cookbook, and thought that watermelon + strawberry = match made in heaven. It just so happened that we had a seedless watermelon that needed to be cut into as well, so it was recipe fate. This sorbet needed to be made. 🙂

By the way, if you’re ever in the market for a good, solid New Orleans cookbook, I’m a big fan of Besh’s cookbook. There’s quite a few recipes in there (for pretty much any classic New Orleans dish), and it’s a gorgeous cookbook that could double as a coffee table book. 🙂 (Also, John Besh has no earthly idea who I am…just wanted to gush about this book…)

Anyway, sorbet is one of the easier recipes for an ice cream machine. Seriously…it’s just pureed fruit, sugar and some citrus mixed together. Nothing fancy…nothing to cook, and yet, it’s incredibly perfect. Refreshing…cooling…and sweet!

Watermelon Strawberry Sorbet
Source: My New Orleans

Ingredients:

  • 1 pint fresh strawberries, hulled
  • 1 cup diced, seeded watermelon
  • 1 tsp. freshly squeezed lemon juice
  • 1/2 cup granulated sugar

Directions:

  1. Place all of the ingredients in a blender, and blend everything until smooth and well-blended.
  2. Add the sorbet mixture to the bowl of an ice cream maker, and make the sorbet according to the manufacturer’s instructions (mine mixed for 30 minutes).
  3. Enjoy immediately or place in the freezer for a couple of hours, until hardened.

Filed Under: Desserts, Frozen Desserts, Fruit

Bananas Foster a la Mode Cups & A Giveaway!

September 18, 2013 by Amy 32 Comments

bananasfosteralamode2

A couple of months ago, my husband and I went to a restaurant in New Orleans. When it came time for dessert, we decided to split something, but the problem with splitting with my husband is the dessert cannot contain any chocolate, caramel or peanut butter (he hates it all). I know…poor guy doesn’t know what he’s missing! Luckily, this particular restaurant had a bananas foster torte, so I knew we were set. It was absolutely delicious, indulgent and rich. In fact, I’m SO glad we split it, because there was no way I could eat the whole thing. Ever since then, bananas foster has been fresh on my mind. I had to make a fun recipe with this classic New Orleans favorite.

I’m thrilled to be working with Calphalon again to review their brand new Elite Nonstick cookware, which is sold exclusively at Williams-Sonoma. It’s currently for sale on their website, and will be in stores on September 27th. I’m sure you guys know that I love using nonstick cookware, but one of the biggest issues I’ve faced is being limited to wooden or silicone utensils. This line is safe for metal utensils (fork out your whisks!). Yep…I’m serious! This cookware also comes with a textured sear surface, which is awesome because you can get the sear that you usually get from stainless steel, but with the convenience (hello, easy clean-up) of a nonstick pan. This line of cookware is also dishwasher safe.

Calphalon sent me this 3 piece set to review, and asked me to create a modern twist on a classic recipe, using one of the pans. With that in mind, I grabbed the 10″ pan, some bananas and got to work! The end result is homemade bananas foster ice cream, topped with warm bananas foster, contained in a cinnamon sugar wonton cup. I hope you like bananas for this one, y’all, because there is plenty of sweet banana flavor in this recipe!

bananasfosteralamode

For the ice cream, I omitted the rum, because even though the alcohol cooks off, I didn’t want to chance the ice cream not setting up properly. I suggest making the ice cream one day before you plan on serving these desserts, so the ice cream can be a scoop-able consistency.

…

Read More »

Filed Under: Desserts, Frozen Desserts, Fruit, Giveaways/Reviews, Nifty Foodie Original

Cinnamon Toast Crunch Ice Cream

September 11, 2013 by Amy 4 Comments

cinnamontoasticecream

Is it crazy that I haven’t made any homemade ice cream this summer? I mean it’s hot enough for it, so I have no idea why I didn’t fork out the machine until September. I will say that I did have a slight addiction to skinny cow sandwiches the past couple of months, and homemade ice cream isn’t very calorie friendly, but usually calorie splurges never stop me (especially lately).

I HAD to make this ice cream, though. I recently received a copy of Jessica Segarra’s (also known as The Novice Chef) new cookbook: Cereal Sweets & Treats. Jessica is a good blogging friend of mine, and I was so excited when she wanted to send me a copy of her new book. It’s full of so many fun recipes…recipes you’d never think you could use cereal with. Cap’n Crunch milkshakes, Lucky Charms macarons, Pumpkin Cheerios bars, Fruit Loops cupcakes, and Corn Pops ice cream, just to name a few. Seriously….doesn’t that all sound so fun?!

The idea of cereal ice cream just pulled me in, and I will mention that while the original recipe is for Corn Pop ice cream, in Jessica’s notes, she mentions trying this with your favorite cereal. One of my favorites is cinnamon toast crunch, and I had a feeling this would make for a great ice cream. One of the best things about this ice cream is that this isn’t a custard based ice cream. Yup…no eggs needed, so making this recipe really wasn’t that difficult. The method Jessica uses doesn’t make the ice cream overpoweringly sweet, because the cereal soaks in the milk/heavy cream and then you strain it out. Also, no worries about soggy cereal, since you strain it out…it’s more of an infusion of flavor from the cereal. I have to say, after having a bowl (or two haha!), I think this ice cream would be perfect on top of a slice of warm apple or pumpkin pie. It has a really good cinnamon flavor to it that would make fall treats that much more amazing. 🙂

If you want to check out more recipes (I think those pumpkin cheerios bars are calling my name next!), Jessica’s book is available on Amazon for under $15!

Cinnamon Toast Crunch Ice Cream
Source: barely adapted from Cereal Sweets & Treats

Ingredients:

  • 2 cups whole milk
  • 1 cup heavy cream
  • 3 cups cinnamon toast crunch cereal
  • 3/4 cup granulated sugar
  • 1 tsp. vanilla extract

Directions:

  1. In a large bowl, mix the milk, heavy cream and cinnamon toast crunch cereal together. Allow the mixture to soak for 30 minutes in the fridge, stirring occasionally. Strain the cereal out of the mixture and discard the cereal.
  2. Place the milk mixture in a large saucepan, and whisk in the sugar. Bring the mixture to a boil, stirring constantly, and continue to boil the mixture for 2 minutes. Remove the mixture from heat, and stir in the vanilla extract. Allow the mixture to fully cool in the refrigerator, until the mixture is cold to the touch.
  3. Once the mixture has cooled, pour the mixture into your ice cream maker and mix according to the manufacturer’s instructions. The ice cream will be a soft serve consistency at this point, but if you’d like the ice cream to be more scoop-able, allow it to harden in an airtight container in the freezer for at least 3 hours.


Disclosure: I was sent a copy of this book for a fair and honest review. All opinions are 100% my own.

Filed Under: Desserts, Frozen Desserts

Blackberry Basil Popsicles

August 24, 2012 by Amy 6 Comments


Blackberry Basil Popsicles

A few weeks ago, our basil was absolutely booming. I ended up making a huge batch of pesto, but I also wanted to try something sweet with the basil. I know that strawberry basil is a popular combination, so I figured why not try something with blackberries?

When I was a kid, I remember going to my grandma’s house, and picking a bowl full of these near the ditch by her house. They grew like crazy out there, and as kids, it was the coolest thing to pick your own food and bring it back for everyone to enjoy for dessert. Every time I eat blackberries, I’m always reminded of grandma’s house. 🙂

These popsicles are simple to throw together, and they are insanely good. You only need your blender or a food processor, and you’re good to go. I made these in those tiny bathroom cups (I think they’re 3 oz) and stuck a paper straw in there, since I couldn’t find popsicle sticks at the store. I think it makes them look more fun anyway. 🙂

Blackberry Basil Popsicles
Source: an original

Ingredients:

  • 1.5 cups fresh blackberries, rinsed
  • one heaping handful of fresh basil, rinsed
  • 1/4 cup honey
  • juice of one lemon

Directions:

  1. Add the berries, basil, honey and lemon to your food processor or blender and puree the ingredients until well combined. (Optional: strain out the seeds, if you’d like.)
  2. Add the mixture to popsicle molds or 3 oz. cups. If you’re using cups, allow the popsicles to freeze for about 30 minutes before putting the popsicle sticks in, so they stay put.
  3. Freeze for about 8 hours or overnight. Enjoy!

Filed Under: Frozen Desserts, Fruit, Nifty Foodie Original

Peanut Butter Cup Ice Cream

August 17, 2012 by Amy 3 Comments

Peanut Butter Cup Ice Cream

I’ve been making a ton of frozen treats lately. With the crazy heat outside, I feel like the best way to “cook” is to not use any heat at all. Sure, some ice creams use eggs, but since you have to cook the ice cream mixture in that case, I’ve been trying quite a few quick (egg free) ice cream recipes.

One of my favorite ice cream treats is a Sonic Blast with Reese’s cup pieces mixed in. Reese’s cups for me is just one of those candies I can’t say no to. I can only buy them if I have a recipe in mind, otherwise I tend to black out and find myself surrounded by Reese’s wrappers. Those things are my weakness.

In a brief, insane (yep, insane…I’m trying to lose some weight y’all!) moment, I thought to look up recipes for Reese’s ice cream, and I came across this one. Two great things…it comes together quickly and it’s egg free (no cooking!). Taste wise? Let’s just say that I’m thankful that I bought the fancy little ice cream cup that I have, because 1/2 cup of ice cream fits in there and in my mind, it feels like I’m eating a full bowl. I really could have eaten the whole container in one serving, I imagine.

Peanut Butter Cup Ice Cream
Source: barely adapted from Recipe Girl (originally found in the Cuisinart Ice Cream book)

Ingredients:

  • 1 1/4 cups peanut butter
  • 3/4 cup granulated sugar
  • 1 1/4 cups whole milk
  • 2 cups heavy whipping cream
  • 2 tsp. vanilla extract
  • 2 cups chopped peanut butter cups

Directions:

  1. In the bowl of a stand mixer, add the peanut butter and sugar and beat the mixture for 2 minutes until it’s very smooth. Add the milk to the bowl and mix everything on low for another 2 minutes, until the sugar is completely dissolved. Add the heavy cream and vanilla extract and beat the mixture on low for another 2 minutes, until the ice cream base is well-combined. Chill the mixture in the fridge for an hour.
  2. Take the ice cream mixture out of the fridge, give it a quick stir to make sure nothing settled and add the ice cream to your ice cream machine, and churn the mixture according to your manufacturer’s instructions. Add the chopped peanut butter cups, and stir them into the churned ice cream. At this point, the ice cream will be like a soft serve ice cream. If you’d prefer a more scoopable consistency, place the ice cream in a freezer safe container and freeze the ice cream for a few hours. Enjoy!


Filed Under: Candy, Chocolate, Frozen Desserts, Peanut Butter

Bing Cherry Sorbet

August 3, 2012 by Amy 4 Comments

Bing Cherry Sorbet

Back in high school, I worked at a Winn-Dixie as a cashier. I learned a lot of important life lessons while I was a cashier. When hosting a crawfish boil, one must buy at least 2 cases of beer with the vegetables you are about to boil. When one has a baby, a bottle of wine is a necessity when you have a cart full of baby food. Then, there were people who brought new foods to my attention, especially produce. I learned about prices of produce too…bananas were dirt cheap and cherries were ridiculously expensive. I often wondered what was SO special about fresh cherries when you could buy a jar of maraschinos for $2 or something.

Now, don’t judge me. When I was younger, cherries to me were simply the top of a sundae. 🙂 Sure, I enjoyed plenty of fresh fruits, but cherries weren’t one of those when I was a kid. And I completely understand why…being 1 of 4 kids, I’m sure buying cherries for a family of 6 would be ridiculously expensive.

I didn’t get to try fresh cherries until a few years ago. I happened upon them in the grocery store, and when I saw that they were $2.99/lb., I figured it was definitely time to try these. I bit into one and immediately hurt my tooth. Wait a second…these things have PITS?? (Remember…my experience with cherries were jarred maraschinos. :-P) No worries though…there was no dentist needed after that mistake. I’m glad I tried them, though, because I was completely in love with these little treats. Whenever they’re in season now, I easily go through a bag of these in a couple of days. With the weather being so crazy hot lately though, I wanted to make a frozen dessert with these. I thought about ice cream, but if I made something like Cherry Garcia, my diet would be fairly screwed. There’s no portion control when it comes to Cherry Garcia ice cream, y’all. I just can’t do it, so I don’t even buy it. So, I searched for a sorbet and found this recipe. What I love about sorbets is that they’re very quick. When you want a frozen dessert in a pinch, go for a sorbet! It tastes absolutely refreshing and light, which is really perfect when you have 100 degree heat outside. 🙂

Bing Cherry Sorbet
Source: mildly adapted from Cooking Light

Ingredients:

  • 1 cup sugar
  • 2/3 cup water
  • 4 cups pitted fresh Bing cherries (about 1 1/3 pounds)
  • 3 tablespoons brandy
  • 2 tablespoons fresh lime juice

Directions:

  1. Mix 1 cup of sugar and 2/3 cup of water in a 2-cup measuring glass. Microwave the mixture for 2 minutes, and allow the syrup to completely cool before continuing with the recipe.
  2. Then, add the sugar syrup, cherries, brandy and lime juice to a blender and puree for about 1 minute, until the mixture is smooth. Churn the sorbet in an ice cream maker, according to the manufacturer’s instructions. Add the sorbet to a freezer-safe container, cover and freeze for 4 hours (or overnight), until firm. Enjoy!


Filed Under: Frozen Desserts, Fruit

Double Chocolate Chip Cookie Dough Ice Cream

July 18, 2012 by Amy Leave a Comment

Chocolate Chip Cookie Dough Ice Cream

Ahh cookie dough. Whenever I see cookie dough, I imagine myself sitting on the sofa with a roll of Pillsbury dough and a spoon. Don’t judge me. I know half of you are nodding your head and smiling — y’all know how awesome it is! I know, I know…salmonella risk. However, I’ve been eating cookie dough for years and I’m still kicking. 😛

Because I’m paranoid, I just want to disclose that I’m not encouraging ANYONE to eat cookie dough containing raw eggs, like Pillsbury dough…I don’t want to get sued over this post darnit!

Anyway, since I have been seeing cookie dough all over the blogs lately, I just had to make something involving it. The craving was just too strong. I had some heavy cream in the fridge, and I figured that it would be the perfect excuse to make some ice cream. I had this recipe from Annie’s blog starred for quite a while, because it wasn’t your ordinary cookie dough ice cream. No…it was DOUBLE chocolate chip cookie dough ice cream. Oh man, y’all. Not only are there chunks of cookie dough in there, but the ice cream is also cookie dough flavored.

Once I finished making it, it was SO hard to not eat the whole batch right out of the ice cream maker bowl. Seriously. In fact, that little ice cream bowl you see in the picture is my secret weapon while I’m calorie counting. It’s dainty, makes me feel all sorts of fancy, and it fits two scoops of ice cream on it. For this gal who could put away a pint of ice cream, this is awesome. Portion control y’all. I’m learning.

Double Chocolate Chip Cookie Dough Ice Cream
Source: Annie’s Eats (ice cream from Joy the Baker and cookie dough from The Perfect Scoop)

Ingredients:

For the cookie dough:

  • 5 tbsp. salted butter, melted (or unsalted butter plus ¼ tsp. salt)
  • 1/3 cup packed light brown sugar
  • 1/4 cup flour
  • 1/2 tsp. vanilla extract
  • 3/4 cup mini chocolate chips

For the ice cream:

  • 3 tbsp. unsalted butter
  • 2 cups heavy cream
  • 2/3 cup dark brown sugar
  • 4 large egg yolks
  • Pinch of coarse salt
  • 2 tsp. vanilla extract
  • 1 1/2 cups whole milk
  • 1 cup chocolate chips

Directions:

  1. To make the cookie dough chunks, stir the melted butter and sugar together in a mixing bowl until everything is smooth. Add in the flour, then the vanilla and mini chocolate chips. The dough will be very soft before chilling. Form the dough into a disk over some plastic wrap, wrap the dough well in the plastic wrap and refrigerate until the dough is firm.
  2. While the dough is chilling, make the ice cream by first melting the butter in a medium saucepan over medium-high heat. Stir often over the heat (to avoid burning), until the butter is a deep golden brown color. Whisk in the heavy cream and heat the mixture until simmering. While this is going on, in a medium bowl, vigorously stir the egg yolks and the brown sugar are pale and fluffy.
  3. Once the cream mixture is warm, add a small amount of the cream mixture to the bowl with the egg yolk mixture, whisking well. Once that’s done, slowly whisk in the rest of the cream mixture. Then, add in the salt and return the egg/sugar/cream mixture to the saucepan and heat the mixture until slightly thickened, (the temperature should read 170-175 degrees on a thermometer). Immediately take the saucepan off of the heat and pour the mixture through a fine sieve into a bowl.
  4. Stir the vanilla extract and milk into the egg/sugar/cream mixture until well-mixed. Then cover the bowl and chill the ice cream mixture thoroughly in the refrigerator.
  5. Once the ice cream mixture is chilled, churn the ice cream in an ice cream maker (according to the instructions on your specific ice cream maker). While the ice cream is churning, chop the cookie dough into small chunks. Once the ice cream is done churning, transfer to a freezer safe bowl or container and stir in the chocolate chips and cookie dough chunks. Freeze the ice cream in the freezer for a few hours (or until firm) before serving.

Filed Under: Chocolate, Cookies, Frozen Desserts

Strawberry Buttermilk Sherbet

June 29, 2012 by Amy 2 Comments

Strawberry Sherbet

I’m always the gal looking for a deal. It makes me cringe to go shopping and pay full price for something. While you won’t find me on Extreme Couponers, I do tend to stalk the deal sites, like Slick Deals and Fat Wallet. It’s a good day when I find an item at Target for 75% off or 90% off, too. Even for my weight loss rewards, I fully intend on getting the most out of those rewards, like finding that ::99 lbs. lost:: designer handbag on sale.

When it was strawberry season here, there were trucks lined up all along a major highway every weekend selling flats of strawberries. In my opinion they were asking way too much since the season was in its prime, so I tried to talk them down a couple of dollars. (Always after a deal…ha!) I was surprised to see that it worked, but they explained since it was the end of the weekend, they were more than happy to give a deal just to get rid of them. 🙂

So, I happily took those strawberries home and made multiple recipes using them. This was the last recipe from that flat (boo…). I usually make a sorbet, but this year, I wanted to give sherbet a try. Like sorbet, this is a great refreshing dessert. Oh, and best of all, this is an extremely simple recipe to throw together!

Strawberry Buttermilk Sherbet
Source: Southern Living

Ingredients:

  • 2 cups fresh strawberries
  • 2 cups buttermilk
  • 1 cup sugar
  • 1 tsp. vanilla extract

Directions:

  1. Puree the strawberries in a blender or food processor, for about 30 seconds until the berry puree looks smooth. If you don’t prefer seeds, pour the puree through a strainer into a large bowl, pressing down the puree to make sure you’re just straining the seeds out.
  2. Add the buttermilk, sugar and extract to the bowl and mix everything (you can just use a spoon or a whisk) until everything is well-mixed. Then, cover the sherbet mixture and chill in the fridge for an hour.
  3. After the mixture has chilled, pour the mixture into your ice cream maker (at least 1 1/2 quart capacity) and freeze according to the ice cream maker’s directions. You can enjoy this right out of the ice cream maker (for more of a soft serve consistency) or freeze the sherbet in the freezer for a few hours to enjoy at a scoop-able consistency.

Filed Under: Frozen Desserts, Fruit

  • Go to page 1
  • Go to page 2
  • Go to page 3
  • Go to Next Page »

Primary Sidebar

Hey Y’all!

Image Credit: Leslie Pendleton Photography


Hey y’all!

Thanks so much for reading! I’m Amy, and I live in south Louisiana with my husband and our rescue dog. I enjoy sharing my love for cooking, baking, crafts & more! Follow my daily adventures on social media!

Follow my Daily Adventures

  • Email
  • Facebook
  • Instagram
  • Pinterest
  • Twitter

Footer

  • Email
  • Facebook
  • Instagram
  • Pinterest
  • Twitter

Archives

Copyright © 2025 · Foodie Pro Theme by Shay Bocks · Built on the Genesis Framework · Powered by WordPress