• Skip to primary navigation
  • Skip to main content
  • Skip to primary sidebar
  • Skip to footer

The Nifty Foodie

  • Home
  • About
  • Recipes
    • Appetizers
    • Beverages
    • Breads/Muffins
    • Breakfast
    • Canning
    • Desserts
    • Dog Treats
    • Entertaining/Parties
    • Fruit
    • Holiday Recipes
    • Louisiana Cuisine
    • Main Dishes
    • Mexican
    • Nifty Foodie Original
    • Nifty Tricks
    • Project Food Blog
    • Pumpkin
    • Salads
    • Sauces/Dips
    • Side Dishes
    • Skinny
    • Slow Cooker
    • Spices
    • Stews/Soups
    • The Disasters
  • My Weight Loss Journey
    • Races
    • Running
    • Weight Loss Milestones
  • Crafts
  • Contact Me

Side Dishes

Shrimp, Corn, and Avocado Salad with Basil Vinaigrette

July 31, 2017 by Amy 2 Comments

Disclosure: This post is sponsored by Amaize Sweet Corn. I was compensated for my post, and all opinions are 100% my own.

IMG_1277

Oh man, y’all. This summer has been BRUTAL. The other day, I was helping my husband cut the grass, and it just got to be too much. I’m just going to hug the AC vent until October. I’m not built for this heat and humidity!

One of the few things that summer has going for it is that it’s grilling season! I love grilled foods! Meats, veggies, you name it! I’m a fan! The a-MAIZE-ing folks at Amaize Sweet Corn reached out to me to create a recipe using their corn, and I couldn’t wait! The last time I worked with them, I shared this delicious Grilled Corn Guacamole with y’all.

Amaize Sweet Corn is a non-GMO breed of sweet white corn, grown and harvested in the warm summer months (June – September). It was in development for 22 years, and during that time, over 10,000 variations of corn were tested until the perfect balance of texture and taste were found. Amaize Sweet Corn is only available in the US. In Louisiana, it is found exclusively at Rouse’s (for other states, here is the store locator).

IMG_1281

Since Amaize Sweet Corn prides itself in their flavor and texture, I had to let it be the star in a dish. This Shrimp, Corn & Avocado salad puts Amaize Sweet Corn front and center. We enjoyed this as a side dish, but you could easily put this over a bed of lettuce as well. I seasoned the shrimp with lemon pepper to bring a bit more fresh flavor to the dish and also tossed the salad in a fresh basil vinaigrette. It just screams summer! I absolutely loved this dish! Just turn on the grill, and this salad is ready in no time!

IMG_1284

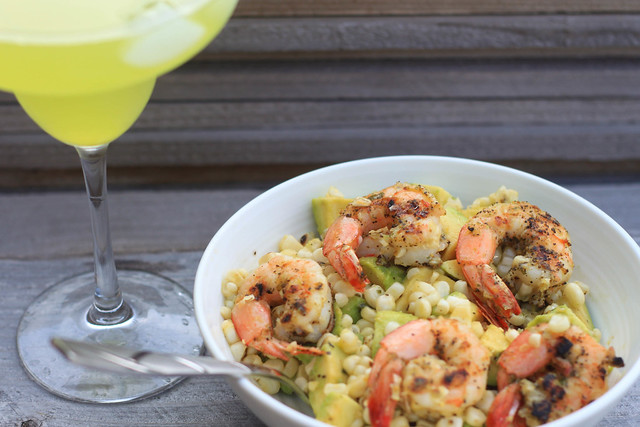
Shrimp, Corn & Avocado Salad with Basil Vinaigrette
Source: Nifty Foodie Original

Ingredients:

  • 2 ears of Amaize Sweet Corn
  • 1/2 ripe avocado, cubed
  • 1 1/2 lb. shrimp, deveined and peeled
  • 1 1/2 tsp. canola oil
  • 2 tsp. lemon pepper
  • 1 tbsp. fresh basil, chopped
  • 1 1/2 tbsp. white wine vinegar
  • 1/2 tbsp. fresh lemon juice
  • 5 tbsp. extra virgin olive oil
  • 1/2 tsp. salt
  • 1/4 tsp. pepper
  • 1 tsp. sugar

Directions:

  1. Preheat your grill. Place your corn on the grill, and grill the corn for about 2 minutes on each side, until it shows grill marks (about 10 minutes total). Set the corn aside to cool.
  2. Season your shrimp by tossing it in the canola oil with the lemon pepper and place them on the grill. Grill the shrimp for 2 minutes on each side, until the shrimp turn hot pink and opaque.
  3. Once the corn has cooled, cut away the kernels from the ear, and place in a medium bowl with the cubed avocado and grilled shrimp.
  4. In a mason jar, place the fresh basil, white wine vinegar, lemon juice, extra virgin olive oil, salt, pepper, and sugar. Close the lid and shake the mixture well until everything is mixed together.
  5. Toss half of the basil vinaigrette in the medium bowl with the corn salad. Enjoy!

Filed Under: Side Dishes

Peanut Thai Quinoa Salad

April 2, 2014 by Amy 12 Comments

Disclosure: I received a selection of whole grain products from the Whole Grain Council to sample, as a whole grain ambassador for “Whole Grain Sampling Day”, but was not compensated for this post. All opinions are 100% my own.

Thai Quinoa Salad

There’s nothing better than finally feeling in control of things again…at least diet-wise. Sure, I still have my splurge days, but for the most part, I don’t go over my calorie count. I have to admit, it really helps that the new office discourages eating at your desk. Walking to the break room for a handful of dried fruit or a granola bar makes me think twice before snacking. I actually like it….mindless snacking while at work was one of my biggest issues, and the new job sort of figured it out for me. 🙂

I’ve also started trying new food items again. I was recently approached by the Whole Grains Council about being a Whole Grains Ambassador this year, along with some other fantastic food bloggers. I definitely jumped at the chance, because one thing I’ve learned throughout my weight loss journey, is that there is nothing wrong with giving new foods a try. One of my favorite whole grains is quinoa, which I wouldn’t have ordinarily tried when I was almost 300 pounds. I was looking for other options for lunch at the office, and there were so many great recipes out there involving quinoa…I just had to give it a try! I know it’s all the rage lately, but I can’t get enough of it. Not only is it tasty (it reminds me of brown rice, but with a nuttier taste), but I also think it’s versatile. You can serve it hot or cold, savory or sweet, and you can easily enjoy it anytime of the day!

…

Read More »

Filed Under: Giveaways/Reviews, Peanut Butter, Salads, Side Dishes

Roasted Cauliflower

March 19, 2014 by Amy 2 Comments

Untitled

I love my job. I’ve been making maps for almost 7 years now, and while it’s a small little niche to be in, I just love it. At first when I entered this field, I was scared out of my mind. I was no longer a student, which I was very comfortable with since I had been one for 18 years. I remember my first day at my first “real world” job. While I took classes to prepare me for my job, I was afraid that all of my college years were a lie. I’d walk into my job and be completely lost. Those first few days were pretty darn nerve-wracking and sort of embarrassing. I’d ask my boss all the time…um, how do you do this? (feeling completely stupid) However, my boss was super patient and had no issues reminding me about a certain tool in the software or what this acronym meant, etc…..and for that, I’m super thankful. I loved my first job…loved it, but since an hour plus commute/day wouldn’t be fun once I moved to where my (now) husband lived, I had to leave it. It just made sense. I won’t go into why I left my job before this one, but I’ll just say I’m super thankful that I found a new job where I can still work in the field that I enjoy.

Now that I’ve been doing this for quite a few years, while I don’t know it all (honestly, in my tech-y map field, not many people, with the exception of the software developers, do), I feel like I know a good bit. I will admit that I had a good bit of nerves walking into this new job on day 1, but I feel like I’m getting the hang of things here with a lot more ease versus previous jobs. The software I worked in never changed….just the work type and the standards. I feel a sense of belonging when I’m asked if I know how to do this in the software, and I can say “yes”. While I’m still very much the new person, and I still have a lot to learn, I feel like the transition hasn’t been too too bad. 🙂 I finally feel comfortable working in my field, just like I was comfortable being a student back in college. 🙂

Now, I know roasted cauliflower isn’t comfort food…at all. However, when it came to cooking plain vegetables, I usually steamed them. It’s what I thought was the only way to prepare vegetables in a healthy way, and well, it never crossed my mind to roast vegetables, but after reading multiple blogs where everyone was like YES…MUST TRY ::insert veggie name:: ROASTED. It was new to me, like say…a new job? (Heehee…trying to link stories here, but failing miserably.) Anyway, roasted is my favorite way to prepare most vegetables now. This is one of those posts where a recipe isn’t really needed, but I’m gonna share it anyway. It’s a technique worth trying! I love the roasted flavor of veggies, and I’ve done this with cauliflower, broccoli, sweet potatoes (cut in chunks) and fresh green beans, to name a few. I recently got another fun shipment of produce from Frieda’s Produce, and included in the shipment was cauliflower (white and purple) and romanesco (sort of a greenish cauliflower, but different shape). I just had to roast it up to see how pretty it would all turn out. 🙂

If you roast different quantities of vegetables from time to time, you will want to adjust the oil and spices accordingly. It’s not an exact science by any means….I use just enough oil to coat the veggies and sort of gauge out the spices as I see fit. 🙂

Roasted Cauliflower
Source: adapted from Simply Recipes

Ingredients:

  • 1 head of cauliflower, broken up into florets
  • 1 tsp. garlic powder (adjust this based on the amount of vegetables)
  • olive oil
  • coarse salt and freshly ground pepper

Directions:

  1. Preheat the oven to 400 degrees F. Place the cauliflower florets in an oven-proof baking pan or dish, and spread them into an even, single layer. Sprinkle the garlic powder evenly over the cauliflower, as well as the salt and pepper. Drizzle the vegetables with olive oil and toss to coat the cauliflower evenly in spices and oil.
  2. Once the oven has reached temperature, place the baking pan/dish in the oven and roast the vegetables, uncovered, for 25-30 minutes, until the tops of the vegetables are just turning brown. Enjoy!

Disclosure: The cauliflower and romanesco were sent at no cost to me by Frieda’s Produce.

Filed Under: Side Dishes, Skinny

Baked Za’atar Eggplant Fries

June 13, 2013 by Amy 16 Comments

Za'atar Eggplant Fries

A while back, I decided to go to a new local spice store, called Red Stick Spice Company. I remember seeing them on Groupon, and thought…oh gosh…this could be a very good thing. Every time my husband and I go to Houston, we usually drive to Penzey’s, because the quality of spices and blends there are just amazing. I’m like a kid in a candy store there, so I was hoping this new place would be similar.

It turns out that this little spice store was one of the most GENIUS ideas for home cooks. A spice store where you can buy as little or as much as you want (sold by weight), instead of buying things by the bottle. I mean…how many times do you need a tsp. of a certain spice, and you never use it again? Genius, I tell you!

I was sold. The last time I went was around the holidays, so I bought some blends for gifts, a TON of cinnamon & nutmeg and a few random spices that caught my eye. A few months later, I peeked into the disaster that was my spice cabinet, and saw a bag of Za’atar. Um….yeah. Could not remember what recipe I bought that for, so I googled recipes and stumbled upon this recipe for eggplant fries. (I STILL don’t remember what I bought this spice for…it’s really bothering me lol!)

Now, I don’t eat eggplant very much, because I always seem to forget about this veggie. I love eggplant, however, my husband does not. So, the week he went out of town, I decided to make these fries happen with my sous chef (the dog) standing below, waiting hopelessly for me to drop something. 🙂

These fries were flavorful, crispy and very simple to throw together. I forgot how much I love baked eggplant, and they were perfection when dipped in hummus.

Just to note: Red Stick Spice Company or Penzey’s didn’t compensate me to write this post. They probably have no idea I exist. 🙂

Baked Za’atar Eggplant Fries
Source: The Kitch’n

Ingredients:

  • 1 large eggplant
  • 1/2 cup all-purpose flour
  • 3/4 cup panko breadcrumbs
  • 3 tbsp. grated Parmesan
  • 1/4 cup za’atar spice blend
  • 1 teaspoon kosher salt
  • Pinch cayenne pepper
  • 2 large eggs
  • flaky salt, to finish
  • hummus, for dipping

Directions:

  1. Preheat the oven to 425 degrees F. Place a wire cooling rack on top of a rimmed cookie sheet (to ensure that all sides of the fries get crispy) and set aside.
  2. Slice the eggplant into 1/2″ thick rounds, and then slice each round piece into 1/2″ thick “fries”. Set aside.
  3. Take out three bowls for the batter process. Fill one with the flour, another with the eggs (well beaten), and the third, combine the panko bread crumbs, parmesan cheese, za’atar, salt and cayenne.
  4. Using one hand, dip the eggplant fries in the flour and make sure they’re evenly coated in flour. Then with another hand, grab the fries and dunk them in the egg, making sure that all sides are coated in egg, and place in the third bowl. With the hand that dipped the eggplant fries in the flour, roll the eggplant fries in the panko mixture. This ensures that you don’t end up with a clumpy egg-y panko mix all over your hands…use one hand for dry…one hand for the wet.
  5. Lay each eggplant fry close to one another on the prepared cookie sheet. Bake the fries until they are golden brown and crispy, about 15 minutes. Sprinkle the fries with flaky salt right as they come out of the oven, and enjoy with hummus!

Filed Under: Side Dishes

Top 10 Recipes of 2011

December 29, 2011 by Amy 6 Comments

Am I the only person who is shocked that Christmas just passed? I can’t believe it. Neighbors are taking down lights, and our tree looks SO empty without gifts under it. My favorite holiday is over, and crazy enough, it’s time for a new year. 2012.

Time to take the shrink wrap off of the new planner and get used to writing “2012” on papers/emails/etc. This is just crazy.

Also crazy…sometime in 2012, my 4 year blogiversary is happening and my 3 year wedding anniversary is happening too. WHAT?

It’s a lot to look forward to, but before everyone rings in the new year, I just wanted to share with y’all the top 10 posts of 2011. 🙂

Yellow Cupcakes w/ Strawberry Swiss Meringue Buttercream

10. Strawberry Swiss Meringue Buttercream – This was my first time making SMBC, and I swear, if you haven’t tried SMBC before, just do it. Please?

Pecan Pie Macarons

9. Pecan Pie Macarons – Gotta love macarons. These were really a huge favorite for Thanksgiving, and the star shape (which was a happy accident) made them super cute and festive!

Queso Blanco

8. Restaurant Style Queso Blanco – This is it. The ultimate queso blanco. If you’re as addicted to queso as me, you’d understand how wonderful it is to FINALLY have a recipe for this!

Strawberry Cream Cake

7. Strawberry Cream Cake – I’m actually glad I compiled this top 10, because I sort of forgot about this cake. Since it’s currently strawberry season in Louisiana, I think I MUST make this cake again. Yum!

Peppermint Bark Cheesecake Truffles

6. Peppermint Bark Cheesecake Truffles – This is the recipe that made my year, basically. I still can’t believe I won that recipe contest, and I’ve been told by a few friends who made this that these little truffles were a hit at their holiday parties! So happy to hear that!

Banana Nutella "Ice Cream"

5. Banana Nutella “Ice Cream” – Two ingredient “ice cream”. It’s basically awesome and couldn’t be any easier. Your food processor does all the work!

Corn Grits

4. Grilled Corn Grits – I can’t be from the South, and not have a post about grits. I promise you if you make this, your hips may never be the same again, but your taste buds will tell you it’s completely worth it!

3. Easy Pasta Salad – My first (and so far, only) vlog. I might get the courage to make one again, since you guys seemed to like it so much!

Diet Cupcakes

2. Cooking For Kids – The infamous post. Yup, who’da thought that a soda cupcake would get so much response from you guys (both good and bad)…yikes!

Homemade S'mores

1. S’mores for a Shower – Nutella S’mores. I can see why you guys loved this one so much. I’m sort of craving s’mores right now, actually. 😛

I hope you have a wonderful New Year with your family and friends, and thank you so much for reading The Nifty Foodie! See y’all in 2012!

Filed Under: Cakes/Cupcakes, Candy, Chocolate, Cookies, Frozen Desserts, Fruit, Other, Pasta/Rice, Sauces/Dips, Side Dishes

Grilled Corn Grits

June 29, 2011 by Amy 17 Comments

Corn Grits

I love grits. Usually in the winter, grits are a big part of my breakfast, because they just seem to warm the soul. I know that sounds cheesy, but really, there is NOTHING like a good, warm bowl of grits.

I remember the first time we went to a restaurant called Zea Rotisserie in Metairie (right outside of New Orleans). They have amazing food, such as this pesto trout that makes your taste buds sing, but the real goodness is in their side items. Taking up a small part of the menu, there it is…the corn grits. Really, I think Zea’s needs to fix their menus and put a huge arrow next to the corn grits with a caption saying “MUST TRY THESE NOW!”, because it’s just so plainly listed on the menu and these grits, to me, are the epitome of grits awesomeness.

I never really thought of making them myself, because in my head, there was no way Zea’s would share this awesome recipe with the world. Why should they? But, oh…yes, somehow they did. On Food Network’s website of all places. The whole world can make these corn grits, and I absolutely believe they should.

Now, these grits are not for the health conscious. What do you think makes them so dang AMAZING? 2 sticks of butter and a pint of heavy cream. Yup…Paula Deen, eat your heart out!

Grilled Corn Grits
Source: Zea Rotisserie (via Food Network)

Ingredients:

  • 2 cups water
  • 2 cups heavy cream
  • 1 cup yellow grits
  • 1/2 pound butter
  • 1 tablespoon salt
  • 1 ear grilled corn, kernels removed

Directions:

  1. Bring the water and heavy cream to a boil in a large pot.
  2. Stir in the grits and keep stirring until the grits are well incorporated.
  3. Cut the butter into tbsp sized pieces and add them to the grits, as well as the salt. Stir well.
  4. Once everything is stirred in, add your corn at the end and enjoy!

Filed Under: Side Dishes

Foodbuzz 24×24: A Culinary Journey Down the Muddy Mississippi

June 26, 2011 by Amy 5 Comments

When I was a little kid, I had such trouble spelling “Mississippi”. Was it too many “s”s or the double “p” that threw me for a loop? I just couldn’t get it. My house was less than a tenth of a mile away from the river, and I just couldn’t spell it. That bothered me. My parents taught us a little fun way to spell it eventually, and now I can’t ever spell Mississippi wrong. When in doubt, I tell myself “M-i-s-s… I-s-s…i.P.P.i”. There was an emphasis on the cap letters, so it became a bit of a rhythm to say it in my head that way before spelling it out.

Since I grew up living so close to the Mississippi, I’ve seen the river have its ups and downs. Literally. When the river gets high in the Spring, boats appear like they are floating on the levee. And of course, when it gets low, you’ll barely see the tops of the boats. It’s crazy how much it varies, and this year was no exception. For the first time in almost 40 years, the river was so high that the Corps of Engineers had to open a spillway north of Baton Rouge in order to save New Orleans and Baton Rouge from catastrophic flooding. Sadly, this spillway isn’t just land. People actually built their homes and farms in the spillway, so they had to evacuate. While I’m glad that nothing catastrophic happened to our big cities, it still hurts to know that some people suffered from this.

While I was watching a news segment about the river one night, I couldn’t help but think about the massive journey that the water takes. All the way north from Minnesota to the Gulf of Mexico. There are so many different cities that the river just flows by, and my husband had the greatest idea. A culinary journey down the river–from Minneapolis all the way to New Orleans. Our party idea featured foods that are notorious in the major cities along the river: Minneapolis, St. Louis, Memphis and New Orleans. I was so stoked when Foodbuzz let me know that our party proposal had been accepted for this month’s 24×24, so I called up our families and had them over for this awesome party!

For Minneapolis, we grilled up the famous Juicy Lucy burger! You can’t go wrong with a cheese stuffed burger, and this burger was one of the favorites of the meal!

Jucy Lucy

For St. Louis, we baked a gooey butter cake. We served it with ice cream and various summer fruit sorbets. The cake is a yeast based batter on the bottom and of course, a gooey butter base layer on top. Many of us (myself included) have never had a gooey butter cake, but it was a great hit! I think next time, this would go perfectly with some fresh fruit.

Gooey Butter Cake

For Memphis, we made some fabulous BBQ Baby Back ribs. This was my first time ever working with ribs, and it really wasn’t that bad. These were very flavorful ribs and super tender, since they were in an oven for a good part of the morning before finishing off on the grill!

BBQ Baby Back Ribs

And of course, for New Orleans, we made some grilled corn grits. Grits are a favorite around here, and in one of our favorite restaurants, this is how they make the grits. It’s fabulously rich and flavorful! You probably don’t want to know how much heavy cream and butter are in these grits, but I’ll tell you anyway later when I post the recipe! 🙂

Corn Grits

Oh, and since we’re all from Louisiana, we had to add in a little lagniappe for NOLA: Hurricanes. I mean, how could you NOT? For a hot, summer day, these are always a hit!

Hurricane

*all recipes will be shared on the blog at a later date*

It was so wonderful to spend time with our families, and I’m so glad everyone enjoyed the food. You know it was a good party when people ask for the leftovers and recipes as they’re leaving! 🙂

Dessert Time

Family

Thanks so much to Foodbuzz for making this party happen! We really enjoyed the different foods from cities along the river, and also had a blast spending time together!


Filed Under: Beef, Beverages, Cakes/Cupcakes, Entertaining/Parties, Louisiana Cuisine, Pork/Ham/Bacon, Side Dishes

My first Vlog entry: Easy Pasta Salad!

March 12, 2011 by Amy 16 Comments

You may not know this, but in real life, I’m a fairly shy person. I love blogging because my voice comes across in my writing, however, the subject of vlogging has always made me nervous.

I will say, though, I really do love watching vlogs from bloggers I’ve followed for a while. I always have an idea in my head about how people’s voices sound, and usually I’m wrong. It’s always a fun surprise to actually hear a blogger for the first time, you know?

Well, I definitely had to bite the bullet when Foodbuzz informed me that a recipe idea I submitted for their Tastemaker’s Program was accepted! The criteria was to make a vlog featuring my simple (30 minute or less) recipe that uses Newman’s Own products. I couldn’t believe it when I saw the package at my door!! It included quite a few salad dressings, pasta sauces, and ::gasp:: a FLIP CAMERA!! So, thank you so much Foodbuzz and Newman’s Own for this amazing opportunity. You helped me take the giant leap into vlogging. 🙂

Hope y’all don’t laugh at me too much. I stumbled on my words a few times, but I think I actually want to do this again!

FTC disclosure: I was supplied Newman’s Own products and a Flip camera for free, but my opinions of this recipe are completely my own.

Filed Under: Poultry, Side Dishes, Skinny

Roasted Fingerling Potatoes

February 2, 2011 by Amy 5 Comments

Roasted Fingerling Potatoes

I love cute food. Anything mini always seems to catch my eye.  In this case, it was fingerling potatoes. I mean, how can you say no to a cute bag of itty bitty potatoes? I know I can’t!

Of course, I didn’t want to make these itty bitty potatoes into mashed potatoes. Where’s the cuteness in that? Mashed potatoes are never cute. Then, I saw this recipe on The Novice Chef. Roasted fingerlings. Those would be cute, right? The recipe is so simple (just rosemary and garlic…that’s simple AND cheap), and the verdict? These are delicious! No joke.

Seriously, if your store has fingerlings, make these. You’ll be happy you did. 🙂

Roasted Fingerling Potatoes
Source: The Novice Chef, original recipe from Jamie Oliver

Ingredients:

  • 1 lb fingerling potatoes, halved (or quarter for the larger ones)
  • 4 garlic cloves, crushed
  • 3 sprigs of fresh rosemary, chopped
  • sea salt and freshly ground black pepper
  • 3-4 tablespoons olive oil
  • water (for boiling)

Directions:

  1. In a large stock pot, bring water and a dash of salt (enough to cover the potatoes) to a boil. Once boiling, add potatoes and boil for 8 minutes.
  2. Then drain potatoes in a colander and allow to dry (about 5 minutes). While the potatoes are still in the colander, toss them around a bit to ensure you got all the water out and to as Jamie says “fluff them up a bit”.
  3. Then combine potatoes, garlic, rosemary, salt, pepper, and olive oil in a roasting pan. Make sure the potatoes are well mixed in the seasonings and that the potatoes are spread out in a single layer.
  4. Cook at 400 degrees for about 35-45 minutes. Check them mid way through and stir them up a bit. You will know they are done once the edges are perfectly browned and crisp! Serve immediately!

Filed Under: Side Dishes

Crawfish Boiled Mashed Potatoes

September 6, 2010 by Amy 2 Comments

Meatloaf/Potatoes

“Hey, uh, Amy? You’ve posted this picture before. You know that, right?” I’m sure you guys are thinking that, but this time I’m going to rave about what’s on the right side of that plate. Oh yes, those potatoes.

These aren’t your ordinary mashed potatoes. They are spicy, flavorful and make you want to start peeling crawfish at a newspaper-lined dinner table. Delicious!

I had a similar tasting dish at a local chain that, as a Louisianian, had me thinking, “Why didn’t I think of doing this?” It’s so simple and such a great idea!

Basically, at a crawfish boil, there is more than crawfish there. You have boiled veggies, like corn, potatoes, onions, garlic, etc. This recipe takes those potatoes to a dinner plate-worthy level, if you get my drift. Oh, and you can easily make these in the kitchen. No need for the 100 gallon pots here, folks!

Crawfish Boiled Mashed Potatoes
Source: an original

Ingredients:

  • 3 lbs. small red potatoes
  • 1/8 cup crawfish boil seasoning
  • 4 tbsp. butter
  • Milk (as needed)

Directions:

  1. Fill a pot with water and add pre-washed red potatoes and seasoning.
  2. Bring to a boil for about 20-25 minutes or until fork tender.
  3. Let the potatoes sit in the water for 5-10 minutes to absorb the seasoning. (We did 10 minutes. Husband loved them…I thought WAY too spicy, but I’m a wuss!)
  4. Take the potatoes out and put them in a large bowl. Mash them with the butter added in. If you find this too thick, add milk, a little at a time until you reach the desired consistency.

Filed Under: Louisiana Cuisine, Nifty Foodie Original, Side Dishes

  • Go to page 1
  • Go to page 2
  • Go to page 3
  • Go to Next Page »

Primary Sidebar

Hey Y’all!

Image Credit: Leslie Pendleton Photography


Hey y’all!

Thanks so much for reading! I’m Amy, and I live in south Louisiana with my husband and our rescue dog. I enjoy sharing my love for cooking, baking, crafts & more! Follow my daily adventures on social media!

Follow my Daily Adventures

  • Email
  • Facebook
  • Instagram
  • Pinterest
  • Twitter

Footer

  • Email
  • Facebook
  • Instagram
  • Pinterest
  • Twitter

Archives

Copyright © 2025 · Foodie Pro Theme by Shay Bocks · Built on the Genesis Framework · Powered by WordPress