• Skip to primary navigation
  • Skip to main content
  • Skip to primary sidebar
  • Skip to footer

The Nifty Foodie

  • Home
  • About
  • Recipes
    • Appetizers
    • Beverages
    • Breads/Muffins
    • Breakfast
    • Canning
    • Desserts
    • Dog Treats
    • Entertaining/Parties
    • Fruit
    • Holiday Recipes
    • Louisiana Cuisine
    • Main Dishes
    • Mexican
    • Nifty Foodie Original
    • Nifty Tricks
    • Project Food Blog
    • Pumpkin
    • Salads
    • Sauces/Dips
    • Side Dishes
    • Skinny
    • Slow Cooker
    • Spices
    • Stews/Soups
    • The Disasters
  • My Weight Loss Journey
    • Races
    • Running
    • Weight Loss Milestones
  • Crafts
  • Contact Me

Poultry

Cream Cheese and Pesto-Filled Chicken

September 13, 2011 by Amy 6 Comments

Pesto Chicken

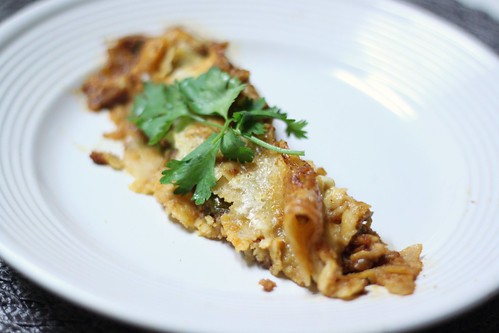
My husband and I aren’t big-time menu planners. At the end of the night, I usually grab a bag of meat from the freezer*, and the next day, we figure out what the heck will be for dinner. One night, I ended up thawing chicken breasts, and was drawing a blank since the past two weeks, I pretty much cooked up all of our favorite usual week-night recipes. So, I had to basically scour the Internet for something weeknight friendly (simple), somewhat healthy and flavorful. This fit the bill.

I was extremely surprised at how fast this dish came together. It was so flavorful and easy to make. Plus, it’s from Eating Well, so you know it’s not that bad for you. Next time, we’ll probably add cajun spices to the chicken just to give it a good kick, but other than that, this recipe was really great!

*Now, to explain the whole bag in the freezer concept. My husband and I purchase meat in bulk when it goes on sale. Then that same day, we use our Foodsaver to portion out things (either in 1 lb. increments or 2 meat cut increments). I highly recommend it this way, since it saves us $2-$3/lb.

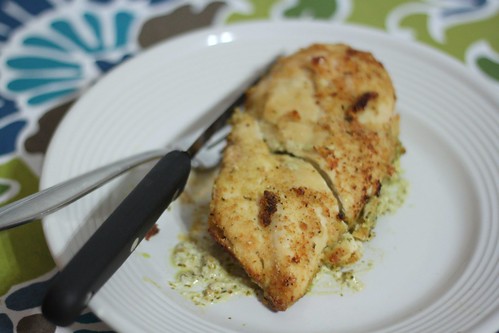
Cream Cheese and Pesto Filled Chicken
Source: adapted from Eating Well, found on Carrie’s Sweet Life

Ingredients:

  • 2 tbsp. reduced-fat cream cheese
  • 1 tbsp. basil pesto (store-bought or homemade)
  • Freshly ground pepper to taste
  • 4 boneless, skinless chicken breast halves (1-1 1/4 pounds total)
  • 1 egg white
  • 1/2 cup Italian breadcrumbs
  • 2 tsp. extra-virgin olive oil

Directions:

  1. Preheat the oven to 400°F and coat a rimmed baking sheet with cooking spray.
  2. Combine the cream cheese, pesto and pepper in a small bowl using a fork.
  3. Cut a horizontal slit along the thin, long edge of a chicken breast half, nearly through to the opposite side. Open up each breast and place one-fourth of the filling in the center. Close the breast over the filling, pressing the edges firmly together to seal. Repeat with the remaining chicken breasts and filling.
  4. Lightly beat egg white with a fork in a medium bowl. Place breadcrumbs in a shallow glass dish. Hold each chicken breast half together and dip in the egg white, then dredge in the breadcrumbs. Discard the leftovers.
  5. Heat oil in a large nonstick skillet over medium-high heat. Add chicken breasts; cook until browned on one side, about 2 minutes. Place the chicken, browned-side up, on the prepared baking sheet. Place the sheet in the oven and bake until the chicken is no longer pink in the center or until an instant-read thermometer registers 170°F, about 20 minutes.

Filed Under: Poultry

Creamy Baked Chicken Taquitos

August 12, 2011 by Amy 5 Comments


Creamy Chicken Taquitos

It’s no surprise that my husband and I love tex-mex food. Our go-to favorite home cooked meals are usually tex-mex, and when we go out to eat, it’s usually at a tex-mex place. Obsessed, much? 🙂

Whenever we go to our favorite tex-mex place, my husband either gets the fajitas or the flautas. I like to know that I can replicate what we eat when we go out, and heck, I can make fajitas, but flautas? Flautas intimidate the heck out of me! Why, you ask? Well, flautas are fried, and I hate frying. I either under-cook or burn the food. It’s always bad when I want to try to fry. I just can’t figure out frying. (I guess that’s a good thing, health-wise!)

When I saw this recipe for taquitos, flautas popped in my head. Sure, taquitos aren’t flautas, but they are pretty dang close! And the best part, these taquitos are baked. Whew…escaped frying once again! 🙂

Let me tell y’all something…these taquitos are NOT the frozen taquitos that you buy in bulk in the frozen section. I swear. The ingredients sound so simple, but whoa, these taquitos are absolutely delicious. My husband even said that this may just be his favorite home-cooked meal that I’ve ever made (and I’ve made a lot of things…this is HUGE folks!)! The combination of cheeses makes these taquitos just like the title says..creamy, and the combination of ingredients just makes these taquitos so flavorful! Now, to note…for the chicken, we used an extra chicken breast that I cooked for these enchiladas, so the flavors were already in the chicken, which I think helped to put this dish over the top, but I’m sure if you use any pre-cooked chicken, these will still taste pretty awesome.

Creamy Baked Chicken Taquitos
Source: mildly adapted from Pink Parsley Blog, originally from Our Best Bites

Ingredients:

  • 3 oz cream cheese, softened
  • 1/3 cup salsa
  • juice of 1/2 a lime
  • 1 tsp. chili powder
  • 1/2 tsp. ground cumin
  • pinch cayenne pepper
  • 1/2 tsp. onion powder
  • 3 cloves garlic, minced
  • 1/4 cup chopped fresh cilantro
  • 3 tbsp. chopped scallions
  • 2 cups cooked and shredded chicken
  • 1/2 cup shredded extra sharp cheddar cheese
  • 1/2 cup shredded Pepperjack cheese
  • 8-12 (6-inch) corn tortillas
  • kosher salt and freshly ground black pepper
  • cooking spray

Directions:

  1. Preheat the oven to 425 degrees and spray a baking sheet with cooking spray.
  2. In a large bowl, combine the cream cheese with the salsa, lime juice, cumin, chile powder, cayenne, onion powder, garlic, cilantro, scallions, and 1/4 tsp kosher salt.  Fold in the chicken and cheeses.  Taste and season with additional salt and pepper if necessary.
  3. Working 3 tortillas at a time, stack them on a microwave-safe plate and cover with plastic wrap.  Cook 30 seconds, or until tortillas are soft and pliable.
  4. NOTE: Be careful when working with the tortillas…they are hot right out of the microwave! Spoon 2-3 tablespoons of filling onto the lower third of each tortilla, and roll tightly.  Place seam side-down on the prepared baking sheet.  Repeat with remaining tortillas and filling.
  5. Spray the taquitos lightly with cooking spray, sprinkle with salt.  Bake 15-20 minutes, or until the tortillas are crisp and golden-brown.  Serve with salsa, sour cream, queso and/or guacamole.


Filed Under: Mexican, Poultry

Chicken Enchiladas

August 1, 2011 by Amy 2 Comments

Chicken Enchiladas

There are some dishes that just were not meant to be photographed by me. I’ve attempted to take pictures of these enchiladas 4 separate times, and something always goes wrong. So, the result is a picture of an enchilada with a torn tortilla…enchiladas, you win. The resulting dish just isn’t pretty. In this case, looks are very deceiving, y’all. These enchiladas are even better than the ones at my favorite tex-mex joint! I absolutely love them, and this is now our go-to recipe. 🙂

The first time I tried enchiladas was actually in college. See, I don’t like beans, and for some reason, I always thought every enchilada had beans. So, when one of my friends ordered them, insisting the ones at a restaurant were the best ever, I asked her what was in them. When she didn’t say beans, I had to try them. Why was I deprived for so long? Now, I usually order enchiladas when we go out for tex-mex. I prefer enchiladas to fajitas…crazy, eh?

Chicken Enchiladas
Source: mildly adapted from Pink Parsley Blog, originally from America’s Test Kitchen

Ingredients:

  • 1 medium onion
  • 2 jalapenos, 1 seeded (the other not, for an extra kick)
  • 1 teaspoon canola oil
  • 3 medium cloves garlic, grated with a microplane or minced
  • 3 Tablespoons chili powder
  • 2 teaspoons ground cumin
  • 3 teaspoons sugar
  • 1 15-oz can tomato sauce
  • 1 cup water
  • 1 large roma tomato, seeded and chopped
  • 1 pound boneless, skinless chicken breast (most of the times, we only need 1 large chicken breast…2 is just too many)
  • 1 cup extra sharp white cheddar, shredded
  • 1 cup monterey jack cheese, shredded
  • 1/2 cup minced fresh cilantro
  • 12 (6-inch) soft corn tortillas
  • cooking spray
  • salt and ground black pepper

Directions:

  1. Place onion and jalapenos in a food processor until chopped very fine.
  2. Combine the onion, jalapenos, 1/2 teaspoon salt, and oil in a large saucepan. Cook over medium-low heat, stirring often, until the onions and peppers have softened, 8-10 minutes. Stir in the garlic, chili powder, cumin, and sugar, and cook until fragrant, less than 30 seconds. Stir in the tomato sauce, water, and chopped tomato. Cook the sauce on medium-low, until slightly thickened, 5 minutes.
  3. Nestle the chicken into the sauce. Reduce heat to low, cover, and cook until chicken is cooked through (thickest part reaches 160 degrees), about 12-20 minutes. Transfer the chicken to a plate, and set aside to cool.
  4. Strain the sauce through a strainer into a medium bowl, pressing the onion mixture to extract as much liquid as possible. Transfer the onions to a large bowl and set aside. Season sauce with additional salt and pepper to taste.
  5. Shred the chicken into bite-sized pieces. Add to the onion mixture, and add 1/4 cup of the enchilada sauce, 1 cup cheese, and the cilantro. Toss to combine.
  6. Stack the tortillas on a plate and cover with plastic wrap; Microwave on high until warm and pliable, 40-60 seconds. Working with the tortillas one at a time, spoon 1/4 cup of the chicken mixture on the left side. Tightly roll each tortilla and lay seam-side down in a greased 9×13 inch baking dish.
  7. Lightly spray the tops of the enchiladas with cooking spray. Place in the oven, uncovered, for about 10 minutes, or until the tortillas start to brown slightly (skip this step if you don’t like the crunch…my husband loves a good bit of crunch to these).
  8. Reduce heat to 400. Remove enchiladas and pour sauce evenly on top. Top with the remaining cheese. Cover dish with foil, and bake an additional 20 minutes, or until heated through.
  9. Remove foil and bake another 5 minutes, until cheese browns. Remove from oven and let stand 10 minutes before serving.

Filed Under: Mexican, Poultry

Grilled Chicken Fajitas

April 12, 2011 by Amy 3 Comments

Chicken Fajitas

I can’t believe it’s April already. Wasn’t I just wrapping Christmas gifts last week or something? 🙂 With Spring in full force, it’s time to fork out the grill! I absolutely LOVE warmer months, because I’m a sucker for grilled everything! Also, usually my husband volunteers to do the cooking on grilling nights. (Win!)
My husband and I are huge fans of Tex Mex. One of our favorite restaurants to visit is a tex mex place. They have some killer queso blanco, the margaritas are just so tasty, and their fajitas? My goodness…they are majorly yummy! However, at $15 an order, it’s not the most $$ friendly meal, so I wanted to find a way to make this at home.
 
Of course, I had to turn to food bloggers for some help, and I came across this one on The Way the Cookie Crumbles. The ingredients are simple, and the recipe is fool-proof! Best of all? It involves the grill! (Note: If you don’t have an outdoor grill, you can always use an indoor grilling pan like I did.)
 
The only thing I would change about this recipe is that I would keep the ribs and seeds in the jalapenos, because these fajitas really didn’t end up that spicy. 
Grilled Chicken Fajitas
Source:  The Way the Cookie Crumbles, originally by Cooks Illustrated
Ingredients:
  • ⅓ cup juice from 2 to 3 limes
  • 6 tablespoons vegetable oil
  • 3 medium garlic cloves, minced
  • 1 tablespoon Worcestershire sauce
  • 1½ teaspoons brown sugar
  • 1 jalapeno, seeds and ribs removed, minced
  • 1½ tablespoons minced fresh cilantro leaves
  • table salt and ground black pepper
  • 3 boneless, skinless chicken breasts (about 1½ pounds), trimmed of fat, tenderloins removed, pounded to ½-inch thickness
  • 1 large red onion (about 14 ounces), peeled and cut into ½-inch-thick rounds (do not separate rings)
  • 1 large red bell pepper (about 10 ounces), quartered, stemmed, and seeded
  • 1 large green bell pepper (about 10 ounces), quartered, stemmed, and seeded
  • 8-12 (6-inch) flour tortillas
Directions:
  1. In a medium bowl, whisk together the lime juice, 4 tablespoons oil, garlic, Worcestershire, brown sugar, jalapeno, cilantro, 1 teaspoon salt, and ¾ teaspoon pepper. Reserve ¼ cup marinade in a small bowl; set aside. Add another teaspoon salt to the remaining marinade. Place the chicken in the marinade; cover with plastic wrap and refrigerate 15 minutes. Brush both sides of the onion rounds and the peppers with the remaining 2 tablespoons oil and season with salt and pepper.
  2. Remove the chicken from the marinade and place it smooth side down on the hotter side of the grill; discard the remaining marinade. Place the onion rounds and peppers (skin side down) on the cooler side of the grill. Cook the chicken until it’s well browned, 4 to 5 minutes; using tongs, flip the chicken and continue grilling until it’s no longer pink when cut into with a paring knife or an instant-read thermometer inserted into the thickest part registers about 160 degrees, 4 to 5 minutes longer. Meanwhile, cook the peppers until spottily charred and crisp-tender, 8 to 10 minutes, turning once or twice as needed; cook the onions until tender and charred on both sides, 10 to 12 minutes, turning every 3 to 4 minutes. When the chicken and vegetables are done, transfer them to a large plate; tent with foil to keep warm.
  3. Working in 2 or 3 batches, place the tortillas in a single layer on the cooler side of the now-empty grill and cook until warm and lightly browned, about 20 seconds per side (do not grill too long or the tortillas will become brittle). As the tortillas are done, wrap them in a kitchen towel or a large sheet of foil.
  4. Separate the onions into rings and place them in a medium bowl; slice the bell peppers lengthwise into ¼-inch strips and place them in the bowl with the onions. Add 2 tablespoons reserved unused marinade to the vegetables and toss well to combine. Slice the chicken into ¼-inch strips and toss with the remaining 2 tablespoons reserved marinade in another bowl; arrange the chicken and vegetables on a large platter and serve with the warmed tortillas.

Filed Under: Mexican, Poultry

My first Vlog entry: Easy Pasta Salad!

March 12, 2011 by Amy 16 Comments

You may not know this, but in real life, I’m a fairly shy person. I love blogging because my voice comes across in my writing, however, the subject of vlogging has always made me nervous.

I will say, though, I really do love watching vlogs from bloggers I’ve followed for a while. I always have an idea in my head about how people’s voices sound, and usually I’m wrong. It’s always a fun surprise to actually hear a blogger for the first time, you know?

Well, I definitely had to bite the bullet when Foodbuzz informed me that a recipe idea I submitted for their Tastemaker’s Program was accepted! The criteria was to make a vlog featuring my simple (30 minute or less) recipe that uses Newman’s Own products. I couldn’t believe it when I saw the package at my door!! It included quite a few salad dressings, pasta sauces, and ::gasp:: a FLIP CAMERA!! So, thank you so much Foodbuzz and Newman’s Own for this amazing opportunity. You helped me take the giant leap into vlogging. 🙂

Hope y’all don’t laugh at me too much. I stumbled on my words a few times, but I think I actually want to do this again!

FTC disclosure: I was supplied Newman’s Own products and a Flip camera for free, but my opinions of this recipe are completely my own.

Filed Under: Poultry, Side Dishes, Skinny

Light Chicken Parmesan

August 26, 2010 by Amy 6 Comments

Light Chicken Parm

It’s very rare that we go out for Italian food. While I absolutely LOVE Italian cuisine, the hubs isn’t a really huge fan and totally has to be in the right mood for it. When I was thinking of a new recipe to try in the house, I thought, well, why not make the hubs’ favorite dish: chicken parmesan?

However, I really despise frying. Everytime I try to fry something, I can’t quite control the oil and it either ends up undercooked or burnt. Plus, I end up burnt too from the oil splatters..it’s a crappy situation. Oh yeah, and since I’m trying to lose weight, well, frying isn’t in my vocabulary for the moment.

So, I found a Cooks Illustrated recipe, which really has never steered me wrong when it comes to baking food dishes that are traditionally fried, and I tried this. It really didn’t take that long to throw together, and the hubs really enjoyed it. Yay!

Lighter Chicken Parmesan
Source: Cooks Illustrated 

Ingredients:

  • 1 1/2 cups panko (Japanese-style bread crumbs)
  • 1 tablespoon olive oil
  • 1 ounce grated Parmesan cheese (about 1/2 cup), plus extra for serving
  • 1/2 cup unbleached all-purpose flour
  • 1 1/2 teaspoons garlic powder
  • Table salt and ground black pepper
  • 3 large egg whites
  • 1 tablespoon water
  • Vegetable cooking spray
  • 3 large boneless, skinless chicken breasts (about 8 ounces each), trimmed of excess fat and sliced into cutlets
  • 2 cups tomato sauce , warmed (see below)
  • 3 ounces shredded part-skim mozzarella cheese (about 3/4 cup)
  • 1 tablespoon minced fresh basil

Tomato Sauce

  • 1 (28-ounce) can diced tomatoes
  • 4 medium cloves garlic , minced or pressed through a garlic press (about 4 teaspoons)
  • 1 tablespoon tomato paste
  • 1 teaspoon olive oil
  • 1/8 teaspoon red pepper flakes
  • 1 tablespoon minced fresh basil leaves
  • Table salt and ground black pepper

Directions:

  1. Pulse the tomatoes in a food processor until mostly smooth, about ten 1-second pulses; set aside. Cook the garlic, tomato paste, oil, and pepper flakes in a medium saucepan over medium heat until the tomato paste begins to brown, about 2 minutes. Stir in the pureed tomatoes and cook until the sauce is thickened and measures 2 cups, about 20 minutes. Off the heat, stir in the basil and season with salt and pepper to taste. Cover and set aside until needed.
  2. Adjust an oven rack to the middle position and heat the oven to 475 degrees. Combine the bread crumbs and oil in a 12-inch skillet and toast over medium heat, stirring often, until golden, about 10 minutes. Spread the bread crumbs in a shallow dish and cool slightly; when cool, stir in the Parmesan.
  3. In a second shallow dish, combine the flour, garlic powder, 1 tablespoon salt, and 1/2 teaspoon pepper together. In a third shallow dish, whisk the egg whites and water together.
  4. Line a rimmed baking sheet with foil, place a wire rack on top, and spray the rack with vegetable oil spray. Pat the chicken dry with paper towels, then season with salt and pepper. Lightly dredge the cutlets in the flour, shaking off the excess, then dip into the egg whites, and finally coat with the bread crumbs, Press on the bread crumbs to make sure they adhere. Lay the chicken on the wire rack.
  5. Spray the tops of the chicken with vegetable oil spray. Bake until the meat is no longer pink in the center and feels firm when pressed with a finger, about 15 minutes.

Filed Under: Pasta/Rice, Poultry

Rosemary Lemon Chicken with Ravioli

May 25, 2010 by Amy 3 Comments

Rosemary Lemon Chicken

My husband and I aren’t wine drinkers. There, I said it. My palate is not sophisticated enough to distinguish different wines, nor am I able to just enjoy a good wine event. I’m not at all drawn to the taste of it, but I sort of wish I was. The only time I buy wine is when I have a recipe to cook with, and even then I’m clueless on the wine aisle. I need the exact type spelled out for me or else, I’m calling on one of my wine expert friends.

My friend and her mom came to visit on Saturday night, and we ordered pizza. She offered to bring wine and beer, but all I wanted was Diet Dr. Pepper. I’m fully aware of my drinking immaturity, but I do embrace it. Diet Dr. Pepper, after all, is zero calories. 😉

She brought some Pinot Grigio for her mom, and there was quite a bit leftover. So, her mom offered up a simple way to fix chicken so we could use it up, since she didn’t want to bring it home with her. Wow, was this chicken moist and flavorful and really simple to put together.

Since today’s Foodbuzz Daily Special product is this skillet, I wanted to feature an easy and tasty weeknight meal to make in a skillet. Personally, we just use a non-stick skillet pan, like this one, to make this recipe.

I fixed up a side of Buitoni’s ravioli, which I received complimentary of Foodbuzz’s Tastemaker program. It was absolutely delicious.

Buitoni Ravioli

Rosemary Lemon Chicken
Source: My friend’s Mom

Ingredients:

  • 1/2 bottle Pinot Grigio
  • 3 sprigs of fresh rosemary
  • juice of one lemon
  • 2 cloves garlic, minced
  • 2 boneless chicken breasts
  • salt and pepper

Directions:

  1. Pound chicken breasts to an even thickness.
  2. Add salt and pepper to the chicken on each side and sear on each side on medium-high for a couple of minutes.
  3. Set the heat to low, and add the wine, rosemary sprigs, garlic and lemon juice.
  4. Cover the skillet and cook for 20-25 minutes, until the chicken is cooked all the way through.

Filed Under: Poultry

Garlic Lemon Chicken Kabobs

May 18, 2010 by Amy 11 Comments

Garlic Lemon Chicken Kabobs w/ Roasted Vegetables

I love the idea of food on a stick. It’s so amazingly convenient to not get your hands or utensils dirty. Popsicles, corn dogs, roasted marshmallows…and now, kabobs. I’ve never had a kabob before, and it’s not because I was intimidated, it’s just something I don’t think much about. I’m more of a comfort food gal.

Nowadays though, my husband and I have a friendly bet going on. We’re challenging ourselves to lose as much weight as we can in 6 months. The motivation? A $300 prize. We each put in $150 of our own “fun” money for this, and now it’s time to bring on the competition. So, because of the bet (and the need to eat healthier), we are looking for better food options to help with the weight loss. Bye bye comfort food!

I saw this recipe on Annie’s Eats, and knew this would be a good dinner to cook since it’s light, involves garlic and is something new to try (kabobs). This chicken turned out flavorful and moist. The marinade is so simple to put together too! I think this would be a great weeknight dinner, especially for the summer. I served the chicken with onion/bell pepper kabobs too as a side, although, for next time, I’m gonna need a better, more filling side dish. If anyone has suggestions, please give me some ideas!

Garlic Lemon Chicken Kabobs
Source: Annie’s Eats (adapted from Williams Sonoma)

Ingredients:

  • 3 tbsp. extra-virgin olive oil
  • Zest of 1 lemon
  • 3 cloves garlic, minced or pressed
  • 1 tbsp. minced fresh parsley
  • 1 tsp. kosher salt
  • ½ tsp. ground black pepper
  • 1 lb. boneless, skinless chicken breasts, cut into ¾-inch pieces

Directions:

  1. In a medium bowl, whisk together the olive oil, lemon zest, garlic, parsley, salt and pepper.  Add the chicken pieces to the bowl and mix to coat with the marinade.  Cover and refrigerate for at least 2 hours and up to 8 hours.
  2. Prepare a medium fire in a grill.  If using wooden skewers, soak them in water for at least 20 minutes before use.
  3. Thread the chicken pieces onto skewers and discard the excess marinade.  Lightly oil the grill grates.  Place the kabobs on the grill, cover, and cook until the chicken is opaque throughout, about 8-12 minutes, turning once or twice during cooking.  Transfer to a warmed platter and serve immediately.

Filed Under: Poultry, Skinny

Chicken Enchiladas

March 4, 2010 by Amy 2 Comments

Ok, so I’m gonna give you all a crawfish break today. I just HAD to share this recipe ASAP, because it’s just awesome.

This is a different recipe than the enchiladas I am used to (the ones with red sauce), but I had some leftover crockpot chicken that we used for tacos the night before (which I didn’t photograph, but I will share the recipe) and wanted to make sure that I used up the leftovers. I found this recipe on AllRecipes and thought that it sounded pretty interesting. So, I decided to give it a try!

This recipe is very easy to put together, and was so yummy. My husband absolutely loved these, so I’m definitely going to have to make them again!

Chicken Enchiladas
Source: AllRecipes

Ingredients:

  • 1 tablespoon butter
  • 1/2 cup chopped green onions
  • 1/2 teaspoon garlic powder
  • 1 (4 ounce) can diced green chiles
  • 1 (10.75 ounce) can condensed cream of mushroom soup
  • 1/2 cup sour cream
  • 1 1/2 cups cubed cooked chicken breast meat (used shredded leftover chicken taco meat. Recipe below)
  • 1 cup shredded Cheddar cheese, divided
  • 6 (12 inch) flour tortillas
  • 1/4 cup milk

Directions:

  1. Preheat oven to 350 degrees F (175 degrees C). Lightly grease a large baking dish.
  2. In a medium saucepan over medium heat, melt the butter and saute the green onion until tender (about 3 to 4 minutes). Add the garlic powder, then stir in the green chiles, cream of mushroom soup and sour cream. Mix well. Reserve 3/4 of this sauce and set aside. To the remaining 1/4 of the sauce in the saucepan, add the chicken and 1/2 cup of shredded Cheddar cheese. Stir together.
  3. Fill each flour tortilla with the chicken mixture and roll up. Place seam side down in the prepared baking dish.


Crockpot Chicken Tacos
Source: The Nest (Houston Nesties board)

Ingredients:

  • 1 chicken taco seasoning packet
  • 2-3 frozen chicken breasts
  • Fresh pico de gallo (12-16 oz.)
  • 1/4 cup olive oil
  • 1/4 cup water

Directions:

  1. Sprinkle the seasoning packet all over the bottom of the crockpot. Lay the frozen chicken breasts on top.
  2. Pour the pico de gallo on top and add the olive oil and water. Do not stir!
  3. Allow the chicken to cook in the crockpot for 4-6 hours on low. Remove chicken and shred with a fork, then add back in the crockpot, stir the sauce and let it cook for 30 more minutes on low.
  4. In a small bowl combine the reserved 3/4 of the sauce with the milk. Spoon this mixture over the rolled tortillas and top with the remaining 1/2 cup of shredded Cheddar cheese. Bake in the preheated oven for 30 to 35 minutes, or until cheese is bubbly.

Filed Under: Mexican, Poultry

Herb Roasted Chicken Breast

January 8, 2010 by Amy 4 Comments

Since my husband and I are trying to eat healthier, I thought a simple roasted chicken would work well for dinner. I didn’t really follow a recipe at all this time, so I guess you could say this is an original. It does involve butter, but hey, it’s not that much really. The skin does come out super crispy, but I opted not to eat mine. This is for two people, but this can easily be doubled, tripled, whatever. It’s a really flexible recipe and easy to do!

Herb Roasted Chicken Breast

Ingredients:

  • 2 bone-in chicken breasts
  • 2 tbsp. butter (Edit: The second time, I used canola oil instead since butter seemed to smoke up the house. It worked MUCH better.)
  • 3 tbsp. freshly chopped basil
  • 3 tbsp. freshly chopped parsley
  • 2 tsp. salt
  • 2 tsp. freshly ground black pepper
  • 1 tsp. onion powder
  • 1 tsp. garlic powder

Directions:

  1. Preheat your oven to 400 degrees.
  2. Wash and dry chicken in the sink. Add salt/pepper under and over the skin of the chicken.
  3. Knead the butter in your hands until it is fairly soft. Add in the basil, parsley, onion powder and garlic powder. Mix until thoroughly combined.
  4. Add herbed butter to the chicken under and over the skin of the chicken
  5. Bake for 1 hr or until juices run clear on the chicken.

The Skinny (with skin/no skin) – per serving, serves 2:
Calories: 262.9/191.3
Fat: 19.7 g/12.5 g
Fiber 0.5 g/ 0.5 g

Filed Under: Nifty Foodie Original, Poultry, Skinny

  • « Go to Previous Page
  • Go to page 1
  • Go to page 2
  • Go to page 3
  • Go to page 4
  • Go to page 5
  • Go to Next Page »

Primary Sidebar

Hey Y’all!

Image Credit: Leslie Pendleton Photography


Hey y’all!

Thanks so much for reading! I’m Amy, and I live in south Louisiana with my husband and our rescue dog. I enjoy sharing my love for cooking, baking, crafts & more! Follow my daily adventures on social media!

Follow my Daily Adventures

  • Email
  • Facebook
  • Instagram
  • Pinterest
  • Twitter

Footer

  • Email
  • Facebook
  • Instagram
  • Pinterest
  • Twitter

Archives

Copyright © 2025 · Foodie Pro Theme by Shay Bocks · Built on the Genesis Framework · Powered by WordPress