• Skip to primary navigation
  • Skip to main content
  • Skip to primary sidebar
  • Skip to footer

The Nifty Foodie

  • Home
  • About
  • Recipes
    • Appetizers
    • Beverages
    • Breads/Muffins
    • Breakfast
    • Canning
    • Desserts
    • Dog Treats
    • Entertaining/Parties
    • Fruit
    • Holiday Recipes
    • Louisiana Cuisine
    • Main Dishes
    • Mexican
    • Nifty Foodie Original
    • Nifty Tricks
    • Project Food Blog
    • Pumpkin
    • Salads
    • Sauces/Dips
    • Side Dishes
    • Skinny
    • Slow Cooker
    • Spices
    • Stews/Soups
    • The Disasters
  • My Weight Loss Journey
    • Races
    • Running
    • Weight Loss Milestones
  • Crafts
  • Contact Me

Homemade Strawberry Lemonade

April 25, 2012 by Amy 6 Comments

Homemade Strawberry Lemonade

The first time I ever tried Strawberry Lemonade was at Chilis. I went to dinner once with friends, and in the many times we went there as college students, I never noticed the drink before until the waitress mentioned it. I really thought it would be a disgusting Hi-C drink, but when the waitress bought it out, it contained strawberry puree. I was in love. I’m sure it had 900 calories a glass, but it was just SO good and sweet! Now, I don’t go to Chilis as much anymore, but whenever I end up there, I have to have it! I’m sure some of y’all are judging me for liking something at Chilis, but just give me a little slack here. 🙂 I think the last time we ate at Chilis was several months ago…it’s definitely not a place we frequent.

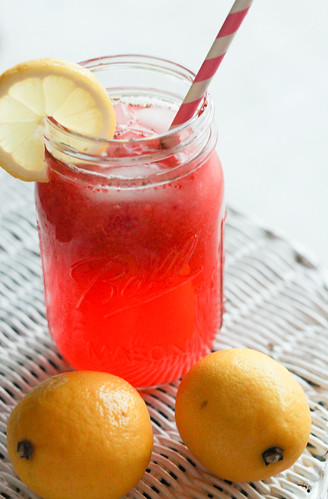
A while back, I saw this recipe for homemade strawberry lemonade. I waited until strawberry season came around, bought a bag of lemons, and made a pitcher of the stuff. Let’s just say I had three glasses of this in a row that evening. This stuff is GOOD and super easy to make!

Homemade Strawberry Lemonade
Source: My Baking Addiction

Ingredients:

  • 1 cup sugar
  • 1 1/2 cups of water, divided
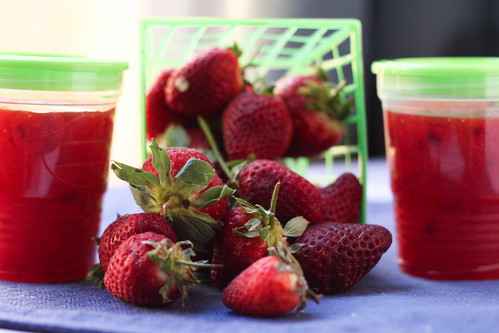
  • 1 pint fresh strawberries
  • 1 cup fresh lemon juice (about 8-9 small lemons)
  • 4-6 cups cold water (I used 5 cups)

Directions:

  1. In a small saucepan, combine the sugar and water. Make a simple syrup by heating and occasionally stirring the mixture on medium heat until the sugar is dissolved. Allow the mixture to fully cool before doing the other steps.
  2. Puree the strawberries in a blender or food processor with 1/2 cup of water.
  3. In a large pitcher, add the strawberry puree, cooled simple syrup and lemon juice. Stir the mixture until everything is well-mixed.
  4. Add 4 cups of cold water and taste. If you feel the lemonade needs more water, add it a cup at a time until the lemonade tastes great to you!
  5. Stir the lemonade really well and serve it over ice.

Note: It lasted about 2 days in the fridge (since I finished the pitcher by then), but it may last longer.

Filed Under: Beverages, Fruit

Since when is 20 lbs. not a big deal?

April 18, 2012 by Amy 40 Comments

I try not to think of the big picture. 120 lbs. gone  is the big picture. It’s a huge number, and when I think about it, I get extremely overwhelmed.

I start to question myself..

  • maybe if I liked regular milk instead of chocolate milk as a kid…
  • maybe if I didn’t have that Burger King habit when I worked at the grocery store…
  • maybe if I didn’t sneak an ice cream snack every day after school…
  • maybe if I ate better in the all you can eat cafeteria when I was in college…
  • maybe if I didn’t randomly grab fast food at 3am because I had the munchies…
  • maybe if I chose a career that wasn’t a desk job…
  • maybe if I kept going after the wedding with my weight loss instead of gaining 58 lbs…

In January 2012, I was staring at a weight that was dangerously close to 300 lbs. 300 lbs. Football players are supposed to be 300 lbs….not a gal like me.

So, I started doing something about it. Could I have done better the past 4 months? Of course. If I pushed myself, I could have probably lost double. But I was proud of the 20 lbs. that are gone. I’ll never see those pounds again.

Until yesterday. Yesterday, an email from someone who reads this blog basically said that 20 lbs. was nothing in the grand scheme of things, and this made me question those 20 lbs. I know…don’t let one random person get you down, but darnit, this one hit me hard. The email made me think about those other 100 lbs. that are left along my weight loss journey. I was staring at my before/now pictures and thinking negatively about the belly I still have, the double chin, the back fat….ugh. All I could see was the fat in my current pictures.

20 pounds down

(Left–before, right–4/16/2012)

After a few great, encouraging comments from y’all, I thought about it again….My XL shirts are looser. I can pull my jeans down (when they’re still buttoned), and if I forget to wear a belt (which BTW is on its last notch), it’s a battle all day to keep them up.

(Yeah, never forgetting my belt again…)

So, while 20 lbs. is a small fraction of my total weight loss goal, it’s still something. Something I’m very proud of. I still have 100 lbs. to go, but thinking about it, I only have 5 more rounds of 20 lbs. to lose. I can do this 5 more times. 🙂


Filed Under: Health/Weight Loss, Weight Loss Milestones

Spicy Spinach Artichoke Dip

April 16, 2012 by Amy Leave a Comment


Spinach Artichoke Dip

I love hosting big family holidays. I have a blast choosing a menu, shopping and waking up early to start the cooking festivities. It’s really rewarding when you see all of your loved ones gathered around and enjoying the food that YOU made! Never in my college day Lean Cuisine eating dreams did I think I could ever host a family holiday, but we have…quite a few times.

One of the big perks to cooking up a huge holiday meals is that you can sneak a taste or two of a few dishes as you’re cooking them up without getting smacked on the wrist by your momma. Sadly, I actually end up filling up on appetizers and taking small tastes before serving everyone! (whoops!) By the time everyone has their huge plates of food, I find myself sitting down and struggling to eat one plate. Oh well…

This past Christmas and Easter, I had this spinach artichoke dip to blame for the pre-meal full feeling. My friend, who blogs at Wine and Shoes, gave me this recipe after trying this dip at a party, and it’s just fabulous! I like to have this in a crockpot (to help the dip stay warm) where the appetizers are, which is sadly my kitchen island. All I have to do is take a step or two to sneak a cracker full of this stuff every couple of minutes. I’m not the only one who found it dangerous, either. As people started arriving, I noticed a little crowd was forming, and it certainly wasn’t for the cheese tray. 😛

I especially love this dip, because there is no mayo. 90% of you will disagree with me, but I think mayo is gross. It smells terrible, looks nasty and because of that, I just can’t stomach the idea of eating ANYTHING containing mayo. Sorry to the mayo lovers…

Spicy Spinach Artichoke Dip
Source: Wine and Shoes (originally from Tabasco)

Ingredients:

  • 1 stick butter
  • 1 med onion, chopped finely
  • 2-10 oz packs frozen spinach, thawed and well drained
  • 1-14 oz can artichoke hearts, drained and chopped
  • 8 oz cream cheese
  • 8 oz sour cream
  • 1 cup Monterey jack cheese, shredded & divided
  • 1 cup parmesan cheese, grated & divided
  • 2 tbsp. Tabasco sauce
  • salt, to taste

Directions:

  1. Melt the butter in large saucepan on medium-low heat. Add the chopped onion and sautĂ© the butter and onions until they are translucent and soft, about 5 minutes.  Add in the spinach, artichokes, cream cheese, sour cream, Ÿ cup of the parmesan and Ÿ cup of the Monterey jack, Tabasco and salt (to taste).  Cook until well mixed.
  2. Pour the mixture into a smaller crockpot and sprinkle the remaining cheese on top.
  3. Add the lid to the crockpot and heat on low for about 20 minutes, until the cheese is just melted. Then, keep the crockpot on low throughout serving.


Filed Under: Appetizers, Sauces/Dips

Baby Boy Quilt

April 15, 2012 by Amy 3 Comments

A while ago, I was told that my friend’s sister was having a baby! I was super stoked for my friend and her sister, so I decided to throw together a quilt for the baby. This was going to be a unisex quilt, but since I took my darn time (ha!), I found out the sex of the baby since he was born, well a couple of months ago! (oof, crafter fail!)

The craft bug has been really biting lately, so I took this past weekend to finish this quilt. Whew!

I decided to go with a simple strip quilt, because I really wanted the fabrics to shine here. The main fabric was Giraffe Garden by Michael Miller, and I just purchased some fabrics using the colors in that particular print.

Baby Boy Quilt

This was my first strip quilt, and I have to say, it comes together rather quickly. It only took me a while to finish this quilt, because we had the big house move, had to unpack everything, the holidays happened, etc. Now that things are slowing down, I can safely say I’m going to be busy in my craft room. 🙂

Baby Boy Quilt

Here’s another view of the fabrics I used. I just love how colorful and bright this quilt is! I hope the baby loves this quilt!

Baby Boy Quilt


Filed Under: Crafts

Guest Post: Weight Loss in College

April 12, 2012 by Amy 4 Comments

I usually don’t have guest posts on my blog, but my little sister has inspired the something out of me. My youngest sister, Rachel, is a freshman at LSU. You know how the freshman 15 is usually a given? Well, she hasn’t gained a pound. In fact, she’s LOST nearly 30 pounds. She’s made a complete lifestyle change, and I asked her if she’d mind taking some time out of her busy college schedule to write a guest post on here. She has a ton of great tips for college students, as well as pretty much any person.

——————

Hello Everyone! I am Amy’s sister, Rachel, and she has asked me to do a guest post for her blog! I couldn’t be more excited to share some weight loss tips with you all! But first, I thought I’d share some of my background story.

I was always a chubby kid. I got bullied and made fun of a lot because of it. I remember one time in particular when we had to share our weight to the entire class for some math activity, and it was one of the most embarrassing moments of my life seeing the other kids just stare at me. I also remember not being able to fit into the cute clothes at Limited Too (now called Justice). I was also a shy kid. It was a bad combination in school because I couldn’t stand up to the bullies until I was older. But, thanks to getting into musical theatre (as well as my loving family), I got a lot more confidence. I felt better about myself, but my weight was always a nagging thing in my life.

Once I got to high school, the bullying pretty much stopped, but I was gradually gaining more and more weight. At my highest weight (which you’ll see a picture of below), I weighed about 220 lbs., maybe a little higher. This was around the time I was auditioning for college musical theatre programs. One audition in particular was a huge wake up call for me. I was auditioning for Penn State’s program, and after I sang and did my monologue, they sat me down. They basically told me that I couldn’t succeed in musical theatre being so overweight. Not only were they extremely rude about it, they also proceeded to tell me that it would be different had I been black (um, excuse me, but did they look at my resume? I have done a lot of lead roles before, so obviously my weight hasn’t gotten in my way so far!). So, in the end I didn’t get into any of the musical theatre programs I applied to mainly because of my weight. I decided to go to LSU for vocal performance and it was one of the best decisions I’ve ever made. I have no regrets.

Fast forward to January of this year. I had already done little things to lose a little bit of weight the previous semester, but I’m pretty sure I gained all that weight back during the holidays. So once I got back to school, I decided to make a lifestyle change, not go on a diet, and lost 25 lbs.!! I dropped a full dress size (maybe a little more) and lost almost 15% of my body weight! This was also very gradual (took about 2 months) so no one really noticed until I either told them or showed them the two pictures below.

The first is of me at my first LSU football game last semester and the second is of me right before doing a 5k a couple of weeks ago. Isn’t the difference crazy? It’s made such a huge difference in how I dance and exercise (it’s so much easier!) and I just feel ten times better about myself. Now who said you can’t LOSE weight while in college?

So here are some amazing tips that helped me lose the weight and can help you too!

  1. Drink water. This is pretty basic, but this also means to completely cut sodas out of your life. It was actually a lot easier than I thought. I used to hate drinking plain old water, but now I crave it. I try to drink about 4-6 glasses a day, and it has helped so much! If you get tired of water, I suggest drinking crystal light or some tea! I also drink a glass of milk every once in a while for some much needed calcium.
  2. Simple carbs are the enemy. Basically, I just try my best to avoid simple carbs, such as white bread, rice, pasta, corn, and potatoes (sweet potatoes are great though!). Sometimes it’s unavoidable in the dining hall at school, but otherwise it’s very do-able. Simple carbs basically turn into sugar once inside of the body, and you want to avoid sugar as much as possible if you want to effectively lose weight. I learned all about this in the book The Dorm Room Diet by Daphne Oz, a wonderful source for those of us in college. It’s also very do-able to avoid these when going out to eat. Just substitute the potatoes or rice in a dish for more veggies!
  3. Veggies and fruits, please! These will be your best friends when trying to lose weight. They are very nutritious and can surprisingly fill you up when paired with a source of protein, such as chicken or steak. I used to only like certain veggies, like broccoli, but you will eventually get used to eating veggies for every meal, so I promise you’ll love them as much as I do. I’ve always loved fruits, so this was never a challenge for me. What was a challenge was substituting delicious ice cream and cakes for dessert in the dining halls for fruit. But now that I’ve pretty much overcome that, it’s really easy.
  4. Have a Support System. I started going to LSU’s gym more and more since I got back to school from winter break. What really helped me out was that I had a couple of close friends who loved exercising and would be willing to go to the workout classes with me, and it made it ten times more fun to go to the gym every day! Also, one of my friends eats really healthy like I try to do, so when in doubt, I always copy what she’s eating. Having the support system will really motivate you to keep going.
  5. Get moving, and make sure it’s FUN! I can’t say enough how important it is to work out at least 3 times a week for at least 30 minutes. Thanks to the LSU UREC, I work out 5 times a week taking many different classes including Zumba, yoga, and cycling. These classes are an hour and I’m always sweating so much by the end of them, so I know I’m really doing something good for my body every time I leave the gym. I know this isn’t everyone’s situation, but this is where your support system can come in. Try to get a small group of friends together to go running or even join a gym, and your body will love you for it. Make sure it’s fun, so you’ll want to keep doing it. That’s why I love Zumba so much, it just feels like a dance party! Even if you don’t have much time to get moving, remember that diet alone is 80% of losing weight, so no worries!
  6. It’s OK to splurge sometimes! Always remember that if you do go off of your “diet” one day, it’s really no big deal. Maybe one day you decide to get a frappuccino or a small scoop of ice cream. It’s OK. We would all go crazy if we didn’t splurge sometimes. Just remember to splurge in moderation, and you’re good. Just don’t make splurging a habit!
  7. Rewarding yourself is essential. I love that my sister has goals and once she meets those goals, she will reward herself in some way. This is yet another way to keep yourself motivated. My reward was usually a frappuccino one week or some ice cream another week. But a really satisfying reward is clothes shopping once you’ve lost a good amount of weight. I can’t tell you how good I felt about myself when I went shopping this past weekend. Before I lost the weight, I was a size 16, sometimes 18 or 16W. Now I’m a solid 14 and it feels great. I no longer fit into Lane Bryant clothes, which is wonderful! I know I still have some weight to lose, but fitting into everything I tried on was just great motivation to keep going. I ended up getting a lot of cute things, and I couldn’t be more excited!!

Sorry for making this post so long, but I had so much to say! Some people may think these guidelines are a little strict, but they really do help. I hope at least some of you got something from this. Thank you Amy for letting me write this post! If you want to read more from me, feel free to follow my Happiness Project blog as well as my life blog!

http://rachelshappinessproject.blogspot.com/
http://rachelslifeasofnow.blogspot.com/

XOXO
Rachel 🙂

Filed Under: Goals, Health/Weight Loss

Strawberry Freezer Jam

April 10, 2012 by Amy 1 Comment

Strawberry Freezer Jam

I’m fairly sure I mentioned before that when I was a kid, I had a terrible allergy to strawberries. It was an absolute bummer for years, because there’s nothing like a good strawberry, especially when they’re local strawberries. I ended up purchasing a flat this past weekend, and just couldn’t wait to dig in and make something fun.

I’ve been craving a good peanut butter and jelly sandwich (I know…I’m totally 6 years old right now.), but I just wasn’t in the mood to make shelf-stable jam. I’ve always been curious about freezer jam, though, since people insist it’s so much better & fresher tasting than the cooked/shelf stable jam. Freezer jam doesn’t require canning supplies, except for freezer safe jars, which they sell near the mason jars. No need to violently boil the cans and hope/pray that the lids “pop” revealing that you canned everything perfectly. You just cook the pectin, add it to your fruit/sugar mixture, let it set up and freeze/enjoy! It’s pretty darn fantastic and it really is much fresher tasting..if you want to make homemade jam easily, this is the way to go. 🙂

Strawberry Freezer Jam
Source: Kraft Foods

Ingredients:

  • 2 cups crushed strawberries (about 2 pints of ripe strawberries)
  • 4 cups of granulated sugar
  • 3/4 cup water
  • 1 box Sure-Jell pectin (in a yellow box)

Directions:

  1. Wash and rinse 5 (1 cup) freezer safe plastic containers and lids with boiling water. Dry the containers and lids thoroughly and set on a clean towel.
  2. Hull and crush strawberries really well with a potato masher or two forks, 1 cup at a time. Make sure to measure out 2 cups of crushed berries into a large bowl. Add the sugar and stir until well-mixed. Allow the mixture to stand for 10 minutes, stirring occasionally during that time.
  3. In a small sauce pan, mix the water and pectin together with a whisk. Heat the mixture, stirring often, until boiling, Keep stirring and allow the mixture to boil for a full minute. Remove the pan from heat, and add the pectin mixture to the sugar mixture. Constantly stir for 3 or so minutes, until the sugar is completely dissolved and everything is well-mixed.
  4. Working quickly, fill all containers with the jam, leaving a 1/2 inch head space. (The great thing about freezer jam containers is there is a line drawn in on the jar to show where to stop pouring.) Wipe the edges of the containers and cover with the lids. Let the jam stand at room temperature for 24 hours to set up, and then place the jars in the freezer or fridge to use.

Note: You can store the jam in the refrigerator for up to 3 weeks or in freezer up to 1 year. Thaw in refrigerator before using.


Filed Under: Canning, Fruit

Thin Mint Blondies

April 3, 2012 by Amy 7 Comments

Thin Mint Blondies

Somehow these cookies have survived in our house for well over a month. I guess I was afraid to open these or something. I mean, these cookies only come once a year, and I’m known for eating these a sleeve at a time. I can behave when it comes to Tagalongs, but Thin Mints? Oh no. I had to ignore them…had to.

Then, this past Saturday, I opened my freezer and stared the Thin Mints down. Then, in my cheat day rage, I ran to Pinterest and looked over recipes using thin mints and stumbled upon these blondies. Of course I had to find a way to make thin mints less diet friendly. 😛

The wonderful thing about bars or brownies is they whip up so quickly. It’s kind of dangerous, but it’s also a good thing when you want to bake something for your coworkers after getting home from work, but also before you have to start cooking supper. 🙂 I had a small taste of these when I was cutting into them, and whoa. If I wasn’t counting my darn calories, I’d save half of the pan for myself.

If you happen to be one of the few with a box of thin mints stashed away, definitely give these a shot. You, or whomever you give these amazing bars to, will thank you a million times over. Just to note: The original recipe calls for Andes chips, but since I couldn’t find these in the store, I made them with a mixture of milk and white chocolate chips.

Thin Mint Blondies
Source: Culinary Concoctions by Peabody

Ingredients:

  • 8 oz. unsalted butter (2 sticks), at room temperature
  • 1 1/3 cup brown sugar, loosely packed
  • 2/3 cup granulated sugar
  • 2 large eggs
  • 1 teaspoon vanilla
  • Pinch salt
  • 2 cups all-purpose flour
  • 1 box Thin Mint Cookies, cut or broken in half
  • 1/2 cup milk chocolate chips
  • 1/2 cup white chocolate chips

Directions:

  1. Preheat the oven to 350 degrees. Butter and flour a 9×13 inch pan and set it aside.
  2. In a stand mixer, fitted with the paddle attachment, cream the butter for 2 minutes until light and fluffy. Then, add in the white and brown sugars and whip the butter and sugars together for 2-3 minutes until everything looks light. Scrape the bowl down
  3. Add in the eggs one at a time, as well as the vanilla and beat the mixture on low speed for about 30 seconds, scraping down the bowl after adding each egg.
  4. Mix the salt and flour with a whisk separately in a small bowl. Then, add your flour mixture to your wet mixture with the mixture on low. Mix everything together until everything is just fully incorporated.
  5. Turn off the mixer, and using a spatula, fold in the milk chocolate chips as well as half of the box (one sleeve) of the Thin Mints.
  6. Spread the batter into your 9×13 pan. If it’s too thick to use your spatula, dip your fingers in warm water and spread the batter using your fingers.
  7. Bake the blondies for 20-25 minutes, until they are set in the middle.
  8. Once you take them out of the oven, working quickly, sprinkle the white chocolate chips evenly on top of the blondies. Allow them to sit for a minute, and then gently press the other half of the Thin Mints into the top of the blondies.
  9. Allow the pan to fully cool on a rack before serving.


Filed Under: Brownies/Bars, Chocolate, Cookies

Yard Work Weekends

March 26, 2012 by Amy 3 Comments

 The past two weekends have consisted of hardware stores, dirt, flowers, sore legs and smashing tons of bugs that would attempt to crawl on me. It has been tiring, for sure, but when Spring hits, I just get an itch to beautify everything outside.

Last weekend, we noticed our neighbors were fixing up their front beds, and we thought it would probably be best to start with that, since that’s what everyone sees when they drive by the house, and that would take the least amount of time.

2 azaleas and a bunch of begonias/petunias/zinnias later? I think our front yard garden is pretty fantastic looking, if I do say so myself! (We already had a ton of iris/amaryllis bulbs in the garden, as well as 2 indian hawthorne bushes we bought last Fall.)

The rest of the weekend, we cleared some old bushes in the backyard and also built a small shed (from a kit) in the back (that was mostly H, actually). It came out pretty cute, actually.

This past weekend, my big project was finally installing our square foot gardens. I purchased 2 of these kits at our local Sam’s Club, because the kits had raving reviews and for $40 (in store price) for a double raised garden? It wasn’t too shabby!

The only bummer about those kits is the double garden size is 3.5 ft. x 7 ft. So, two 3.5 ft. x 3.5 ft. gardens. Not an exact foot measurement, but eh, I think I made it work. I do love that these kits assembled super easily (no screws, nails or anything) and the materials are pretty darn heavy (sturdy).

We decided to fill the gardens with Mel’s Mix, which we made on our own. We purchased the vermiculite at a local nursery ($29 /4 cu. feet, which beat the heck out of $20/2 cu. feet at Home Depot) and the compost/peat moss at Lowes (compost was $3/2 cu. feet and peat moss was $10/3 cu. feet).  We mixed everything in a wheelbarrow a few cu. feet at a time, and it really didn’t take too long to mix it that way. It ended up costing us $110 to fill up 2 kits with the soil mix, which really wasn’t that shabby!

Here’s one bed filled. You might notice the cardboard below the kit. That’s not only to prevent weeds/grass from growing in the bed, but also to provide the drainage the garden needs (since paper is porous). Coincidentally, we were able to use the box from the shed kit. The front and back of the box were the perfect size to place the garden kits on top of.

Once that was done, I placed the veggies in the garden to get the spacing right. Then, I just dug holes with my hands (yeah, no hand shovel needed…this soil mix is SUPER light and easy to dig into) and placed the veggies in the garden! Here’s the first kit done…

And…here’s the second kit done! After everything was planted, I gave the garden a good soaking with the sprinkler.

 I’m way excited to see what our garden produces this year. I’m hoping we have better luck with the square foot garden vs. just planting veggies in the ground. 🙂

Here’s what’s in our garden (so far…we still have some room to plant a few more things):

  • creole tomatoes
  • cherry tomatoes
  • heirloom tomatoes
  • sweet basil (and also a purple basil, which should make for a really cool pesto)
  • green, yellow and purple bell peppers
  • bush pickle cucumbers
  • jalapeno peppers
  • poblano peppers
  • cucumbers
  • chives
  • dill

Have you started on the ol’ Spring yard work yet? What are you up to in your gardens this year?

Filed Under: Gardening, House

Easter Candy S’mores Cookies

March 22, 2012 by Amy 3 Comments

Easter S'mores Cookies

I absolutely love seasonal candies. When it comes to Easter, it’s so dang hard to resist my favorite candies in pastels. It just makes them that much cuter. This doesn’t bode well for my thighs, since I’ve probably consumed about 45902 Cadbury caramel eggs this season alone. 😛 When I was walking down the candy aisle earlier this week, I thought about baking with Easter candy just so I could have yet another excuse to buy another bag of candy. Then it hit me when I saw the Peeps: S’mores. I know I’ve seen s’mores cookies on a few food blogs before, so I grabbed a bag of Sixlets and Peeps (as well as another box of Cadbury caramel eggs…ugh).

When I got home, I thought that colorful sprinkles would make these cookies even cuter. I mean, why not? I ended up finding a bottle of rainbow (chocolate) chips by the sprinkles. I think that was fate, since the original recipe called for mini chocolate chips, which I didn’t have (whoops). So, with all of these colorful ingredients on my counter, I was pretty darn excited to make these cookies! In fact, when the first batch of cookies were done, I really didn’t wait long to pull one of these off of the cooling rack and devour it. And y’all, these cookies are just awesome. Not only are they super cute and colorful; they’re insanely addictive. This recipe also makes quite a few cookies for sharing. 🙂 I used my small cookie scoop to scoop these on the cookie sheet, but since this dough spreads a good bit, it still makes a decent sized cookie. In the end, I had enough cookies to share with both mine and H’s coworkers this time around. 🙂

Easter Candy S’mores Cookies
adapted from Two Peas & Their Pod, originally from Baked Perfection

Ingredients:

  • 1 3/4 cups all purpose flour
  • 1 cup graham cracker crumbs
  • 1 tsp. baking soda
  • 1 tsp. salt
  • 1 cup (2 sticks) butter, softened
  • 3/4 cup sugar
  • 3/4 cup brown sugar
  • 1 tsp. vanilla extract
  • 2 eggs
  • 1/4 cup Wilton Rainbow Chip
  • 1 1/2 cups chopped Easter Peeps (appx. the same size as mini marshmallows)
  • Easter Sixlets

Directions:

  1. Preheat the oven to 375 degrees. In a medium bowl, whisk together the flour, graham cracker crumbs, baking soda and salt, until well blended.
  2. In another bowl, using a mixer, beat the butter for about 2 minutes, until light and fluffy. Add the sugars and beat for about another minute.
  3. With the mixer on low, add the vanilla extract and the eggs, one at a time, scraping the bowl after each addition. Add in the flour mixture slowly, and mix on low until just combined.
  4. Fold in the rainbow chips with a spatula.
  5. Using a small cookie scoop (appx. tbsp. sized), scoop the cookie dough out, giving about 2 inches between each cookie (like I said, these do spread). Bake for about 7 minutes and take the cookies out of the oven.
  6. Immediately add the sixlets and peeps, by pressing them gently into the cookie. Place the cookies back in the oven and bake them for another 3-4 minutes. Allow the cookies to cool on a cooling rack, and serve!

Filed Under: Candy, Chocolate, Cookies

Snickers Cupcakes

March 19, 2012 by Amy 8 Comments

Snickers Cupcakes

Snickers bars are my diet nemesis. The candy bars are 280 calories each (yep), and I could seriously destroy one in a couple of minutes. Now that I’m calorie counting, 280 calories is a lot when you get under 1600 calories each day, but in my opinion, calories don’t count for one day of the year. Your birthday. I turned 28 on Friday, and since Snickers are my favorite, I decided to make these cupcakes to celebrate. Now, of course, I could buy a cake at a bakery and spend $30+, but heck, where can you find SNICKERS cupcakes? Not any place around here, that’s for sure!

The hardest thing for me was bringing home two bags of mini Snickers to make these bad boys happen. I totally ate about 10-ish mini Snickers that week, so I obviously don’t have any willpower against this candy….at.all. Oh, and when it came time to make these Thursday and cut the candy up for the filling….yeah, totally snuck a few tiny bites. Whoopsie!

I will admit, these cupcakes were more time-consuming than I thought, but it’s worth it to give these a try. Just don’t do it on a weeknight, like I did. 😛

If you’re concerned about me completely killing my diet, I’ll let you know that since I could have totally eaten all 20 of these cupcakes, I ended up giving most of them to H to bring to his coworkers. His coworkers absolutely loved these, and some of these actually wanted to know how much they would be for me to make them. So, I guess they weren’t a flop haha! My opinion? Heaven in a cupcake. Oh yes…if you love Snickers like I do, just make these cupcakes.

Snickers Cupcakes
Source: mildly adapted from Annie’s Eats, cupcakes originally from Martha Stewart, frosting originally from My Baking Addiction

Ingredients:

For the cupcakes:

1/2 cup Dutch-process cocoa powder
1/2 cup hot water
2 cups all-purpose flour
3/4 tsp. baking soda
3/4 tsp. baking powder
3/4 tsp. coarse salt
16 tbsp. unsalted butter
1 1/2 cups sugar
2 large eggs plus 1 egg yolk
1 3/4 tsp. vanilla extract
2/3 cup sour cream, at room temperature

For the filling:

1 bag mini Snickers chopped into fourths (I found it easier to do this after the Snickers were in the freezer)
1/4 cup salted butter caramel sauce

For the frosting:

16 tbsp. unsalted butter, at room temperature
1 lb. confectioners’ sugar
1 1/2 tsp. vanilla extract
1/3 cup salted butter caramel sauce
Pinch of coarse salt
2 tbsp. heavy cream

**To garnish the tops, you’ll need 20 mini Snickers.**

Directions:

  1. Preheat the oven to 350 degrees. In a medium bowl, add the flour, baking soda, baking powder and salt and mix together until the ingredients are well-combined. In a smaller bowl, whisk the cocoa powder and hot water together until it’s a smooth liquid.
  2. In a saucepan, melt the butter and sugar using medium heat. Once the butter has melted, remove the mixture from the cook top and transfer the mixture to a mixer bowl. Using the paddle attachment on the mixer, beat the butter/sugar mixture on medium-low speed for a few minutes, until the mixture has cooled (you don’t want to cook the eggs when you add them). Add in the eggs and egg yolk, one at a time, beating the mixture well and scraping down the side of the bowl after you add each egg. Add in the vanilla and the cocoa mixture and mix until well-combined. Then, turn the mixer on low and add in the flour mixture in two batches, and alternating with the sour cream. You want to beat the mixture until just combined (don’t overmix).
  3. Using a medium cookie scoop, add the batter to your cupcake pans (lined with cupcake liners) until each cup is about 3/4 full. Bake the cupcakes for 18-20 minutes (rotating the cupcake pan once when the cupcakes are halfway done with baking), until a toothpick inserted into the center of the cupcake comes out clean. Allow the cupcakes to cool in the pan for a few minutes, and move them to a wire cooling rack to finish cooling.
  4. Once the cupcakes are completely cool, cut a cone shape out of the center of the cupcakes using a paring knife. Using cooled caramel sauce, add 1/3 cup of the caramel sauce to your Snickers pieces and mix until the candy is coated in caramel. Then, add a spoonful of the filling to each cupcake.
  5. For the frosting, using a paddle attachment on your mixer, whip the butter on medium speed until light and fluffy, about 2 minutes. Scrape down the bowl and add in the confectioners’ sugar with the mixer on low speed, a cup at a time (to avoid a mess), until the mixture smooth and creamy. Add in the caramel sauce (which should be just a tad on the warm side for this), vanilla and salt on low speed, and mix until well-blended. Add in the heavy cream, and mix the frosting on medium speed for a few minutes until fluffy and smooth.
  6. To finish the cupcakes, frost the cupcakes to your liking (I used a Wilton 1B tip), drizzle on some caramel sauce, and place a mini Snickers on the center of each cupcake.

Filed Under: Cakes/Cupcakes, Candy, Chocolate

  • « Go to Previous Page
  • Go to page 1
  • Interim pages omitted …
  • Go to page 32
  • Go to page 33
  • Go to page 34
  • Go to page 35
  • Go to page 36
  • Interim pages omitted …
  • Go to page 85
  • Go to Next Page »

Primary Sidebar

Hey Y’all!

Image Credit: Leslie Pendleton Photography


Hey y’all!

Thanks so much for reading! I’m Amy, and I live in south Louisiana with my husband and our rescue dog. I enjoy sharing my love for cooking, baking, crafts & more! Follow my daily adventures on social media!

Follow my Daily Adventures

  • Email
  • Facebook
  • Instagram
  • Pinterest
  • Twitter

Footer

  • Email
  • Facebook
  • Instagram
  • Pinterest
  • Twitter

Archives

Copyright © 2026 · Foodie Pro Theme by Shay Bocks · Built on the Genesis Framework · Powered by WordPress