• Skip to primary navigation
  • Skip to main content
  • Skip to primary sidebar
  • Skip to footer

The Nifty Foodie

  • Home
  • About
  • Recipes
    • Appetizers
    • Beverages
    • Breads/Muffins
    • Breakfast
    • Canning
    • Desserts
    • Dog Treats
    • Entertaining/Parties
    • Fruit
    • Holiday Recipes
    • Louisiana Cuisine
    • Main Dishes
    • Mexican
    • Nifty Foodie Original
    • Nifty Tricks
    • Project Food Blog
    • Pumpkin
    • Salads
    • Sauces/Dips
    • Side Dishes
    • Skinny
    • Slow Cooker
    • Spices
    • Stews/Soups
    • The Disasters
  • My Weight Loss Journey
    • Races
    • Running
    • Weight Loss Milestones
  • Crafts
  • Contact Me

Slow Cooker Salsa Chicken

June 10, 2016 by Amy Leave a Comment

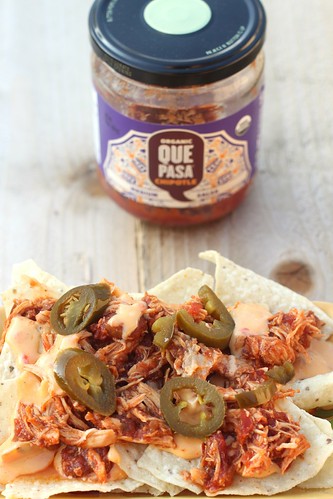
Disclosure: Que Pasa Foods sent me products/coupons in exchange for a recipe post. All opinions are 100% my own.
Salsa Chicken

One of the most surprising things about building a new house is realizing how many projects are involved after the house is built! The garden, fencing in the yard, organizing everything, decorating, and other random house projects…the list goes on and on! I feel like most of our weekends involve something to do with the house, so my usual weekend cooking/baking adventures have taken a back seat. When our weekends are just crazy, I love forking out the slow cooker and making a meal. Throw the ingredients in the slow cooker, set the timer, and just let it go. Easy.

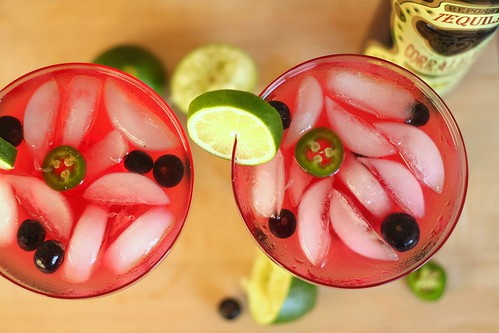
Recently, I went back to an old favorite….Salsa Chicken (only THREE ingredients)! Que Pasa Foods sent me a variety of their products to try, and my husband and I fell in LOVE with their Chipotle Salsa. Chipotle peppers add a bit of heat and spice, and when you add this in the slow cooker with chicken? OMG y’all. We had tacos the first night, and I made nachos another night with them. It’s just so flavorful. I just need to buy a case of this stuff…it’s probably the best jarred salsa I have ever had (seriously). 🙂 While this recipe works wonderfully for dinner, it’s also perfect for a party! You could easily make this a part of a taco bar for the 4th of July!

Slow Cooker Salsa Chicken
Source: adapted from Gimme Some Oven

Ingredients:

  • 1 jar Que Pasa Chipotle Salsa (just about 2 cups)
  • 3-4 boneless, skinless chicken breasts
  • 1 1/2 tbsp. taco seasoning

Directions:

  1. Pour half of the jar of salsa in the bottom of the slow cooker. Place the chicken breasts over the salsa. Sprinkle the taco seasoning over the chicken, and then pour the rest of the salsa over the chicken breasts.
  2. Cover the slow cooker, and set on low for 6-8 hours (or high for 4 hours). Take out the chicken and shred the chicken well. Place the chicken back in the crockpot, and stir it into the salsa mixture. Enjoy!


Filed Under: Mexican, Poultry

Mamma Chia’s Chia & Greens Beverage Review (+ Giveaway)

May 19, 2016 by Amy 15 Comments

Disclosure: Mamma Chia provided me with free samples, and they are also providing the prize pack for the giveaway, in exchange for a post. All opinions are 100% my own.

Mamma Chia Chia&Green

For the past few months, I’ve been struggling with my weight loss journey. I originally lost 20 lbs. within the first two months, and then Easter happened. How come it only takes one thing for me to totally derail? I gained back a few of those pounds, but I purchased a new workout program online and I’m ready to get back to it!

I knew things were a little out of control when I (the person who no longer drinks soda) was craving a coke icee, and well…I had one. I KNOW. I KNOW.

I told myself that no matter what…those coke icees aren’t happening again. The other day, I was having that same craving again, but this time I grabbed one of these – Mamma Chia’s new Chia & Greens beverages. Mamma Chia generously offered to send me a sampling of their new Chia & Greens beverages, along with other Mamma Chia products that I just LOVE!

Mamma Chia Chia&Green

Their Chia & Greens beverages contain the lowest amounts of sugar, along with the highest amounts of nutrients (each bottle contains 2500 mg of Omega-3s, 4 grams of complete protein, 7 grams of fiber, 25% RDA of Vitamin A and 95 mg of calcium)! How are they packed with so many nutrients? Well, each drink has organic chia seeds and organic power veggies (like kale, spinach and broccoli).

I’m not going to lie…I was worried that it wasn’t going to calm down my craving for a sweet drink, but I was surprised that I really liked these! The Beet & Ginger was my favorite, because it sort of reminded me of a ginger ale flavor, which is close to soda, right?

The Chia & Greens beverages are available in four flavors:

  • Joyful Greens (Ginger & Lemongrass)
  • Soulful Greens (Cayenne & Lemon)
  • Love Greens (Beet & Ginger)
  • Grateful Greens (Kale & Mint)

If you like Mamma Chia’s Vitality beverages, you might want to give these a try. They aren’t as sweet as their fruity vitality beverages, but they still have that fun chia seed texture.

The generous folks at Mamma Chia are offering one lucky reader of The Nifty Foodie a prize pack, which includes their new Chia & Greens beverages, as well as other great Mamma Chia products and/or coupons!

Enter the giveaway using the Rafflecopter widget below (continental US readers only):

a Rafflecopter giveaway

Note: This giveaway is supplied by Mamma Chia, and is open to readers in the continental US only. Entries will be accepted until May 25th, 2016 at 11:59pm (central standard time). Winner will be emailed (make sure you leave an email address in the form), and will have 48 hours to respond or another winner will be chosen.

Filed Under: Giveaways/Reviews

Blueberry Margaritas + Blue Cheese Guacamole!

May 5, 2016 by Amy Leave a Comment

Disclosure: This is a sponsored post, on behalf of Corralejo Tequila and Cheese of Europe. I was compensated for this post, and all opinions are 100% my own. Please drink responsibly.

IMG_9402

Happy Cinco de Mayo, y’all! I’m not sure how we got to May, but I’m not complaining! We’re so close to summer, and while I’m no longer in school, I’m looking forward to no more school traffic and a happy thing for food bloggers — more sunlight!

IMG_9417

When it comes to Cinco de Mayo, I have to have something tex-mex. It just feels right. So, I made some guacamole and not just any guacamole…I made blue cheese guacamole!

I just love a good, chunky guacamole. This recipe is a twist on a classic — just crumbling in some tangy, slightly-spicy Roquefort (blue) cheese brings this guacamole to a whole different level! It’s fantastic, and it couldn’t be easier to make.

IMG_9427

Blue Cheese Guacamole
Source: an original

Ingredients:

  • 2 large Hass avocados, peeled and pitted
  • 1 medium roma tomato, seeded and chopped
  • 1/4 cup chopped red onion
  • 2 cloves garlic, minced
  • 2 tbsp. chopped fresh cilantro
  • 1/4 cup crumbled Roquefort cheese
  • juice of one lime
  • 1 tsp. salt
  • 1/2 tsp. black pepper

Directions:

  1. Place the avocados in a medium-sized bowl and mash the avocados with a fork. Place the rest of the ingredients in the bowl with the avocado, and mix until everything is well-combined.
  2. Enjoy!

Since it’s Cinco de Mayo, you know I was itching to make a margarita. Since I was already working with BLUE cheese, my silly self thought…why not make BLUEberry margaritas? (Get it? I crack myself up!) And to give it a little extra kick, I added in a little jalapeno. 🙂

This is the first time I’ve ever had Corralejo tequila, and their Reposado paired really well with blueberry. Confession time: I didn’t really know much about how tequilas were made until recently. Corralejo Reposado is aged four months in barrels, which are made from three types of wood including French, American and Mexican Oak. Corralejo Silver is bottled fresh from the distillery.

Now, as far as the margarita goes, this margarita didn’t have a jalapeno flavor…rather, it just gave the drink a slightly spicy kick. To make the drink, I made a blueberry simple syrup, and added that to the tequila/triple sec/lime/jalapeno. That way, you can easily control how sweet/blueberry-ish you want your margarita to be.

IMG_9408

Blueberry Jalapeno Margarita
Source: an original

Ingredients:

To make the blueberry simple syrup:

  • 1 cup fresh blueberries
  • 1 cup sugar
  • 1 cup water

To make the margarita:

  • 4 oz. Corralejo Reposado Tequila
  • 2 oz. Triple Sec
  • 1/4 to 1/3 sliced jalapeno (depending on how much of a kick you want)
  • juice of 3 limes
  • 2-3 oz. blueberry simple syrup (depending on how sweet you want the drink to be)
  • Optional: salt for the rim, fresh blueberries and lime slices for garnish

Directions:

  1. To make the simple syrup, heat the blueberries, sugar and water together in a medium saucepan, stirring and mashing the berries as the mixture cooks. Cook the simple syrup until the sugar has fully dissolved. Turn off the heat and set aside until fully cooled. Once the mixture has cooled, put the blueberry simple syrup through a strainer and into a large jar. Discard the blueberries that strain out.
  2. Place the tequila, triple sec, jalapeno slices, lime juice, and blueberry simple syrup into a cocktail shaker over ice. Cover the shaker and shake the mixture well. Pour the margarita into glasses over ice and enjoy! (Please drink responsibly.)

Filed Under: Appetizers, Beverages, Entertaining/Parties, Fruit, Mexican, Nifty Foodie Original

The Keepsake Kitchen Diary (Review + Giveaway)

May 4, 2016 by Amy 13 Comments

Disclosure: I received a copy (as well as a giveaway copy), in exchange for a fair and honest review. All opinions are 100% my own.

Back when I started this blog, the original idea was for my blog to just be for me. I just wanted a place to type out recipes, along with what we thought of them (sort of like a virtual recipe box). 🙂

I still love something about sifting through cookbooks, though. It’s a lot easier to refer back to a book vs. refreshing a screen while cooking, and plus, it’s just something about paper. I can’t get rid of it….I know my husband wishes I’d move to a Kindle edition of every cookbook I own, but I just can’t.

Lily & Val came up with a lovely way to sort of DIY your own recipe box cookbook. They created The Keepsake Kitchen Diary, and I couldn’t wait to get my hands on it to review for you guys!

Recipe Book Review

One of the key details that I appreciate is that it’s spiral-bound. It just makes everything lay flat as you’re writing in it. 🙂

Recipe Book Review

The book also features a pocket folder on the front and back sides, which is perfect for newspaper clippings, recipe cards or other stray papers. Another nice detail is that there are tabs to separate the recipe types, so you can flip to exactly what you need.

Recipe Book Review

In the front of every tab is a table of contents that you can fill out. Also, all of the pages in the book are numbered for you to make a true table of contents.

Recipe Book Review

Here’s the recipe page. On the left side is where you can write the recipe name, ingredients, directions and other tips. The right side is more of a journal to where you can write when you made the recipe. As you can see, my mom’s fudge recipe is pretty much just for the holidays. 🙂

Recipe Book Review

Also throughout the book, there are really cute graphics. I sort of want to tear some out and frame them, but the book is too pretty to mess up!

Recipe Book Review

And finally, near the back of the book are perforated recipe cards for you to share your favorite recipes with others.

All in all, I really appreciate the details in The Keepsake Kitchen Diary. Between the lovely graphics and just how organized it is, I have a feeling I’ll fill this book up in no time. 🙂 If I had to list a con, however, I wish there were more lines for directions. I don’t have very large handwriting, so I feel like they could have put the lines closer together, allowing them to add more in the space that they have on the page.

Do you guys want to enter for a chance to win your own copy of The Keepsake Kitchen Diary? Enter the Rafflecopter giveaway below!
a Rafflecopter giveaway

Note: This giveaway is supplied by the publisher and is open to readers in the continental US only. Entries will be accepted until May 11th, 2016 at 11:59pm (central standard time). Winner will be emailed (make sure you leave an email address in the form), and will have 48 hours to respond or another winner will be chosen.

Filed Under: Organization, Review

Welcome to NOLA, Carnival Triumph!

April 29, 2016 by Amy Leave a Comment

Disclosure: Carnival Cruise Lines invited my husband and I to this event as no cost to us. All opinions are 100% my own.

The Carnival Triumph kicks off a year-round schedule of four- and five-day cruises from the Port of New Orleans today, April 4, 2016. Carnival Triumph represents a 34 percent capacity increase on the line's short cruise program from the Big Easy. Carnival Cruise Line is the number one cruise operator in New Orleans, with two year-round ships carrying 450,000 passengers annually.
Image Source: Carnival Cruise Line

Earlier this month, my husband and I had the opportunity to check out the Carnival Triumph and watch the traditional maritime plaque exchange in New Orleans. The Carnival Triumph replaced the Carnival Elation, and offers 4-5 day cruises to Cozumel and Progreso, Mexico. The Triumph has great restaurants/bars like Guy’s Burger Joint, Blue Iguana Cantina, and the Alchemy Bar (to name a handful). In the past, we’ve gone on 7 day cruises, but after visiting this ship, we’re tempted to go on a shorter cruise!

When we were walking on the platform to get on the ship, I couldn’t help but think of our last cruise. We had such a wonderful time, and while we didn’t go on a cruise last year (since we were in the house-building process), we absolutely can’t wait for our next one! In fact, we totally booked one to take later this year. 🙂 Time to dust off the luggage!

Now, as you may know, Carnival is known for being a fun ship. It was pretty awesome to have drinks in hand once we took our seats for the plaque exchange. We immediately asked each other if we really had to leave the ship after this haha!

Welcome, Carnival Triumph!

Before the traditional maritime plaque exchange, it was really neat to listen to the CEO and Board of Directors from the Port of New Orleans talk about how much cruise tourism is growing in the area, which is why Carnival brought the Triumph here. In fact, the Triumph is a 34% increase in capacity vs. the Elation. New Orleans is booming, y’all!

Gary LaGrange, President and CEO of the Port of New Orleans, Captain Alessandro Iemmi, Bill Bergeron, Chairman of the Board of Directors of the Port of New Orleans, and Rusty Barkering, Port of New Orleans Commissioner participate in a traditional maritime plaque to commemorate Carnvial Triumph's launch of year-round four- and five-day service from the Port of New Orleans.
Image Source: Carnival Cruise Line

I couldn’t get a really good picture of this, but here’s the Port of New Orleans’s CEO and Board of Directors participating in the traditional maritime plaque exchange with the captain of the Carnival Triumph.

Welcome, Carnival Triumph!

After the plaque exchange, Carnival invited four representatives from different local music charities to play a few funny games for a total of $35,000 in donations to their charities. I love that Carnival is all about helping out local organizations, especially music-related ones (being New Orleans).

After the games were over, we were invited to a fantastic lunch in the London dining room.

Welcome, Carnival Triumph!

Dear Carnival, please give me that bacon vinaigrette recipe?

Welcome, Carnival Triumph!

Actually, I’ll take all of the recipes…everything was delicious! (Well, I don’t need the flourless chocolate cake…I already have that recipe. :-P)

Welcome, Carnival Triumph!

Side note: While I didn’t have any of this, check out this tray. I just had to take a picture of it! So much attention to detail here.

One of the things that I love the most about cruising is the restaurant experience. We always feel spoiled after having a meal on a cruise ship…the wait staff are the friendliest and the food is just SO good. I could end every meal with warm chocolate melting cake…no joke.

We seriously didn’t want to leave the ship after this lovely event.
Welcome, Carnival Triumph!

Until next time, Carnival (we can’t wait)! 🙂


Filed Under: Travel

Coconut Oatmeal Cookies with Caramel Drizzle

April 21, 2016 by Amy Leave a Comment

Disclosure: I was sent this cookbook at no cost to me for a fair and honest review. All opinions are 100% my own.

Coconut Oatmeal Cookies with Caramel Drizzle

A few years ago, I went to IFBC when it was held in New Orleans. It was my first blog conference, and I had no idea what to expect. I gained so much from that conference, from inspiring sessions to meeting wonderful bloggers like Andie. Andie stood out to me, because her weight-loss journey inspired me, and after meeting her, I can’t even begin to describe how awesome she is. When I introduced myself (in probably the most dorky way possible), she was just so sweet and genuine. She’s just such a wonderful person, and her positivity is contagious.

If you haven’t read her blog before, I urge you to take a minute (or a few hours haha) to check it out. She’s a fantastic writer with an inspiring story. Her memoir, It Was Me All Along, was the first book that I read in a long time, and I couldn’t put it down. In fact, I read her memoir again recently to inspire me on the start of my weight loss journey.

When Andie announced that she was writing a cookbook, I knew it would be perfect for someone like me. Her book, Eating in the Middle, features the perfect combination of recipes for enjoying a healthier life without sacrificing the foods that most people crave (in moderation, of course). From Greek Yogurt Pancakes to Jerk Shrimp Salad with Mango & Avocado to these lovely cookies, there’s a huge variety of recipes in this book! If you have yet to read her memoir, I feel like this book is beyond recipes…she relates her recipes to different aspects of her life and experiences that make you feel like old friends. 🙂 Also, the photography is just drop-dead gorgeous. Because of Andie’s book, we’re going to have several new dinner ideas to try.

Eating in the Middle Cover
Source: Andie Mitchell

Now, these cookies. When I was flipping through the book, of course the dessert section grabbed my attention. These cookies have a little bit of everything delicious in it…sweetened coconut, oatmeal, walnuts, chocolate chips, and of course…caramel! When I brought these to share them with my coworkers, I was shocked that all 36 cookies (ok, 35…quality control haha!) disappeared. 🙂 I even had a couple of emails asking for the recipe (well here it is, y’all)! These were a home-run, Andie! I can’t wait to try other recipes in the book. 🙂

Coconut Oatmeal Cookies with Caramel Drizzle


Coconut Oatmeal Cookies with Caramel Drizzle
Source: Eating in the Middle

Ingredients:

For the cookies:

  • 1 1/4  cups all-purpose flour
  • 3/4 tsp. baking powder
  • 1/2 tsp. baking soda
  • 1/2 tsp. salt
  • 2 cups old-fashioned rolled oats
  • 1 cup unsalted walnuts, toasted and chopped
  • 1 cup sweetened shredded coconut
  • 3/4 cup semisweet chocolate chips
  • 10 tbsp. (1 1/4 sticks) unsalted butter, at room temperature
  • 1 1/4 cups packed dark brown sugar
  • 1 large egg
  • 2 tsp. pure vanilla extract

For the drizzle:

  • 12 soft caramels, unwrapped
  • 2 tbsp. heavy cream

Directions:

  1. Preheat the oven to 350 degrees F, and line 2 large baking sheets with parchment paper or a silicone mat.
  2. Add the flour, baking powder, baking soda and salt to a medium-sized bowl and whisk until combined.
  3. In another medium-sized bowl, stir together the oats, walnuts, coconut and chocolate chips.
  4. In the bowl of a stand mixer fitted with the paddle attachment, mix together the butter and dark brown sugar on medium-high speed for about 3 minutes, until whipped and smooth. Scrape the bowl, and add in the egg and vanilla. Mix for about a minute, until combined.
  5. Change the speed on the mixer to low, and gradually add the flour mixture, beating until the dough is just combined. Using a spatula or wooden spoon, add in the oats mixture and stir until just combined, being mindful not to overmix.
  6. Using a medium cookie scoop (or 2 tbsp.), scoop out the dough and place the dough balls 2 inches apart on the baking sheet. Using your hands or the bottom of a glass, gently flatten the dough balls.
  7. Bake the cookies, rotating the baking sheets halfway (front to back and top to bottom) until the edges of the cookies are crisp, the cookies are a golden color, and the centers are still soft and underdone (about 13-15 minutes). Allow the cookies to cool completely on the baking sheets before transferring the cookies to a wire cooling rack.
  8. Once the cookies have completely cooled, prepare the caramel drizzle. In a small microwave-safe bowl, add the caramels and heavy cream. Microwave the mixture on high, stirring every 30 seconds, until the caramels have melted and the mixture is smooth (about 1-2 minutes). Drizzle the caramel over the cookies, and allow the caramel to cool completely until the caramel is set. Enjoy!

Filed Under: Chocolate, Cookies, Desserts, Review

PEEPS Butterscotch Nests + GIVEAWAY!

March 18, 2016 by Amy 5 Comments

Disclosure: Quarto Publishing Group provided me with a copy of the book, as well as one to giveaway, in exchange for a post. All opinions are 100% my own.

Peeps Butterscotch Nests

I absolutely love Spring. 🙂 The warmer weather, more daylight, pretty flowers and of course, I’ve professed my love for Easter candy! I’m a sucker for pastels, and Easter candy is everything pastel. Plus, there’s PEEPS!

I know a lot of people either hate or love PEEPS, and for me, I LOVE them! It’s kind of a childhood nostalgia thing. I have to get a pack (or three) every Easter. So, when I was offered a review copy of Just Born’s latest book Peeps-a-licious!, I was so excited to flip through this book! Not only are these recipes from Just Born, but quite a few food bloggers contributed their recipes to the book, too. There’s recipes from cute butterscotch nests to s’mores brownies and creme brulee. I also love that there are different holiday PEEPS featured throughout the book, like Christmas and Halloween. To me, it’s a really cute/fun book, and if you’re a PEEPS lover, I think you’ll enjoy it. 🙂

Peeps

I decided to make the butterscotch nests, because I thought it would be a simple, festive recipe to share with coworkers. All you have to do is melt the butterscotch chips, and the rest is mixing/assembling. They are just too adorable. The original recipe calls for jelly beans to be the eggs in the nest, but you can really use any egg-shaped candy.

PEEPS Butterscotch Nests
Source: Peeps-a-licious

Ingredients:

  • 11 oz. bag butterscotch morsels
  • 1/4 cup smooth peanut butter
  • 1 1/2 packages (18 oz.) crispy chow mein noodles
  • 15-20 PEEPS Marshmallow chicks (assorted colors)
  • 1-2 packages of egg-shaped candy

Directions:

  1. Melt the bag of butterscotch morsels in a medium microwave-safe bowl, in 30 second increments (being sure to stir the morsels after every microwave cycle).
  2. Once the morsels are fully melted, mix in the smooth peanut butter, until it’s a smooth consistency. In a large bowl, add the crispy chow mein noodles, and then drizzle the butterscotch/peanut butter mixture over it. Carefully mix everything together, until the noodles are well-coated in the butterscotch/peanut butter mixture.
  3. Prepare a sheet pan by lining it with wax paper or parchment paper. Then, spoon about 2 tbsp. of the mixture onto the wax paper sheet, shaping it into a nest shape (with a slight indentation in the middle).  Repeat until the all of the mixture is used up.
  4. Refrigerate the nests for about 30 minutes, until the butterscotch mixture has set. To assemble the nests, place 3-4 egg-shaped candies in the middle of the nest and place a PEEP chick on top. Repeat until all of the nests are assembled. Enjoy!

Do you want to win a copy of Peeps-a-licious? The generous folks at Quarto Publishing Group are offering a copy to one lucky reader of The Nifty Foodie!

To enter to win, use the Rafflecopter widget below (continental US readers only):

a Rafflecopter giveaway

Note: This giveaway is supplied by the publisher and is open to readers in the continental US only. Entries will be accepted until March 25th, 2016 at 11:59pm (central standard time). Winner will be emailed (make sure you leave an email address in the form), and will have 48 hours to respond or another winner will be chosen.

Filed Under: Candy, Desserts, Giveaways/Reviews, Holiday Recipes

Spicy Chipotle Taco Soup

February 25, 2016 by Amy Leave a Comment

Disclosure: OXO sent me free products, in exchange for a fair and honest review. All opinions are 100% my own.

Spicy Chipotle Taco Soup

Since we moved to the new house, we have been using the kitchen quite a bit. Honestly, the kitchen is what made me fall for the floor plan, so of course, I was going to go a little crazy. After a couple of weeks, however, we were definitely missing our old vented kitchen. So, we had someone come out and take care of venting the kitchen for us.

I can’t even begin to explain how nice it is to have a venting kitchen again. A lot of Louisiana comfort food revolves around cooking with onions/bell peppers/celery to start out the dishes, and while it smells good when you’re cooking, I really don’t want to smell it the next morning haha! It’s so nice to no longer deal with that…in fact, when I was cooking this soup, H commented that he could barely smell it (and y’all know that tex-mex spices, like cumin, are strong)! So, I’m definitely in my happy place when I’m in our kitchen now. 🙂

OXO sent me some of their newest products to try out, and I couldn’t help but think about making a hearty soup with some of their tools. I was sent the Ground Meat Chopper and Turner, Silicone Ladle, and the
Vegetable Chopper with Easy-Pour Opening.

OXO

I decided to make a spicy chipotle taco soup the other night. After having a smoky tortilla soup at a local tex-mex place, I so wanted to replicate the broth as closely as I could. One thing I didn’t expect was for H to love it as much as he did. He’s usually adding more spices to whatever I make, and I’m pretty sure he didn’t add anything to this soup! I will mention that this soup is pretty darn spicy, so I added some avocado slices to my bowl to help with the heat from this soup. If you don’t want it to be very spicy, you can use less chipotle peppers (or remove the seeds) or use a milder Rotel in the recipe (I used original). I also wanted to mention that while it’s delicious the day you make it, it’s even MORE flavorful the next day. Look at how hearty this soup is!

OXO

I have to admit, this recipe is pretty darn quick to throw together. Prep was very easy, thanks to the OXO Vegetable chopper. Chopping the onion and bell pepper was a breeze!

OXO

Also, I was surprised at how helpful the OXO Ground Meat Chopper was. I’m used to chopping things up with a spatula, but this made the meat break up so easily and quickly.

OXO

I think this recipe is perfect for weeknight cooking. You don’t have to prep too much, and a good bit of the ingredients involve cans of vegetables to add into the recipe. So simple and super delicious!

Spicy Chipotle Taco Soup

Spicy Chipotle Taco Soup
Source: an original

Ingredients:

  • 1 lb. lean ground beef (at least 90% lean)
  • 1 medium yellow onion, chopped
  • 1 green bell pepper, chopped
  • 3/4 tsp. chili powder
  • 1 tsp. cumin
  • 1/2 tsp. smoked paprika
  • 1/2 tsp. salt
  • 3 cloves garlic, minced
  • 1 chipotle pepper (from a can of chipotle peppers in adobo sauce), finely chopped
  • 2 tbsp. adobo sauce
  • 2 10.5 oz. cans of Rotel, with juice (I used medium…if you want it not as spicy, use mild)
  • 1 15 oz. can of yellow corn, rinsed and drained
  • 1 15 oz. can of black beans, rinsed and drained
  • 32 oz. chicken stock
  • 1/4 cup heavy cream
  • Optional toppings: sliced avocado, cheese, broken-up tortilla chips

Directions:

  1. In a large, heavy stockpot (at least 5 quarts in size) over medium-high heat, brown the lean ground beef until it’s fully cooked.
  2. Add in the chopped onion and bell pepper, cooking until the onions are translucent. Reduce the heat to medium. Then, add in the cumin, smoked paprika, salt, garlic cloves, chipotle pepper and adobo sauce, and stir/cook for about another minute, until fragrant.
  3. Add in the Rotel, yellow corn, black beans and chicken stock. Stir and reduce the heat to a simmer. Once it reaches a simmer, place the lid on the pot, and allow the soup to simmer for 20-30 minutes. When the soup has finished simmering, slowly pour and mix in the heavy cream. Enjoy!


Filed Under: Beef, Mexican, Nifty Foodie Original, Review, Stews/Soups

Mamma Chia Vitality Bar Review & A GIVEAWAY

February 17, 2016 by Amy 9 Comments

Disclosure: Mamma Chia provided me with free samples, and they are also providing the prize pack for the giveaway, in exchange for a post. All opinions are 100% my own.

Mamma Chia

Now that life is quieting down again, I decided that it was finally time to focus on the same thing I focused on three years ago: my health.

Do y’all remember this?

Randoms

Picture collage made by Fit For a Bride

It’s been a while, and I’ll admit…most of my hard work from 2-3 years ago is gone. I’ve gained all of my weight back (and then some).

As of this week, I got back on track, and I’m motivated as all heck. I have a closet full of clothes in my previous sizes, and I cannot wait to be able to wear them again!

Since I’m back to eating better, I’m constantly on the search for healthier/grab-and-go snacks. The folks at Mamma Chia sent me an assortment of their new Vitality Bars to try. I’m a big fan of Mamma Chia products, and these bars were no exception.

Mamma Chia

I mean…these bars are seriously chocolate-y. Pictured is their coconut almond & dark chocolate flavor.

These bars are available in four flavors:

  • Blueberry & Dark Chocolate
  • Cherry & Dark Chocolate
  • Coconut Almond & Dark Chocolate
  • Peanut & Dark Chocolate

My favorite flavor is their peanut and dark chocolate….I’m a big fan of the chocolate + peanut combination. 🙂

What I love about Mamma Chia products is that not only are they fairly low in calories, but they are full of nutritional benefits. Each Vitality Bar includes 1000 mg of Omega-3s, 3-6 grams of protein (soy and dairy-free), and 3-4 grams of fiber. Also, if you are avoiding gluten, these bars are gluten-free!

I especially love their Vitality Bars for something to enjoy in the afternoon. Not only do they taste good, I feel like the bars take care of my sweets cravings (which are always raging after work).

The generous folks at Mamma Chia are offering one lucky reader of The Nifty Foodie a prize pack, which includes their new Chia Vitality Bars, as well as other great Mamma Chia products and/or coupons!

Enter the giveaway using the Rafflecopter widget below (continental US readers only):

a Rafflecopter giveaway

Note: This giveaway is supplied by Mamma Chia, and is open to readers in the continental US only. Entries will be accepted until February 24th, 2016 at 11:59pm (central standard time). Winner will be emailed (make sure you leave an email address in the form), and will have 48 hours to respond or another winner will be chosen.

Filed Under: Giveaways/Reviews

A Bunch of Randoms

February 1, 2016 by Amy 1 Comment

Randoms

Hi, hello, how are things?

It has been a crazy whirlwind since we moved. Between unpacking like crazy, getting things set-up in the house and just in general, getting used to our own space again, we’ve just been busy…busy…busy!

I had these grand plans to decorate the house for Christmas the day we moved. You guys know how much I love the holiday season, and us having a brand new house was definitely motivating to get the decorations up.

Well….this was the extent of our Christmas decorations.

Randoms

Since we were living with my in-laws for the past few months (with a very small amount of our belongings), it was like Christmas Day while we were unpacking. I honestly forgot about 1/3 of the things we owned, which makes me think that I could definitely declutter a bit. Time for a garage sale, right?

It took Millie about a week to get settled in when we moved. Our new house is larger than our previous house, so I think she is still adjusting to all of the rooms she has to “guard”. One thing that didn’t change for her was that our sofa + blanket = bliss.
Randoms

While Christmas was a whirlwind (it really didn’t feel like Christmas happened), I did have a lot of fun shopping the after-Christmas sales. Of course, I had to buy all sorts of new Christmas decor (hi Hobby Lobby and Target!), and I also attacked the Lush buy one get one sale. It’s the only time of the year I buy from them, because I’m cheap.

Randoms

A few months ago, I purchased a Nespresso. While I’m a huge fan of Keurig, I’m frequently visiting coffee shops for a $4 espresso drink. When the Inissia went on major sale (I guess this color was being discontinued?), I had to get it. Y’all…why did I wait so long to buy this? Around the holiday season, I mixed a little eggnog with my espresso and it was heavenly! I love it!

Randoms

Y’all may remember that my sister and I signed up for the half marathon last year. While the half marathon wasn’t in the books for me, I was able to transfer my registration to the 5k. I didn’t train at all, so I walked most of the race. I was slow, but I finished. 🙂

Randoms

As far as house pictures go, I promise I will be sharing pictures very soon! I thought it wouldn’t take very long to unpack everything, but oh man…I was SO wrong. We’re getting there though…slowly, but surely. 🙂 I think we’re about 90% done!

Filed Under: Random

  • « Go to Previous Page
  • Go to page 1
  • Interim pages omitted …
  • Go to page 3
  • Go to page 4
  • Go to page 5
  • Go to page 6
  • Go to page 7
  • Interim pages omitted …
  • Go to page 85
  • Go to Next Page »

Primary Sidebar

Hey Y’all!

Image Credit: Leslie Pendleton Photography


Hey y’all!

Thanks so much for reading! I’m Amy, and I live in south Louisiana with my husband and our rescue dog. I enjoy sharing my love for cooking, baking, crafts & more! Follow my daily adventures on social media!

Follow my Daily Adventures

  • Email
  • Facebook
  • Instagram
  • Pinterest
  • Twitter

Footer

  • Email
  • Facebook
  • Instagram
  • Pinterest
  • Twitter

Archives

Copyright © 2026 · Foodie Pro Theme by Shay Bocks · Built on the Genesis Framework · Powered by WordPress