Y’all. I just can’t stop thinking about fall spices. I can’t get enough of the spicy, warm scents in our house, and even though the weather hasn’t caught up yet, I’m baking up a storm! I’ve already gone through 3 cans of pumpkin, picked up all of my favorite fall spices (since a few were running low from last year) and I’m fairly sure my mixer is enjoying those precious little breaks ever so often.
This recipe is out of the norm for me. You see, when I started baking, I tried to be brave and try recipes involving yeast. I can’t tell you how many times the yeast just wouldn’t rise. I figured out that my error was probably in the temperature of the water, since yeast can easily die if you use too hot of a liquid in your recipe. So now when I bake with yeast, I’m very mindful of the ingredients’ temperature, and sometimes err on the cooler side, just in case.
I saw this recipe on America’s Test Kitchen’s twitter page a couple of weeks ago, and I just couldn’t get it out of my mind. I took a Saturday morning to make these happen, and thankfully, the yeast was my friend. These were delicious and pretty darn easy to make (seriously…it’s just time consuming because of the rising times). My mom happened to be in town to meet me for lunch that afternoon, and she loved these! I had to send one home to Dad, too. 🙂
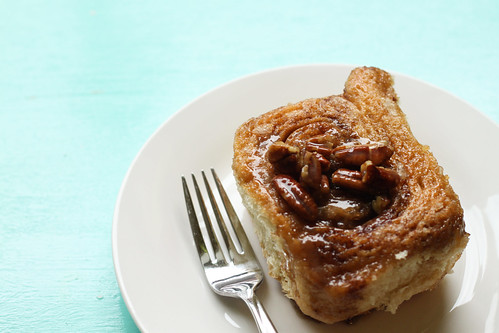
Sticky Buns with Pecans
Source: America’s Test KitchenIngredients:
For the dough:
- 3 large eggs, at room temperature
- 1/4 cup granulated sugar
- 3/4 cup buttermilk, at room temperature
- 1 1/4 tsp. table salt
- 2 1/4 tsp. instant yeast
- 4 1/4 cups unbleached all-purpose flour (plus additional for dusting work surface)
- 6 tbsp. unsalted butter, melted and cooled until warm
For the caramel glaze:
- 6 tbsp. unsalted butter
- 3/4 cup packed light brown sugar
- 3 tbsp. corn syrup (light or dark)
- 2 tbsp. heavy cream
- pinch of table salt
For the cinnamon-sugar filling:
- 3/4 cup packed light brown sugar
- 2 tsp. ground cinnamon
- 1/4 tsp. ground cloves
- pinch of table salt
- 1 tbsp. unsalted butter, melted
For the pecan topping:
- 3 tbsp. unsalted butter
- 1/4 cup packed light brown sugar
- 3 tbsp. corn syrup (light or dark)
- pinch of table salt
- 1 tsp. vanilla extract
- 3/4 cup pecans (toasted in a skillet for 5 minutes on medium heat, then cooled and coursely chopped)
Directions:
- To make the dough, in the bowl of a stand mixer (fitted with the paddle attachment), whisk the eggs until combined and add the buttermilk, whisking to combine as well. Add the sugar, salt and yeast to the mixer and mix well. Add 2 cups of the flour, as well as the melted butter, and mix until the mixture is evenly mixed and moistened. Add another 2 cups of flour to the mixture, and switch out the paddle attachment for the dough hook, and knead the dough on low speed for 5 minutes. Once the kneading is done, check the consistency of the dough (dough should feel soft and moist, but not wet and sticky…if you need more flour, add the extra 1/4 cup in). Knead the dough on low speed for 5 more minutes, and you’ll notice that the dough should clear the sides of the bowl but still stick to the bottom of the bowl. Place the dough on a lightly floured work surface, and knead the dough by hand for about a minute to make sure that the dough is uniform (if the dough is still sticky during hand kneading, knead in more flour 1 tbsp. at a time).
- Spray the inside of a large bowl or plastic container with nonstick cooking spray. Place the dough in the bowl, and lightly spray the dough with cooking spray as well. Cover the bowl tightly with plastic wrap, and place it in a warm, draft-free place until the dough has doubled in volume (about 2 – 2 1/2 hours).
- While the first rise is happening, make the glaze. Combine all ingredients for the glaze in a small saucepan, and cook the mixture over medium heat (whisking occasionally), until the butter is melted and mixture is thoroughly combined. Pour the mixture into a nonstick metal 9×13 inch baking dish, and spread the mixture evenly with a rubber spatula to completely cover the surface of the baking dish. Set aside.
- Now, make the filling by combining the brown sugar, cinnamon, cloves and salt in a small bowl, and mix everything until well-combined (making sure to break up any sugar lumps). Set the mixture aside. After the dough has finished its first rise, place the dough on a lightly floured work surface. With a gentle hand, shape the dough into a rough rectangle with the long side nearest you. Lightly dust the top of the dough with flour, and roll into a 16×12 inch rectangle. At this time, brush the dough with the 1 tbsp. of melted butter, being sure to leave a 1/2 inch border along the top edge of the dough. After you’re done buttering the dough, with the remaining butter on the brush, brush the sides of the baking dish. Sprinkle the filling mixture over the dough, making sure to leave a 3/4 inch border along the top edge. When all of the filling is used, smooth the filling in an even layer with your hand, and gently press the mixture into the dough to adhere. Starting with the long edge nearest you, roll the dough into a tight cylinder. Firmly pinch the top seam to seal the dough, and roll the cylinder seam-side down. Gently stretch the cylinder to an even diameter and an 18 inch length. If necessary, push the ends in to create an even thickness throughout. With a serrated knife and gentle sawing motion, slice the cylinder in half, then slice each half in half once more to make even sized quarters. Then, slice each quarter evenly into thirds, making 12 buns.
- Place the buns in the prepared pan, cut-side down. Cover the pan tightly with plastic wrap, and set the pan in a warm, draft-free spot, until the buns are puffy and are pressed against each other, about 1 1/2 hours. While the dough is in its final rise, place the oven rack in its lowest position. Preheat the oven to 350 degrees.
- Once the buns are done rising, place the pan in the oven, and bake the buns until they’re golden brown, and the center of the dough reads 180 degrees on a digital thermometer (about 25-30 minutes). Cool the buns in the pan on a wire cooling rack for 10 minutes, and then invert the pan onto a rimmed baking sheet, large serving platter or cutting board. Using a rubber spatula, scrape any leftover glaze from the pan onto the buns. Allow the buns to cool while making the pecan topping.
- To make the topping, add the butter, brown sugar, corn syrup and salt to a small saucepan and cook the mixture over medium heat, until it reaches a simmer, stirring occasionally to thoroughly combine. Remove the saucepan from heat, and stir in the vanilla extract and pecans, until the pecans are evenly coated with the sauce. Using a spoon, spoon a heaping tbsp. amount of nuts/sauce over the center of each bun. Continue to cool the buns until they are just warm, another 15-20 minutes. Pull apart the buns or use a serrated knife to separate the sticky buns and serve.
These are some seriously beautiful buns! I need to make a batch asap. I really, really DO.
Oh man these buns looks AWESOME Amy!! I’m slowly branching into working with yeast and these are added to the must make list!!
Yumm, this looks delicious!