• Skip to primary navigation
  • Skip to main content
  • Skip to primary sidebar
  • Skip to footer

The Nifty Foodie

  • Home
  • About
  • Recipes
    • Appetizers
    • Beverages
    • Breads/Muffins
    • Breakfast
    • Canning
    • Desserts
    • Dog Treats
    • Entertaining/Parties
    • Fruit
    • Holiday Recipes
    • Louisiana Cuisine
    • Main Dishes
    • Mexican
    • Nifty Foodie Original
    • Nifty Tricks
    • Project Food Blog
    • Pumpkin
    • Salads
    • Sauces/Dips
    • Side Dishes
    • Skinny
    • Slow Cooker
    • Spices
    • Stews/Soups
    • The Disasters
  • My Weight Loss Journey
    • Races
    • Running
    • Weight Loss Milestones
  • Crafts
  • Contact Me

Desserts

Bananas Foster a la Mode Cups & A Giveaway!

September 18, 2013 by Amy 32 Comments

bananasfosteralamode2

A couple of months ago, my husband and I went to a restaurant in New Orleans. When it came time for dessert, we decided to split something, but the problem with splitting with my husband is the dessert cannot contain any chocolate, caramel or peanut butter (he hates it all). I know…poor guy doesn’t know what he’s missing! Luckily, this particular restaurant had a bananas foster torte, so I knew we were set. It was absolutely delicious, indulgent and rich. In fact, I’m SO glad we split it, because there was no way I could eat the whole thing. Ever since then, bananas foster has been fresh on my mind. I had to make a fun recipe with this classic New Orleans favorite.

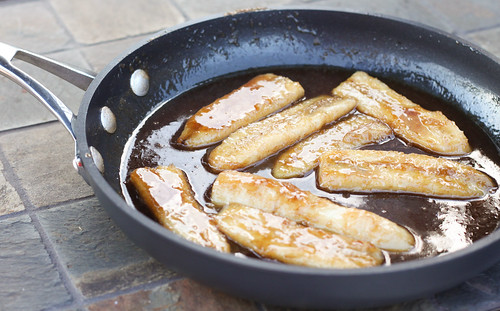
I’m thrilled to be working with Calphalon again to review their brand new Elite Nonstick cookware, which is sold exclusively at Williams-Sonoma. It’s currently for sale on their website, and will be in stores on September 27th. I’m sure you guys know that I love using nonstick cookware, but one of the biggest issues I’ve faced is being limited to wooden or silicone utensils. This line is safe for metal utensils (fork out your whisks!). Yep…I’m serious! This cookware also comes with a textured sear surface, which is awesome because you can get the sear that you usually get from stainless steel, but with the convenience (hello, easy clean-up) of a nonstick pan. This line of cookware is also dishwasher safe.

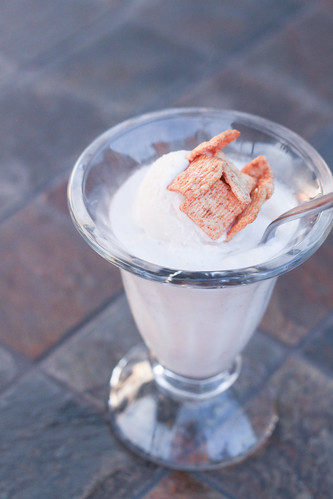
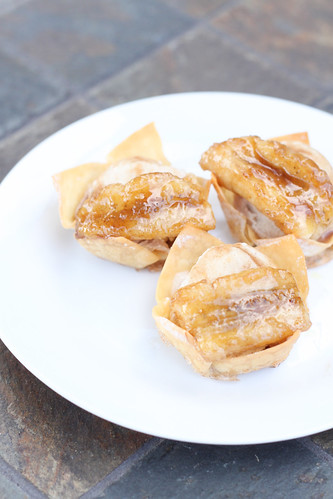
Calphalon sent me this 3 piece set to review, and asked me to create a modern twist on a classic recipe, using one of the pans. With that in mind, I grabbed the 10″ pan, some bananas and got to work! The end result is homemade bananas foster ice cream, topped with warm bananas foster, contained in a cinnamon sugar wonton cup. I hope you like bananas for this one, y’all, because there is plenty of sweet banana flavor in this recipe!

bananasfosteralamode

For the ice cream, I omitted the rum, because even though the alcohol cooks off, I didn’t want to chance the ice cream not setting up properly. I suggest making the ice cream one day before you plan on serving these desserts, so the ice cream can be a scoop-able consistency.

…

Read More »

Filed Under: Desserts, Frozen Desserts, Fruit, Giveaways/Reviews, Nifty Foodie Original

Cinnamon Toast Crunch Ice Cream

September 11, 2013 by Amy 4 Comments

cinnamontoasticecream

Is it crazy that I haven’t made any homemade ice cream this summer? I mean it’s hot enough for it, so I have no idea why I didn’t fork out the machine until September. I will say that I did have a slight addiction to skinny cow sandwiches the past couple of months, and homemade ice cream isn’t very calorie friendly, but usually calorie splurges never stop me (especially lately).

I HAD to make this ice cream, though. I recently received a copy of Jessica Segarra’s (also known as The Novice Chef) new cookbook: Cereal Sweets & Treats. Jessica is a good blogging friend of mine, and I was so excited when she wanted to send me a copy of her new book. It’s full of so many fun recipes…recipes you’d never think you could use cereal with. Cap’n Crunch milkshakes, Lucky Charms macarons, Pumpkin Cheerios bars, Fruit Loops cupcakes, and Corn Pops ice cream, just to name a few. Seriously….doesn’t that all sound so fun?!

The idea of cereal ice cream just pulled me in, and I will mention that while the original recipe is for Corn Pop ice cream, in Jessica’s notes, she mentions trying this with your favorite cereal. One of my favorites is cinnamon toast crunch, and I had a feeling this would make for a great ice cream. One of the best things about this ice cream is that this isn’t a custard based ice cream. Yup…no eggs needed, so making this recipe really wasn’t that difficult. The method Jessica uses doesn’t make the ice cream overpoweringly sweet, because the cereal soaks in the milk/heavy cream and then you strain it out. Also, no worries about soggy cereal, since you strain it out…it’s more of an infusion of flavor from the cereal. I have to say, after having a bowl (or two haha!), I think this ice cream would be perfect on top of a slice of warm apple or pumpkin pie. It has a really good cinnamon flavor to it that would make fall treats that much more amazing. 🙂

If you want to check out more recipes (I think those pumpkin cheerios bars are calling my name next!), Jessica’s book is available on Amazon for under $15!

Cinnamon Toast Crunch Ice Cream
Source: barely adapted from Cereal Sweets & Treats

Ingredients:

  • 2 cups whole milk
  • 1 cup heavy cream
  • 3 cups cinnamon toast crunch cereal
  • 3/4 cup granulated sugar
  • 1 tsp. vanilla extract

Directions:

  1. In a large bowl, mix the milk, heavy cream and cinnamon toast crunch cereal together. Allow the mixture to soak for 30 minutes in the fridge, stirring occasionally. Strain the cereal out of the mixture and discard the cereal.
  2. Place the milk mixture in a large saucepan, and whisk in the sugar. Bring the mixture to a boil, stirring constantly, and continue to boil the mixture for 2 minutes. Remove the mixture from heat, and stir in the vanilla extract. Allow the mixture to fully cool in the refrigerator, until the mixture is cold to the touch.
  3. Once the mixture has cooled, pour the mixture into your ice cream maker and mix according to the manufacturer’s instructions. The ice cream will be a soft serve consistency at this point, but if you’d like the ice cream to be more scoop-able, allow it to harden in an airtight container in the freezer for at least 3 hours.


Disclosure: I was sent a copy of this book for a fair and honest review. All opinions are 100% my own.

Filed Under: Desserts, Frozen Desserts

Chewy Oatmeal Fudge Bars

September 6, 2013 by Amy 1 Comment

fudgebars

I’m starting to really get tired of the summer. I know there are some people still clinging on to summer for dear life, but living in heat indexes of over 100 degrees for almost 3 months now? I’m just over it. OVER IT.

I feel like this summer has been full of bad news too. My latest round of it was breaking a tooth. Yeah, I know. I was just eating a cookie (a chewy one, at that), I felt a crack and there it was. A big chunk of tooth. I went to the dentist the other day, and she took one look in my mouth and told me I’m definitely grinding my teeth again. The question of new stresses popped up, and I had to laugh. The poor dental office became my therapist as I vented about the house, the tragedies in our family, the fact that I was sick and now, this broken tooth. I’m trying to look at the bright side of things…at least I wasn’t in any pain after my tooth broke? I still can’t believe that I broke a tooth…ugh. Ridiculous.

Lately, with all of this bad news, I’m all about comfort foods. I stink at calorie counting right now…I just can’t find my stride. I’m a pro at eating chocolate when more stress enters our lives. I’ve gained 15 lbs. since April. ::sigh:: Yep. 15 lbs. 🙁

Part of that is probably because I’ve been baking a good bit since we realized that the lightning didn’t fry our range oven (phew!). I forgot how comforting baking is…too bad I have no willpower against the end products lately. I’m gonna have to start taping saran wrap over the goodies to avoid eating 2-3 of everything I bake.

These bars were something I’ve been meaning to make for a while now. I wanted something rich/indulgent, and the fudge filling on these bars were just that. In fact, I joked with myself that this would make a KILLER hot fudge sauce….I almost grabbed ice cream out of the freezer before I assembled the bars, but I resisted.

Chewy Oatmeal Fudge Bars
Source: Erin’s Food Files, originally on Baking Blonde

Ingredients:

For the bars:

  • 2 1/2 cups flour
  • 1 tsp. baking soda
  • 1 tsp. salt
  • 1 cup unsalted butter, softened
  • 2 cups brown sugar
  • 2 eggs
  • 2 tsp. vanilla extract
  • 3 cups quick oats

For the filling:

  • 2 cups semi-sweet chocolate chips
  • 1 15 oz. can sweetened condensed milk
  • 2 tbsp. unsalted butter, softened
  • 1 tsp. salt
  • 2 1/2 tsp. vanilla extract

Directions:

  1. Preheat the oven to 325 degrees. Line a 9×13 inch pan with parchment paper and set aside.
  2. In a large bowl, whisk together the flour, baking soda and the 1 tsp. of salt. Set aside.
  3. In the bowl of an electric mixer fitted with the paddle attachment, beat the 1 cup of butter and the brown sugar for 2-3 minutes, until light and fluffy. Add the eggs, one egg at a time and mix until combined. Add the 2 tsp. of the vanilla extract and mix until combined.
  4. Add in the flour mixture to the wet mixture slowly and mix until just combined. Using a spoon or spatula, stir in the quick oats to the batter as well.
  5. Spread 2/3 of the crust into the bottom of the prepared pan, and save the last 1/3 for a topping.
  6. To make the filling, place the chocolate chips, condensed milk, 2 tbsp. butter and the 1 tsp. salt in a medium sauce pot. Heat the mixture over medium-low heat, and stir until the mixture is smooth. Once the mixture is melted and smooth, remove the mixture from heat and stir in the 2 1/2 tsp. vanilla extract.
  7. Pour the filling onto the oatmeal bar crust, keeping the filling about 1/4 inch away from the sides of the pan to prevent sticking while baking. Evenly add the rest of the oatmeal batter in dollops on top of the filling. Then, bake the bars for 30-35 minutes, until the oat topping is light brown and the fudge layer is set, being mindful not to over bake these bars. Allow the bars to fully cool before cutting and serving.

Filed Under: Brownies/Bars, Chocolate, Desserts

Pumpkin Spice M&M Dulce De Leche Blondies

August 29, 2013 by Amy 3 Comments

psdulceblondies

I can’t even begin to express how happy I am that August is almost gone. It has been a month full of bad news for us, so a fresh new month is definitely welcome. September marks the start of pumpkin things, cinnamon scents, fun decor, football and milder weather. I’m also hoping that September helps us close the whole lightning hit our house chapter in our lives. We’ve been spending our afternoons/evenings trying to get our house back in order (you’d be surprised how much clutter you accumulate when you just don’t care anymore) to make our house feel like a home again. I totally bought 4 fall scented candles, even though fall isn’t here yet. I promised myself I that wouldn’t light them until September 1st, but you better believe first thing that morning (well, OK…after church), the summer candles are being put away and our Bath and Body Works Leaves candle will be burning. 🙂

I also told myself that I won’t touch the cans of pumpkin in our pantry until September 1st. I’m surprised that I haven’t broken that little promise, because trust me, I’ve been SO tempted to bake up some pumpkin bread. That’s totally happening Sunday morning, as well. Now, I did sort of stretch things a bit making these blondies a couple of nights ago. We went to Target over the weekend to start replacing the food that we lost in the fridge. By the way, I can’t tell you guys how amazing everyone was to us the night that fire happened. I’m SO SO thankful for our neighbors, especially, for loaning us their outside plug to keep the contents of the deep freezer from spoiling until we could get an electrician to replace all of the fried wires. Anyway, we were at Target, and I was walking past the check-out lines and saw an end-cap full of fall M&Ms. My weakness is actually the pumpkin spice kisses, but then I saw pumpkin spice M&Ms. OMG.

I just had to make something with them. After a bit of thought, I decided to add them to blondies. I found a base recipe on Smitten Kitchen’s site, and I added in some pumpkin spice to give it that fall flavor (without using pumpkin haha!). After mixing the batter, I spread half of it on the pan, added a whole can of dulce de leche on top of that, and then added the rest of the batter on top. Ooey gooey amazingness, basically. These bars are so rich, but that just gave me an excuse to top them with vanilla ice cream. 🙂 They were also super easy to throw together….one bowl to make the blondies and the dulce de leche is in a can. It’s sort of dangerous….in a you better wrap them up and bring them to coworkers the next day before you eat the whole pan, dangerous.

psdulceblondies1

Pumpkin Spice M&M Dulce De Leche Blondies
Source: adapted from Smitten Kitchen, originally from How to Cook Everything

Ingredients:

  • 16 tbsp. unsalted butter, melted
  • 2 cups light brown sugar
  • 2 large eggs
  • 2 tsp. vanilla
  • 1/2 tsp. cinnamon
  • 1/4 tsp. nutmeg
  • a pinch of ground cloves
  • a pinch of salt
  • 2 cups all-purpose flour
  • 9.9 oz. bag of pumpkin spice M&Ms
  • 1 small can dulce de leche

Directions:

  1. Line a 9×13 pan with parchment paper and set aside. Preheat the oven to 350 degrees.
  2. In a large bowl, whisk the melted butter and brown sugar together, until smooth. Beat in the eggs, vanilla, spices and salt. Switch to using a wooden spoon or spatula, and stir in the flour, until just combined. Gently stir in the M&Ms, until they’re evenly distributed throughout the batter.
  3. Pour half of the batter into the prepared 9×13 pan, and spread it with a spoon/spatula to cover the surface. Scoop the dulce de leche into the pan, and spread that over the batter. Then, scoop the rest of the batter in small spoonfuls over the dulce de leche and gently spread it on top. It’s OK if a little bit mixes together, but you mainly want the top of the bars to be blondie batter.
  4. Bake for 35-40 minutes, or until the bars are set in the middle, being mindful not to over-bake the blondies. Allow the blondies to fully cool on a cooling rack before cutting/serving.

Filed Under: Brownies/Bars, Candy, Desserts

  • « Go to Previous Page
  • Go to page 1
  • Interim pages omitted …
  • Go to page 3
  • Go to page 4
  • Go to page 5

Primary Sidebar

Hey Y’all!

Image Credit: Leslie Pendleton Photography


Hey y’all!

Thanks so much for reading! I’m Amy, and I live in south Louisiana with my husband and our rescue dog. I enjoy sharing my love for cooking, baking, crafts & more! Follow my daily adventures on social media!

Follow my Daily Adventures

  • Email
  • Facebook
  • Instagram
  • Pinterest
  • Twitter

Footer

  • Email
  • Facebook
  • Instagram
  • Pinterest
  • Twitter

Archives

Copyright © 2026 · Foodie Pro Theme by Shay Bocks · Built on the Genesis Framework · Powered by WordPress