• Skip to primary navigation
  • Skip to main content
  • Skip to primary sidebar
  • Skip to footer

The Nifty Foodie

  • Home
  • About
  • Recipes
    • Appetizers
    • Beverages
    • Breads/Muffins
    • Breakfast
    • Canning
    • Desserts
    • Dog Treats
    • Entertaining/Parties
    • Fruit
    • Holiday Recipes
    • Louisiana Cuisine
    • Main Dishes
    • Mexican
    • Nifty Foodie Original
    • Nifty Tricks
    • Project Food Blog
    • Pumpkin
    • Salads
    • Sauces/Dips
    • Side Dishes
    • Skinny
    • Slow Cooker
    • Spices
    • Stews/Soups
    • The Disasters
  • My Weight Loss Journey
    • Races
    • Running
    • Weight Loss Milestones
  • Crafts
  • Contact Me

Pies

Mrs. Smith’s Signature Deep Dish Pies & A Giveaway

December 4, 2012 by Amy 177 Comments

This is a Sponsored post written by me on behalf of Mrs. Smith’s for SocialSpark. All opinions are 100% mine.

Mrs. Smith's (1)

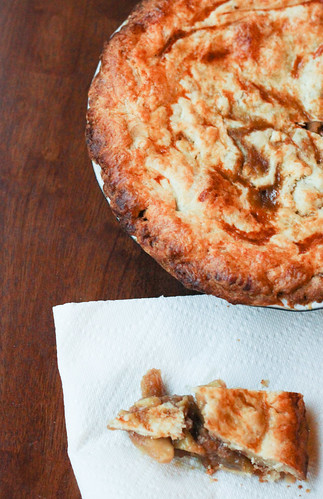
I feel like I’ve been baking pie like crazy lately. Between the office potlucks and family get-togethers, it just seems like the butter will run out. Seriously y’all….I purchased 12 boxes of butter last month and I’m down to 5! Crazy, no?

As much as I love to bake, sometimes there’s a party where I just don’t have the time to make something for us to bring. There may be some people who will judge me for this, but hey, I’ve been known to purchase a frozen pie or two, and bake them up. I usually tend to grab for Mrs. Smith’s, because I’ve never had a bad pie from them. In fact, my husband insists that his all-time favorite pie is Mrs. Smith’s Cinnabon Apple Crumb Pie, so when Mrs. Smith’s (via SocialSpark) offered me the opportunity to try their new line of Mrs. Smith’s Signature Deep Dish pies, I just couldn’t say no.

MrsSmith.jpg

In case you’re a stranger to Mrs. Smith’s products, here’s a little background on the company (from the company’s website):

When Amanda Smith baked her first pies in the kitchen of her Pottstown, Pennsylvania home, she used the finest ingredients and amazing attention to detail to create the finest pies available. Amanda Smith started by baking pies for family, friends and charity events, but when her son, Robert Smith, convinced her to sell her pies, a business was born. Today, the makers of MRS. SMITH’S® desserts continue the tradition started by Amanda Smith, delivering pies and cobblers with made-from-scratch goodness you can see and taste. MRS. SMITH’S® pies and cobblers … a timeless tradition. Their new Signature Deep Dish pies come in four flavors:

  • Signature Deep Dish Dutch Apple Pie with Caramel Sauce
  • Signature Deep Dish Cherry Pie with Butter Fudge Sauce
  • Signature Deep Dish Peach Pie with Cream Cheese Icing
  • Signature Deep Dish Pumpkin Pie with Cream Cheese Icing

The great thing about these pies is that it comes with a fun topping packet to help you create a unique, customized pie, and of course, with any Mrs. Smith’s pie, it couldn’t be simpler to bake. Simply take it out of the freezer, place it on a baking sheet (in case it leaks) and let it bake in the oven. Then, once the pie has cooled, add the topping.

Mrs. Smith's (2)

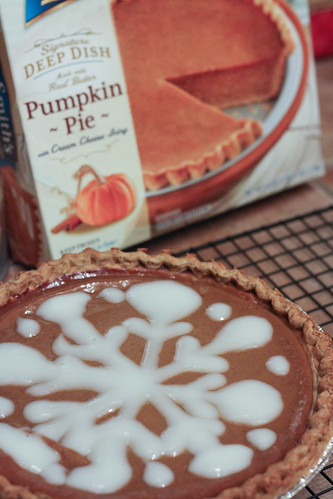
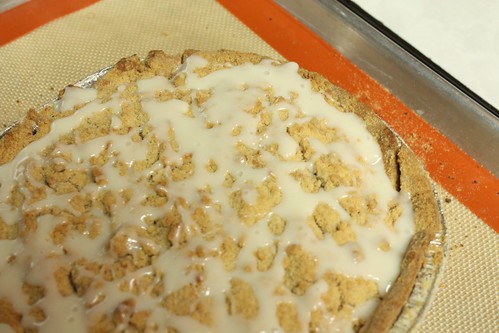
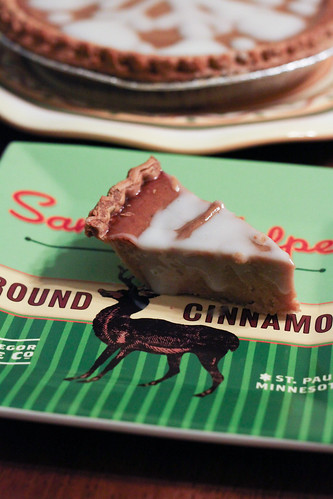
I got to try the pumpkin pie, and it was VERY good! It was spiced well (some pumpkin pies don’t have enough spice, in my opinion), and the custard was super smooth! The pie dough was very flaky and not at all soggy, too. I especially loved being able to decorate our pie with the included icing packet, which gave it a fun, festive touch. If you’re under a time crunch this holiday season, this pumpkin pie would definitely do the trick! To find where these pies are sold, here’s a link to the retailers near you. Mrs. Smith’s is generously offering one reader of The Nifty Foodie a coupon for a free Signature Deep Dish pie, as well as a $50 gift card to Williams-Sonoma!!
…

Read More »

Filed Under: Giveaways/Reviews, Pies, Review

Caramel Apple Pie

November 13, 2012 by Amy 5 Comments

Caramel Apple Pie

I find that I don’t make pie nearly enough. For some reason, I find it to be much more time-consuming than cupcakes or cookies, but in all seriousness, pie is very simple. Your food processor basically does all of the work to make the crust, and heck, sometimes I’ve even made pie crust in the stand mixer…still works great. The secret to an easier pie crust for me is frozen butter. I like to cut the butter in small cubes, then throw them in the freezer to make them extra cold. This is one of the few desserts where you want your butter as cold as possible, because as you work with the dough, it warms up and is just miserable to work with when it’s no longer cold (at least in my very beginner pie-making experience).

I have been having a killer craving for some apple pie, and since I had a batch of caramel sauce handy (Why do I do that to myself?), I figured there HAD to be a recipe out there for caramel apple pie. I got to googling and found this one. Since I already had the caramel sauce, I just used that in this recipe instead of the caramel recipe that Williams-Sonoma had. This pie came out so good, y’all. The filling just melts in your mouth, and their recipe for pie crust has such a wonderful, buttery flavor, as well as a bit of a flaky texture. Just SO good. If you want to bring something a little different to your Thanksgiving dinner, this is a tasty twist on the American classic.

Now, if this caramel apple pie isn’t your thing, you can definitely find other ideas this week. Come join Love the Pie with TidyMom  sponsored by Whirlpool and enter to win a new Whirlpool Range! Be sure to check out TidyMom’s website for other great pie ideas and recipes! The party is going on all week!

Caramel Apple Pie
Source: adapted from Williams-Sonoma

Ingredients:

For the pie crust:

  • 2 1/2 cups all-purpose flour
  • 2 tbsp. + 2 tsp. sugar, divided
  • 2 tsp. salt
  • 2 sticks cold, unsalted butter, cut into small cubes
  • 6 to 8 tbsp. ice water
  • 1 egg + 1 tbsp. water, lightly beaten in a small bowl

For the filling:

  • 4 lb. Granny Smith apples, peeled/cored & cut into 8 slices
  • 1/2 cup firmly packed light brown sugar
  • 1/2 tsp. ground cinnamon
  • 1/4 tsp. freshly grated nutmeg
  • 1 tbsp. fresh lemon juice
  • 3 tbsp. cornstarch
  • 1 batch salted butter caramel sauce

Directions:

  1. To make the pie crust, combine the flour, 2 tbsp. of the sugar and salt in a large food processor and pulse the mixture to combine. Add the cold cubes of butter and pulse the mixture until it resembles a coarse meal. Add 6 tbsp. of the ice water and pulse the mixture twice. Check the dough for consistency by squeezing it with your fingers. If the dough holds together well, the dough is fine. You don’t want the dough to be crumbly (too little water), but not sticky either (too much water). If you need to add water, add it 1 tsp. at a time and pulse twice after each addition. Once the dough is at the consistency you need, place the dough on a work surface and divide the mixture in half.  Shape each half into a dish and wrap each with plastic wrap. Refrigerate the dough for at least 2 hours (or up to 2 days).
  2. To roll the dough, remove it from the refrigerator and let the dough stand for 5 minutes. Place 1 dough between 2 sheets of lightly floured wax paper & roll it out into a 12-inch round, to about 3/16″ thickness. Repeat for the other disk of dough. Take one of the doughs out from between the wax paper sheets and gently press it into a 9 inch deep-dish pie dish. Refrigerate both doughs for another 30 minutes.
  3. To make the apple filling, place the apples, brown sugar, cinnamon, nutmeg & lemon juice in a large dutch oven. Cover and cook the mixture, stirring occasionally, for about 20 minutes, until the apples are just tender (you can easily check by sticking a fork in an apple slice). Once the mixture is done, uncover the pot and allow the filling to cool to room temperature. Stir in the cornstarch.
  4. Preheat your oven to 400 degrees. Once the filling is cool, take out your pie crusts and allow those to sit for 5 minutes. In the meantime, stir the apple filling and 3/4 cup of the caramel sauce together (the rest of the caramel will be for serving).  Pour the apple filling into your pie dish, and then place the top crust over the pie. Cut off any remaining dough hanging over the edge of the pie dish, and then press the top and bottom crusts together. Brush the top crust with the egg wash, and sprinkle the top crust with the remaining 2 tsp. of sugar.
  5. Place the pie dish in a jelly roll/baking sheet. Bake the pie until the crust is golden brown, about 1 hour. Be sure to check the pie after 30 minutes, to make sure the crust isn’t too dark—whatever part of the crust on too dark, just simply cover it with foil. When the pie is done baking, allow the pie to cool on a wire rack for at least 2 1/2 hours before serving. Serve with leftover caramel sauce (warmed) for drizzling (it’s also equally great with ice cream). Enjoy!

Filed Under: Fruit, Pies

Fresh Strawberry Pie

May 1, 2012 by Amy 10 Comments

Fresh Strawberry Pie

Happy May Day! I can’t believe it’s already May, y’all! Wasn’t it just December? I swear I’m still humming “Let It Snow” around the house…wishful thinking, I guess. Although, I’m currently getting a real kick out of this Justin Timberlake meme, which makes bringing in the month that much more awesome. 😛 Hello fellow *NSYNC fans…I know you’re out there laughing and singing along with me!!

Now, let’s talk about this pie, y’all. When it comes to baking, pie is one of those things I just don’t make that much. For some reason, pie always seems like a ton of work. I used to buy crusts in the freezer section, and when I first attempted homemade pie years ago, it just ended up taking a while for it to come together. After all of that work, the crust was a crumbly mess. UGH. I just sort of mentally blocked the idea of making pie, unless there was a pre-made crust involved.

Sometimes I forget that I have a stand mixer that happily does all of the work for me…..

I had a flat of strawberries in the house, and since I promised to bring a dessert for a lunch we were going to, I decided that I had to bring something involving strawberries. I didn’t want to bring the typical shortcake, so I went to Pinterest to help me brain storm. (Don’t you just love Pinterest?!) That’s when I saw this fresh strawberry pie. I clicked on the post, and thought about pie crust. Ugh. Then I saw that the directions involved the stand mixer. Oh heck yes! My pastry cutter can stay in the drawer? SA-WEET!

So, I made this pie. With the sweet, ripe local strawberries and the light, buttery crust, this pie was just a wonderful, refreshing dessert. It wasn’t too heavy, which really allowed the strawberries to shine.  It was a real winner at lunch. I didn’t end up bringing any of this home!

Fresh Strawberry Pie
Source: Annie’s Eats (originally from Williams-Sonoma and Cooks Illustrated)

Ingredients:

For the crust:

  • 1 1/4 cups all-purpose flour
  • 1 tbsp. sugar
  • 1/4 tsp. salt
  • 8 tbsp. cold, unsalted butter, cut into small pieces
  • 3 tbsp. very cold water

For the filling:

  • 4 pints (about 3 lbs.) fresh strawberries, gently rinsed and dried, hulled
  • 3/4 cup sugar
  • 2 tbsp. cornstarch
  • 1 1/2 tsp. Sure-Jell for low-sugar recipes (don’t use the regular Sure-Jell)
  • Generous pinch table salt
  • 1 tbsp. freshly squeezed lemon juice

Directions:

  1. To make the crust, add the flour, sugar, and salt in the bowl of a stand mixer. Using the paddle attachment, mix everything together just to blend it. Add the butter pieces and mix together on medium-low speed to cut the butter into the flour until the butter pieces are no bigger than peas and the rest of the mixture resembles a coarse sand. Turn the mixer on low and add the cold water. Mix until the dough just comes together.
  2. Mold the dough into a ball, wrap the dough in plastic wrap and allow to chill in the refrigerator for at least 30 minutes.
  3. Roll out your dough on a lightly floured surface into a 12 inch circle. Then transfer the crust to a 9 inch pie pan and crimp the edges. Cover the pie pan with saran wrap and freeze for 30 minutes. In the meantime, preheat your oven to 375 degrees and adjust an oven shelf to the lower middle slot. Take the pie pan out of the freezer and line the top of the pie crust with foil. Add pie weights on top or balled up foil pieces to prevent the dough from bubbling up and rising. Bake the pie crust for 20-25 minutes, until the dough no longer appears wet. Remove the pie weights/balled up foil and other foil. Then, bake the pie crust for 10-12 minutes more until golden brown. Place the pie pan on a wire rack and allow to cool fully.
  4. To make the filling, weigh out 6 oz. of weird shaped, under-ripe or unattractive berries, halving those that are large. In the end, you should have about 1 1/2 cups of berries. Using a food processor or blender, blend the berries to a puree for about 30 seconds. Measure out the puree; you should have 3/4 cup.
  5. Using a medium sized saucepan, add the sugar, cornstarch, Sure-Jell and salt and whisk the mixture to combine. Stir in the berry puree and cook the mixture over medium-high heat, stirring constantly. Bring the mixture to a full boil and boil for two minutes, ensuring that the bottom and sides of the pan are constantly scraped with a silicone spatula or spoon. Transfer the mixture to a large bowl and stir in the lemon juice; allow the mixture to cool to room temperature.
  6. Look through the remaining berries and weigh out 2 pounds of the most attractive berries. If the berries are very large, halve them. Add the berries to the bowl with the glaze, and fold the mixture gently with a spatula or spoon until the berries are well coated with the mixture. Add the berry mixture on the pie crust, piling the berries into a mound. If you’d like, turn down the berries that are cut side up for a prettier presentation. Chill the pie for about two hours and serve immediately (at the most, within 5 hours of making the pie since berries are extremely moist and will make your pie soggy). Optional: serve with fresh whipped cream.


Filed Under: Fruit, Pies

Caramel Apple Pie A La Mode Bites

September 21, 2010 by Amy 19 Comments

Caramel Apple Pie A La Mode Bites

Since the Summer is winding down, it’s time to say goodbye to fresh, sweet berries and hello to juicy, flavorful apples. A great way to celebrate the season is with apple pie, of course.

Instead of making a pie, I wanted to make another recipe highlighting Nature’s Pride bread! This is another entry for the Nature’s Pride bread ambassador contest.

Note: As part of the Foodbuzz Tastemaker’s Program, Foodbuzz offered a coupon for a free Nature’s Pride product in exchange for making up a little ol’ recipe highlighting Nature’s Pride bread.  Six bloggers’ recipes will be chosen to be an ambassador for Nature’s Pride at this year’s Foodbuzz Festival!

Can you tell I’d really like to go to Foodbuzz Festival this year? 🙂

I took apple pie a few steps further and made this into a caramel apple pie a la mode bite. Talk about DELICIOUS and perfect for a party! 🙂

I’m sure you’re curious about the crust. The crust is simply sliced Honey Wheat bread, and it comes out perfectly crispy and sweet, which is great for a dessert crust! To do this, I used a 2″ circle cutter to cut out the crusts and pressed them into a mini muffin pan to shape them! I took a couple of pictures, since I’m a visual person, and thought pictures would help.

Crust how-to

Super easy, right? Definitely give these a try! You’ll be glad that you did!

Caramel Apple Pie A La Mode Bites
Source: an original

makes 24 bites

Ingredients:

Crust:

  • 12 slices of Nature’s Pride honey wheat bread
  • 1/2 cup granulated sugar
  • 1 1/4 tsp. cinnamon
  • 3 tbsp. melted butter

Apple Filling:

  • 2 granny smith apples, peeled, cored and diced finely
  • 1/2 stick butter
  • 5 tbsp. brown sugar
  • 2 tsp. cinnamon
  • 3/4 tsp. nutmeg
  • 1 1/2 tsp. flour

Additional toppings:

  • vanilla ice cream
  • caramel sundae topping

Directions:

  1. Preheat your oven to 400 degrees.
  2. Using a 2″-3″ circle cookie cutter, cut out circles in the bread. I was able to get 2 per slice.
  3. Press each circle into a mini muffin pan, making sure it’s pressed well against the edges to form into a good crust. (see above picture)
  4. Brush melted butter on the tops of the crusts.
  5. Combine sugar and cinnamon. Sprinkle liberally over the buttered crusts.
  6. Bake for 5-8 minutes, until the crusts brown. Allow to cool.
  7. To make the apple filling, melt the 1/2 stick butter in a small pot and add apples. Then, add brown sugar, cinnamon and nutmeg. Cook down for about 5 minutes on low/med-low heat. Add flour to thicken the sauce and cook another 5 minutes or until tender. Allow to cool until apple filling is just warm.
  8. To assemble the bites, add about 2 tsp. of ice cream to each of the crusts (just eyeball it). Add a tsp. of apple filling and then drizzle with caramel sundae topping. Serve immediately. 🙂

Filed Under: Entertaining/Parties, Fruit, Nifty Foodie Original, Pies

Foodbuzz 24×24: The Best Things We Ever Ate

June 27, 2010 by Amy 15 Comments

IMG_1943

Summer officially started last Monday. However, being in Louisiana, we’ve been feeling summer-like weather since May. With the heat index hitting 110 degrees sometimes, we wanted to throw a summer party that was most definitely indoors!

I watch entirely too much Food Network. If it wasn’t for Food Network and reading food blogs, I’m fairly certain my husband and I would be living off of Hamburger Helper and take-out. One of my favorite shows lately has been The Best Thing I Ever Ate. Every show has a theme, and it features the cooks/hosts on Food Network and their favorite eats in that theme. So, when Foodbuzz emailed about this month’s 24×24 proposals, I figured it would be a fun party to feature the best things our families have eaten! Thanks so much to Foodbuzz for sponsoring this party! 🙂

To come up with the menu, I sent out an email to our families asking for their favorites in each category.

  • On the Grill (recipes that are done on the BBQ)
  • Dangerously Cheesy (major cheese in a dish)
  • No Utensils (finger foods/apps)
  • Keep it Comfy (comfort food)
  • Frozen Treats (any dessert from the freezer)
  • Mix it Up (a food that requires using a mixer—doesn’t have to be a sweet)
  • Louisiana’s Best (Louisiana food)
  • Cold and Colorful (like a salad or cold app with lots of veggies or fruit)
  • Under the Sea (favorite seafood dish)
  • Classic American (with 4th of July approaching, tell me a dish that screams American)

After getting many responses, here is the menu we came up with:

Drinks:
Strawberry Lemonade
Strawberry Daiquiris

Appetizers:
Cheese Fondue with Vegetables/Bread*
Bruschetta*
Boudin Balls

Entrees:
Steak Skewers with Chimichurri, Onion Cheese Sauce and Compound Butter*
Spicy BBQ Shrimp Skewers*

Sides:
Crawfish Fettuccine
Macaroni and Cheese
Vegetable Skewers*
Grilled Corn
Lettuce Greens with Honey Lime Vinaigrette

Desserts:
Strawberry Cake*
Assorted Cupcakes
Cinnamon Crumb Apple Pie
Fresh Berries with Ice Cream

* recipes will be featured in the blog in future posts

I will admit, I’m still getting the hang of entertaining for a large number of people. Despite doing a lot of prep, I felt fairly stressed in the last hour. Since the party was for family, though, I had loads of help at the last minute. 🙂 Whew!

The fondue was an absolute hit. I was nervous to make this myself, but this recipe came together beautifully! I served the fondue with day old po’boy bread, carrots and broccoli.

IMG_1962

We purchased the boudin balls at a local joint, since they are pretty much my husband’s favorite. The bruschetta was a lighter alternative to the other appetizers. I was super excited to use basil from our garden for this dish!

Appetizers

I need to thank the hubs for braving the sweltering disgusting heat to cook up this magic on the grill. The steak, especially was a real winner to family!

kabobs

We made 3 sauces available for people to dip/cover their skewers in: a chimichurri, onion blue cheese (not pictured) and a worchestershire chive butter. The chimichurri ended up being a huge hit (and I used parsley from the garden for it)!

Steak Butter/Chimichurri

Here is some lovely grilled corn that survived a few flare-ups on the grill. 🙂

Grilled Corn

Here is a semi-decent picture of the crawfish fettuccine before everyone digged in. The hubs’ parents made this dish and it was delicious. Perfect flavor with a little Louisiana kick!

Crawfish Fettucine

This is some macaroni and cheese that is my mother-in-law’s favorite. It was definitely pretty tasty (not to mention, cheesy). 🙂

Mac and Cheese

After enjoying some serious eats, we waited a good while before putting out desserts and just chatted, watched TV and played some games.

I will say the desserts were absolutely amazing.

Fresh berries (and ice cream, not pictured)

berries

Strawberry Cake (inspired by a local bakery). I would have just purchased one, but I had no idea an 8″ cake was over $30. What the heck?! I guess I’m just used to baking my own cakes to realize how expensive cakes have gotten!

Strawberry Cake

This was a welcomed surprise. A local cupcake bakery occasionally has giveaways on Twitter, and I won some cupcakes! They were seriously delish! Thank you Sweet Wishes Cafe!

Cupcakes

Here is the cinnamon crumb apple pie. This is one of those frozen pies you can find in the grocery store, but has quickly become a favorite with my hubs’ family.

apple pie

Of course, our puppy was very excited to get all of the attention she got at the party, and thanks to my mom, she tried a piece of steak for the first time. I think she enjoyed it. 🙂

IMG_1965

And of course, it wouldn’t be a party without family! Here are some pictures of our family.

Mom and Sis

family

IMG_1974

It was a great time to be had by everyone, especially in the milder indoors. Thank you so much to Foodbuzz again for the party! Everyone had a blast! 🙂

Filed Under: Appetizers, Beef, Cakes/Cupcakes, Entertaining/Parties, Frozen Desserts, Fruit, Louisiana Cuisine, Pasta/Rice, Pies, Sauces/Dips, Seafood, Side Dishes

Chocolate Peanut Butter Torte

May 7, 2010 by Amy 7 Comments

Chocolate Peanut Butter Torte

Around noon yesterday, my heart was pounding as someone was talking over the PA system at work. I tried to play it cool, acting like my work had to be done, even though it was my lunch break. However, I could sense my coworkers were listening in with anticipation too. I entered this recipe in a dessert contest at work earlier that day, and the results were being announced.

 As they announced the winners of each category, I could feel butterflies flying around like crazy in the pit of my stomach. They announced the winners for cake, cookies, brownies, pie and then…miscellaneous. See,  I don’t know what this torte would be considered. Pie? Eh, kind of, but it didn’t LOOK like a pie. Cake? Nope, shaped like a cake, but not a hint of spongey cake texture. So, I just placed it in the miscellaneous category, since this torte is in a league all of its own. For category’s sake on the blog though, I’ll call it more of a pie.

This was the first time I whipped cream and the first time I made a ganache. As I was making these two components, I remember watching Food Network and seeing all of the flops associated with attempting these components. Overbeating cream to a butter, chocolate seizing, etc. I was a bit of a worry worm, because this was a contest and I couldn’t mess up! To be honest, I have no idea why I was scared. Whipping cream was kind of fun to watch, and watched the gananche come together was delicious. I admit, I came close to drooling right into that glass bowl of deliciousness (but I didn’t, I promise).

I loved making this dessert. Peanut butter and cream cheese are usually rather heavy components in recipes, and as I was folding in the whipped cream, it significantly lightened up the filling. The dessert looks deceptively rich and decadent but  because of the whipped cream, it is actually a fairly light feeling dessert. I think this dessert would be amazing for a nice ending to a summer dinner.

Oh, and tastewise? Well, this torte won first place in it’s category. I even have a little blue ribbon to prove it, and the bragging rights in the office. I think that speaks volumes on how amazing this torte tastes!

Chocolate Peanut Butter Torte
Source: Baking: From My Home to Yours (adapted by Annie’s Eats)

Crust Ingredients:

  • 32 Oreo cookies, finely processed into crumbs
  • 5 1/3 tbsp. unsalted butter, melted and cooled
  • Small pinch of salt

Crunch filling Ingredients:

  • 1 1/4 cups salted peanuts, finely chopped, divided (for the filling, crunch and topping)
  • 1/2 cup mini chocolate chips
  • 2 tsp. sugar
  • 1/2 tsp. espresso powder
  • 1/4 tsp. ground cinnamon
  • Dash of ground nutmeg

Filling ingredients:

  • 2 cups heavy cream
  • 1 1/4 cups confectioners’ sugar, sifted
  • 12 oz. cream cheese, at room temperature
  • 1 1/2 cups creamy peanut butter (not natural)
  • 2 tbsp. whole milk

Ganache ingredients:

  • 1/2 cup heavy cream
  • 4 oz. bittersweet chocolate, finely chopped (I just used 4 oz. of the mini chips)

Directions:

  1. To make the crust, preheat the oven to 350 degrees F.  Butter a 9-inch springform pan and place it on a baking sheet.  Combine the Oreo crumbs, melted butter and salt in a small bowl.  Toss with a fork to moisten all of the crumbs.  Press into a thin layer covering the bottom and sides of the springform pan.  Freeze the crust for 10 minutes.  Bake in the preheated oven for 10 minutes, then transfer to a wire rack and let cool completely before filling.
  2. To make the crunch, in another small bowl combine 1/2 cup of the chopped peanuts, mini chocolate chips, sugar, espresso powder, cinnamon and nutmeg.  Toss with a fork to mix and set aside.
  3. To prepare the filling, in the bowl of a stand mixer fitted with the whisk attachment, whip 2 cups of the cream until it holds medium peaks.  Beat in 1/4 cup of confectioners’ sugar and whip until the cream holds medium-firm peaks.  Scrape the cream into a separate bowl and refrigerate until needed. 
  4. Wipe out (do not wash) the mixer bowl, replace the whisk with the paddle attachment, and beat the cream cheese with the remaining 1 cup of confectioners’ sugar on medium speed until the cream cheese is satiny smooth.  Beat in the peanut butter, whole milk, and 1/4 cup of the chopped peanuts until well combined.
  5. Using a large rubber spatula, gently stir in about 1/4 of the whipped cream just to lighten the mousse.  Still working with the spatula, stir in the crunchy peanut mixture, then gingerly fold in the remaining whipped cream.  Scrape the mousse into the crust, mounding and smoothing the top.  Refrigerate for at least 4 hours or overnight; cover with plastic wrap as soon as the mousse firms.
  6. To finish the torte, put the chopped chocolate or mini chips, in my case,  in a heatproof bowl set over a saucepan of simmering water.  Leave the bowl over the water just until the chocolate softens and starts to melt, about 3 minutes; remove the bowl from the saucepan.  Bring the 1/2 cup of cream to a full boil.  Pour the cream over the chocolate and, working with a rubber spatula, very gently stir together until the ganache is completely blended and smooth.
  7. Pour the ganache over the torte, smoothing with a metal icing spatula.  Scatter the remaining peanuts over the top and chill to set the topping, at least 20 minutes.  When the ganache is firm, run a knife along the side of the springform to ensure nothing is sticking, and then remove the sides of the springform pan.  Refrigerate until ready to serve.

Filed Under: Chocolate, Peanut Butter, Pies

Pumpkin Pie

November 4, 2008 by Amy Leave a Comment

With the time change, I was anxiously awaiting Desperate Housewives to come on at 8. However, it was 5:30 and dark! I realized I needed to make the time zoom a little faster, so I decided to make a pumpkin pie.

Not just any pumpkin pie, a Weight Watchers friendly pumpkin pie! I found this great recipe in Cooking Light, believe it or not. I’m being completely serious when I say I cannot tell the difference between normal pumpkin pie and this pumpkin pie!

Pumpkin Pie
Source: Cooking Light

Ingredients:

Filling:

  • 3/4 cup packed brown sugar
  • 1 3/4 teaspoons pumpkin pie spice
  • 1/4 teaspoon salt
  • 1 (12-ounce) can evaporated low-fat milk
  • 2 large egg whites
  • 1 large egg
  • 1 (15-ounce) can unsweetened pumpkin

Crust:

  • 1/2 (15-ounce) package refrigerated pie dough (such as Pillsbury) (I used premade frozen crust)
  • Cooking spray

Topping: (I omitted this topping and subbed some Cool Whip Fat Free)

  • 1/4 cup whipping cream
  • 1 tablespoon amaretto (almond-flavored liqueur)
  • 2 teaspoons powdered sugar

Directions:

  1. Position oven rack to lowest position and preheat oven to 425°.
  2. To prepare filling, combine first 6 ingredients in a large bowl, stirring with a whisk. Add pumpkin, and stir with a whisk until smooth.
  3. To prepare crust, roll dough into an 11-inch circle; fit into a 9-inch pie plate coated with cooking spray. Fold edges under and flute.
  4. Pour pumpkin mixture into the crust. Place pie plate on a baking sheet. Place baking sheet on lowest oven rack. Bake at 425° for 10 minutes. Reduce oven temperature to 350° (do not remove pie from oven); bake an additional 50 minutes or until almost set. Cool completely on wire rack.
  5. To prepare topping, beat cream with a mixer at high speed until stiff peaks form. Add the amaretto and powdered sugar, and beat until blended. Serve with pie.

Serves 12.

POINTS*: 4.5/slice (with 1 tbsp. whipped topping included)

Seriously, try this recipe for the holiday season. You will not be disappointed! 🙂 This is now going to be a favorite I’m bringing to every holiday I’m asked to bring a dish for!

Filed Under: Pies, Pumpkin, Skinny

Pumpkin Mousse Pie

October 26, 2008 by Amy 1 Comment

I remember finding a recipe for this in my Weight Watchers magazine last year, and when I made it, it was SO yummy. Unfortunately, in my decluttering, I threw out the magazine, and thus, losing the recipe. I resorted to google to find the pie’s recipe, but there were like 4 versions. I took a chance on this one and made it. I will say, this isn’t the same recipe as the magazine. It was more spicy and much less pumpkin flavor than before. It was still good, but not the same. I will find that original recipe though…my family enjoys the trials!


Pumpkin Mousse Pie
Adapted from On Beyond Running

Ingredients:

  • 1 reduced fat graham cracker pie crust
  • 1 1/4 cup cold 2% milk
  • 1 package SF FF instant cheesecake pudding
  • 1 cup canned pumpkin
  • 1/2 tub sugar free cool whip, thawed
  • 1 tbs. pumpkin pie spice OR 1 1/2 tsp. ground cinnamon, 3/4 tsp. ground ginger and 1/4 tsp. ground cloves

Directions

  1. In a large bowl, beat milk, pudding mix and spices together with a whisk for 1 1/2 minutes. Whisk in pumpkin. Fold in cool whip. Spread in pie crust.
  2. Refrigerate for at least 2 hours for it to set. Keep stored in fridge.

Makes 8 servings
Points*: 4

Filed Under: Pies, Pumpkin, Skinny

Dorie’s All American Apple Pie!

July 4, 2008 by Amy 5 Comments

Who couldn’t start the 4th of July weekend without an All American recipe, such as this one. 🙂 If you have the book, consider making it for this weekend! You won’t be disappointed hehe!

When the ever so popular book “Baking: From My Home to Yours” went on bargain listings for Amazon (sorry, it’s not on bargain anymore 🙁 ), I knew I couldn’t pass it up. So many people rave about this book. In fact, there is a group online solely dedicated to making a recipe from this book every Tuesday, but I can’t join that because of my diet, and I really lack the time right now. Plus with a dead camera at home, I can only make desserts on weekends (since my fiance graciously allows me to use his camera), and those will be VERY few and far between!!


My new shiny baking book!!

I chose this recipe as my first recipe out of the book, because my fiance bought a bag of apples a week ago, and so we had to use them all..so this was perfect for that!

This was my first pie that I’ve made from scratch, and PRAISE GOD for a food processor. This crust was light and flaky, and just mmm. I will say the tapioca in the recipe made me a little confused, and I wanted to omit it so bad. The only time I eat tapioca is in my bubble (boba) tea, and in really large pearls. So, imagining this in apple pie was like hmm…

However, I’m glad I didn’t omit it. I really think this made the texture of the filling amazing. I’ve always been known to sub things in baking and cooking, and if I’m lucky, it comes out right…so I went strictly by the recipe! Oh wait, I did forget the graham cracker crumbs…only 2 tbs. so I think I’m ok…**sinks in desk chair** but still, fabulous apple pie!


Peeling, coring and slicing 4 lbs. of apples is HARD WORK!! We used pink lady and granny smith apples (he had 3 lbs of pink lady and I picked up a couple granny smiths)


The dough halved, getting ready to roll down 🙂


The pie assembled and ready to chill before going in the oven.


The finished pie..sigghh…sorry, had to have a slice!


The gooey goodness in the middle!

Filed Under: Pies

  • « Go to Previous Page
  • Go to page 1
  • Go to page 2

Primary Sidebar

Hey Y’all!

Image Credit: Leslie Pendleton Photography


Hey y’all!

Thanks so much for reading! I’m Amy, and I live in south Louisiana with my husband and our rescue dog. I enjoy sharing my love for cooking, baking, crafts & more! Follow my daily adventures on social media!

Follow my Daily Adventures

  • Email
  • Facebook
  • Instagram
  • Pinterest
  • Twitter

Footer

  • Email
  • Facebook
  • Instagram
  • Pinterest
  • Twitter

Archives

Copyright © 2026 · Foodie Pro Theme by Shay Bocks · Built on the Genesis Framework · Powered by WordPress