• Skip to primary navigation
  • Skip to main content
  • Skip to primary sidebar
  • Skip to footer

The Nifty Foodie

  • Home
  • About
  • Recipes
    • Appetizers
    • Beverages
    • Breads/Muffins
    • Breakfast
    • Canning
    • Desserts
    • Dog Treats
    • Entertaining/Parties
    • Fruit
    • Holiday Recipes
    • Louisiana Cuisine
    • Main Dishes
    • Mexican
    • Nifty Foodie Original
    • Nifty Tricks
    • Project Food Blog
    • Pumpkin
    • Salads
    • Sauces/Dips
    • Side Dishes
    • Skinny
    • Slow Cooker
    • Spices
    • Stews/Soups
    • The Disasters
  • My Weight Loss Journey
    • Races
    • Running
    • Weight Loss Milestones
  • Crafts
  • Contact Me

The 30 Day Shred RESULTS

March 25, 2013 by Amy 2 Comments

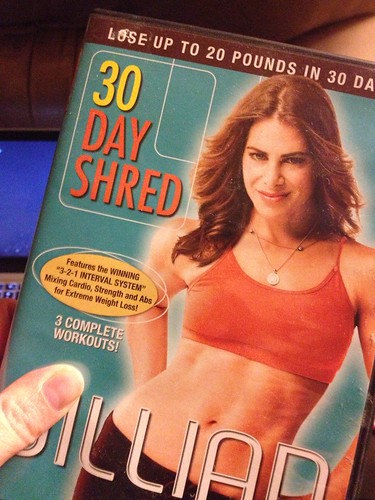
Last month, I mentioned that I would finally take on Jillian Michaels’ 30 Day Shred. I don’t know the specifics of her program, but I took the title literally and did her Shred workout for 30 days straight. I was originally going to do 10 days at level 1, 10 days at level 2 and 10 days at level 3. However, some of you recommended that I jump around to make things less monotonous, which is what I went with.

On day 1, I thought I was going to die. Seriously…I used to do jumping jacks like crazy in grade school, but on day 1? Heh….crazy crazy crazy. And push-ups? I did 3. THREE. Jillian is a smart gal though…she mentions in her video that the day 5/6/7 people would probably feel a huge difference in what they were capable of, and boy was she right! Little by little, jumping jacks were no big deal, push-ups weren’t completely miserable and halfway through (on day 15), I even upped my weights in the work-outs from 3 lbs. to 5!

I have to admit, though….my BFF for about 75% of the work-out moves was this gal.

30 Day Shred post

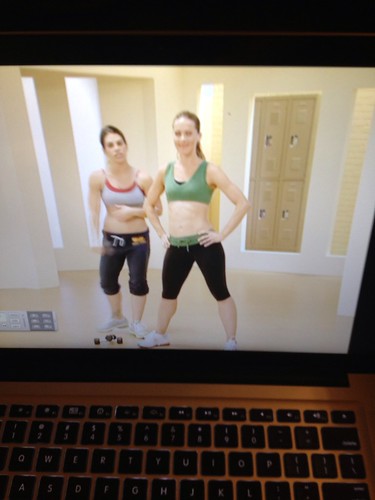
If you’ve done the Shred, you are probably familiar with Anita (aka the gal who does the modified versions of the moves). I’m sure quite a few of you can do the more difficult versions of the moves, but for me, Anita’s modifications were more than enough of a challenge. 🙂

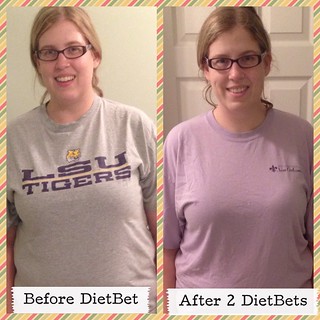
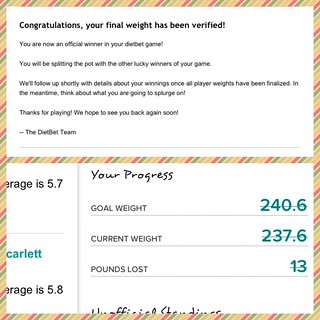
I’m so glad that I can finally check this off of the 101 goals in 1001 days list, and even more happy news…check out these results!

30 Day Shred post

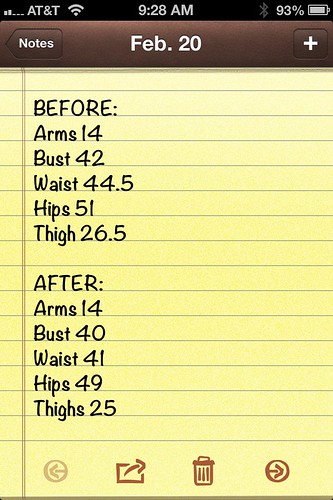
Pretty cool, right? That’s 10.5 inches lost in 30 days, which is SO encouraging to see! 🙂 While I didn’t take any official before/after pictures (oops), I’m glad that I at least remembered to take my measurements!

I decided to give myself a little reward for finishing the Shred. 🙂 I don’t like to spend too much money on make-up, but this was a treat to myself (and heck, my birthday just passed, so why not?)

30 Day Shred post

The box on the left is a bunch of samples as this year’s Sephora beauty reward. On the right is this blush (in Dollface), which I’ve heard nothing but raving reviews about. Can’t wait to give it a try!

Also, more happy weight loss moments from this past weekend.

My mom and grandma purchased some clothes for me for my birthday (which is so sweet, because I’m really really trying to avoid spending $$ on clothes right now), and most of them were too big when I tried them on Saturday. It felt weird to go to JCPenney’s and Macy’s to return everything, just to tell the associates at the store that these 1x clothes are TOO BIG. Crazy…

Since I was already at the mall, I went to the Gap for the first time ever (for myself, that is…I’d go in to buy gifts on occasion). They were having a $10 sale on their essential tees, and since most of the tees in my closet are too large, I thought I’d use up a mall gift card that I received on these. The shirts below are an XL.

30 Day Shred post

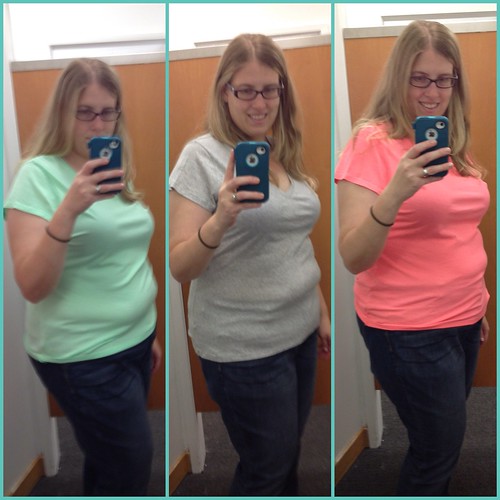
The jeans I’m wearing are these. They are a bit too big right now, but the jeans that I received from my sister are a 16, which are kind of tight. I can wear them, but um, tight clothes don’t look very good on me. You’re welcome, universe. Hopefully I’ll be in those jeans fairly soon, though!

Now that the Shred is over, I’m getting back into running again. My running slacked a bit the past month, because I found if I ran, my legs would be shot for a Shred workout. My next 5K is coming up in less than a month, so I’m stoked to get back into it! 🙂

Have any of you done all 30 days of the Shred? How were your results?

Filed Under: Health/Weight Loss

Peanut Butter & Jelly Protein Shake

March 22, 2013 by Amy 1 Comment

Peanut Butter & Jelly Protein Shake

This past week, I’ve been spending my afternoons prepping the gardens/weeding/planting annuals. Wasn’t it just Christmas? Man…can’t believe it’s almost April, y’all! With the weather starting to warm up over here, the colder the beverages, the better. I started making iced coffees a couple of weeks ago, and now, I just can’t get enough of smoothies/shakes.

As far as this shake goes, peanut butter and jelly is a favorite of mine. Move over ham sandwiches…if you offer me a PB&J, I’m going for it! I wanted to try these flavors in a shake, and while I used frozen fruit instead of jelly, the flavors (strawberry/peanut butter) work beautifully together. This was so refreshing, and filling (thanks to the protein powder). It’s definitely a goodie!

Peanut Butter & Jelly Protein Shake
Source: an original

Ingredients:

  • 1 cup ice
  • 1 cup water
  • 1 scoop vanilla protein powder
  • 1 cup frozen strawberries
  • 1 1/2 tbsp. peanut butter

Directions:

  1. Place all ingredients in a blender, and blend on high until everything is smooth (about 2 minutes).

Filed Under: Beverages, Fruit, Nifty Foodie Original, Peanut Butter

Almond Scented White Cake

March 15, 2013 by Amy 6 Comments

Almond Scented Cake

Not sure how time flew by this quickly, but tomorrow, I’ll be 29. One year away from 30. My birthday always seems to sneak up on me, because in my family, March is a busy birthday month (mine being the last March birthday). 🙂

Every birthday, I look back on the year and try to think about something significant that happened that year. 2010’s birthday was really the last “big” year for me. It was the year that I got married & the year I became a home owner. Two big adult-like things. 2011 and 2012 were just dull in comparison, but this past year, something pretty significant has happened (which most of you know about). I’ve lost nearly 70 lbs. and my husband has lost 110 lbs. (hope he doesn’t mind me bragging about him here).

I shared a picture last night of the before/after. The before picture was in October 2011 at IFBC New Orleans. I thought that was a great picture, and I never thought that my face was “fat”. In fact, as I’m losing weight, people ask me if I really notice a difference, and I’ll be honest…I don’t until I fork out older pictures. It always shocks me. At IFBC, I was wearing a size 26. Today, I’m wearing a size 16. It’s a whole ‘nother side of the plus size store & I’m being introduced to regular sizes now for the first time in almost 15 years. It’s crazy…never thought I would be here. EVER. I also signed up for a half marathon next year…I regularly ask myself WHO AM I? when these thoughts cross my head. 😛

Of course I would write about weight loss/fitness in a cake post. Oops.

I’ll be honest…my sweet tooth is shifting. Cake/cookies/brownies…while they’re delicious, they’re starting to taste TOO sweet to me. 🙁 I guess that’s a good thing…it discourages my urges to binge and eat the whole pan or something. While my eating habits are changing, I still wanted to make cake for my birthday…the whole process is just so fun to me. Whipping up the batter, dividing the cake into layers, whipping up frosting and assembling…all wonderful.

I chose this cake, because of the almond flavor in the recipe. I love wedding cake, and because of the almond, this cake reminds me a lot of wedding cake. The almond flavor is definitely there, and the raspberry just bumps up the cake a bit. I wasn’t sure about the frosting, but I really like that the cream cheese icing breaks up the sweetness. I’m used to 4-5 cups of powdered sugar in a recipe…this only calls for a little over a cup. The combination is perfect, and when I brought this cake to work, it was gone that day (which NEVER happens with cake around here).

Almond-Scented White Cake
Source: Williams-Sonoma

Ingredients:

For the cake:

  • 2 cups unbleached all-purpose flour
  • 1 tbsp. baking powder
  • 1/2 tsp. salt
  • 12 tbsp. (1 1/2 sticks) unsalted butter, at room temperature
  • 1 1/2 cups sugar
  • 2 tsp. vanilla extract
  • 1 tsp. almond extract
  • 1 cup milk
  • 5 egg whites, at room temperature
  • 3/4 cup raspberry preserves, melted

For the frosting:

  • 1 lb. (2 blocks) cream cheese, at room temperature
  • 6 tbsp. (3/4 stick) unsalted butter, at room temperature
  • 1 1/4 cups confectioners’ sugar
  • 1 1/2 tsp. vanilla extract
  • 1 1/2 tsp. almond extract

Directions:

  1. Preheat the oven to 350 degrees & move the oven rack to the middle position. Prepare two 9″ round cake pans by butter/flouring (or using baking spray) the insides of the pans. Set aside.
  2. In a medium sized bowl, sift together your dry ingredients: flour, baking powder and salt. Set aside.
  3. In the bowl of an electric mixer, beat the egg whites until stiff peaks form. Place the egg whites in another bowl, and set aside. Wash your bowl to reuse for making the cake batter
  4. Using the same bowl (now cleaned), cream the butter on medium-high speed with the mixer until it’s light and fluffy, about 2 minutes. Add the sugar gradually, beating until everything is well-blended. Add in the vanilla and almond extracts, and scrape the bowl down. With the mixer on low, add 1/3 of the dry mixture, then 1/3 of the milk, repeating until all ingredients are just combined.
  5. Fold in the egg whites gently into the batter until everything is just incorporated. Divide the batter equally between the cake pans and smooth the batter with a spatula.
  6. Bake the cakes on the middle rack until a toothpick inserted into the center of the cakes comes out clean, about 30 minutes. Place the cake pans on a cooling rack for 10 minutes, to slightly cool, then invert the cakes onto the cooling rack to finish cooling.
  7. As the cakes are cooling, make the cream cheese frosting. In a large bowl, cream the cream cheese and butter, until light and fluffy, for about two minutes. Reduce the mixer to low, and add the confectioners sugar, beating until everything is smooth. Add in the vanilla and almond extracts until everything is well-blended.
  8. To assemble the cake, using a long, serrated knife, cut each cake in half horizontally. Place a small bit of frosting in the middle of the plate (or cake board), then place your first layer over that (this helps the cake stick to the plate). Add 1/2 cup of frosting over the top of the cake and spread evenly, and then drizzle 1/4 cup of the melted preserves. Top this with another cake layer and repeat for the rest of the layers until you get to the last layer. With the last layer, you want to top the cake with the cut side down (to prevent crumbs for final frosting). Using an offset spatula, spread the rest of the frosting over the top and sides of the cake. Serve immediately or cover the cake, refrigerate and serve the next day (being sure to bring the cake to room temperature before serving). Enjoy! 


Filed Under: Cakes/Cupcakes, Fruit

A bunch of randoms

March 14, 2013 by Amy Leave a Comment

Another DietBet = done! I’m so thrilled to reach my 4% goal once again…I know everyone is motivated in different ways, but the competitive side of me loves DietBet! I can’t believe I’m showing these (since I took them first thing in the morning and I look a mess), but I wanted to share the before DietBet #1/after DietBet #2 pictures.

Untitled

There’s nothing like fresh local strawberries. Oh man…I easily put away 3 pints already since getting them yesterday. Better than a candy bar, right?

Untitled

My husband and I went bowling for the first time in a while. Just a little background…my husband actually learned how to bowl from being on leagues. I, on the other hand, learned the fine art of throw it as hard and as fast as you can/hope it doesn’t end up in the gutter. My husband usually had triple or quadruple my score every game. Ah well…it was fun. 😛

Untitled

You know it’s your birthday week when your inbox looks like this…

Untitled

I purchased this candle as a gift for someone. It smells SO clean and just awesome…I don’t know how to put it in words, but it smelled so good! I think I’m going back to Williams Sonoma to get us one…

Untitled

A while back, I begged for you guys to vote/like a picture of my running journey on Instagram. It was for a contest with Claim Your Journey. You guys are SO awesome…I actually won one of the weeks (THANK YOU!!), which meant that a rep from Mizuno would send me a pair of free running shoes! Check ’em out! I’ve been fighting a cold for the past two weeks on/off, but once that’s gone, I can’t wait to run in these! 🙂

Untitled
 

Filed Under: Health/Weight Loss, Random

Monday Weigh-In: Week 62

March 11, 2013 by Amy 1 Comment

I’ve been on this weight loss journey for quite some time. I figured it’s about time I did a weekly weigh-in, so I’m starting now. In week 62. 🙂

Week 61’s Weight:             234.4
Today’s Weight:                 230.4

Weight Lost:                         4.0 lbs.
Total Weight Lost:              68.1 lbs.

Some thoughts about this past week:

  • Today marks Day 19 of doing Jillian Michaels’ 30 Day Shred. Crazy that I’ve kept up with it! 11 more workouts to go!


  • The jeans I bought at Old Navy last month are ridiculously loose. Bummer (wallet wise) but YAY! weight loss wise. I’m gonna lay off the clothes purchasing for a while, if I can help it. It’s exciting to fit in regular sizes, but I don’t want to blow money on something that fits well for maybe a month.


  • I painted my toenails this weekend without feeling out of breath. Feels good to have a shrinking belly for simple tasks like that.


  • I purchased bras for the first time since college in a store that wasn’t Lane Bryant. OMG….bras that fit are the way to go, people (duh, Amy). I’ve been wearing the same bras (washed regularly, of course) since I weighed almost 300 lbs. I didn’t realize how loose they were in the ladies and band size until last night. I’m in love.


  • My second DietBet ended today….just in time for my birthday week. I’m not gonna go crazy, but it will be nice to enjoy a splurge meal or two before DietBet #3 begins on Saturday.  If you’d like to check out the DietBet that I set up, here’s the link! The more, the merrier!


How was your week? Any victories or vents to share? By the way, if you’re on MyFitnessPal, my username is niftyfoodie! Feel free to friend me! 🙂


Filed Under: Health/Weight Loss

Lightened Breakfast Burritos

March 7, 2013 by Amy 4 Comments

Breakfast Burrito

I used to hate breakfast. Back in school, I’d hardly ever ate breakfast, which of course, made me eat like crazy in the afternoons. It was fairly stupid, and I learned my lesson in the real world, especially when meetings would go beyond my normal lunch time. Grumbling stomach noises aren’t very professional, so breakfast definitely became a necessity.

Now, when it comes to cooking in the morning, I’m just not doing it. I’m the type of person who wakes up as early as absolutely necessary. I love my sleep, y’all. Most mornings, I’m up 30 minutes before I leave for work. Cute hair? Perfect make-up? Ain’t nobody got time for that!  😛 I make it to where I have enough time to feed the dog, take her out, get dressed, brush my hair, brush my teeth and watch the morning traffic news. I’m lazy like that.

When I get to work, I usually just grab a scrambled egg with toast & cheese in the cafeteria. They cook it on a griddle, so I know it’s not bathed in butter or anything. Sometimes if I’m feeling dangerous, I go for bacon too. 😛 However, that started adding up a bit, and I decided to look into making a bunch of breakfast items on the weekends that I could heat up during the week at work.

Enter breakfast burritos.

I saw this recipe on Pioneer Woman’s blog, and while I’m sure her recipe is perfect, I figured it probably needed a little lightening up to fit my calorie counting lifestyle. Simple substitutions like turkey sausage vs. regular sausage and egg whites vs. eggs help tremendously with the calorie count here. I also omitted the cheese for the cooking portion (since it sort of disappears anyway once it cooks down) and just sprinkle a little reduced fat cheddar in after microwaving the burrito. 🙂 I found making 10 of these at a time didn’t take very long, and with a little bit of salsa, they are truly great! According to MyFitnessPal, they are only 280 calories each, and they are super filling!

Lightened Breakfast Burritos
adapted from Pioneer Woman

Ingredients:

  • 14 oz. turkey sausage
  • 3 cups frozen Ore-Ida Potatoes O’Brien
  • 10 egg whites (this was a small carton of egg whites)
  • 10 whole wheat tortillas
  • salt and pepper, to taste
  • reduced fat cheddar cheese

Directions:

  1. Brown the turkey sausage in a large saute pan or dutch oven. Once that is done cooking, place the turkey sausage on a plate lined with paper towels to drain the extra fat, making sure to leave a little (maybe a tbsp.) in the saute pan for the potatoes. Place the potatoes in the saute pan with some salt and pepper and cook them down for 15-20 minutes until the potatoes are soft and thoroughly cooked.
  2. Add the turkey sausage back in the saute pan with the potatoes, along with the 10 egg whites, as well as some salt and pepper. Scramble everything together, until the eggs are fully cooked. Taste the mixture to make sure it’s well-seasoned.
  3. Once it’s done, place the 10 tortillas on a large baking sheet, and place 1/10th of the egg/sausage/potato mixture in the middle of each tortilla. Roll each burrito by first pulling in the sides, and then rolling the tortilla until it’s closed.
  4. To prepare for freezing, saran wrap each burrito separately, and place the saran wrapped burritos in a gallon freezer bag, making sure to push excess air out of the bag before sealing. To reheat, take the burrito out of the saran wrap and instead wrap in a paper towel, heating on 40% power until done. Optional: once heated, open the tortilla slightly and sprinkle in some reduced fat cheese. (I calculated the calories assuming that each burrito had 1/10 cup cheese added.)


Filed Under: Breakfast

Announcing: March-April DietBet

March 4, 2013 by Amy Leave a Comment

After the holidays, I was definitely pumped to get back on track. I feel like if I go over my calories on a regular basis, it’s just so much harder to get back on track. When I heard about a DietBet a fellow blogger was hosting, I was all in.

This isn’t the average bet to see who will lose the most weight. It’s really a bet against yourself. All you need to do is join the DietBet (paying the bet amount into the pot), weigh in/take pictures of your weigh in (DietBet has instructions on this) and then you’re good to go! Then, you have to lose 4% of your starting weight in 28 days, and if you do, you win! Then, all of the winners in that DietBet get an equal share of the pot (after DietBet takes out a small percentage for their admin fees)! Easy enough, right?

I’m a competitive person, so to me, the thought of losing my $20 was a huge push to win. I think I did pretty well in my first bet. I even went 3 lbs. beyond the 4% goal!!

Randoms

I was amongst the winners in my first DietBet, and won $43! Not too shabby since I bet $20 of my own money. 🙂 I’m currently in the last week of another one, but I’ve been so thrilled with doing DietBet, I decided to start one on my own!

So, here we go, y’all! Here’s the DietBet that I set up!

First of all…I’m sure you want to know when this all starts. This DietBet starts on March 16 (weights need to be submitted 24-48 hours before the bet starts), and ends on April 12 (final weights are submitted 24-48 hours after the end date). The bet is $20. Not a crazy amount, but hey, I think it’s enough to motivate!

To understand how DietBet works, here’s a link. It’s very simple, and just a note: I have nothing to do with the handling of the money. It’s all regulated by the admins of the website. 🙂

I decided to make this a public DietBet, so it’s easy for anyone to join. Tell your friends and family! You can make this a mini-competition, if you want. 🙂 You can also make your weight private, if you don’t want other members to see your weight.

I hope a few (or heck, several) of y’all join! I want this DietBet to be a fun, supportive little community. If you have any other questions about this, check out their FAQs.


Filed Under: Health/Weight Loss

Banana Biscoff Protein Shake

February 28, 2013 by Amy 5 Comments

Banana Biscoff Protein Shake

My husband is a protein shake nut. He makes them for breakfast every day, and this stubborn gal thought…there’s no way a shake would make me feel full. No way. I need food…the chewing kind,  you know? Well, one day, my husband introduced me to a protein based smoothie at a local smoothie place. The medium was apparently only 270 calories, according to their nutrition facts, so I wasn’t expecting much. I was pleasantly surprised that the texture wasn’t gritty, it tasted great and I got full halfway through drinking the thing. Whoa…that was the first time a smoothie from there made me feel full. The difference between my normal muscle punch and this? The protein powder.

I was hooked on those smoothies for a while, until I they changed their menu. The smoothie I quickly fell in love with was calculated wrong (calorie wise). Instead of being 270 calories, the menu suddenly said 300-680 calories (depending on fruit you chose). WHAT???! So, I emailed the company, and asked what my smoothie REALLY was (telling them the fruit that I usually choose).

510 calories.

What.the.heck??!

I mean, I knew there was SOME variation from one fruit to another, but what I didn’t know is that some of their fruits sit in sugar juice. No WONDER it was so tasty. I was drinking 1/3 of my daily calories! Needless to say, I quit going to that smoothie place and decided it was time to make my own. I could save money and have complete control over the calories & ingredients.

This idea came to me after I saw this recipe. Banana and Biscoff? Sounded awesome, so I decided to try it in a smoothie. OMG…it was like dessert and it was the perfect treat after a work-out.

Just a note: When it comes to protein powder, I use this. I chose this protein powder based on recommendations from friends and a few of y’all. It has a pretty mellow flavor (perfect for blending in other fruits and flavors), and it’s not gritty at all.

Banana Biscoff Protein Shake
an original

Ingredients:

  • 1 medium frozen banana (cut in slices before freezing)
  • 1 scoop vanilla protein powder
  • 1 tbsp. biscoff cookie spread
  • 1 cup water
  • 1 cup ice

Directions:

  1. Place all ingredients in the blender, and blend together until all of the ingredients are well-blended.

Filed Under: Beverages, Fruit

The 30 Day Shred

February 22, 2013 by Amy 3 Comments

A while back, I made this list of goals. If you’ve been reading a while, you’re probably familiar with my 101 goals in 1001 days list. I was recently checking off some items, and noticed my 30 Day Shred goal. I’ve had this DVD since the wedding days, but I never actually did the full 30 days. I actually never moved on from level 1. Whoops!

So, no better time than the present, right? Yesterday was day 1.

I took my measurements and my body fat percentage yesterday as well, so hopefully I’ll see some great results from this. 🙂

Shred Challenge

Has anyone looked at her face on this DVD, and thought that she’s saying “BRING IT!” with that expression?? Maybe that’s just me….

In case you’re wondering, I will be doing this in addition to my regular work-out routine. My strength training is going really well right now, and I also don’t want to slack off when it comes to running since my next 5K is a couple of months away. Hopefully this isn’t overkill, but I figured since this is a quick 20 minute work-out, it really couldn’t hurt, right?

Has anyone done the full 30 Day Shred? How were the results for you?


Filed Under: Goals, Health/Weight Loss

M&M Cookie Bars

February 20, 2013 by Amy 1 Comment

M&MBars

This week has been pretty difficult on me (spoiler: first world problem). I gave up chocolate (and took on trying to be more patient on the road, which is REALLY hard around here), and I’m having terrible cravings for chocolate. I miss having the occasional fun size candy after lunch or grabbing a couple of kisses out of the freezer. I am an addict, and I have no intention of fixing said addiction. 😉 I’ll be happily eating a Cadbury Caramel egg on Easter Sunday, y’all.

I saw this recipe a while back, and thought it would be perfect with M&Ms thrown in. When I was told about a Valentine’s Day bake sale at work, I immediately ran to Target and grabbed a bag of festive M&Ms. It was so hard not to sneak a taste of these right out of the oven, but I did try some of the dough before adding in M&Ms haha! I honestly have no idea how these bars taste (baked), but based on coworker reviews, they were pretty awesome. I will say that recipe like this is perfect for a bake sale (or a party) since it makes a TON, and it’s very simple to throw together.

M&M Cookie Bars
Source: adapted from Martha Stewart

Ingredients:

  • 1 1/2 cups (3 sticks) unsalted butter, room temperature
  • 4 cups all-purpose flour
  • 2 tsp. baking soda
  • 3/4 tsp. salt
  • 1 cup granulated sugar
  • 1 1/2 cups packed light brown sugar
  • 2 large eggs
  • 1 tbsp. pure vanilla extract
  • 1 large bag plain M&Ms

Directions:

  1. Preheat your oven to 350 degrees, moving an oven rack to the center. Line a 12×17 rimmed baking sheet with parchment paper and set aside.
  2. In a medium sized bowl, whisk together the flour, baking soda and salt. Set aside.
  3. In the bowl of a stand mixer, cream the butter and both sugars on medium speed until light and fluffy, for about 2-3 minutes. Scrape down the bowl, and add the eggs and vanilla extract. Mix until well incorporated. Add the flour mixture to the wet mixture, and beat on low speed until just combined. Using a spatula, gently mix in the M&Ms.
  4. Place the dough in the baking sheet, and spread the cookie dough evenly across the pan (it’s easier to do this with your hands). Bake the bars, rotating the sheet halfway through, until the edges are browning and the top is a golden color, about 20-25 minutes. Cool the pan on a wire rack, and allow the bars to cool completely before slicing.

Filed Under: Brownies/Bars, Candy

  • « Go to Previous Page
  • Go to page 1
  • Interim pages omitted …
  • Go to page 23
  • Go to page 24
  • Go to page 25
  • Go to page 26
  • Go to page 27
  • Interim pages omitted …
  • Go to page 85
  • Go to Next Page »

Primary Sidebar

Hey Y’all!

Image Credit: Leslie Pendleton Photography


Hey y’all!

Thanks so much for reading! I’m Amy, and I live in south Louisiana with my husband and our rescue dog. I enjoy sharing my love for cooking, baking, crafts & more! Follow my daily adventures on social media!

Follow my Daily Adventures

  • Email
  • Facebook
  • Instagram
  • Pinterest
  • Twitter

Footer

  • Email
  • Facebook
  • Instagram
  • Pinterest
  • Twitter

Archives

Copyright © 2026 · Foodie Pro Theme by Shay Bocks · Built on the Genesis Framework · Powered by WordPress