• Skip to primary navigation
  • Skip to main content
  • Skip to primary sidebar
  • Skip to footer

The Nifty Foodie

  • Home
  • About
  • Recipes
    • Appetizers
    • Beverages
    • Breads/Muffins
    • Breakfast
    • Canning
    • Desserts
    • Dog Treats
    • Entertaining/Parties
    • Fruit
    • Holiday Recipes
    • Louisiana Cuisine
    • Main Dishes
    • Mexican
    • Nifty Foodie Original
    • Nifty Tricks
    • Project Food Blog
    • Pumpkin
    • Salads
    • Sauces/Dips
    • Side Dishes
    • Skinny
    • Slow Cooker
    • Spices
    • Stews/Soups
    • The Disasters
  • My Weight Loss Journey
    • Races
    • Running
    • Weight Loss Milestones
  • Crafts
  • Contact Me

Amy

Mexican Rice

April 12, 2010 by Amy 8 Comments

mexicanrice

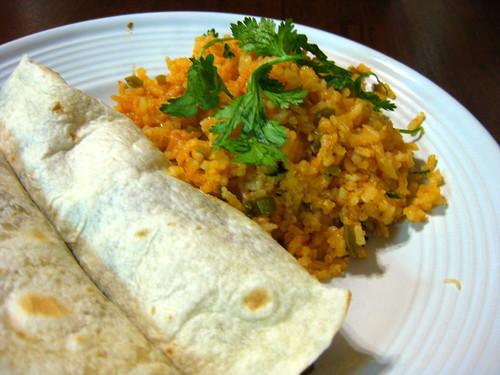
I am a big time fan of Mexican food. I can eat quesadillas, fajitas, queso and rice until my stomach wants to explode. I could probably eat this stuff everyday, but if I did, I’m sure my jeans would tell me to take a hike! One of my favorite things is Mexican rice, especially at this local Mexican joint. I’ve never found an adequate at-home replacement, and I thought I would give this a shot.

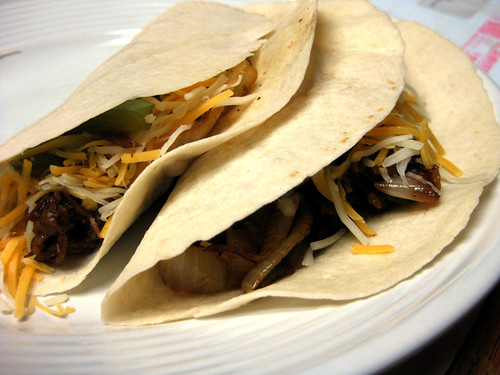
I’m so sad that this stuff turned out bland bland bland. I worked on this darn side dish on a work night, only to be disappointed. Maybe it needed more salt? Anyway, I will say it was dynamite when mixed with some carmelized onions and veggies that I cooked for the fajitas.

I don’t even know what went wrong (anyone have tips?), but the search continues….

EDIT: After making this again, I realized I must not have rinsed the rice long enough. The recipe turned out spectacular!

Mexican Rice
Source: Annie’s Eats (originally from Cooks Illustrated)

Ingredients:

  • 2 ripe tomatoes, cored and quartered
  • 1 medium white onion, peeled, trimmed and quartered
  • 2 cups long grain white rice
  • 1/3 cup canola oil
  • 4 cloves garlic, minced or pressed through a garlic press
  • 3 medium jalapenos, ribbed, seeded and minced
  • 2 cups low-sodium chicken broth
  • 1 tbsp. tomato paste
  • 1 1/2 tsp. salt
  • 1/2 cup minced fresh cilantro (optional)
  • 1 lime, cut into wedges for serving

Directions:

  1. Preheat the oven to 350 degrees F and move a rack to the middle position.  Process tomatoes and onions in the food processor until smooth and thoroughly pureed, about 15 seconds, scraping down the bowl if necessary.  Transfer the mixture a liquid measuring cup; you should have 2 cups (if necessary, spoon off excess or add water so that the volume equals 2 cups).   
  2. Place the rice in a large fine mesh strainer and rinse under cold running water until the water runs clear, about 1 1/2 minutes.  Shake rice vigorously in strainer to remove all excess water.
  3. Heat the oil in a heavy-bottomed oven-safe Dutch oven or straight-sided sauté pan with a tight-fitting lid over medium-high heat, 1 to 2 minutes.  Add the rice and fry, stirring frequently, until it is golden and translucent, 6 to 8 minutes.  Reduce the heat to medium; add the garlic and minced jalapenos; cook, stirring constantly, until fragrant, about 1 1/2 minutes.  Stir in pureed tomatoes and onions, chicken broth, tomato paste and salt; increase heat to medium-high and bring to a boil.  Cover the pan an transfer to the oven; bake until the liquid is absorbed and rice is tender, 30 to 35 minutes, stirring well after 15 minutes.

Filed Under: Mexican, Side Dishes

Potato Bundles

April 9, 2010 by Amy 8 Comments

potato

With the Spring starting, my husband couldn’t wait to break out the grill and cook! Steaks happened to be on sale that week, so I brought home some steaks and planned on making a new potato dish for the side dish. This is a super easy side to make and a fun way to serve up potatoes.

I remember seeing this recipe on Pioneer Woman and being intrigued because foil packs = less dishes. Plus, cream and butter? How can you go wrong? The only thing I noticed is that you need to stir the contents of the bundle out of the oven before you eat it, because the creamy buttery goodness is at the bottom of the pack. 🙂

Potato Bundles
Source: The Pioneer Woman

Ingredients:

  • 6 whole Russet Potatoes
  • ½ whole Yellow Onion, Diced
  • 1 stick Butter
  • ½ cups Heavy Cream
  • Kosher Salt To Taste
  • Paprika To Taste
  • Freshly Ground Black Pepper, To Taste
  • 2 Tablespoons Minced Parsley

Directions:

  1. Pile potatoes and onions on a square of foil. Add 2 tablespoons butter. Splash on cream. Then sprinkle on salt, paprika, and black pepper. Sprinkle minced parsley over the top.
  2. Wrap bundles tightly and bake at 375 degrees for 45 minutes, or until extremely tender.
  3. Serve bundles right on the dinner plate. Serves 8.

Filed Under: Side Dishes

A glimpse of Spring..

April 7, 2010 by Amy 4 Comments

I surely hope you didn’t forget about me. I’ve been working on a new set of sparkly brand new blogs to try to make things uniform. So, here we go. This blog is now The Nifty Foodie’s Life, based on my new food blog, called The Nifty Foodie.

I have to give mad props to His Birdie’s Nest, because a while back, I wanted to change my Twitter name from a screenname I used in college to something more, well, me. She came up with The Nifty Foodie, and ever since, I’ve LOVED this name.

So, here’s the new blog. Feel free to comment on the new look and layout. Just try not to be too harsh, k? 🙂

So, let’s bring some Spring into this blog, and well, nothing shouts Spring more than gardens. The hubs and I completely redid our gardens, and I’m a lot more optimistic about the year to come with our vegetable crop, because of an interesting theory: companion planting.

Companion plants are plants that either repel pests from the garden or solely attract ALL pests to those respective plants, thus, leaving your precious vegetables ALONE in a natural way.

After reading this article and speaking with my mom (a horticulturist), I planted marigolds and salvias around the tomatoes.

Check out our vegetable garden, which is in our backyard. I planted heirloom tomatoes, super fantastic (yep, that’s the name) tomatoes, bell peppers and jalapenos. I also planted some herbs along the front of the garden with thecompanion plants dispersed around.

veggarden

Because of last year’s experience with spider mites and goodness knows what else killed my tomatoes, I decided to up the companion planting ammo with these companion plants, and grew seedlings of MORE marigolds, sunflowers, and cosmos.

You might also notice the salad greens to the far left. 🙂 That’s just because I love me some lettuce, and I’m too cheap to spend $2/plant.

seeds

These bad boys will be going in the ground in the next few days, and I can’t be more excited to watch these little seedlings grow into lean mean companion plant MACHINES!!

Are you as psyched about your veggie garden as I am? C’mon Spring!

Filed Under: Gardening

Beachy Cookies

April 7, 2010 by Amy 5 Comments

cookies

::offers plate of beachy cookies::

Hi everyone! Remember me? Well, I used to be Skinny Food by Amy, but it turns out that I bake too much, and it would make me a liar to post such buttery foods on a site that promises skinny food. So, I decided to make the move.

It’s a big move, but no worries, my posts won’t be changing. I just wanted a title that felt like a better fit.

I hope you like the new layout. I find it kind of, well, nifty. 🙂

Feel free to follow me on Twitter, Facebook, and heck, add me to your readers while you are at it. 🙂

Oh and if you have any feedback on the new look, I’d surely appreciate it!

Filed Under: Cookies, Other, Wilton Decorating

Nifty Trick: Tomato Paste

March 16, 2010 by Amy 5 Comments

I’m going to start featuring some nifty tricks that I’ve learned in the kitchen to save money and time.

One of the things with cooking is a lot of recipes call for a little bit of this, when the smallest can isn’t so little. I feel horrible wasting food, so I try to save food, even if it’s, in this case, a few ounces of tomato paste.

I know there are tubes of tomato paste out there, but why spend $3 on a small tube when you can buy a small can for less than 50 cents!

A recipe I made for crawfish pie called for 1 tbsp. of tomato paste, so I had a lot of paste leftover, which I know I would eventually use for other recipes.

So, I took the rest of the can, and scooped out tablespoon portions on top of an inside-out freezer bag.

tomatopaste

After you do that, pop the bag in the freezer for a couple of hours so the tablespoon shapes set, and then flip the bag inside out again (so it is able to zip) and freeze until you need them! Nifty, right?

If you have some nifty tricks to share, please feel free to comment and share! I might even feature your nifty trick!! 🙂

Filed Under: Nifty Tricks

Crockpot Steak Fajitas

March 15, 2010 by Amy 2 Comments

beeffajitas

We’ve had some skirt steak sitting in the freezer for a couple of months, so I decided to try my hand at making fajitas with this stuff. The meat can tend to be a little tough, so I figured the crockpot would help. I kind of made this recipe up in my head, so it was a big experimen! Luckily, these were very flavorful, and while the meat wasn’t super tender, it was much better than just cooking it on a skillet and serving it!

Crockpot Steak Fajitas

Ingredients:

  • 1 lb. skirt steak, cut into strips
  • 1 large yellow onion, sliced
  • 1 green bell pepper, sliced
  • 2 tbsp. taco seasoning
  • 2 tbsp. olive oil (divided)
  • 1/4 cup water
  • 1/2 tsp. cumin
  • 1 tsp. garlic powder
  • 1 tsp. onion powder
  • salt & pepper

Directions:

  1. Add 1 tbsp. oil to a skillet on medium-high and allow it to heat up. Add steak pieces in with the taco seasoning and brown them. Don’t fully cook the pieces, but give it a little sear.
  2. In a 2 qt. crockpot, add the water, cumin, garlic powder, onion powder, salt and pepper. Add the seared steak and leftover oil.
  3. Cook on low for 2.5 – 3 hours.
  4. After the meat is cooked, add oil and a tsp. each of salt and pepper to a skillet and cook down onions and bell peppers on medium-high.
  5. Toss in meat with 3 tbsp. seasoned liquid from the crockpot and cook the mixture for another 2-3 minutes or until the majority of the liquid has cooked off.

Serve with warmed soft tortillas and other toppings! Enjoy!

Filed Under: Beef, Mexican, Slow Cooker

Making Progress

March 9, 2010 by Amy 3 Comments

Since it’s craft month, I’m determined to make my sewing skills much better! After my giant fail with the tote bag, I decided to move on to do another project. I decided to make the box bag. I was completely confused at first, because I’m a visual person and I needed a video or something to get this right the first time. Since there was no video, there was a lot of seam ripping, random outbursts and in the end, a box bag that has crooked corners. Oh well, don’t judge me.

See for yourself…

IMG_0873

Another view…

IMG_0872

I think my enemy was my (way too thick) interfacing, and maybe mixed with some impatience and a cute puppy who wanted to play, towards the end.  Next time, I’ll know to not buy it out of a pack at Hobby Lobby. Rather, go to a fabric store and get a feel for different interfacing.

I will say, I’m pretty proud that I sewed in my first zipper! I feel pretty darn cool about that!

Oh, and if you need zippers, don’t buy them at a fabric store. They are like $2 each, when you can buy a bunch on Etsy for way cheaper. I purchased from this seller. 🙂

Here’s a future project (as in, once I can sew straight lines with much more confidence) spoiler: I cut 30 squares for a beginner’s quilt, found in S.E.W. Everything Workshop. This is the book that is sort of teaching me most of the basics. I recommend it…great patterns and ideas in there!

Anyway, I bought the fabrics at Hobby Lobby…aren’t they cute? 🙂

IMG_0838

How is National Craft month going for you?

Filed Under: Crafts

Boeuf Bourguignon

March 8, 2010 by Amy 1 Comment

Like so many food bloggers, I watched Julie and Julia. I will admit, as a child, I hated when my mom watched Julia Child. I couldn’t understand a word she was saying, and heck, there was Nickelodeon to watch!

After watching this movie, I was inspired and knew I had to make this dish. I’ve been making it for a while now, but one of my blogger friends asked me to make this and show it step-by-step. Please realize that there is NO natural light in my kitchen, just in the dining area, so I did my best on the step-by step pictures!

I used a version found on Joelen’s Culinary Adventures, because it was done in steps, which made it way easier! Thanks Joelen!

Oh, and yes, this stuff is amazing. If you have time and a devoted dish washer (yes, this uses a LOT of dishes), definitely make this!

Boeuf Bourguignon
Source: found on Joelen’s Culinary Adventures, originally by Julia Child, mildly adapted by me

Ingredients:

  • 6 ounces bacon
  • 3 pounds lean stewing beef , cut into 2-inch cubes
  • 1 cup baby carrots
  • 1 sliced large onion
  • 1 tsp. salt
  • 1/4 tsp. pepper
  • 2 Tbsp. flour
  • 3 cups full-bodied, young red wine , such as a Chianti (used Merlot)
  • 2 to 3 cups brown beef stock or canned beef bouillon
  • 1 Tbsp. tomato paste
  • 2 cloves mashed garlic
  • 1/2 tsp. thyme
  • Bay leaf
  • Chopped parsley for garnish

For onions:

  • 18 to 24 small white onions (white pearl onions)
  • 1 tbsp. butter
  • 1/4 cup wine (same type used in beef)
  • 1/4 cup water
  • 1/2 tsp. thyme
  • salt and ground pepper
  • 2 tsp. parsley

For mushrooms:

  • 1 pound fresh mushrooms
  • 1 tbsp. butter

Directions:

Preheat oven to 325 degrees.

Sauté the bacon in a dutch oven (no oil) over moderate heat for 2 to 3 minutes to brown lightly. (The bacon will render and give off enough fat to cook with.) Remove the bacon from the pot and place in a bowl; set aside.

Dry the stewing beef in paper towels – it will not brown if it is damp. Add the beef, a few pieces at a time, to the dutch oven to cook in the rendered bacon fat. Sauté until nicely browned on all sides. Remove the beef from the pot and add it to the bacon in the bowl; set aside.


If the bacon fat has been absorbed by sauteing the beef at this point, feel free to add 1 tablespoon of olive oil. In the pot, brown the carrots and onions.

Return the beef and bacon to the pot and toss with the salt and pepper. Sprinkle on the flour over the meat in the pot and toss everything in the pot to coat the beef lightly with the flour. On the stovetop, heat the pot for about 2-3 minutes to lightly cook off some of the flour.

To the pot, stir in the wine along with the stock or bouillon so that the meat is barely covered. Add the tomato paste, garlic, thyme and bay leaf. Bring to simmer on top of the stove.

Then cover the pot and set in lower third of preheated oven. Allow the pot to braise very slowly for 2 1/2 to 3 hours. The meat is done when a fork pierces it easily.

I decided to stop here for the evening and let the beef cool for an hour or so out of the oven and then refrigerate overnight. It’s a good stopping point and you can resume with the onions or mushrooms. OR, if you are ambitious, do these vegetables while the beef is in the oven. 🙂
For the onions – place the peeled onions in a skillet with the butter and sear them until they start to brown, move to a medium saucepan, adding the wine, water and herbs. Saute on low for 30 minutes. Set aside to cool.

For the mushrooms –  place butter in the same skillet used to prepare the onions. Saute the mushrooms in the butter until they start to brown. Remove from the skillet and set them aside to cool.

After the meat is braised in the oven or brought back up to temperature on a stovetop, remove and strain the beef and vegetables from the pot with a slotted spoon and place in a large bowl; set aside. With the remaining sauce left in the pot, allow it to simmer. You should have about 2 1/2 cups of sauce thick enough to coat a spoon lightly. If the sauce is too thin, boil it down rapidly to reduce and thicken. If it’s too thick, mix in a few tablespoons of stock or canned bouillon. Taste carefully for seasoning.

At this point, return the beef and vegetables to the thickened sauce, along with the caramelized pearl onions and mushrooms. Gently heat everything over a medium low heat and then serve with egg noodles, rice or potatoes. Garnish with chopped parsley.

Filed Under: Beef, Stews/Soups

Beginning of Spring!

March 7, 2010 by Amy 7 Comments

This was the most perfect weekend to get some outdoor work done. After months of freezing cold weather, a season with two days of snow (in Louisiana) and dead plants, I just needed to plant some flowers.

So, after the puppy woke me up at 6:30 in the morning, I thought that it was time to work on a project that has been months in the works.

Beforegarden

Yeah, ugly right? This was in our front yard…right here.

Yes, this was taken in October. I’d rather a pretty picture with grass to give you an idea of our garden in its prime. This spot used to have a HUGE sago palm that blocked the walkway and would randomly sting me (darn leaves) when I tried to weed around it. Also, they are very poisonous to dogs and we knew we would want a puppy.

**obligatory cute puppy picture of the day**

Puppy bandana

Since that photo of the house was taken in October, yes, it’s been that way for a while. I just couldn’t do anything in the winter, because I hate the cold. So, Saturday, I ventured out to Lowe’s and bought these perfect little pansies and some rocks. 🙂

Lowes trip
Two hours of rock removal, sago palm seed clean-up (for the dog), filling in the hole from the palm, and weed blocking, it was time to make this garden pretty.
After garden

We bought this fountain almost a year and a half ago. It’s been sitting on our porch, and I was so glad to finally put it SOMEWHERE! It looks spectacular, and would you believe we paid under $15 for it? I’m sure you are asking how...stalk your local Target’s garden center when the Fall hits. After gardening season is over, they clear everything out: Furniture, BBQ pits, Fountains, etc. And I mean, clear out! Ours was 75% OFF! 🙂

We put the pansies in pots as well, and placed them in the rocks. The great thing about this garden is (hopefully) there will be little to no weeds! 🙂 The landscape rocks surrounding the garden were from the old homeowners. So, essentially this garden was less than $50. 🙂

Another great addition to our yard? My birthday is coming up, and my husband knows I LOVE Louisiana citrus. He bought me this Meyer Lemon tree as a surprise for our backyard…isn’t he fantastic? I can’t wait to see some fruit! 🙂

Did any of y’all get great Spring weather to garden this weekend? 🙂

Filed Under: Gardening

Cookie Cutters Aren’t Everything..

March 5, 2010 by Amy 8 Comments

Crawfish cookies don’t seem to be as popular as Christmas tree cookies or Teddy bear shaped ones, so finding a cookie cutter for these just did not happen. I was sad, but I had my paring knife on me and went to town.

I found a print out of a decent crawfish and generalized it for cutting purposes. I was going to pipe the details instead. 🙂

This took me about an hour to cut out 16 crawfish shaped cookies, but the overall shape looked good to me, so I baked them up.

Hilariously, these cookies are the two WORST colors to make on icing. Red and black are hard colors to get, and you have to use almost 1/3 of the bottle to attain the color. (Note: If you need to make red icing, buy no taste red or you’ll end up with bitter icing.) Just remember, let the icing sit a little after dying it. Lighter colors get richer when they sit!

At this point of piping and filling, the hubs pointed out that they look like ants. Great…

However, after the details were put in, they looked pretty much like cutesy crawfish! 🙂 So, if you can’t find the cutter you are looking for, definitely consider getting a template and cutting from there!

In case you are wondering how to decorate cookies and what recipes I use, click here.

Filed Under: Cookies, Wilton Decorating

  • « Go to Previous Page
  • Go to page 1
  • Interim pages omitted …
  • Go to page 57
  • Go to page 58
  • Go to page 59
  • Go to page 60
  • Go to page 61
  • Interim pages omitted …
  • Go to page 85
  • Go to Next Page »

Primary Sidebar

Hey Y’all!

Image Credit: Leslie Pendleton Photography


Hey y’all!

Thanks so much for reading! I’m Amy, and I live in south Louisiana with my husband and our rescue dog. I enjoy sharing my love for cooking, baking, crafts & more! Follow my daily adventures on social media!

Follow my Daily Adventures

  • Email
  • Facebook
  • Instagram
  • Pinterest
  • Twitter

Footer

  • Email
  • Facebook
  • Instagram
  • Pinterest
  • Twitter

Archives

Copyright © 2026 · Foodie Pro Theme by Shay Bocks · Built on the Genesis Framework · Powered by WordPress