• Skip to primary navigation
  • Skip to main content
  • Skip to primary sidebar
  • Skip to footer

The Nifty Foodie

  • Home
  • About
  • Recipes
    • Appetizers
    • Beverages
    • Breads/Muffins
    • Breakfast
    • Canning
    • Desserts
    • Dog Treats
    • Entertaining/Parties
    • Fruit
    • Holiday Recipes
    • Louisiana Cuisine
    • Main Dishes
    • Mexican
    • Nifty Foodie Original
    • Nifty Tricks
    • Project Food Blog
    • Pumpkin
    • Salads
    • Sauces/Dips
    • Side Dishes
    • Skinny
    • Slow Cooker
    • Spices
    • Stews/Soups
    • The Disasters
  • My Weight Loss Journey
    • Races
    • Running
    • Weight Loss Milestones
  • Crafts
  • Contact Me

Amy

Chocolate Peanut Butter Torte

May 7, 2010 by Amy 7 Comments

Chocolate Peanut Butter Torte

Around noon yesterday, my heart was pounding as someone was talking over the PA system at work. I tried to play it cool, acting like my work had to be done, even though it was my lunch break. However, I could sense my coworkers were listening in with anticipation too. I entered this recipe in a dessert contest at work earlier that day, and the results were being announced.

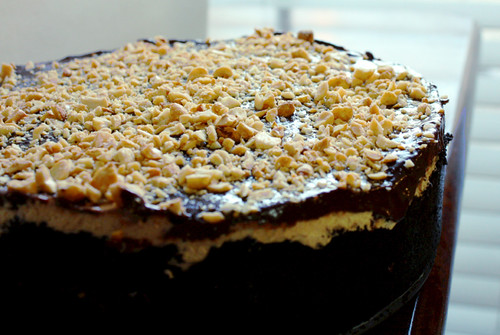
 As they announced the winners of each category, I could feel butterflies flying around like crazy in the pit of my stomach. They announced the winners for cake, cookies, brownies, pie and then…miscellaneous. See,  I don’t know what this torte would be considered. Pie? Eh, kind of, but it didn’t LOOK like a pie. Cake? Nope, shaped like a cake, but not a hint of spongey cake texture. So, I just placed it in the miscellaneous category, since this torte is in a league all of its own. For category’s sake on the blog though, I’ll call it more of a pie.

This was the first time I whipped cream and the first time I made a ganache. As I was making these two components, I remember watching Food Network and seeing all of the flops associated with attempting these components. Overbeating cream to a butter, chocolate seizing, etc. I was a bit of a worry worm, because this was a contest and I couldn’t mess up! To be honest, I have no idea why I was scared. Whipping cream was kind of fun to watch, and watched the gananche come together was delicious. I admit, I came close to drooling right into that glass bowl of deliciousness (but I didn’t, I promise).

I loved making this dessert. Peanut butter and cream cheese are usually rather heavy components in recipes, and as I was folding in the whipped cream, it significantly lightened up the filling. The dessert looks deceptively rich and decadent but  because of the whipped cream, it is actually a fairly light feeling dessert. I think this dessert would be amazing for a nice ending to a summer dinner.

Oh, and tastewise? Well, this torte won first place in it’s category. I even have a little blue ribbon to prove it, and the bragging rights in the office. I think that speaks volumes on how amazing this torte tastes!

Chocolate Peanut Butter Torte
Source: Baking: From My Home to Yours (adapted by Annie’s Eats)

Crust Ingredients:

  • 32 Oreo cookies, finely processed into crumbs
  • 5 1/3 tbsp. unsalted butter, melted and cooled
  • Small pinch of salt

Crunch filling Ingredients:

  • 1 1/4 cups salted peanuts, finely chopped, divided (for the filling, crunch and topping)
  • 1/2 cup mini chocolate chips
  • 2 tsp. sugar
  • 1/2 tsp. espresso powder
  • 1/4 tsp. ground cinnamon
  • Dash of ground nutmeg

Filling ingredients:

  • 2 cups heavy cream
  • 1 1/4 cups confectioners’ sugar, sifted
  • 12 oz. cream cheese, at room temperature
  • 1 1/2 cups creamy peanut butter (not natural)
  • 2 tbsp. whole milk

Ganache ingredients:

  • 1/2 cup heavy cream
  • 4 oz. bittersweet chocolate, finely chopped (I just used 4 oz. of the mini chips)

Directions:

  1. To make the crust, preheat the oven to 350 degrees F.  Butter a 9-inch springform pan and place it on a baking sheet.  Combine the Oreo crumbs, melted butter and salt in a small bowl.  Toss with a fork to moisten all of the crumbs.  Press into a thin layer covering the bottom and sides of the springform pan.  Freeze the crust for 10 minutes.  Bake in the preheated oven for 10 minutes, then transfer to a wire rack and let cool completely before filling.
  2. To make the crunch, in another small bowl combine 1/2 cup of the chopped peanuts, mini chocolate chips, sugar, espresso powder, cinnamon and nutmeg.  Toss with a fork to mix and set aside.
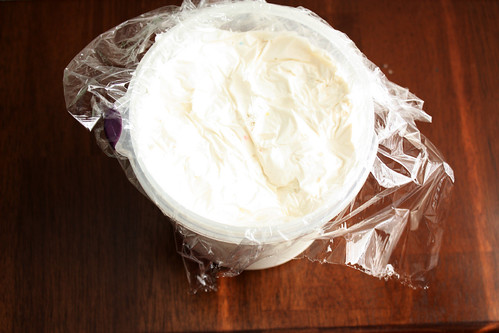
  3. To prepare the filling, in the bowl of a stand mixer fitted with the whisk attachment, whip 2 cups of the cream until it holds medium peaks.  Beat in 1/4 cup of confectioners’ sugar and whip until the cream holds medium-firm peaks.  Scrape the cream into a separate bowl and refrigerate until needed. 
  4. Wipe out (do not wash) the mixer bowl, replace the whisk with the paddle attachment, and beat the cream cheese with the remaining 1 cup of confectioners’ sugar on medium speed until the cream cheese is satiny smooth.  Beat in the peanut butter, whole milk, and 1/4 cup of the chopped peanuts until well combined.
  5. Using a large rubber spatula, gently stir in about 1/4 of the whipped cream just to lighten the mousse.  Still working with the spatula, stir in the crunchy peanut mixture, then gingerly fold in the remaining whipped cream.  Scrape the mousse into the crust, mounding and smoothing the top.  Refrigerate for at least 4 hours or overnight; cover with plastic wrap as soon as the mousse firms.
  6. To finish the torte, put the chopped chocolate or mini chips, in my case,  in a heatproof bowl set over a saucepan of simmering water.  Leave the bowl over the water just until the chocolate softens and starts to melt, about 3 minutes; remove the bowl from the saucepan.  Bring the 1/2 cup of cream to a full boil.  Pour the cream over the chocolate and, working with a rubber spatula, very gently stir together until the ganache is completely blended and smooth.
  7. Pour the ganache over the torte, smoothing with a metal icing spatula.  Scatter the remaining peanuts over the top and chill to set the topping, at least 20 minutes.  When the ganache is firm, run a knife along the side of the springform to ensure nothing is sticking, and then remove the sides of the springform pan.  Refrigerate until ready to serve.

Filed Under: Chocolate, Peanut Butter, Pies

Cake Batter Ice Cream

May 6, 2010 by Amy 5 Comments

Cake Batter Ice Cream

I have a sad addiction to ice cream. I usually have a bowl a few times a week, even in the freezing winter. Even on my pseudo diet (kinda sorta trying to lose weight), I’ll have a small cone. When the weather warms up, I feel like my ice cream maker is constantly working through the week. With fresh fruit ripening and feeling the cravings rise when I pass up heavy cream in the grocery store, I just can’t let my ice cream maker sit alone, unused. 🙂

This time, I’m making an old favorite. I love cake batter ice cream. It reminds me of those days I spend baking and licking the batter bowl clean. It’s just so delicious, and for the people who hold aversions to raw egg, this recipe has NO raw eggs in it! It’s probably the quickest ice cream batter to put together too! If you are a beginner with the ice cream machine, definitely start off with a recipe like this.

Cake Batter Ice Cream
Source: Carrie’s Sweet Life (through Delicious Meliscious)

Ingredients:

  • 1 cup whole milk, well chilled
  • 3/4 cup granulated sugar
  • 2 cups heavy cream, well chilled
  • 1 teaspoon pure vanilla extract
  • 2/3 cup yellow cake mix (I used Funfetti because I like sprinkles!)

Directions:

  1. In a medium bowl, whisk the milk and granulated sugar until the sugar is dissolved.
  2. Stir in the heavy cream and vanilla.
  3. Stir in cake mix, making sure there are no lumps.
  4. Pour mixture into the freezer bowl of your ice cream maker and let mix until it has thickened (about 25-30 minutes).

Filed Under: Frozen Desserts

Peanut Butter Cheesecake Brownies

May 4, 2010 by Amy 4 Comments

Peanut Butter Cheesecake Brownies

Peanut butter and chocolate are a match made in heaven. Brownies are simply amazing and easy. In fact, this is the one dessert where my KA stays in the cabinet. A simple bowl and wooden spoon are all you need, and wow, the results are nothing short of amazing.

With a potluck coming up at my work, I decided to make some delicious peanut butter cheesecake brownies. I’ve made this recipe before, but I wanted something sinfully rich. After seeing the words “triple chocolate brownies” on Annie’s Eats, I knew I had to use this for my brownie base. I still used the peanut butter cheesecake swirl in the original recipe, and the results were awesomely rich, as in be prepared to have a glass of milk handy…I’m not kidding.

Peanut Butter Cheesecake Brownies
Sources: Brownie Batter – Baking Illustrated (found on Annie’s Eats) PB Cheesecake Batter – Baking Blonde

Brownie Ingredients:

  • 5 oz. semisweet or bittersweet chocolate, chopped
  • 2 oz. unsweetened chocolate, chopped
  • 8 tbsp. unsalted butter, cut into quarters
  • 3 tbsp. cocoa powder
  • 3 large eggs
  • 1¼ cups (8¾ oz.) sugar
  • 2 tsp. vanilla extract
  • ½ tsp. salt
  • 1 cup (5 oz.) all-purpose flour

Peanut Butter Cheesecake Batter Ingredients:

  • 4 oz cream cheese, softened
  • 1/2 cups creamy PB
  • 1/3 cup sugar
  • 1 egg
  • 1 tsp vanilla
  • 5-6 regular sized Reese’s peanut butter cups, chopped

Directions:

  1. Place an oven rack in lower-middle position and preheat the oven to 350° F.  Line an 8-inch square baking dish with foil and spray lightly with nonstick cooking spray; set aside.
  2. In a heatproof bowl set over a pan of barely simmering water, melt the chocolate and butter, stirring occasionally until smooth.  Whisk in the cocoa powder until smooth.  Set aside to cool.
  3. In a medium bowl, combine the eggs, sugar, vanilla and salt; whisk until combined, about 15 seconds.  Whisk in the warm chocolate mixture until incorporated.  Then stir in the flour with a wooden spoon until just combined.
  4. In separate mixing bowl, beat together cream cheese, peanut butter, sugar and vanilla until smooth. Add egg and beat until just combined.
  5. Pour 2/3 of the brownie mixture into the prepared pan and spread with a spatula to make an even layer.  Then add 1/2 of the peanut butter cheesecake mixture on top. Using a knife, gently swirl the mixtures together. Add the remaining brownie batter, then the cheesecake batter and swirl again.
  6. Bake until slightly puffed and a toothpick inserted in the center comes out with a small amount of sticky crumbs clinging to it, about 45-50 minutes. Then, take out the brownie pan and add the chopped Reese’s cups to the top. Place it in the oven for a couple of minutes, until just melted.
  7. Transfer the pan to a wire rack and let cool to room temperature, about 2 hours.
  8. Remove the brownies from the pan using the foil and transfer to a cutting board.  Cut into squares as desired.  Store in an air-tight container.

Filed Under: Brownies/Bars, Chocolate, Peanut Butter

Nifty Trick: Ice Cream

May 3, 2010 by Amy 3 Comments

I can’t tell you how many times I’ve softened ice cream, only to need to refreeze it. Sadly, you know what happens. The edges of the ice cream become a hardened, freezer burnt nasty mess.

After watching an Alton Brown show about making ice cream, I noticed that he used saran wrap to cover the top of the ice cream to seal away air from getting to the ice cream. It works WONDERS..

Nifty Trick: Ice Cream

You can also use this on store-bought ice cream. I love this nifty trick!

Filed Under: Nifty Tricks

Spring Surprises

May 3, 2010 by Amy Leave a Comment

Remember our veggie garden? I can’t believe this was less than a month ago.

veggarden

Ahh how wonderful Mother Nature has been to us this year. So far, no need for pesticides. Is it possible that the companion planting is working?

Veggie Garden 5/3/10

Those tomatoes surely shot up, no? Upon closer inspection, I found a few little surprises in the garden.

Baby Super Fantastic Tomato
Super Fantastic Tomato

Baby Heirloom Tomato
Heirloom Tomato

I’m SO excited about tomatoes! Last year, my crop suffered severe blossom end rot, and so I’m watering daily, as well as adding diluted milk to the soil near the plants to hopefully help!

Also, I noticed this little gem in my chives. These are edible (according to horticulturist Mom) but I’m not sure if I’m that brave, yet. Plus, I just think these are gorgeous on the plant, not in my mouth. 🙂

Chives Flower

Ahh, I love how this picture turned out! I’m completely on manual mode on the dSLR right now, and I’m just so excited when pictures come out great (in my humble not at all professional opinion). 🙂

Filed Under: Gardening

Lackadaisical funk

April 30, 2010 by Amy 3 Comments

Now, that’s a big word for such a boring blog post. I learned the word, lackadaisical in 6th grade. I’m sure you all were tortured through weekly vocabulary lessons where you learned words that would barely stick with you past a week. Lackadaisical stuck with me. Not for it’s actual meaning really, but because when I was in 6th grade, I loved daisies.

Most of my lifestyle at home is fairly lackadaisical lately. I work for 8 hours, making maps, and I come home to do what seems like barely anything. It’s lame — really lame.

I remember having a post-it calendar completely full of meetings, classes, projects to work on, deadlines to meet. Now, it’s empty and fairly flexible to get things done. I’ve tried to make goals for myself, but they really no longer interest me.  

It’s so weird that I’m polar opposite in my career. I try to impress, want to learn more and constantly explore the software to teach myself new things, to eventually get a GISP.

I wish I could find the drive to sew more, blog more, clean more or even care enough to not let my puppy get away with too much.

How do you get out of a funk like this? Are you in a lackadaisical funk when it comes to home life?

P.S. Just a word from the last post about my dSLR, I would like to thank the hubs for driving 1 hour out of his way to get me my dSLR camera on major clearance. He wanted a shout-out here, so here’s his shout-out! Go hubs. 🙂

Filed Under: About Us

Louisiana Strawberry Jam

April 26, 2010 by Amy 8 Comments

Louisiana Strawberry Jam

When I was 5 years old, I remember sharing some strawberry ice cream with my grandmother. Much to my surprise, I broke out in a horrible case of hives. I developed an allergy to my favorite fruit! For years, I’d block out this delicious fruit from my vision. I feared strawberries, but was secretly jealous of my siblings who were able to happily enjoy them. In Louisiana, the strawberries are grown locally, so they are just amazingly flavorful and sweet.

By the time I was in high school, I grew tired of it.  I remember holding a bowl of strawberries, lightly sweetened with sugar, in front of me. I told my Mom to have the first aid spray handy, because I wanted to see if my strawberry allergy was only a childhood allergy. I wolfed down the bowl, waited…waited…and the next day, I was still OK. Thank goodness!! I could eat strawberries again! I think I went through half a flat that day, just to make up for the years of lost opportunities with this tasty berry.

Every time April rolls around, I have to have a flat of them. This year, I decided to make some homemade jam. I wasn’t as intimidated this time, because I have canned before. This was easy to put together, and from the foamy jelly I skimmed off after cooking the jam up, I will say this stuff is REALLY tasty. Smuckers can’t touch this! 🙂

For canning, I use this kit. I find all of the tools in there almost essential for easy and safe canning.

Before you begin canning,  I recommend this website, since this explains in detail how to can safely. The recipe below is considered “high acid canning”.  I also purchased this book, which also has all of the directions for canning and bonus, has quite a few more recipes than their website provides.

Louisiana Strawberry Jam
Source: Ball Blue Book of Preserving

Ingredients:

  • 2 quarts fresh strawberries
  • 1 package powdered pectin
  • 1/4 cup fresh lemon juice
  • 7 cups sugar

Directions:

  1. Wash strawberries and drain. Remove the stems and crush strawberries a few at a time (I place them on a cookie sheet and used a fork to mash).
  2. Combine strawberries, lemon juice and powdered pectin in a pot. Bring mixture to a boil, stirring occasionally. Add in the sugar and stir until the mixture is dissolved. Bring this to a rolling boil. Boil hard for 1 minute, stirring constantly. Remove from heat. Skim off foam, if there is any (I used a slotted spoon to do this).
  3. Ladle hot jam into hot jars, leaving 1/4 inch headspace. Adjust two-piece caps, and process for 10 (for half pints)-15 (for pints) minutes in a boiling water canner.

Makes 4 pint or 8 half pint jars.

Filed Under: Canning, Fruit

Dressing up the dSLR

April 21, 2010 by Amy 1 Comment

I’ve been wanting a dSLR camera for quite some time now. The only thing holding me back was partially price, trying to get my car paid off  ASAP (which will be done next month YAY!) and fear of regretting a splurge. I have trouble making splurges, because I feel like I don’t really NEED them and the money could be better spent. I wrote about my issue with clothing purchases before, so you can understand where I’m coming from here.

Cheap alert: I’m wearing a 3 year old blouse today and work pants with a partially broken zipper. I’m contemplating ripping the zipper out and just replacing the zipper for 2 bucks haha!

Anyway, come to find out, Target had my beloved Canon XSi on clearance for $454. I’ve been budgeting and saving for a $600 camera, so this was a welcome surprise. I bought it.

With my newly developing sewing skills, I decided to make a strap cover for it. I followed this tutorial, minus all that quilting. The more cutting required, the more I mess up it seems.

Of course, it didn’t turn out perfect, since it’s slightly a little too short. However, it’s comfy and that’s all I care about! Plus, using scrap fabric and thread I own, it was nearly free! I did purchase $3 worth of fusible fleece at Hobby Lobby, but that was 1/2 yard….barely used much of that at all!

Pardon the iPhone pic and my stinky mobile Photoshop skills.

Canon XSi with new strap cover

Now, to work on finishing those Craft It Forward projects that I promised the 5 winners a month ago…sorry gals!

Filed Under: Crafts

Newlywed 30?

April 20, 2010 by Amy 8 Comments

Before the wedding, I went from the 260s to the 240s. It was so awesome to lose that much weight and to notice my XL workout shirts loosening more and more. I was excited about the prospect of continuing my weight loss journey, fitting in a L tee, and possibly, shopping in regular clothing stores for the first time since I was in high school!

I should have known better. In May, at my last dress fitting, the seamstress politely told me that I cannot lose anymore weight or the beadwork on my dress would be affected. So, I decided to still work-out to keep with the routine, but to go back to eating junk. I know, weird thinking right? I did maintain though, and felt pretty darn slim on the wedding day!

Fast forward 11 months, my scale says 270.9 lbs. Why is that, folks? Because my month of slipping turned into that ugly habit that I’ve had for most of my life. I ended up quitting the Y, because I had better things to do, apparently, and well, cooking healthy just didn’t matter so much anymore (no dress to fit in).

So, I gained a newlywed 30 in less than a year. What am I going to do about it? Back on track…

I’ve been debating sharing these pictures on the Internet, but I joined Bobbi+Mike’s healthy train, so it’s not like I can hold these as a secret for much longer.

Before - Side

Before - Front

I hope to take pictures like this monthly in the same get-up to show progress. Heck, I just want to see some progress. These pictures are TERRIBLE, and I know I can’t live life like this forever. Wish me luck, folks. It’s time to lose this flab!

Filed Under: Goals, Health/Weight Loss

Dog Bandana

April 18, 2010 by Amy Leave a Comment

So, the sewing machine and I have maintained a pretty healthy and slow relationship. I try to keep my projects simple, because I really hate putting so much time into a project, only to have a flop.

When I took Millie to the groomers for the first time, I asked for them to put a bandana on her. That bandana was ::gulp:: $7. Seriously…

So I thought, heck, I could TOTALLY sew something like this. The bandana had a slot at the top for the collar to slide in, which is pretty genius.

To not be totally copycat-ish, I added my own twist and made it reversible. Two looks in one! 🙂 And…the cost? Not $7….Free with scrap fabrics!

Bandana

And here’s Millie showing it off.

Side 1 bandanna

Side 2 bandanna

Way cute…and I think I will be making many more bandanas in my future!

Filed Under: A Paw-Fect Life, Crafts

  • « Go to Previous Page
  • Go to page 1
  • Interim pages omitted …
  • Go to page 56
  • Go to page 57
  • Go to page 58
  • Go to page 59
  • Go to page 60
  • Interim pages omitted …
  • Go to page 85
  • Go to Next Page »

Primary Sidebar

Hey Y’all!

Image Credit: Leslie Pendleton Photography


Hey y’all!

Thanks so much for reading! I’m Amy, and I live in south Louisiana with my husband and our rescue dog. I enjoy sharing my love for cooking, baking, crafts & more! Follow my daily adventures on social media!

Follow my Daily Adventures

  • Email
  • Facebook
  • Instagram
  • Pinterest
  • Twitter

Footer

  • Email
  • Facebook
  • Instagram
  • Pinterest
  • Twitter

Archives

Copyright © 2026 · Foodie Pro Theme by Shay Bocks · Built on the Genesis Framework · Powered by WordPress