• Skip to primary navigation
  • Skip to main content
  • Skip to primary sidebar
  • Skip to footer

The Nifty Foodie

  • Home
  • About
  • Recipes
    • Appetizers
    • Beverages
    • Breads/Muffins
    • Breakfast
    • Canning
    • Desserts
    • Dog Treats
    • Entertaining/Parties
    • Fruit
    • Holiday Recipes
    • Louisiana Cuisine
    • Main Dishes
    • Mexican
    • Nifty Foodie Original
    • Nifty Tricks
    • Project Food Blog
    • Pumpkin
    • Salads
    • Sauces/Dips
    • Side Dishes
    • Skinny
    • Slow Cooker
    • Spices
    • Stews/Soups
    • The Disasters
  • My Weight Loss Journey
    • Races
    • Running
    • Weight Loss Milestones
  • Crafts
  • Contact Me

Candy

Lumps of Coal & A Giveaway!

November 25, 2013 by Amy 13 Comments

handmadeholidays

I’m ridiculously excited about this week’s posts. As you guys may already know, I’m a big fan of the holiday season. One of my favorite things to do during the holidays is to DIY some of the gifts, and this week is going to be all about homemade holiday gifts that you can easily make from the kitchen. So, everyday this week (with the exception of Thanksgiving), I’ll be featuring a fun homemade holiday gift idea, along with a giveaway from some very generous companies whose products I love to use!

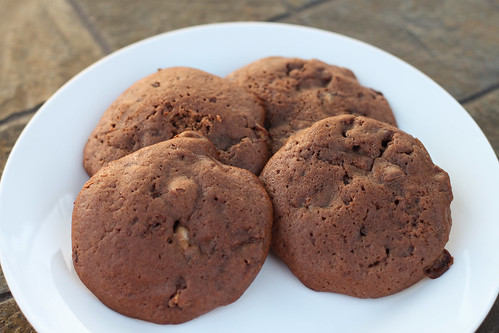
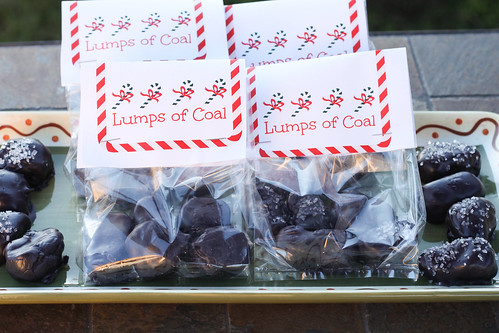
Today, I wanted to share with you guys how easy it is to make these adorable “lumps of coal”.

candy2

…

Read More »

Filed Under: Candy, Chocolate, Giveaways/Reviews, Holiday, Holiday Recipes

Pumpkin Spice M&M Dulce De Leche Blondies

August 29, 2013 by Amy 3 Comments

psdulceblondies

I can’t even begin to express how happy I am that August is almost gone. It has been a month full of bad news for us, so a fresh new month is definitely welcome. September marks the start of pumpkin things, cinnamon scents, fun decor, football and milder weather. I’m also hoping that September helps us close the whole lightning hit our house chapter in our lives. We’ve been spending our afternoons/evenings trying to get our house back in order (you’d be surprised how much clutter you accumulate when you just don’t care anymore) to make our house feel like a home again. I totally bought 4 fall scented candles, even though fall isn’t here yet. I promised myself I that wouldn’t light them until September 1st, but you better believe first thing that morning (well, OK…after church), the summer candles are being put away and our Bath and Body Works Leaves candle will be burning. 🙂

I also told myself that I won’t touch the cans of pumpkin in our pantry until September 1st. I’m surprised that I haven’t broken that little promise, because trust me, I’ve been SO tempted to bake up some pumpkin bread. That’s totally happening Sunday morning, as well. Now, I did sort of stretch things a bit making these blondies a couple of nights ago. We went to Target over the weekend to start replacing the food that we lost in the fridge. By the way, I can’t tell you guys how amazing everyone was to us the night that fire happened. I’m SO SO thankful for our neighbors, especially, for loaning us their outside plug to keep the contents of the deep freezer from spoiling until we could get an electrician to replace all of the fried wires. Anyway, we were at Target, and I was walking past the check-out lines and saw an end-cap full of fall M&Ms. My weakness is actually the pumpkin spice kisses, but then I saw pumpkin spice M&Ms. OMG.

I just had to make something with them. After a bit of thought, I decided to add them to blondies. I found a base recipe on Smitten Kitchen’s site, and I added in some pumpkin spice to give it that fall flavor (without using pumpkin haha!). After mixing the batter, I spread half of it on the pan, added a whole can of dulce de leche on top of that, and then added the rest of the batter on top. Ooey gooey amazingness, basically. These bars are so rich, but that just gave me an excuse to top them with vanilla ice cream. 🙂 They were also super easy to throw together….one bowl to make the blondies and the dulce de leche is in a can. It’s sort of dangerous….in a you better wrap them up and bring them to coworkers the next day before you eat the whole pan, dangerous.

psdulceblondies1

Pumpkin Spice M&M Dulce De Leche Blondies
Source: adapted from Smitten Kitchen, originally from How to Cook Everything

Ingredients:

  • 16 tbsp. unsalted butter, melted
  • 2 cups light brown sugar
  • 2 large eggs
  • 2 tsp. vanilla
  • 1/2 tsp. cinnamon
  • 1/4 tsp. nutmeg
  • a pinch of ground cloves
  • a pinch of salt
  • 2 cups all-purpose flour
  • 9.9 oz. bag of pumpkin spice M&Ms
  • 1 small can dulce de leche

Directions:

  1. Line a 9×13 pan with parchment paper and set aside. Preheat the oven to 350 degrees.
  2. In a large bowl, whisk the melted butter and brown sugar together, until smooth. Beat in the eggs, vanilla, spices and salt. Switch to using a wooden spoon or spatula, and stir in the flour, until just combined. Gently stir in the M&Ms, until they’re evenly distributed throughout the batter.
  3. Pour half of the batter into the prepared 9×13 pan, and spread it with a spoon/spatula to cover the surface. Scoop the dulce de leche into the pan, and spread that over the batter. Then, scoop the rest of the batter in small spoonfuls over the dulce de leche and gently spread it on top. It’s OK if a little bit mixes together, but you mainly want the top of the bars to be blondie batter.
  4. Bake for 35-40 minutes, or until the bars are set in the middle, being mindful not to over-bake the blondies. Allow the blondies to fully cool on a cooling rack before cutting/serving.

Filed Under: Brownies/Bars, Candy, Desserts

Peanut Butter Cup Cookies

June 6, 2013 by Amy 2 Comments

reesescookies

My husband and I are huge fans of warehouse club shopping. The only one out here is Sam’s Club, but we’re getting a Costco soon, and I couldn’t be more excited to check that place out!

Even though there’s just two of us in the house, we buy a lot of staples there. To name a few, we like to buy cheap spices, baking ingredients, frozen fruits, meat (we use our FoodSaver religiously), dog treats and a lot of times, even clothes!

Clothes are a new thing, for sure. Before my weight loss journey began, I barely fit in the shirts they would sell there. It’s very odd to now go to Sam’s, and purchase jeans/shirts/cardigans from there. It all fits now! It’s awesome, because it’s dirt cheap and most of the time, they offer fairly classic pieces.

The nemesis of warehouse club shopping, however, are the impulse buys. Whew…can’t tell you how many times random things just hop in our cart! In fact, just recently, there was a bulk box of Reese’s mini cups (the already unwrapped kind) that somehow found its way in our cart. 😛

Since I had a plethora of Reese’s cups to now use up, I decided that cookies would be an awesome idea. I searched the Internet, and found these giant cookies. I was immediately smitten. These were so good…they have the classic chewy peanut butter cookie flavor with Reese’s all throughout. Can’t go wrong here, folks!

Peanut Butter Cup Cookies
Source: Real Mom Kitchen

Ingredients:

  • 3/4 cup butter, softened
  • 1 cup sugar
  • 1 cup brown sugar
  • 1 cup peanut butter
  • 2 large eggs
  • 2 tsp. vanilla
  • 1 tsp. baking soda
  • 1/2 tsp. salt
  • 2 1/2 cups flour
  • 1 1/2 cup milk chocolate chips
  • 32 mini Reese’s peanut butter cups, quartered

Directions:

    1. Preheat the oven to 350 degrees. Add the butter and sugar to the bowl of an electric mixer, and mix on medium-high until light and fluffy (about 3 minutes). Scrape down the bowl, and add the peanut butter, eggs and vanilla. Mix until well-combined
    2. With the mixer on low, add in the baking soda, salt and flour. Mix until just combined. Fold in the chocolate chips and Reese’s cups using a spatula.
    3. Using a large cookie scoop, scoop the dough onto a parchment or silicone mat lined cookie sheet. For me, 6 cookies fit on each sheet. Slightly flatten each scoop with your hand, and then bake the cookies for 12-15 minutes.
    4. Allow the cookies to cool for 2 minutes, then place them on a cooling rack to finish cooling.


Filed Under: Candy, Chocolate, Cookies, Peanut Butter

Chocolate Malted Milk Ball Cookies

May 30, 2013 by Amy 2 Comments

whoppercookies

Do you ever smell something that just takes you back to a memory? I had a memory like that when I was making the batter for these cookies.

When I was a kid, one of my uncles used to own a snoball stand. In case you don’t know what New Orleans style snoballs are, you’re missing out they are basically ice, VERY finely shaved with flavored syrups added throughout. I know it doesn’t sound like anything special, but the ice is what makes it. Next time you’re in NOLA for the Spring/Summer, seek out a snoball. It’s worth it.

I remember going to my uncle’s snoball stand quite frequently, and just watching them work. Since they were close to so many refineries (lots of people working outside in the Louisiana heat), there was never a dull moment there. They were always busy. Since he also had a soft serve machine in his stand (to make stuffed snoballs), he would also offer malts and shakes. OMG…the banana shakes that he would make were just amazing. To this day, banana is my favorite flavor in a shake. However, when I tried the malt, I was ehh…it was the ONE THING I just didn’t like. Am I weird for not liking malts?

Ever since trying a malt as a kid, I’ve just steered clear of anything malt-y flavored. Malts, malted milk balls…if it has anything to do with a malt flavor, I’m out. After Halloween, I was sorting through our leftover candy and found a TON of malted milk ball packs in the bowl. I stashed them in the fridge, and forgot about them…until this month. I was looking through one of my cookbooks, and came across these cookies. Perfect.

I whipped up the dough for these, and decided since I haven’t tried malted anything in at least 15 years, I’d try a cookie. I found that I’m still not a fan of malted anything…ah well! So, I brought them to my coworkers. Y’all…if you’re a lover of the malted milk balls, try these cookies. I had quite a few coworkers stop by my office asking for this recipe. They were apparently that good. 🙂

Chocolate Malted Milk Ball Cookies
Source: Baking From My Home to Yours

Ingredients:

  • 1 3/4 cups all-purpose flour
  • 1 cup malted milk powder (regular or chocolate flavored)
  • 1/4 cup unsweetened cocoa powder
  • 1 1/2 tsp. baking powder
  • 1/4 tsp. salt
  • 1 stick + 3 tbsp. unsalted butter, room temperature
  • 2/3 cup granulated sugar
  • 2 large eggs
  • 1 tsp. vanilla extract
  • 1/4 cup whole milk
  • 2 cups Whoppers (malted milk balls), coarsely chopped
  • 6 oz. semi-sweet chocolate chips

Directions:

  1. Prepare two cookie sheets by lining them with parchment paper or a silicone mat. Set aside. Sift together the flour, malted milk powder, cocoa, baking powder and salt into a medium sized bowl, and set aside.
  2. In the bowl of a stand mixer, fitted with the paddle attachment, cream together the butter and sugar on medium speed for 3 minutes, until light and fluffy. Add the eggs in one at a time, beating for a minute after each addition. Mix in the vanilla extract.
  3. Reduce the speed on the mixer to low, and add in half of the dry ingredients, mixing until just combined. Add in the milk, and then the remainder of the dry ingredients, mixing again, until just combined. With a spatula, fold in the Whoppers and chocolate chips.
  4. Scoop the dough with a tbsp. sized scoop onto the lined cookie sheets, leaving about 2 inches of space between the cookies. Bake the cookies for 11-13 minutes, rotating the sheets in the oven halfway through the baking process. Do not overbake…these cookies will be puffy and set, but still slightly soft to the touch when done. Allow the cookies to cool for 2 minutes after baking before transferring the cookies to a cooling rack.
  5. Repeat until all of the dough is used, keeping in mind to allow the cookie sheets to fully cool between batches. Enjoy!

Filed Under: Candy, Chocolate, Cookies

Chocolate Cake with Chocolate Peanut Butter Frosting

April 25, 2013 by Amy Leave a Comment

chocolatepbfrosting

If you put a bag of Reese’s in front of me, consider it gone almost immediately. It’s one of my vices, and I know I can’t keep that kind of stuff in my house. When my husband and I went shopping at Sam’s Club a few weeks ago, however, I saw Reese’s minis…in bulk. Ugh. I totally bought it, justifying that I would bake with them. Haha. Yeah…

Well, 1 bag mysteriously disappeared :-P, but then I was asked to bake up a simple cake for my work’s birthday club. Every month, they have a cake to celebrate birthdays for those in the office who had a birthday that month. Previously, they would just buy a sheet cake from a grocery store, but since my coworkers know I love to bake, they asked me to do it from now on. Um…how could I say no to that?!

I figured a Reese’s cake would be a tasty one, so I made chocolate cake with a chocolate peanut butter frosting, and then topped it with chopped Reese’s minis. The cake may not be the prettiest (ugh…my cake totally stuck to the pan in the corners so I used frosting to glue it back together), but darnit…it was GOOD! I had to pour dish soap on the leftover frosting or I seriously would have eaten the rest with a spoon. So good!

Chocolate Cake with Chocolate Peanut Butter Frosting
Source: cake from Ina Garten, frosting adapted from this post

Ingredients:

For the cake:

  • 1 3/4 cups all-purpose flour
  • 2 cups sugar
  • 3/4 cups cocoa powder
  • 2 tsp. baking soda
  • 1 tsp. baking powder
  • 1 tsp. kosher salt
  • 1 cup buttermilk, shaken
  • 1/2 cup vegetable oil
  • 2 large eggs, at room temperature
  • 1 tsp. vanilla extract
  • 1 cup freshly brewed hot coffee

For the frosting:

  • 2 sticks unsalted butter, softened
  • 3 1/2 cups confectioners sugar, sifted
  • 1/2 cup cocoa powder, sifted
  • 1/2 tsp. salt
  • 2 tsp. vanilla extract
  • 1/4 cup peanut butter
  • 5 tbsp. heavy cream
  • optional: Reese’s minis (chopped), for decoration

Directions:

  1. Preheat the oven to 350 degrees. Prepare an 9×13 inch cake pan by lining the inside with baking spray or butter/flour
  2. Sift the flour, sugar, cocoa powder, baking soda, baking powder and salt into the bowl of an electric mixer, and mix on low speed with the paddle attachment until combined. In another large bowl, mix the buttermilk, oil, eggs and vanilla together. Turn the mixer on low speed again, and slowly add the wet ingredients to the dry. Scrape down the bowl with a spatula, and then slowly add the coffee and mix until everything is just combined.
  3. Pour the cake batter into the prepared 9×13 inch pan, and bake for 30-40 minutes, until a toothpick or cake tester comes out clean. Cool the cake in the pan for 30 minutes, and then turn it out onto a cooling rack to finish cooling.
  4. While the cake is cooling, make the frosting. Place the two sticks of butter in a clean bowl of your electric mixer, fitted with the paddle attachment and cream it on medium-high for 2 minutes, until light and fluffy. Turn the mixer to low and add the confectioners sugar, cocoa powder and salt until well-mixed. Scrape the bowl down, and then, add the vanilla extract, peanut butter and heavy cream and mix on low for 30 seconds to incorporate the ingredients. Turn the speed up to medium and whip up the frosting for 2-3 minutes, until fluffy.
  5. Once the cake is completely cool, frost your cake and if preferred, add the chopped Reese’s on top for decoration.

Filed Under: Cakes/Cupcakes, Candy, Chocolate

M&M Cookie Bars

February 20, 2013 by Amy 1 Comment

M&MBars

This week has been pretty difficult on me (spoiler: first world problem). I gave up chocolate (and took on trying to be more patient on the road, which is REALLY hard around here), and I’m having terrible cravings for chocolate. I miss having the occasional fun size candy after lunch or grabbing a couple of kisses out of the freezer. I am an addict, and I have no intention of fixing said addiction. 😉 I’ll be happily eating a Cadbury Caramel egg on Easter Sunday, y’all.

I saw this recipe a while back, and thought it would be perfect with M&Ms thrown in. When I was told about a Valentine’s Day bake sale at work, I immediately ran to Target and grabbed a bag of festive M&Ms. It was so hard not to sneak a taste of these right out of the oven, but I did try some of the dough before adding in M&Ms haha! I honestly have no idea how these bars taste (baked), but based on coworker reviews, they were pretty awesome. I will say that recipe like this is perfect for a bake sale (or a party) since it makes a TON, and it’s very simple to throw together.

M&M Cookie Bars
Source: adapted from Martha Stewart

Ingredients:

  • 1 1/2 cups (3 sticks) unsalted butter, room temperature
  • 4 cups all-purpose flour
  • 2 tsp. baking soda
  • 3/4 tsp. salt
  • 1 cup granulated sugar
  • 1 1/2 cups packed light brown sugar
  • 2 large eggs
  • 1 tbsp. pure vanilla extract
  • 1 large bag plain M&Ms

Directions:

  1. Preheat your oven to 350 degrees, moving an oven rack to the center. Line a 12×17 rimmed baking sheet with parchment paper and set aside.
  2. In a medium sized bowl, whisk together the flour, baking soda and salt. Set aside.
  3. In the bowl of a stand mixer, cream the butter and both sugars on medium speed until light and fluffy, for about 2-3 minutes. Scrape down the bowl, and add the eggs and vanilla extract. Mix until well incorporated. Add the flour mixture to the wet mixture, and beat on low speed until just combined. Using a spatula, gently mix in the M&Ms.
  4. Place the dough in the baking sheet, and spread the cookie dough evenly across the pan (it’s easier to do this with your hands). Bake the bars, rotating the sheet halfway through, until the edges are browning and the top is a golden color, about 20-25 minutes. Cool the pan on a wire rack, and allow the bars to cool completely before slicing.

Filed Under: Brownies/Bars, Candy

Monster Cookies

January 29, 2013 by Amy 1 Comment

Monster Cookies

In the 13 months that I’ve been on my weight loss journey, I’ve never found myself as challenged as I am this month. Last January, when I started counting calories, I was on a weight loss high. I was dropping weight left and right, and it was completely motivating to stay on track. This January, however, my weight isn’t coming off as quickly as it did (of course), and for some reason, I keep having a raging craving for all things sweet. I usually have some awesome willpower to say “no”, but I’m finding that I can’t trust myself lately.

Example: I bought a king cake for the first time this season. That same day, I ate THREE slices. The scale went up 2 lbs. ::sad:: Must.find.willpower.ASAP!

Now, I find that I’m improving a bit since Christmas. Y’all….the holidays had a ton of food. It all started with a cruise that my husband and I went on. Unlimited food that was already included? Well, let’s just say five pounds later I found myself standing on the scale in awe. You would think my mind would say GET BACK ON TRACK, but no…my mind said WHERE’S THE CHOCOLATE? Ugh.

So, all of the candy had to go. All of it. The best way I’ve discovered to get rid of a bunch of random candy? Add oatmeal and peanut butter and make some monster cookies! This was my first time making these cookies, and y’all….I think these were a worse temptation than the darn candy! I had to revert back to the days when I couldn’t resist baked goods, and immediately wrap the cookies in saran wrap, and ask my husband to just take them to his office. I know…I really need my willpower back, y’all. My husband told me some people took 5-6 of these cookies with them, so I know they were a hit in the office!

Monster Cookies
Source: adapted from Paula Deen

Ingredients:

  • 3 eggs
  • 1 1/4 cups packed light brown sugar
  • 1 cup granulated sugar
  • 1/2 tsp. salt
  • 1 tsp. vanilla extract
  • 12 oz. creamy peanut butter
  • 1 stick butter, softened
  • 1/2 cup M&Ms
  • 1/2 cup assorted chocolate candy (chopped)
  • 1/2 cup chocolate chips
  • 1/4 cup raisins
  • 2 teaspoons baking soda
  • 4 1/2 cups quick-cooking oatmeal

Directions:

    1. Preheat your oven to 350 degrees, and line two baking sheets with parchment paper or silicone baking mats.
    2. In a mixing bowl, mix the eggs and sugars for about a minute on medium, or until mixed well. Scrape down the bowl and add the salt, vanilla extract, peanut butter and butter. Mix everything on medium high for 2-3 minutes. Scrape down the bowl and using a silicone spatula or spoon, stir in the M&Ms, chocolate candy, chocolate chips, raisins, baking soda and oatmeal.
    3. Scoop the cookies out with a medium sized scoop, allowing 2 inches between each cookie, onto the already prepared baking sheets.
    4. Bake the cookies for 8-10 minutes, making sure not to over-bake the cookies. Allow the cookies to cool for about 3-5 minutes on the baking sheet before transferring the cookies to wire racks to finish cooling. Enjoy!


Filed Under: Candy, Chocolate, Cookies, Peanut Butter

Top 10 Recipes of 2012

December 28, 2012 by Amy 2 Comments

Man, what a year it has been! I hope everyone had a wonderful holiday season with their friends and family. 🙂

Most years, I feel like time has flown by, but for some reason, it feels like last January was truly a year ago. So many great things have happened to us this year (as well as some really crappy events).  

Some highlights and not so highlights:

  • It was our first full year in our new house, which has been such a blessing. It’s just awesome to finally have friendly neighbors, who don’t throw their trash in our backyard or play loud music at 2am (side-eye to the neighbors at the old house).
  • My husband and I have both decided to live healthier. Between us, we’ve lost over 150 lbs. this year. (I’m sure my husband is rolling his eyes at me sharing this, but seriously..I’m gonna brag here!) That’s just amazing to me. I’m so proud of us.
  • Another weight loss highlight. I fit into a clothes size that I haven’t been able to wear since 10th grade. That was 12 years ago. OMG!
  • A not so highlight. Hurricane Isaac…don’t want to go into too much detail with that one, but yeah, hurricanes suck. Oh, and for the record, labradors don’t care if the winds are 50 mph outside. If there’s rain/water, it’s playtime! (ugh)
  • I think I’m making some good progress on my 101 Goals in 1001 Days list.

And of course, it’s been another fun year blogging. I really appreciate all of y’all taking the time to read my tiny corner of the Internet. Thank you for your sweet comments, emails and tweets. In January, it’s gonna be this blog’s 5th anniversary, and I’m just amazed by all of the friends I’ve made and people I’ve “met”  through this blog. You guys are the best!

Just to round up the year, I wanted to share with y’all your top 10 most read posts from 2012.

Pumpkin Whoopie Pies w/ Salted Caramel Buttercream

10. Pumpkin Whoopie Pies with Salted Caramel Buttercream – These whoopie pies were made for a work fundraiser, and they were a huge success. Great pumpkin/spicy flavor, and the salted caramel buttercream just makes them super indulgent. Pumpkin + caramel is a wonderful combination!

Red Velvet Bundt Cake

9. Red Velvet Bundt Cake with Cream Cheese Frosting – I love anything red velvet. This bundt cake is a fun change from a regular cake, and it was pretty easy to throw together and bake!

Baked Oatmeal

8. Baked Oatmeal – My breakfast has been forever changed by this. This oatmeal is not soggy at all (which I hate about cooked oats), and it’s very sweet with the addition of bananas.

Peanut Butter Cookies

7. Peanut Butter Cookies – Just simple, classic peanut butter cookies. 🙂 Very good!

Candy Corn Oreo Truffles

6. Candy Corn Oreo Truffles – Oreo truffles are insanely good, and it was fun to make these with seasonal flavors. Always a favorite when I bring these truffles to work!

Fresh Strawberry Pie

5. Fresh Strawberry Pie – I’m SO glad strawberry season is back. I need to make this pie again…it’s not rich at all, and since it involves no cooking (except for the crust), it tastes so fresh!

Snickers Cupcakes

4. Snickers Cupcakes – Oh, I totally need to make these again. If you love Snickers, you will LOVE these!

Homemade Strawberry Lemonade

3. Homemade Strawberry Lemonade – Meyer lemon season + strawberry season? Um…guess I need to make this too and ASAP!

Red Velvet Swirl Brownies

2. Red Velvet Swirl Brownies – These were just delicious, and so pretty too! Perfect for Valentine’s Day!

Spinach Strawberry Salad with Feta

1. Spinach, Strawberry, Pecan and Feta Salad with Strawberry Vinaigrette – This is a huge favorite of y’alls. I think Pinterest made this a popular one, and it is VERY easy to throw together! This is a salad you want to make for your next party…it’s an awesome combination!

Thanks so much for reading this blog, and I hope everyone has a Happy New Year! Time to get used to writing/typing “2013”. 🙂

Filed Under: Beverages, Breakfast, Brownies/Bars, Cakes/Cupcakes, Candy, Chocolate, Cookies, Entertaining/Parties, Fruit, Holiday Recipes, Other, Peanut Butter, Pies, Pumpkin, Salads

Candy Corn Oreo Truffles

September 13, 2012 by Amy 3 Comments

Candy Corn Oreo Truffles

This past weekend, we experienced a “cold front” in Louisiana. It went from a heat index in the 100s to a much more manageable heat index in the 80s. Not cold by any means, but it was definitely nice to walk outside for 5 minutes and not sweat like crazy!

I’m a big fan of the fall. Football season, cooler weather, spiced candles and fun fall foods. One of my favorites is the Halloween Oreos. I realize they’re just plain oreos with orange dye in the cream, but darnit, those seasonal oreos are just more fun to enjoy! I was actually looking forward to buying my first pack of halloween ones, when I noticed Candy Corn Oreos. Yes. CANDY CORN OREOS.

I couldn’t help myself. I had to get them. I had to make sure that I didn’t eat the whole box, though, since I had plans for these: the super popular oreo truffles. I ended up trying one, which was VERY sweet…sweeter than normal oreos, actually. At first, I couldn’t put my finger on the flavor until my husband mentioned it–the filling tastes like buttercream. Not super candy corn like, in my opinion, but I still wanted to make truffles out of these.

After crushing them, the filling was a festive orange color, which would be so cute for fall or halloween parties. I do have to note that the candy corn oreos don’t contain nearly as many oreos as a regular box does, which explains why you don’t need as much condensed milk (as the regular recipe here) to make these.

Candy Corn Oreo Truffles
Source: adapted from the regular oreo recipe

Ingredients:

  • 1 box candy corn oreos
  • 1/2 cup of condensed milk
  • 1 bag of semi-sweet chocolate chips
  • 1/8 tsp. canola or vegetable oil
  • candy corn candies, for garnish

Directions:

  1. In a food processor, crush the oreos (with cream) until the oreos are fine crumbs. Add the oreos to a medium sized bowl, and stir in the condensed milk, until it is well-mixed.
  2. Using a small tbsp. scoop, scoop out truffles and roll them between your hands into a ball shape. Place them on a small pan, and allow them to freeze for a few minutes (just to set better for easier dipping). While they are freezing, place your chocolate chips and oil in a microwave safe bowl, and microwave the chocolate on high in 30 second increments, stirring well for every 30 seconds, until the chocolate is melted and easy to stir. Prepare a cookie sheet lined with wax or parchment paper for the finished truffles to cool on.
  3. Take the balls out of the freezer, and individually dip each truffle ball in the chocolate and place the truffles on the cookie sheet. Add a candy corn (or any other decoration) before the chocolate starts to dry. Once all truffles are done, let them sit until the chocolate sets (or if you’re in a rush, place the truffles in the freezer for the chocolate to set). Enjoy!


Filed Under: Candy

Peanut Butter Cup Ice Cream

August 17, 2012 by Amy 3 Comments

Peanut Butter Cup Ice Cream

I’ve been making a ton of frozen treats lately. With the crazy heat outside, I feel like the best way to “cook” is to not use any heat at all. Sure, some ice creams use eggs, but since you have to cook the ice cream mixture in that case, I’ve been trying quite a few quick (egg free) ice cream recipes.

One of my favorite ice cream treats is a Sonic Blast with Reese’s cup pieces mixed in. Reese’s cups for me is just one of those candies I can’t say no to. I can only buy them if I have a recipe in mind, otherwise I tend to black out and find myself surrounded by Reese’s wrappers. Those things are my weakness.

In a brief, insane (yep, insane…I’m trying to lose some weight y’all!) moment, I thought to look up recipes for Reese’s ice cream, and I came across this one. Two great things…it comes together quickly and it’s egg free (no cooking!). Taste wise? Let’s just say that I’m thankful that I bought the fancy little ice cream cup that I have, because 1/2 cup of ice cream fits in there and in my mind, it feels like I’m eating a full bowl. I really could have eaten the whole container in one serving, I imagine.

Peanut Butter Cup Ice Cream
Source: barely adapted from Recipe Girl (originally found in the Cuisinart Ice Cream book)

Ingredients:

  • 1 1/4 cups peanut butter
  • 3/4 cup granulated sugar
  • 1 1/4 cups whole milk
  • 2 cups heavy whipping cream
  • 2 tsp. vanilla extract
  • 2 cups chopped peanut butter cups

Directions:

  1. In the bowl of a stand mixer, add the peanut butter and sugar and beat the mixture for 2 minutes until it’s very smooth. Add the milk to the bowl and mix everything on low for another 2 minutes, until the sugar is completely dissolved. Add the heavy cream and vanilla extract and beat the mixture on low for another 2 minutes, until the ice cream base is well-combined. Chill the mixture in the fridge for an hour.
  2. Take the ice cream mixture out of the fridge, give it a quick stir to make sure nothing settled and add the ice cream to your ice cream machine, and churn the mixture according to your manufacturer’s instructions. Add the chopped peanut butter cups, and stir them into the churned ice cream. At this point, the ice cream will be like a soft serve ice cream. If you’d prefer a more scoopable consistency, place the ice cream in a freezer safe container and freeze the ice cream for a few hours. Enjoy!


Filed Under: Candy, Chocolate, Frozen Desserts, Peanut Butter

  • « Go to Previous Page
  • Go to page 1
  • Go to page 2
  • Go to page 3
  • Go to page 4
  • Go to Next Page »

Primary Sidebar

Hey Y’all!

Image Credit: Leslie Pendleton Photography


Hey y’all!

Thanks so much for reading! I’m Amy, and I live in south Louisiana with my husband and our rescue dog. I enjoy sharing my love for cooking, baking, crafts & more! Follow my daily adventures on social media!

Follow my Daily Adventures

  • Email
  • Facebook
  • Instagram
  • Pinterest
  • Twitter

Footer

  • Email
  • Facebook
  • Instagram
  • Pinterest
  • Twitter

Archives

Copyright © 2025 · Foodie Pro Theme by Shay Bocks · Built on the Genesis Framework · Powered by WordPress