• Skip to primary navigation
  • Skip to main content
  • Skip to primary sidebar
  • Skip to footer

The Nifty Foodie

  • Home
  • About
  • Recipes
    • Appetizers
    • Beverages
    • Breads/Muffins
    • Breakfast
    • Canning
    • Desserts
    • Dog Treats
    • Entertaining/Parties
    • Fruit
    • Holiday Recipes
    • Louisiana Cuisine
    • Main Dishes
    • Mexican
    • Nifty Foodie Original
    • Nifty Tricks
    • Project Food Blog
    • Pumpkin
    • Salads
    • Sauces/Dips
    • Side Dishes
    • Skinny
    • Slow Cooker
    • Spices
    • Stews/Soups
    • The Disasters
  • My Weight Loss Journey
    • Races
    • Running
    • Weight Loss Milestones
  • Crafts
  • Contact Me

Candy

Easter Candy S’mores Cookies

March 22, 2012 by Amy 3 Comments

Easter S'mores Cookies

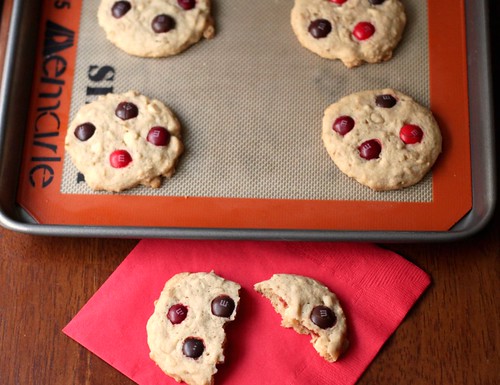
I absolutely love seasonal candies. When it comes to Easter, it’s so dang hard to resist my favorite candies in pastels. It just makes them that much cuter. This doesn’t bode well for my thighs, since I’ve probably consumed about 45902 Cadbury caramel eggs this season alone. ๐Ÿ˜› When I was walking down the candy aisle earlier this week, I thought about baking with Easter candy just so I could have yet another excuse to buy another bag of candy. Then it hit me when I saw the Peeps: S’mores. I know I’ve seen s’mores cookies on a few food blogs before, so I grabbed a bag of Sixlets and Peeps (as well as another box of Cadbury caramel eggs…ugh).

When I got home, I thought that colorful sprinkles would make these cookies even cuter. I mean, why not? I ended up finding a bottle of rainbow (chocolate) chips by the sprinkles. I think that was fate, since the original recipe called for mini chocolate chips, which I didn’t have (whoops). So, with all of these colorful ingredients on my counter, I was pretty darn excited to make these cookies! In fact, when the first batch of cookies were done, I really didn’t wait long to pull one of these off of the cooling rack and devour it. And y’all, these cookies are just awesome. Not only are they super cute and colorful; they’re insanely addictive. This recipe also makes quite a few cookies for sharing. ๐Ÿ™‚ I used my small cookie scoop to scoop these on the cookie sheet, but since this dough spreads a good bit, it still makes a decent sized cookie. In the end, I had enough cookies to share with both mine and H’s coworkers this time around. ๐Ÿ™‚

Easter Candy S’mores Cookies
adapted from Two Peas & Their Pod, originally from Baked Perfection

Ingredients:

  • 1 3/4 cups all purpose flour
  • 1 cup graham cracker crumbs
  • 1 tsp. baking soda
  • 1 tsp. salt
  • 1 cup (2 sticks) butter, softened
  • 3/4 cup sugar
  • 3/4 cup brown sugar
  • 1 tsp. vanilla extract
  • 2 eggs
  • 1/4 cup Wilton Rainbow Chip
  • 1 1/2 cups chopped Easter Peeps (appx. the same size as mini marshmallows)
  • Easter Sixlets

Directions:

  1. Preheat the oven to 375 degrees. In a medium bowl, whisk together the flour, graham cracker crumbs, baking soda and salt, until well blended.
  2. In another bowl, using a mixer, beat the butter for about 2 minutes, until light and fluffy. Add the sugars and beat for about another minute.
  3. With the mixer on low, add the vanilla extract and the eggs, one at a time, scraping the bowl after each addition. Add in the flour mixture slowly, and mix on low until just combined.
  4. Fold in the rainbow chips with a spatula.
  5. Using a small cookie scoop (appx. tbsp. sized), scoop the cookie dough out, giving about 2 inches between each cookie (like I said, these do spread). Bake for about 7 minutes and take the cookies out of the oven.
  6. Immediately add the sixlets and peeps, by pressing them gently into the cookie. Place the cookies back in the oven and bake them for another 3-4 minutes. Allow the cookies to cool on a cooling rack, and serve!

Filed Under: Candy, Chocolate, Cookies

Snickers Cupcakes

March 19, 2012 by Amy 8 Comments

Snickers Cupcakes

Snickers bars are my diet nemesis. The candy bars are 280 calories each (yep), and I could seriously destroy one in a couple of minutes. Now that I’m calorie counting, 280 calories is a lot when you get under 1600 calories each day, but in my opinion, calories don’t count for one day of the year. Your birthday. I turned 28 on Friday, and since Snickers are my favorite, I decided to make these cupcakes to celebrate. Now, of course, I could buy a cake at a bakery and spend $30+, but heck, where can you find SNICKERS cupcakes? Not any place around here, that’s for sure!

The hardest thing for me was bringing home two bags of mini Snickers to make these bad boys happen. I totally ate about 10-ish mini Snickers that week, so I obviously don’t have any willpower against this candy….at.all. Oh, and when it came time to make these Thursday and cut the candy up for the filling….yeah, totally snuck a few tiny bites. Whoopsie!

I will admit, these cupcakes were more time-consuming than I thought, but it’s worth it to give these a try. Just don’t do it on a weeknight, like I did. ๐Ÿ˜›

If you’re concerned about me completely killing my diet, I’ll let you know that since I could have totally eaten all 20 of these cupcakes, I ended up giving most of them to H to bring to his coworkers. His coworkers absolutely loved these, and some of these actually wanted to know how much they would be for me to make them. So, I guess they weren’t a flop haha! My opinion? Heaven in a cupcake. Oh yes…if you love Snickers like I do, just make these cupcakes.

Snickers Cupcakes
Source: mildly adapted from Annie’s Eats, cupcakes originally from Martha Stewart, frosting originally from My Baking Addiction

Ingredients:

For the cupcakes:

1/2 cup Dutch-process cocoa powder
1/2 cup hot water
2 cups all-purpose flour
3/4 tsp. baking soda
3/4 tsp. baking powder
3/4 tsp. coarse salt
16 tbsp. unsalted butter
1 1/2 cups sugar
2 large eggs plus 1 egg yolk
1 3/4 tsp. vanilla extract
2/3 cup sour cream, at room temperature

For the filling:

1 bag mini Snickers chopped into fourths (I found it easier to do this after the Snickers were in the freezer)
1/4 cup salted butter caramel sauce

For the frosting:

16 tbsp. unsalted butter, at room temperature
1 lb. confectionersโ€™ sugar
1 1/2 tsp. vanilla extract
1/3 cup salted butter caramel sauce
Pinch of coarse salt
2 tbsp. heavy cream

**To garnish the tops, you’ll need 20 mini Snickers.**

Directions:

  1. Preheat the oven to 350 degrees. In a medium bowl, add the flour, baking soda, baking powder and salt and mix together until the ingredients are well-combined. In a smaller bowl, whisk the cocoa powder and hot water together until it’s a smooth liquid.
  2. In a saucepan, melt the butter and sugar using medium heat. Once the butter has melted, remove the mixture from the cook top and transfer the mixture to a mixer bowl. Using the paddle attachment on the mixer, beat the butter/sugar mixture on medium-low speed for a few minutes, until the mixture has cooled (you don’t want to cook the eggs when you add them). Add in the eggs and egg yolk, one at a time, beating the mixture well and scraping down the side of the bowl after you add each egg. Add in the vanilla and the cocoa mixture and mix until well-combined. Then, turn the mixer on low and add in the flour mixture in two batches, and alternating with the sour cream. You want to beat the mixture until just combined (don’t overmix).
  3. Using a medium cookie scoop, add the batter to your cupcake pans (lined with cupcake liners) until each cup is about 3/4 full. Bake the cupcakes for 18-20 minutes (rotating the cupcake pan once when the cupcakes are halfway done with baking), until a toothpick inserted into the center of the cupcake comes out clean. Allow the cupcakes to cool in the pan for a few minutes, and move them to a wire cooling rack to finish cooling.
  4. Once the cupcakes are completely cool, cut a cone shape out of the center of the cupcakes using a paring knife. Using cooled caramel sauce, add 1/3 cup of the caramel sauce to your Snickers pieces and mix until the candy is coated in caramel. Then, add a spoonful of the filling to each cupcake.
  5. For the frosting, using a paddle attachment on your mixer, whip the butter on medium speed until light and fluffy, about 2 minutes. Scrape down the bowl and add in the confectioners’ sugar with the mixer on low speed, a cup at a time (to avoid a mess), until the mixture smooth and creamy. Add in the caramel sauce (which should be just a tad on the warm side for this), vanilla and salt on low speed, and mix until well-blended. Add in the heavy cream, and mix the frosting on medium speed for a few minutes until fluffy and smooth.
  6. To finish the cupcakes, frost the cupcakes to your liking (I used a Wilton 1B tip), drizzle on some caramel sauce, and place a mini Snickers on the center of each cupcake.

Filed Under: Cakes/Cupcakes, Candy, Chocolate

M&M White Chocolate Chunk Cookies

March 13, 2012 by Amy 4 Comments

M&M and White Chocolate Chunk Cookies

Happy early St. Paddy’s Day y’all! When I was a kid, my family used to go to the St. Patrick’s Day parade in New Orleans. The parades for St. Paddy’s Day aren’t anything like the ones at Mardi Gras. The prized throws are vegetables. That’s right, y’all. They throw vegetables at these parades. Cabbage, carrots, potatoes…you name it! I remember catching these things as a kid, and thinking that these were the most boring throws ever. Of course veggies are boring to a kid! The tradition is that you take home your catches, and then make a stew for your family for the holiday. ๐Ÿ™‚

The fun part for me was when some older men would walk in the parade carrying these huge displays of fake flowers, and they would hand them to the ladies and little girls. My sister and I used to compare bouquets at the end of the parade, and man, it was so much fun to get flowers as a little girl!

Sadly, I haven’t been to a parade in a long time, which really should be remedied next year, but the memories I have from my childhood just make me so psyched for the holiday. Not to mention, St. Paddy’s Day is the week of my birthday (as well as my sister’s)! Her birthday is actually today! If you’re reading this, Happy Birthday Sis!

As far as these cookies go, I’ve been wanting to make these M&M cookies for a while, and since I had a bag of Christmas M&Ms leftover from the holiday bake-palooza, I took a few minutes to take out the green M&Ms, add some white chocolate chunks and make these cookies finally happen. I have no idea how that bag of M&Ms lasted this long in our house, actually, but I guess I’m getting some willpower from the good ol’ diet. ๐Ÿ™‚

Strictly for quality control purposes, I had to try one of these bad boys. ๐Ÿ˜› It took a lot for me to not grab a second or a third, because I just LOVE M&M cookies! This recipe couldn’t be easier either, since it only requires one bowl. I’m all about doing less dishes, so these cookies are even more awesome because of that!

M&M White Chocolate Chunk Cookies
Source: mildly adapted from Sing For Your Supper, originally from King Arthur Flour

Ingredients:

  • 1/2 cup butter
  • 1/3 cup & 1 tbsp. granulated sugar
  • 1/3 cup packed brown sugar, light or dark
  • 1/2 tsp. salt
  • 1 tsp. vanilla
  • 1/4 tsp. baking soda
  • 1/2 tsp. baking powder
  • 1 large egg
  • 1 1/2 cups all purpose Flour
  • 2 tbsp. milk
  • 1.5 cups M&Ms
  • 1/2 cup white chocolate chunks

Directions:

  1. Preheat the oven to 375 degrees and prepare two baking sheets lined with parchment or Silpat sheets.
  2. Cream the butter and sugars together until light and fluffy, for about two minutes. Add the baking soda, baking powder, salt and vanilla and mix until well-incorporated. Add the egg and mix until blended. Scrape the bowl down, add the milk and mix again.
  3. Add the flour and beat the mixture until just mixed together. Do not overbeat.
  4. Using a spatula, lightly stir in the M&Ms and white chocolate chunks.
  5. With a regular cookie scoop, drop the cookies on your sheet, allowing 2 inches between each cookie. Bake the cookies for 14-16 minutes, until the cookies are a light golden brown and slightly browner along the edges. Allow the cookies to fully cool on the cookie sheet before serving.

Filed Under: Candy, Chocolate, Cookies

Cinnamon M&M Oatmeal White Chocolate Chip Cookies

January 23, 2012 by Amy Leave a Comment

Cinnamon M&M White Chocolate Chip Oatmeal Cookies

A couple of weeks ago, I was scouring Target’s 90% off post-Christmas sale. By the time that sale comes around, all of our Christmas stuff is put away in the attic, but I usually don’t have my sights set on decor at that point. I go to the 90% off sales for birthday wrapping goods. I know that sounds weird, but when you can buy bright colored curling ribbon, white or kraft tissue paper, and/or solid colored gift bags for pennies on the dollar, it’s completely worth it. Sometimes I also go in hoping to score some hidden treasures to keep Lane Bryant in business, like a bag of Ghirardelli holiday candies or in this case, a bag of cinnamon M&Ms.

When I originally saw these, I was hesitant to purchase them, because I didn’t know if these M&Ms were a subtle cinnamon spice or red hot cinnamon-like chocolate candies. I’m not a big fan of red hots, so I didn’t want to take a chance. Well, that is, until the bag was 90% off. Who can refuse a big bag of M&Ms for thirty cents?

So, I gave them a try one night and was pleasantly surprised. These M&Ms had just a hint of cinnamon spice, which proved to be a little addictive. So, before I ate the whole bag, I got to googling and saw these cookies on Picky Palate.

I thought my problems were solved. Bake up these cookies to bring to coworkers and use up all the M&Ms. However, the quality control side of me took over, and before I knew it, 3 of these cookies were gone. There’s nothing like a freshly baked cookie…just couldn’t help myself here…these were insanely good!

To prevent myself from no longer fitting in Lane Bryant (they have size limits, too haha!), I put these cookies away in a container to bring to coworkers. Thankfully, these cookies were so awesome that by the time I went back in the break room to heat up my lunch, my cookie plate only had crumbs remaining. I’d say these were a winner. ๐Ÿ™‚

Cinnamon M&M Oatmeal White Chocolate Chip Cookies
adapted from: Picky Palate

Ingredients:

  • 2 sticks softened unsalted butter
  • 3/4 cup granulated sugar
  • 3/4 cup packed light brown sugar
  • 2 eggs
  • 1 tbsp. pure vanilla extract
  • 3 cups all purpose flour
  • 1 tsp. baking soda
  • 1/4 tsp. salt
  • 1 tsp. ground cinnamon
  • 1 cup rolled oats
  • 1 bag white chocolate chips
  • 1 9.90 ounce bag Cinnamon M&Mโ€™s

Directions:

  1. Preheat the oven to 350 degrees F.
  2. Using a mixer, beat the butter, brown sugar and white sugar in a bowl for 2-3 minutes on medium to medium-high speed, until the mixture is light and fluffy. Scrape down the bowl and add the eggs and vanilla extract. Mix for about a minute on low, or until well combined.
  3. In another bowl, mix the flour, baking soda and salt together with a whisk. With the mixer on low speed, slowly add the dry mixture to the wet mixture. Add the cinnamon, rolled oats and white chocolate chips and mix on low until the mixture is just combined.
  4. Line a baking sheet with parchment paper or a silicone mat. With a medium sized cookie scoop, scoop out the dough and place each cookie about an inch apart on the sheet since these cookies spread a little. Press the cookies down slightly, to just flatten them, and press 4-5 M&Ms on each cookie.
  5. Bake the cookies for 9-12 minutes (I let them go for 12 minutes, which made them barely brown along the edges), and allow the cookies to cool for a few minutes before moving the baked cookies to a cooling rack.

Just a quick reminder. Today is the last day to enter to win one of these four awesome cookbooks! Your chances are great, so check out this post to see how to win!

Filed Under: Candy, Chocolate, Cookies

Top 10 Recipes of 2011

December 29, 2011 by Amy 6 Comments

Am I the only person who is shocked that Christmas just passed? I can’t believe it. Neighbors are taking down lights, and our tree looks SO empty without gifts under it. My favorite holiday is over, and crazy enough, it’s time for a new year. 2012.

Time to take the shrink wrap off of the new planner and get used to writing “2012” on papers/emails/etc. This is just crazy.

Also crazy…sometime in 2012, my 4 year blogiversary is happening and my 3 year wedding anniversary is happening too. WHAT?

It’s a lot to look forward to, but before everyone rings in the new year, I just wanted to share with y’all the top 10 posts of 2011. ๐Ÿ™‚

Yellow Cupcakes w/ Strawberry Swiss Meringue Buttercream

10. Strawberry Swiss Meringue Buttercream – This was my first time making SMBC, and I swear, if you haven’t tried SMBC before, just do it. Please?

Pecan Pie Macarons

9. Pecan Pie Macarons – Gotta love macarons. These were really a huge favorite for Thanksgiving, and the star shape (which was a happy accident) made them super cute and festive!

Queso Blanco

8. Restaurant Style Queso Blanco – This is it. The ultimate queso blanco. If you’re as addicted to queso as me, you’d understand how wonderful it is to FINALLY have a recipe for this!

Strawberry Cream Cake

7. Strawberry Cream Cake – I’m actually glad I compiled this top 10, because I sort of forgot about this cake. Since it’s currently strawberry season in Louisiana, I think I MUST make this cake again. Yum!

Peppermint Bark Cheesecake Truffles

6. Peppermint Bark Cheesecake Truffles – This is the recipe that made my year, basically. I still can’t believe I won that recipe contest, and I’ve been told by a few friends who made this that these little truffles were a hit at their holiday parties! So happy to hear that!

Banana Nutella "Ice Cream"

5. Banana Nutella “Ice Cream” – Two ingredient “ice cream”. It’s basically awesome and couldn’t be any easier. Your food processor does all the work!

Corn Grits

4. Grilled Corn Grits – I can’t be from the South, and not have a post about grits. I promise you if you make this, your hips may never be the same again, but your taste buds will tell you it’s completely worth it!

3. Easy Pasta Salad – My first (and so far, only) vlog. I might get the courage to make one again, since you guys seemed to like it so much!

Diet Cupcakes

2. Cooking For Kids – The infamous post. Yup, who’da thought that a soda cupcake would get so much response from you guys (both good and bad)…yikes!

Homemade S'mores

1. S’mores for a Shower – Nutella S’mores. I can see why you guys loved this one so much. I’m sort of craving s’mores right now, actually. ๐Ÿ˜›

I hope you have a wonderful New Year with your family and friends, and thank you so much for reading The Nifty Foodie! See y’all in 2012!

Filed Under: Cakes/Cupcakes, Candy, Chocolate, Cookies, Frozen Desserts, Fruit, Other, Pasta/Rice, Sauces/Dips, Side Dishes

Elf’s Mix

December 19, 2011 by Amy 3 Comments

Elf's Mix

This past weekend was what I call my annual “bake-palooza”. When it comes to coworkers and neighbors, I just find it much easier to gift food. My idea is…when in doubt, give food. ๐Ÿ™‚

Every year, I have so much fun coming up with the recipes for gifts. I have so many ideas written on paper, but I usually narrow things down to 5-6 recipes, just to remain sane. This was a new recipe for gifts, and it couldn’t have been easier. I based it off of bunny bait, which I bookmarked on my friend Amy’s blog. Of course, I changed the mix up to make it more Christmas-y and added holiday oreos for an even more fun Christmas colored addition.

The mixture of sweet and salty ingredients is what makes this mix so awesome, and just to let you know, it makes a LOT. I thought I’d have to make a double batch, but after making one batch, I realized I had more than enough for gifts.

Of course, I wasn’t going to call this bunny bait since, well, it’s not Easter. I had to call it something else. When I had it cooling on a silicone mat, I kept telling myself it looked like a Christmas elf barfed in my kitchen. Kinda gross, I know. Since I don’t have to guts to name a dessert “Elf’s Barf”, I decided to play it safe and call it “Elf’s Mix”. ๐Ÿ˜›

Elf’s Mix
inspired byย Sing For Your Supper‘s “Bunny Bait”

Ingredients:

  • 1 bag of popped microwave popcorn
  • 6ย oz. almond bark
  • 1 bag of mint M&Ms
  • 15 holiday oreos, chopped
  • 2 cups of pretzel sticks, broken into small pieces
  • Christmas sprinkles

Directions:

  1. Place the popped popcorn, pretzel sticks, M&Ms and oreos in a large bowl or pot. Placeย 4 oz. of almond bark in the microwave in 30 second increments, until well-melted.
  2. Add the melted almond bark to the popcorn mixture and stir the mixture thoroughly. Spread the mixture out on a large silicone mat or wax paper. Top with Christmas sprinkles.
  3. At this time, microwave the additional 2 oz. of almond bark in a disposable plastic piping back in 30 second increments until well-melted. Then, snip the end off of the bag and randomly pipe the almond bark over the popcorn mix. Allow the mixture to cool.
  4. To serve, break up the mix into pieces and place in a bowl. Enjoy!

Filed Under: Candy, Holiday Recipes

Peppermint Bark Cheesecake Truffles

December 15, 2011 by Amy 16 Comments

Peppermint Bark Cheesecake Truffles

I absolutely love making holiday treats. You know it’s the holiday season in our house when our fridge has at least 5 lbs. of butter, 8-10 packages of cream cheese at any given time and 2 extra bags of flour and sugar in the pantry to ensure that I don’t run out of the essentials. ๐Ÿ™‚

The big bake-palooza (as I like to call it) is this weekend. There’s quite a few coworker and neighbor gifts to make this year, which has me super excited! This year’s packages are going to have some old favorites and new ones too, which I plan on sharing with y’all next week.

While this particular recipe won’t be with the gifts this year (since they need to be refrigerated), I wanted to share these truffles with y’all, since this is still a delicious recipe if you’re looking for something to include with your holiday parties. I came up with this recipe for a local recipe contest with the newspaper. I was actually torn between an eggnog inspired dessert and a peppermint bark inspired dessert. This recipe idea won out though, because after asking some friends, it seems like a peppermint bark inspired recipe would be more popular, since quite a few people hate eggnog. Fair enough.

The great thing about these truffles is that they come together pretty quickly. It’s definitely an easy dessert recipe to add to your holiday menu! Just keep in mind since the recipe involves cream cheese, these truffles can’t sit out for too long without needing to be refrigerated. They actually taste a lot better cold anyway.

So, I’m sure you’re wondering how these little truffles did in the recipe contest! I won first place! FIRST PLACE! I still can’t believe it. The prize was a big deal too… $1000 to a local furniture store! (I can’t wait to share with y’all what we used that generous prize on, but I’ll save that for another post once it’s delivered.)

I’m also supposed to be in the paper tomorrow. Crazy, right? I’m completely giddy about that! I’m sure I’ll buy multiple copies for family. ๐Ÿ™‚

Peppermint Bark Cheesecake Truffles
Source: an original

Ingredients:

For the filling:

  • 1 pkg cream cheese, slightly softened
  • 5 candy canes
  • 1/4 cup confectioner’s sugar
  • 1 cup (appx. 6 large) ground graham crackers
  • 1/4 cup white chocolate chips, chopped

For the coating:

  • 2 cups of white chocolate chips or almond bark
  • 1/2 cup of semi-sweet or milk chocolate chips
  • 2 crushed candy canes

Directions:

  1. With a spatula, whip up the cream cheese to a stirrable consistency.
  2. Using a food processor, grind 3 of your candy canes to a powder. Stir the ground candy canes, powdered sugar and ground graham crackers into the cream cheese with a spatula until everything is well-incorporated.
  3. Place the last two candy canes in a quart sized plastic ziploc-type bag, and using a heavy bowl, crush up the candy canes into small pieces (not quite a powder, since you want these to add a bit of a crunch to your truffles). Add the candy canes, along with the chopped white chocolate to your cream cheese truffle mixture.
  4. Chill the mixture well, for four hours or overnight.
  5. When ready to assemble the truffles, divide the mixture into tbsp. sized balls and put the balls on a cookie sheet. By the time you’re done making the truffle balls, the mixture probably warmed up a bit, so place the cheesecake balls in the freezer for 5-10 minutes to firm up.
  6. In the meantime, melt your white chocolate for the coating (either in the microwave or with a double boiler).
  7. Take your cheesecake balls out of the freezer, and individually dip each ball in the white chocolate mixture. Place the finished dipped balls on a cookie sheet lined with wax paper for the chocolate to set.
  8. Once the white chocolate has set, melt your milk or semi-sweet chocolate chips and add a small amount on top of each truffle, along with some crushed candy canes for decoration.
  9. Enjoy these cheesecake truffles right out of the refrigerator and keep the truffles cold, since there is cream cheese in the recipe.

Filed Under: Candy, Chocolate, Holiday Recipes, Nifty Foodie Original

S’mores for a Shower

March 2, 2011 by Amy 19 Comments

Homemade S'mores

I really think the idea for virtual blog parties is so great. I sort of wish food bloggers could have real life parties/potlucks/etc., because it would be some SERIOUS good eats! I was so flattered when I was asked by Amy of Sing For Your Supper to participate in this virtual bridal shower for Kelsey of Apple A Day, but of course, the dilemma was what to bring?

I wanted it to be a simple finger food, but also something that is pretty familiar to most people. That’s when the idea of homemade s’mores somehow popped in my head. I’ve made marshmallows before, so I knew that wouldn’t be a problem and homemade graham crackers? How hard could that be?

Of course, my assumptions were wrong. While cooking my first batch of marshmallows, my candy thermometer somehow SHATTERED in the pot. And before you ask the obvious, no, the thermometer was not sitting at the bottom of the pot. Things like this only happen to me, heh. Because of this, I ran out of one of the ingredients while measuring out my second batch, so the marshmallow flavor was completely an accident. Mixed berry. Not a bad accident, though. I promise. ๐Ÿ™‚

To make the s’mores a little different, instead of using Hershey bars, I spread on a dollop of Nutella! Yummy…majorly…just sayin’.

If you’d like to check out the amazing food that other bloggers are making for Kelsey’s shower, check out Sing For Your Supper and Apple a Day!

Graham Crackers
Source: Smitten Kitchen

Ingredients:

  • 2 cups plus 2 tablespoons all-purpose flour
  • 1/2 cup whole wheat flour
  • 1 cup dark brown sugar, lightly packed
  • 1 teaspoon baking soda
  • 3/4 teaspoon kosher or coarse sea salt
  • 7 tablespoons unsalted butter, cut into 1-inch cubes and frozen
  • 1/3 cupย  mild-flavored honey, such as clover
  • 5 tablespoons milk, full-fat is best
  • 2 tablespoons pure vanilla extract

Directions:

  1. Combine the flour, brown sugar, baking soda, and salt in the bowl of an electric mixer fitted with the paddle attachment. Mix on low to incorporate. Add the butter and mix on low, until the mixture is the consistency of a coarse meal.
  2. In a small bowl, whisk together the honey, milk, and vanilla extract. Add to the flour mixture and mix on low until the dough barely comes together. It will be very soft and sticky.
  3. Lay out a large piece of plastic wrap and dust it lightly with flour, then turn the dough out onto it and pat it into a rectangle about 1-inch thick. Wrap it, then chill it until firm, about 2 hours or overnight.
  4. Adjust the oven rack to the upper and lower positions and preheat the oven to 350ยฐF.
  5. Divide the dough in half and return one half to the refrigerator. Sift an even layer of flour onto the work surface and roll the dough into a long rectangle about 1/8 inch thick. The dough will be sticky, so flour as necessary. Use a cutter to get the shape desired or cut into squares.
  6. Place the crackers on one or two parchment-lined baking sheets. Chill until firm, about 30 to 45 minutes in the fridge or 15 to 20 minutes in the freezer. Repeat with the second batch of dough. Finally, gather any scraps together into a ball, chill until firm, and re-roll.
  7. Mark a vertical line down the middle of each cracker, being careful not to cut through the dough (again, this is for the traditional cracker shape). Using a toothpick or skewer (I like to use the blunt end of a wooden skewer for more dramatic dots), prick the dough to form two dotted rows about 1/2 inch for each side of the dividing line.
  8. Bake for 15 to 25 minutes, until browned and slightly firm to the touch, rotating the sheets halfway through to ensure even baking.


Mixed Berry Marshmallows
Source: mildly adapted from Martha Stewart

Ingredients:

  • Vegetable oil or cooking spray, for pan
  • 4 envelopes unflavored gelatin
  • 2 1/2 cups granulated sugar
  • 1/3 cup seedless strawberry jam or jelly
  • 1/3 cup seedless raspberry jam or jelly
  • 2/3 cup light corn syrup
  • Dash of salt
  • Red food coloring
  • Cornstarch, for dusting

Directions:

  1. Brush a 9-by-13-inch baking dish with vegetable oil. Line dish with parchment paper, leaving a 2-inch overhang on 2 sides; oil parchment. Set dish aside.
  2. Pour 2/3 cup cold water into the bowl of a stand mixer fitted with the whisk attachment. Sprinkle with gelatin; let stand until softened, 5 minutes.
  3. Stir together granulated sugar, jam, corn syrup, salt, and 1/2 cup water in a medium saucepan. Bring to a boil, stirring often. Continue to boil until syrup registers 238 degrees on a candy thermometer (soft-ball stage).
  4. Add syrup to gelatin. Beat on low speed until slightly cooled. Gradually raise speed to high, beating until mixture is cool and peaks form, 10 to 15 minutes. Mix in red food coloring, one drop at a time, to achieve desired shade of pink.
  5. Pour mixture into prepared pan; smooth surface. Let stand, uncovered, until firm, about 3 hours or overnight.
  6. Dust a cutting board with confectioners’ sugar. Run a knife around edges of marshmallow to loosen; un-mold onto cutting board. Peel off parchment. Lightly coat a large sharp knife with oil; cut marshmallow into 1 1/2- to 2-inch pieces, coating knife with more oil as necessary. Dust with cornstarch; toss to coat completely. Marshmallows can be stored in an airtight container up to 1 week.

Filed Under: Candy, Chocolate, Cookies, Entertaining/Parties

Best Fudge Ever!

January 3, 2011 by Amy 7 Comments

Fudge

I’m sorry. I really am. Most of us are making resolutions to be healthier (myself included), and here I am posting a recipe that includes 5 cups of sugar. Please don’t hate me.

I will say, though, this is a recipe I need to share with y’all. This is the fudge that my Mom makes every holiday season. My Memaw makes a very similar version as well, except she swears by marshmallow cream instead of marshmallows.

I finally got the guts to give this recipe a whirl the week of Christmas, and I’m happy to say that I didn’t completely mess it up! I ended up slightly overcooking mine though, so it wasn’t quite as creamy as Mom makes it. I’m still working on getting better with candy making. ๐Ÿ™‚

Mom’s Fudge
Source: My Mom

Ingredients:

  • 5 cups sugar
  • 1/3 cup cocoa powder
  • 1 12 oz. can evaporated milk
  • 1 cup whole milk
  • 1 cup creamy peanut butter
  • 2 cups mini marshmallows
  • 1 tbsp. butter

Directions:

  1. Mix cocoa and sugar in a dutch oven. Add both milks and mix.
  2. Bring the mixture to a boil (to where the mixture almost bubbles over).
  3. Lower the heat and stir the mixture.
  4. Keep cooking and stirring occasionally until the mixture reaches soft ball stage or 235 degrees. (This video is EXCELLENT in helping you to figure out what soft ball stage is.)
  5. Remove the mixture from the heat and working quickly, stir in the butter, peanut butter and marshmallows.
  6. Pour the batter in a parchment paper lined 9×13 inch pan. Allow it to cool for 2-3 hours. Cut and enjoy!

Filed Under: Candy, Chocolate

Peppermint Marshmallows

December 21, 2009 by Amy 3 Comments

Ever since I found out that you could make your own marshmallows, I wanted to make them. The problem? I had a cheap hand mixer before our KA mixer. Now that we had the KA mixer, I had nothing holding me back from making these.

These are delicious, light and have a subtle peppermint flavor. I’m definitely putting the leftover ones from the gift tins in some hot chocolate ASAP.

Peppermint Marshmallows
Source: adapted fromย Alton Brown

Ingredients:

  • 3 packages unflavored gelatin
  • 1 cup ice cold water, divided
  • 12 ounces granulated sugar, approximately 1 1/2 cups
  • 1 cup light corn syrup
  • 1/4 teaspoon kosher salt
  • 1 teaspoon vanilla extract
  • 1/4 teaspoon mint extract
  • 1/4 cup confectioners’ sugar
  • 1/4 cup cornstarch
  • non-stick spray

Directions:

  1. Place the gelatin into the bowl of a stand mixer along with 1/2 cup of the water. Have the whisk attachment standing by.
  2. In a small saucepan combine the remaining 1/2 cup water, granulated sugar, corn syrup and salt. Place over medium high heat, cover and allow to cook for 3 to 4 minutes. Uncover, clip a candy thermometer onto the side of the pan and continue to cook until the mixture reaches 240 degrees F, approximately 7 to 8 minutes. Once the mixture reaches this temperature, immediately remove from the heat.
  3. Turn the mixer on low speed and, while running, slowly pour the sugar syrup down the side of the bowl into the gelatin mixture. Once you have added all of the syrup, increase the speed to high. Continue to whip until the mixture becomes very thick and is lukewarm, approximately 12 to 15 minutes. Add the vanilla during the last minute of whipping. While the mixture is whipping prepare the pans as follows.
  4. Combine the confectioners’ sugar and cornstarch in a small bowl. Lightly spray a 13 by 9-inch metal baking pan with nonstick cooking spray. Add the sugar and cornstarch mixture and move around to completely coat the bottom and sides of the pan. Return the remaining mixture to the bowl for later use.
  5. When ready, pour the mixture into the prepared pan, using a lightly oiled spatula for spreading evenly into the pan. To get red striping, add drops of red food coloring to the mixture in the pan and quickly swirl the coloring in. Dust the top with enough of the remaining sugar and cornstarch mixture to lightly cover. Reserve the rest for later. Allow the marshmallows to sit uncovered for at least 4 hours and up to overnight.
  6. Turn the marshmallows out onto a cutting board and cut into 1-inch squares using a pizza wheel dusted with the confectioners’ sugar mixture. Once cut, lightly dust all sides of each marshmallow with the remaining mixture, using additional if necessary. Store in an airtight container for up to 3 weeks.

Filed Under: Candy, Holiday Recipes

  • « Go to Previous Page
  • Go to page 1
  • Go to page 2
  • Go to page 3
  • Go to page 4
  • Go to Next Page »

Primary Sidebar

Hey Y’all!

Image Credit: Leslie Pendleton Photography


Hey y’all!

Thanks so much for reading! I’m Amy, and I live in south Louisiana with my husband and our rescue dog. I enjoy sharing my love for cooking, baking, crafts & more! Follow my daily adventures on social media!

Follow my Daily Adventures

  • Email
  • Facebook
  • Instagram
  • Pinterest
  • Twitter

Footer

  • Email
  • Facebook
  • Instagram
  • Pinterest
  • Twitter

Archives

Copyright © 2025 · Foodie Pro Theme by Shay Bocks · Built on the Genesis Framework · Powered by WordPress