• Skip to primary navigation
  • Skip to main content
  • Skip to primary sidebar
  • Skip to footer

The Nifty Foodie

  • Home
  • About
  • Recipes
    • Appetizers
    • Beverages
    • Breads/Muffins
    • Breakfast
    • Canning
    • Desserts
    • Dog Treats
    • Entertaining/Parties
    • Fruit
    • Holiday Recipes
    • Louisiana Cuisine
    • Main Dishes
    • Mexican
    • Nifty Foodie Original
    • Nifty Tricks
    • Project Food Blog
    • Pumpkin
    • Salads
    • Sauces/Dips
    • Side Dishes
    • Skinny
    • Slow Cooker
    • Spices
    • Stews/Soups
    • The Disasters
  • My Weight Loss Journey
    • Races
    • Running
    • Weight Loss Milestones
  • Crafts
  • Contact Me

Amy

Peanut Butter Cup Ice Cream

August 17, 2012 by Amy 3 Comments

Peanut Butter Cup Ice Cream

I’ve been making a ton of frozen treats lately. With the crazy heat outside, I feel like the best way to “cook” is to not use any heat at all. Sure, some ice creams use eggs, but since you have to cook the ice cream mixture in that case, I’ve been trying quite a few quick (egg free) ice cream recipes.

One of my favorite ice cream treats is a Sonic Blast with Reese’s cup pieces mixed in. Reese’s cups for me is just one of those candies I can’t say no to. I can only buy them if I have a recipe in mind, otherwise I tend to black out and find myself surrounded by Reese’s wrappers. Those things are my weakness.

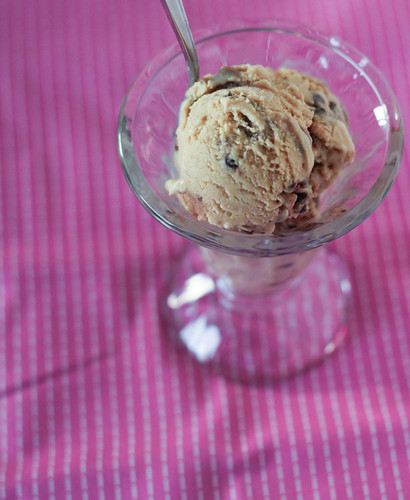
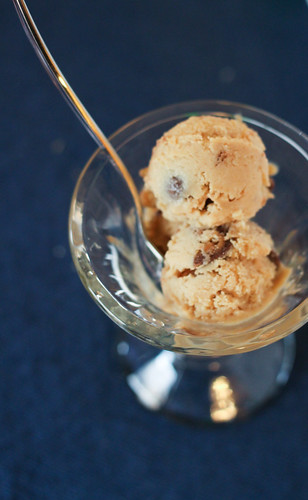
In a brief, insane (yep, insane…I’m trying to lose some weight y’all!) moment, I thought to look up recipes for Reese’s ice cream, and I came across this one. Two great things…it comes together quickly and it’s egg free (no cooking!). Taste wise? Let’s just say that I’m thankful that I bought the fancy little ice cream cup that I have, because 1/2 cup of ice cream fits in there and in my mind, it feels like I’m eating a full bowl. I really could have eaten the whole container in one serving, I imagine.

Peanut Butter Cup Ice Cream
Source: barely adapted from Recipe Girl (originally found in the Cuisinart Ice Cream book)

Ingredients:

  • 1 1/4 cups peanut butter
  • 3/4 cup granulated sugar
  • 1 1/4 cups whole milk
  • 2 cups heavy whipping cream
  • 2 tsp. vanilla extract
  • 2 cups chopped peanut butter cups

Directions:

  1. In the bowl of a stand mixer, add the peanut butter and sugar and beat the mixture for 2 minutes until it’s very smooth. Add the milk to the bowl and mix everything on low for another 2 minutes, until the sugar is completely dissolved. Add the heavy cream and vanilla extract and beat the mixture on low for another 2 minutes, until the ice cream base is well-combined. Chill the mixture in the fridge for an hour.
  2. Take the ice cream mixture out of the fridge, give it a quick stir to make sure nothing settled and add the ice cream to your ice cream machine, and churn the mixture according to your manufacturer’s instructions. Add the chopped peanut butter cups, and stir them into the churned ice cream. At this point, the ice cream will be like a soft serve ice cream. If you’d prefer a more scoopable consistency, place the ice cream in a freezer safe container and freeze the ice cream for a few hours. Enjoy!


Filed Under: Candy, Chocolate, Frozen Desserts, Peanut Butter

A weight loss tool that works for me

August 12, 2012 by Amy 1 Comment

As y’all know, I’m currently calorie counting to lose this weight/lead a healthier lifestyle. As much as I love MyFitnessPal, I also use the BodyMedia Fit Link armband. This tool has really motivated me to just keep on, keeping on.

I wrote a very basic review about the armband in March, and now that I’ve been using it for a few more months (and 20 lbs. later), I’ve found some other features that have made it even more awesome.

Here’s a typical day for me. This was obviously a rest day for me, as you can see in the physical activity. My goal is to always have a 1000 calorie deficit, at the very least, which (theoretically) results in a 2 lbs. loss/week. It doesn’t always work out that way, but it’s a goal that I have.

Another cool feature I’ve noticed after using it for a few months is the “personal bests” tab. I haven’t added comments yet, but I do remember that most of the late July personal bests were from my trip to San Diego. I did TONS of walking there, since my hotel was 1.5 miles from where my conference was held!

Another cool feature on the site is that you can customize your daily goals. My goal weight of 175 is a little on the high side, BMI wise, but I would be thrilled at that weight. If I happen to lose more, great…if not, I know 175 is a pretty good number for my height (5’9″-5’10″ish). I also love being able to see when I will ideally reach my goal weight. At my weight loss rate so far, I should be at my goal weight next summer or fall. Crazy to think about! Just CRAZY!

What kind of tools are you using to motivate you in weight loss?

Disclosure: I was sent this product at no cost to me, as well as free membership for a fair and honest review. All opinions expressed about this product are my own.

Filed Under: Goals, Health/Weight Loss

Peanut Butter Cookies

August 9, 2012 by Amy 3 Comments

Peanut Butter Cookies

A few weeks ago, I decided it was finally time to organize the pantry. Food was just stacked all over the place, and it became pretty darn difficult to figure out what we already had when it came time for grocery shopping. The shelf I spent the most time on was the baking shelf. Y’all…I can’t even tell y’all how many extra boxes and bags of baking supplies were in there, and sadly some of them were expired. 🙁 What a waste. Within that, I also discovered that I had two unopened jars of peanut butter, and one of them was expiring in a month. So, of course I needed to use it up ASAP. Lesson learned….I’m cleaning the pantry more often from now on!

I’m a big fan of cookies, but for some reason, I hardly ever make peanut butter cookies. I like them, but I’m so used to making cookies involving chocolate or just good ol’ sugar cookies. To me, these are sort of the forgotten cookie, and there’s really no reason for that, because peanut butter cookies are delish!

Peanut Butter Cookies
Source: King Arthur Flour

Ingredients:

  • 1/3 cup vegetable shortening
  • 1/2 cup granulated sugar
  • 1/2 cup light brown sugar
  • 1 large egg
  • 1 tsp. vanilla extract
  • 3/4 cup smooth peanut butter
  • 1 1/2 cups all purpose flour
  • 1 tsp. baking soda
  • 1/2 tsp. salt

Directions:

  1. Preheat your oven to 350 degrees. Prepare two baking sheets lined with parchment paper or a silicone mat.
  2. In the bowl of a stand mixer, mix together the shortening, sugars, egg, vanilla and peanut butter, until the mixture is smooth.
  3. Scrape down the bowl and add the flour, baking soda and salt to the wet mixture, beating slowly until the mixture is just combined. This is a dry dough, so it could take a while to come together. If the dough is too crumbly, add a little water at a time until the dough is no longer crumbly.
  4. Using a tablespoon scoop, drop the cookie dough onto your baking sheets, making sure to leave 2 inches between each cookie. Take a fork and flatten the cookie to a 1/2 inch thickness, making a cross-hatch type of design on them.
  5. Bake the cookies for 12-16 minutes, until they just start to brown around the edges of the cookies. The tops will not brown at this point. Cool the cookies on a rack and enjoy!


Filed Under: Cookies, Peanut Butter

When are you a runner?

August 6, 2012 by Amy 37 Comments

I remember those moments as a school kid when the PE teacher would choose team captains. I knew if I wasn’t a captain, I may as well sit down and wait until the very end to be the last kid picked. I was always the last kid picked, even if a best friend was the captain. I was that chubby/slow/awkward/nerdy kid who no one wanted on their team. It stunk.

I also remember every year, we had to do a physical fitness test. Sure, I could do sit-ups and jump rope, but when it came to the run? I would fail. I never got a president’s fitness award or anything like that.  As a nerd, I was always on the honor roll, I was first to finish my times table tests in class, I could spell like it was nobody’s business, but…. I remember feeling like an intense failure when I’d never bring a president’s fitness award to my parents.

The ultimate failure was in 8th grade PE. That day, every student had to run 10 minutes non-stop in the gym for part of the track & field fitness test. And if you stopped, you dropped a letter grade for that test. I remember starting off slow, thinking I can do this…I can…just 10 minutes. I need that A. 5 minutes in, one of the bullies taunted me about being so fat and how ridiculous it was that I was completely out of breath. Between the running and the taunting, I just stopped to walk so I could hold back the tears. My PE teacher screamed my last name and said, “That’s a B. You better run before it’s a C!” So, I got back to it and soon after, my sides started cramping. I had to stop again, but I knew that making a C would be terrible. I didn’t make Cs in school, but every muscle in my body was screaming for me to stop. So, I did. I got yelled at again, and the bullies started with the fat jokes. That PE teacher didn’t care…in those days, bullying was a normal thing. It still hurt like hell, but no teacher really did anything about bullies. Those were the longest 10 minutes of my life, and I ended up with a D grade for that test. My very first D.

That’s something I don’t think I will ever forget. Sure, it was just a 10 minute PE test, but I let myself fail. I let the bullies get to me, and I didn’t get the grade that I wanted. I was so ashamed, and told myself that running was just one of those things I’d never be able to do.

Fast forward 15 years. Now, I’ve been following a good bit of healthy living blogs, watching people run for leisure or because it’s routine. I’ve read about people’s journeys to train for a half or ::gulp::, even a full marathon. It’s been inspiring to read about, but the memories from middle school left a bitter taste in my mouth for running. If I couldn’t run 10 minutes then, what makes me think I could run 10 minutes now?

I wanted to try it, though. I’ve read a few blogs where people have lost 100+ lbs., and their main cardio activity was running.

Hold the phone! Fat people like me CAN run??!

So, I did the first workout of Couch to 5K. One minute running, 90 seconds walking…8 times. I was dead after that. DEAD. I kept thinking…that was just ONE MINUTE. How do these people do it?!

But…I was determined. If they can do it, so can I.

The crazy thing is, I’m doing the Couch to 5K in the middle of summer in Louisiana. Humidity sucks. Heat sucks. I’m a dripping gross mess when I get home, and I’m usually doing my runs at 7:00/7:30pm. Still…it’s hot y’all!

There were many times where I told myself that I should try something else. I’m 265 lbs. I’m too fat for this. But then, during my 20 minute run in week 5, I remembered those bullies.

The ones who told me Shamu doesn’t run…
The ones who told me I was a waste of air…
The ones who told me to get out of their way…

I had a moment where I was about to cry, because I felt like I couldn’t do this anymore. Who was I? I’m not a runner…I will NEVER be a runner….

But when I looked down at my phone, I realized I had already ran for 11 minutes. Non-stop. If I kept going, I could go home knowing that I ran twice the amount of that fitness test in middle school. So I pushed through it. When I was done, I didn’t cry…all I did was smile. I did this. I ran over a mile….without a break.

And then yesterday, I ran for 25 minutes without a break, going 30 seconds faster/mile than the 20 minute run. This week, my runs are nothing but 25 minutes non-stop running. What happened? 6 short weeks ago, I was having my lungs explode over a minute of running. And now??!

COULD I BE A RUNNER?

I mean, first I should ask…AM I a runner yet? If not, when do you call yourself a runner?

Filed Under: Health/Weight Loss

Bing Cherry Sorbet

August 3, 2012 by Amy 4 Comments

Bing Cherry Sorbet

Back in high school, I worked at a Winn-Dixie as a cashier. I learned a lot of important life lessons while I was a cashier. When hosting a crawfish boil, one must buy at least 2 cases of beer with the vegetables you are about to boil. When one has a baby, a bottle of wine is a necessity when you have a cart full of baby food. Then, there were people who brought new foods to my attention, especially produce. I learned about prices of produce too…bananas were dirt cheap and cherries were ridiculously expensive. I often wondered what was SO special about fresh cherries when you could buy a jar of maraschinos for $2 or something.

Now, don’t judge me. When I was younger, cherries to me were simply the top of a sundae. 🙂 Sure, I enjoyed plenty of fresh fruits, but cherries weren’t one of those when I was a kid. And I completely understand why…being 1 of 4 kids, I’m sure buying cherries for a family of 6 would be ridiculously expensive.

I didn’t get to try fresh cherries until a few years ago. I happened upon them in the grocery store, and when I saw that they were $2.99/lb., I figured it was definitely time to try these. I bit into one and immediately hurt my tooth. Wait a second…these things have PITS?? (Remember…my experience with cherries were jarred maraschinos. :-P) No worries though…there was no dentist needed after that mistake. I’m glad I tried them, though, because I was completely in love with these little treats. Whenever they’re in season now, I easily go through a bag of these in a couple of days. With the weather being so crazy hot lately though, I wanted to make a frozen dessert with these. I thought about ice cream, but if I made something like Cherry Garcia, my diet would be fairly screwed. There’s no portion control when it comes to Cherry Garcia ice cream, y’all. I just can’t do it, so I don’t even buy it. So, I searched for a sorbet and found this recipe. What I love about sorbets is that they’re very quick. When you want a frozen dessert in a pinch, go for a sorbet! It tastes absolutely refreshing and light, which is really perfect when you have 100 degree heat outside. 🙂

Bing Cherry Sorbet
Source: mildly adapted from Cooking Light

Ingredients:

  • 1 cup sugar
  • 2/3 cup water
  • 4 cups pitted fresh Bing cherries (about 1 1/3 pounds)
  • 3 tablespoons brandy
  • 2 tablespoons fresh lime juice

Directions:

  1. Mix 1 cup of sugar and 2/3 cup of water in a 2-cup measuring glass. Microwave the mixture for 2 minutes, and allow the syrup to completely cool before continuing with the recipe.
  2. Then, add the sugar syrup, cherries, brandy and lime juice to a blender and puree for about 1 minute, until the mixture is smooth. Churn the sorbet in an ice cream maker, according to the manufacturer’s instructions. Add the sorbet to a freezer-safe container, cover and freeze for 4 hours (or overnight), until firm. Enjoy!


Filed Under: Frozen Desserts, Fruit

Cream Cheese Pound Cake with Strawberry Coulis

July 31, 2012 by Amy 3 Comments

Cream Cheese Pound Cake w/ Strawberry Coulis

Last week, my whole body got confused. For the first time since last fall, I felt the urge to bake something with pumpkin. The reason? I went out of town to San Diego for a work conference. The minute I stepped off the plane, I had to ask someone if this was real. I mean, c’mon. 70 degrees at 1pm? IN JULY??! No way. Down here, we get maybe 2 days like that, and they’re in the middle of October. I’m completely jealous of y’all who call San Diego home. When I came home, I was instantly reminded with the 105 degree heat index that it is definitely still the summer.

I guess I should embrace it, since it’s here for another month or so. When it comes to baking in the summer, I try to make things that aren’t super rich. I like to stick to using fruit and simple flavors, like this pound cake. While pound cake contains an unreal amount of butter, for some reason, it just works really well with fruits. This pound cake is perfectly moist on the inside, but on the outside, the cake bakes up to a nice, sort of crunchy crust (hard to describe, but I swear…it’s great). And the strawberry coulis (pretty much a fancy name for sauce) that accompanies this cake is just perfectly refreshing and light.

Cream Cheese Pound Cake with Strawberry Coulis
Source: Smitten Kitchen

Ingredients:

For the cake:

  • 1 1/2 cups (3 sticks) unsalted butter, at room temperature
  • 1 package (8 ounces) Philadelphia brand cream cheese, at room temperature (the brand is recommended in SK’s post)
  • 3 cups sugar
  • 6 large eggs
  • 1 1/2 tsp. pure vanilla extract plus 1/2 tsp. almond extract
  • 3 cups all purpose flour
  • 1 tsp. salt

For the coulis:

  • 2 cups quartered hulled strawberries (about 12 ounces)
  • 1/4 cup water
  • 3 tbsp. sugar
  • 1 tbsp. fresh lemon juice

Directions:

  1. To make the cake, preheat the oven to 325 degrees. Butter and flour a bundt pan very well to prepare it for the cake batter
  2. Place the butter and cream cheese in the bowl of a mixer and beat on medium speed for about 2 minutes, until the mixture is smooth. Add the sugar and beat the mixture on high for at least five minutes, until very light and fluffy. Add the eggs in one at a time, beating well after each egg and scraping down the bowl with a spatula regularly. Add the vanilla and almond extracts, as well as the flour and salt. Beat the mixture on low until the mixture is just mixed (be careful not to overbeat).
  3. Add the batter to the bundt pan and tap the pan to ensure that the top is even. Bake the cake for 75 minutes, until the cake is golden brown and a toothpick inserted into the center of the cake comes out cleanly.
  4. Take the pan out of the oven and allow the cake to cool in the pan on a cooling rack for 20 minutes, then flip the cake out onto a cooling rack, allowing it to completely cool there.
  5. To make the coulis (which can be made one day ahead), combine the coulis ingredients in a blender, and puree the mixture until it is very smooth. Optional: press the mixture through a strainer to remove the seeds. Chill the coulis until cold.

Filed Under: Cakes/Cupcakes, Fruit

Very lucky…

July 19, 2012 by Amy 3 Comments

Since I’ve been on Twitter, I’ve discovered how awesome Twitter contests are. It’s like blog giveaways, but way quicker. Most of the time, the odds are better since less people enter, so I definitely go for them. Most of the time, prizes happen through a Twitter chat or a trivia contest. Easy enough…Google is your friend, y’all!

A couple of months ago, KitchenAid held trivia contests to publicize the Senior PGA tournament that they were sponsoring. The first prize they were giving away was this:

Image source

It was an under counter fridge. A gorgeous one at that. So, I answered the trivia question. Now, I wasn’t really holding my breath on this one, since it was a high value prize, but heck, you never know until you enter, right?

Well….the next day this happened…

WHAT???!

So yeah..I won it!!

I told my husband, and while we were stoked, we were both unsure how we’d squeeze this in our kitchen. So, we planned on just keeping this in our garage in the meantime. 🙂

Lo and behold, my husband knew someone who was building a house, and needed an under counter fridge. So, we sold the fridge to him since he definitely would use it for the purpose intended. That gorgeous fridge shouldn’t live in a garage!

With some of the money, I decided to gift myself a fun kitchen prize that I’ve been wanting for quite a while. Check it out!

I’m WAY excited to break this bad boy in. Thank you so much to the folks at KitchenAid for the amazing prize. While the fridge didn’t work for us, this mixer definitely will! I would have never purchased this ordinarily, but because of the prize, I decided to treat myself (and ultimately, our family/friends/coworkers who get the baked goodies that come from our kitchen). 🙂 Cool, right??

Have you tried Twitter giveaways before?


Filed Under: About Us

Double Chocolate Chip Cookie Dough Ice Cream

July 18, 2012 by Amy Leave a Comment

Chocolate Chip Cookie Dough Ice Cream

Ahh cookie dough. Whenever I see cookie dough, I imagine myself sitting on the sofa with a roll of Pillsbury dough and a spoon. Don’t judge me. I know half of you are nodding your head and smiling — y’all know how awesome it is! I know, I know…salmonella risk. However, I’ve been eating cookie dough for years and I’m still kicking. 😛

Because I’m paranoid, I just want to disclose that I’m not encouraging ANYONE to eat cookie dough containing raw eggs, like Pillsbury dough…I don’t want to get sued over this post darnit!

Anyway, since I have been seeing cookie dough all over the blogs lately, I just had to make something involving it. The craving was just too strong. I had some heavy cream in the fridge, and I figured that it would be the perfect excuse to make some ice cream. I had this recipe from Annie’s blog starred for quite a while, because it wasn’t your ordinary cookie dough ice cream. No…it was DOUBLE chocolate chip cookie dough ice cream. Oh man, y’all. Not only are there chunks of cookie dough in there, but the ice cream is also cookie dough flavored.

Once I finished making it, it was SO hard to not eat the whole batch right out of the ice cream maker bowl. Seriously. In fact, that little ice cream bowl you see in the picture is my secret weapon while I’m calorie counting. It’s dainty, makes me feel all sorts of fancy, and it fits two scoops of ice cream on it. For this gal who could put away a pint of ice cream, this is awesome. Portion control y’all. I’m learning.

Double Chocolate Chip Cookie Dough Ice Cream
Source: Annie’s Eats (ice cream from Joy the Baker and cookie dough from The Perfect Scoop)

Ingredients:

For the cookie dough:

  • 5 tbsp. salted butter, melted (or unsalted butter plus ¼ tsp. salt)
  • 1/3 cup packed light brown sugar
  • 1/4 cup flour
  • 1/2 tsp. vanilla extract
  • 3/4 cup mini chocolate chips

For the ice cream:

  • 3 tbsp. unsalted butter
  • 2 cups heavy cream
  • 2/3 cup dark brown sugar
  • 4 large egg yolks
  • Pinch of coarse salt
  • 2 tsp. vanilla extract
  • 1 1/2 cups whole milk
  • 1 cup chocolate chips

Directions:

  1. To make the cookie dough chunks, stir the melted butter and sugar together in a mixing bowl until everything is smooth. Add in the flour, then the vanilla and mini chocolate chips. The dough will be very soft before chilling. Form the dough into a disk over some plastic wrap, wrap the dough well in the plastic wrap and refrigerate until the dough is firm.
  2. While the dough is chilling, make the ice cream by first melting the butter in a medium saucepan over medium-high heat. Stir often over the heat (to avoid burning), until the butter is a deep golden brown color. Whisk in the heavy cream and heat the mixture until simmering. While this is going on, in a medium bowl, vigorously stir the egg yolks and the brown sugar are pale and fluffy.
  3. Once the cream mixture is warm, add a small amount of the cream mixture to the bowl with the egg yolk mixture, whisking well. Once that’s done, slowly whisk in the rest of the cream mixture. Then, add in the salt and return the egg/sugar/cream mixture to the saucepan and heat the mixture until slightly thickened, (the temperature should read 170-175 degrees on a thermometer). Immediately take the saucepan off of the heat and pour the mixture through a fine sieve into a bowl.
  4. Stir the vanilla extract and milk into the egg/sugar/cream mixture until well-mixed. Then cover the bowl and chill the ice cream mixture thoroughly in the refrigerator.
  5. Once the ice cream mixture is chilled, churn the ice cream in an ice cream maker (according to the instructions on your specific ice cream maker). While the ice cream is churning, chop the cookie dough into small chunks. Once the ice cream is done churning, transfer to a freezer safe bowl or container and stir in the chocolate chips and cookie dough chunks. Freeze the ice cream in the freezer for a few hours (or until firm) before serving.

Filed Under: Chocolate, Cookies, Frozen Desserts

10%

July 11, 2012 by Amy 27 Comments

Do you ever look at pictures of people losing weight and think their before looks like they were inflated with extra air or something? I’m not trying to insult myself, but when I stare at my nearly 300 lb. self from January squeezing into an XL shirt, I think that. I went out in public like that regularly. I’m really embarrassed thinking back on it, but I always told myself that I was not a size 2XL shirt gal. Clearly, I should have been.

It’s been a little over seven months, three of those being a lull for me (I sort of gave up in the spring…woops!), but I finally reached the 260s this morning! That’s 10%, yall!

I took these pictures tonight, and while I don’t see much of a body shape difference, I definitely see that the XL shirt is a LOT looser. And yes, that’s the exact same shirt and capris I’m wearing in the pic to keep things uniform for progress pics. I also see it in my face…my double chin is slowly going away. 🙂

And yeah….I realize that after taking these pics that I was totally wearing a standard bra and in my current pic I was wearing my sports bra. So, things do look a lot different in the ladies department in these pics, but the difference isn’t that drastic. 😛

10% lost before/now

10% is a big step on this weight loss journey for me. While I still have about 85 lbs. to lose, I think this may have been the biggest hurdle for me to cross.

I feel like I’ve found a good balance, food and exercise wise. I’m on my weight loss plan every day. There are no “cheat days” for me, because I do not want to fall off the wagon like I have in the past. I log every single bite, but I still enjoy a weekly treat and/or meal. I just don’t binge anymore. In fact, you may notice I’m still baking like crazy (if you read my food blog). I’m happy that I get to enjoy every dish that I write about but now, I’m no longer eating 3-4 brownies in one sitting or a heaping bowl of homemade ice cream. It’s much smaller servings this time around, and I’m completely fine with that. As long as I have the calories (or since I’m giving Weight Watchers a try for a month right now, points), I don’t feel an ounce of guilt enjoying a treat.

Weight loss for me isn’t happening quickly. I’m not losing 5 lbs./week. I’m averaging about 2 lbs./week lately, and I’m completely stoked about that. In fact, I haven’t gained any weight the past 7 weeks that I’ve been back in the weight loss groove. 😀 So, while it’s slow, I know I’m still losing, and to me, that’s all that matters. At this rate, if I keep losing 2 lbs./week, I’ll be at my goal by spring of next year! That’s a really exciting thought, y’all!

Here’s some NSVs (non scale victories) that I’ve noticed since starting my weight loss journey:

  • Pants size before: 26 —– Pants size now: 22 or 24 depending on the jeans
  • Work shirt size before: 22/24 or 3x —– Work shirt size now: 18/20 or 2x (although I tried on a 1x shirt at Macy’s last week and that fit perfectly!)
  • I have to hook my bra on one notch in instead of pulling hoping that it hooks on the last notches.
  • I had terrible lower back pain this past winter. That’s not an issue anymore.
  • I ran for 5 minutes in a row TWICE this week (Thank you Couch to 5k!).
  • My BodyMedia Fit armband is no longer squeezing on my arm. It fits, but it doesn’t leave a red mark where the band was when I take it off.
  • My wedding rings are starting to feel loose again.

I know this post may come across as braggy, but I can’t help it. I’m VERY proud of myself for reaching this step. Look at what losing 10% can do! I even get a little reward for losing 10%. 🙂 Just all sorts of great things, y’all!

So, here we go to the next milestone! 50 lbs., here I come!

Filed Under: Goals, Health/Weight Loss, Weight Loss Milestones

Warm Spinach, Quinoa & Mushroom Salad

July 10, 2012 by Amy Leave a Comment

Warm Quinoa Salad

You know, the crazy thing about starting this diet is that when I work-out, I find that I want to eat better. I’m slowly introducing myself to healthier foods that I haven’t tried before. My grocery cart has been full of fresh foods, which is so not like me. It’s a wonderful change, because every week, my clothes are getting looser and my body just feels stronger. It’s amazing how quickly your body can change in a few short months!

Quinoa has been one of those ingredients that I’ve been very curious about, but as long as I had rice and pasta, I felt like I didn’t need to try quinoa. I was actually worried it would taste terrible, but when I went to Whole Foods one weekend, I found quinoa in their bulk aisle and bought a couple of cups worth. I love that about their bulk aisle. You can buy just a little bit to try, and there isn’t much waste if you end up hating whatever you get there. 🙂

Now, the challenge was to find a recipe for my first try with this grain. I was surprised to find so many recipes featuring quinoa, so I searched for a recipe based on what I had in the fridge. Since spinach and mushrooms are usually in my fridge, this was a no brainer. The original recipe calls for shiitake mushrooms, but I had a feeling regular white mushrooms wouldn’t make much of a difference. I also halved this recipe, and I still had a good bit left for leftovers. 🙂

For those of you who are wondering, quinoa (to me) tastes a lot like a nutty brown rice. It has a bit of a bite to it (texture wise), but really, I think I could easily sub this for rice in most recipes I make. 🙂 As for this dish, the salad was very simple to throw together, and it tasted really great! It would be perfect to enjoy this summer, since it’s such a light dish!

Warm Spinach, Quinoa & Mushroom Salad
Source: mildly adapted from Everyday Food

Ingredients:

  • 1/2 cup red-wine vinegar
  • 1/3 cup olive oil
  • Coarse salt and ground pepper
  • 2 pounds fresh sliced mushrooms
  • 1 1/2 cups quinoa (well rinsed in a strainer)
  • 1 pound baby spinach
  • 8 ounces feta cheese, crumbled

Directions:

  1. Preheat the oven to 425 degrees. In a small bowl, vigorously whisk the vinegar, oil, 1 tsp. salt and 1/4 tsp. pepper together until the dressing is well combined.
  2. On a foil-lined baking sheet, toss the mushrooms with half of the dressing and roast the mushrooms for about 20-25 minutes (tossing occasionally).
  3. While the mushrooms are roasting, combine the rinsed quinoa with 3 cups of water and 1.5 tsp. salt in a small saucepan. Bring everything to a boil and then reduce the heat to medium. Cover the saucepan and simmer the quinoa until the liquid has absorbed, for about 15-20 minutes.
  4. To assemble the salad, place the spinach in a large bowl and top it with the warm mushrooms, quinoa and the rest of the dressing. Toss the salad until everything is combined (the spinach will wilt) and top with the crumbled feta before serving.

Filed Under: Salads

  • « Go to Previous Page
  • Go to page 1
  • Interim pages omitted …
  • Go to page 29
  • Go to page 30
  • Go to page 31
  • Go to page 32
  • Go to page 33
  • Interim pages omitted …
  • Go to page 85
  • Go to Next Page »

Primary Sidebar

Hey Y’all!

Image Credit: Leslie Pendleton Photography


Hey y’all!

Thanks so much for reading! I’m Amy, and I live in south Louisiana with my husband and our rescue dog. I enjoy sharing my love for cooking, baking, crafts & more! Follow my daily adventures on social media!

Follow my Daily Adventures

  • Email
  • Facebook
  • Instagram
  • Pinterest
  • Twitter

Footer

  • Email
  • Facebook
  • Instagram
  • Pinterest
  • Twitter

Archives

Copyright © 2026 · Foodie Pro Theme by Shay Bocks · Built on the Genesis Framework · Powered by WordPress