• Skip to primary navigation
  • Skip to main content
  • Skip to primary sidebar
  • Skip to footer

The Nifty Foodie

  • Home
  • About
  • Recipes
    • Appetizers
    • Beverages
    • Breads/Muffins
    • Breakfast
    • Canning
    • Desserts
    • Dog Treats
    • Entertaining/Parties
    • Fruit
    • Holiday Recipes
    • Louisiana Cuisine
    • Main Dishes
    • Mexican
    • Nifty Foodie Original
    • Nifty Tricks
    • Project Food Blog
    • Pumpkin
    • Salads
    • Sauces/Dips
    • Side Dishes
    • Skinny
    • Slow Cooker
    • Spices
    • Stews/Soups
    • The Disasters
  • My Weight Loss Journey
    • Races
    • Running
    • Weight Loss Milestones
  • Crafts
  • Contact Me

Amy

When I meet my Internet friends..

April 21, 2011 by Amy 4 Comments

I know this isn’t like my usual recipe posts for this blog, but since this trip was so food heavy, I just HAD to post on here! I hope you don’t mind, and I certainly hope you aren’t too hungry.

Back in the wedding planning days, I blogged for an awesome site called WeddingBee. My moniker was Ballet Flat, which is perfect for this flats-wearing gal. I really just thought this was another blog, but little did I know that these women I blogged with would become really good friends of mine.

Every year, these ladies plan a meet-up. Last year, it was in Vegas and this year, it was in NOLA. I had no excuse–I had to do this! It isn’t very often that I meet my Internet friends. I’m pretty shy in real life, so I’m always pretty nervous about shutting down and being super quiet. And before you laugh at me, it has happened before. I actually remember sort of shutting down and not talking to anyone (with the exception of the friend I went with) at a local blogger meet-up. Fail.

For this meet-up, I got to work with the fabulous Serena of Big Apple Nosh to plan all of the foodie events for the trip. Serena and I had a blast introducing everyone to some fabulous NOLA fare. 🙂

You might notice that quite a few pictures of food are missing. I totally forgot to take pictures most of the time, because I was probably talking my mouth off. This gal did NOT show her shy side over the weekend…thank goodness. 😉

Thursday evening, we started with some great (CHEAP) food from Cafe Maspero’s. It was such a fun place to meet everyone for the first time, and heck, where else can you get a draft beer and HUGE sandwich with fries for about $10?

On Friday morning, we attended a cooking class, where we learned about gumbo, etouffee, pralines and bread pudding. It was a fun, interactive class, but I found that the instructors made the dishes pretty mild. I guess they want to gradually ease in the tourists to some Louisiana flavors? Boo…

Gumbo

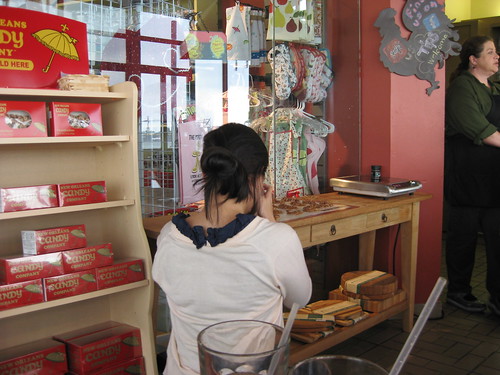
You know this is a blogger trip when everyone is snapping pictures at the food.

Busted, Big Apple Nosh!

Big Apple Nosh doing her thing!

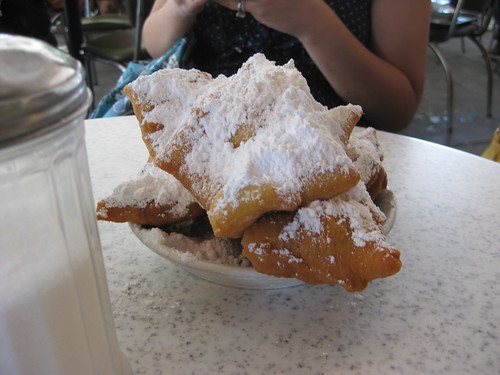
On Saturday, we organized a mini food tour for everyone. We made sure that we let everyone try some real gumbo (not the bland stuff from class) from Coop’s Place, yummy muffalettas from Central Grocery and of course, beignets from Cafe du Monde!

Beignets

That evening, we had a dinner at Oceana Grill in the French Quarter. We surprised everyone with some king cake, since Haydel’s Bakery makes them year-round! And of course, there had to be a prize for whoever got the baby! 🙂

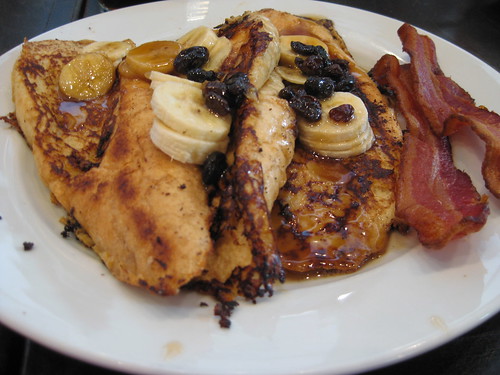
Sigh…Sunday. This was the end of the trip for everyone, and we knew we had to offer everyone a brunch to remember. The Ruby Slipper fit the bill. Bananas Foster Pain Perdu anyone? I think I’ll only make french toast with french bread from now on!

Bananas Foster Pain Perdu

I’m still super bummed that the weekend flew by. It was so fabulous to meet these amazing ladies, and I can’t WAIT for the next meet-up with everyone! 🙂

Filed Under: Entertaining/Parties, Louisiana Cuisine

Grilled Chicken Fajitas

April 12, 2011 by Amy 3 Comments

Chicken Fajitas

I can’t believe it’s April already. Wasn’t I just wrapping Christmas gifts last week or something? 🙂 With Spring in full force, it’s time to fork out the grill! I absolutely LOVE warmer months, because I’m a sucker for grilled everything! Also, usually my husband volunteers to do the cooking on grilling nights. (Win!)
My husband and I are huge fans of Tex Mex. One of our favorite restaurants to visit is a tex mex place. They have some killer queso blanco, the margaritas are just so tasty, and their fajitas? My goodness…they are majorly yummy! However, at $15 an order, it’s not the most $$ friendly meal, so I wanted to find a way to make this at home.
 
Of course, I had to turn to food bloggers for some help, and I came across this one on The Way the Cookie Crumbles. The ingredients are simple, and the recipe is fool-proof! Best of all? It involves the grill! (Note: If you don’t have an outdoor grill, you can always use an indoor grilling pan like I did.)
 
The only thing I would change about this recipe is that I would keep the ribs and seeds in the jalapenos, because these fajitas really didn’t end up that spicy. 
Grilled Chicken Fajitas
Source:  The Way the Cookie Crumbles, originally by Cooks Illustrated
Ingredients:
  • â…“ cup juice from 2 to 3 limes
  • 6 tablespoons vegetable oil
  • 3 medium garlic cloves, minced
  • 1 tablespoon Worcestershire sauce
  • 1½ teaspoons brown sugar
  • 1 jalapeno, seeds and ribs removed, minced
  • 1½ tablespoons minced fresh cilantro leaves
  • table salt and ground black pepper
  • 3 boneless, skinless chicken breasts (about 1½ pounds), trimmed of fat, tenderloins removed, pounded to ½-inch thickness
  • 1 large red onion (about 14 ounces), peeled and cut into ½-inch-thick rounds (do not separate rings)
  • 1 large red bell pepper (about 10 ounces), quartered, stemmed, and seeded
  • 1 large green bell pepper (about 10 ounces), quartered, stemmed, and seeded
  • 8-12 (6-inch) flour tortillas
Directions:
  1. In a medium bowl, whisk together the lime juice, 4 tablespoons oil, garlic, Worcestershire, brown sugar, jalapeno, cilantro, 1 teaspoon salt, and ¾ teaspoon pepper. Reserve ¼ cup marinade in a small bowl; set aside. Add another teaspoon salt to the remaining marinade. Place the chicken in the marinade; cover with plastic wrap and refrigerate 15 minutes. Brush both sides of the onion rounds and the peppers with the remaining 2 tablespoons oil and season with salt and pepper.
  2. Remove the chicken from the marinade and place it smooth side down on the hotter side of the grill; discard the remaining marinade. Place the onion rounds and peppers (skin side down) on the cooler side of the grill. Cook the chicken until it’s well browned, 4 to 5 minutes; using tongs, flip the chicken and continue grilling until it’s no longer pink when cut into with a paring knife or an instant-read thermometer inserted into the thickest part registers about 160 degrees, 4 to 5 minutes longer. Meanwhile, cook the peppers until spottily charred and crisp-tender, 8 to 10 minutes, turning once or twice as needed; cook the onions until tender and charred on both sides, 10 to 12 minutes, turning every 3 to 4 minutes. When the chicken and vegetables are done, transfer them to a large plate; tent with foil to keep warm.
  3. Working in 2 or 3 batches, place the tortillas in a single layer on the cooler side of the now-empty grill and cook until warm and lightly browned, about 20 seconds per side (do not grill too long or the tortillas will become brittle). As the tortillas are done, wrap them in a kitchen towel or a large sheet of foil.
  4. Separate the onions into rings and place them in a medium bowl; slice the bell peppers lengthwise into ¼-inch strips and place them in the bowl with the onions. Add 2 tablespoons reserved unused marinade to the vegetables and toss well to combine. Slice the chicken into ¼-inch strips and toss with the remaining 2 tablespoons reserved marinade in another bowl; arrange the chicken and vegetables on a large platter and serve with the warmed tortillas.

Filed Under: Mexican, Poultry

Bullying

April 4, 2011 by Amy 6 Comments

I remember my first bully. She lived a few doors down, and for some reason, just hated me the second I moved in the neighborhood. It created some really awkward moments in the neighborhood. Most afternoons, a bunch of neighborhood kids would come to my house to play basketball or wall-ball (does ANYONE remember wall-ball??), but sometimes this bully would tell some kids not to come to my house or else they won’t be “cool” anymore. This bully was considered a “cool” kid back in the day, so no one wanted to get on her bad side. Honestly, it really hurt that I was being isolated when I never did anything to her.

Well, it started to escalate in middle school. In middle school, they combined the bus stop to where it was at her house, and at some points, I’d watch from my house until the bus was in sight and I’d RUN to the stop to make sure I got on the bus. I just figured not being at the stop was the best thing I could do to avoid being hurt. Well, one year, I had a huge project to bring to school (yay science fair), so I had to take my time to get to the stop. When I got there, I dropped my backpack full of books on the sidewalk and sort of stared at the ground. Next thing you know, a neighborhood kid ran up to me, took my backpack and plopped it in the bully’s yard. I didn’t think it was a big deal  until I picked up my backpack. He put my backpack in a pile of dog surprises. The bully then told me that this would teach me that I don’t belong at HER bus stop. I’ll never forget how much the kids made fun of me on the bus ride to school. I can’t say I don’t blame them. I smelled like crap to them. The usual 5 minute ride from the bus stop to the school felt like an eternity, and the 20 minutes I spent in the bathroom cleaning and drying my backpack was a much larger pill to swallow. I ended up with a ::fun:: nickname after that day that didn’t really go away until high school.

I also remember another bully in high school. He hated how fat I was, so he made it a point to tell me how fat I was everytime he saw me. I was able to try to ignore this guy, because I had my friends in school to hang out with and they would cheer me up afterwards. However, after school during the usual rush to the bus, he screamed “Hey Fat (insert last name)…I got something for you!” So, stupid me. I walked towards him. He then decided that the “something” would be a huge wad of spit on my jacket. Well, actually it was my Dad’s jacket that I accidentally took that morning in a rush. I got spit on for no reason. So, I ended up sneaking the jacket in the washing machine before my Dad knew about it. My thoughts leaned towards worrying that my Dad would be mad that I got his jacket spit on. I don’t think I ever told my Dad about that day, but in hindsight, if I told my Dad, I know the jacket wouldn’t have been on his mind at all.

Bullying sucks. I know it first hand. I never was a popular kid in school. Sure, I had a few friends, but most of the popular girls and almost all boys weren’t very nice to me. I was a class A dork: frizzy hair, glasses, fat, band dork, smart. I guess I was a moving target for the bullies, and boy oh boy, did they strike!

It’s been about 10 years since I graduated from high school. Since I left the bullies. The bullies never followed me to college. I guess bullies didn’t belong in college, and I was thankful for that. I actually sort of forgot about the bullies until last week. Last week, one of those bullies tried to add me on Facebook.

Of course, a good chunk of those bad memories came back. The taunting…the jokes…the pranks. It’s amazing how much I remember, and how much I tear up just thinking about it. I’m just relieved that those bullies aren’t a part of my life anymore, and I’m surrounded by amazing people who really make me happy. 🙂 Oh, and no…that bully is NOT my friend on Facebook. I guess I hold a grudge…

As much as bullying sucks though, I think I have to thank those bullies. Those bullies made me a nicer person. They made me realize just how much words and actions can really hurt. Now, I’m not perfect…I do get snarky, but overall, I’d like to think that I’m a nice person. Bullies also made me realize how amazing friendships and family are. Whenever a bully pushed me down (verbally, physically, however), my friends and family were there. I could hide in my group of friends and have a good cry over it. I know they would always be there for me when things got tough, and for that, I’m so thankful for them. I was never a depressed person, but I know that without my friends, I probably wouldn’t be who I am today or where I am today. So, my friends/family (you know who you are), thank you so much. Thanks for the hugs, the kleenex and the after-school bike rides to the Icee store. 🙂

Did you have bullies in school? Do you think you’re a different person because of them?

Filed Under: About Us

Strawberry Orange Frozen Yogurt

April 3, 2011 by Amy 3 Comments

Strawberry Brown Sugar Yogurt

This past weekend, I bought a flat of strawberries. Since it’s the peak of the season, how could I not? It took me about an hour to slice up a flat of strawberries, and as delicious as they are on their own, I figured I had to make SOMETHING with them!

Well, a couple of weeks ago, one of my awesome food blogger friends, Serena of Big Apple Nosh, filled me in on a new challenge that she’s doing on her blog: The NoshGirl Chef Challenge! The challenge features two common ingredients, and each blogger has to come up with a recipe idea using those ingredients. The two ingredients for the challenge were plain yogurt and brown sugar. Since I had these strawberries on hand, I definitely wanted to also feature them in my recipe.

I really didn’t come up with the idea until this morning. Talk about last minute! I was debating between a coffee cake, a cookie or something frozen. Well, it’s already feeling like summer out here, so I had to do the frozen idea. I was worried about using brown sugar instead of regular sugar, but it really goes well with the strawberries. The addition of orange zest and juice also brings out the flavor of the strawberries really well. I really love how this turned out!

Strawberry-Orange Frozen Yogurt
Source: an original

Ingredients:

  • 1 lb. strawberries, chopped and hulled
  • 1 5 oz. container of plain greek yogurt
  • 1/4 cup heavy cream
  • 1/3 cup light brown sugar
  • 1 tsp. orange zest
  • 1 tsp. orange juice
  • 1 tsp. vodka

Directions:

  1. Place the chopped strawberries and brown sugar in a bowl, stir the mixture together and allow to chill in the refrigerator for about an hour for the sugar to sort of dissolve into the strawberries.
  2. Place the strawberry mixture, yogurt, heavy cream, zest, juice and vodka in a blender and blend until pureed.
  3. Pour the mixture in an ice cream maker and mix according to the manufacturer’s instructions.
  4. Let the frozen yogurt set in the freezer for a couple of hours, and enjoy! (Note: If you serve this a couple of hours out of the freezer, it will be the perfect texture. I found that the longer I left it in the freezer, the icier the frozen yogurt became, because strawberries tend to contain a lot of water and can contribute to an icier texture when pureed.)

Filed Under: Frozen Desserts, Fruit, Nifty Foodie Original

Hobby Lobby–I love you

March 27, 2011 by Amy 5 Comments

When I first started sewing, I quickly became friends with my local Hobby Lobby. Fabric was adorable, fairly cheap and good quality. I remember walking into Hobby Lobby, asking the lady what bias tape was. I fully expected a roll of tape for fabric. I was that new to sewing,  y’all. The lady was very friendly, helpful and eager to help me find some fun fabrics to make my first projects with. In fact, my first quilt top was nothing but Hobby Lobby fabrics!

I actually avoiding Hobby Lobby for a while, because I’ve quickly found that my fabric stash is pouring out of the basket that I have. While I’d love to have a huge fabric stash, I have to remember that my craft room is also our guest bedroom. I can easily tuck away my fabric basket, but I can’t really tuck away a shelf of fabrics. 🙂

However, my birthday was last week. And, well, I got a gift card to Hobby Lobby (thank you BIL’s family) and of course, I had to check out Hobby Lobby to see what they have! Oops…

Well, I spent my gift card way too quickly, but came out with this!

Hobby Lobby Fabrics

See that fabric on top? Doesn’t that remind you a LOT of Liberty of London?! I know y’all remember when Target had that fantastic line. I couldn’t help but grab up a couple yards of this, which was on sale for about $6/yard! If you like this fabric, it’s part of Hobby Lobby’s Spring line. 🙂 And yes, I have a project in mind for this fabric. Wahoo!

The fabric below it is in their regular Calico prints, which was also on sale. It looks like it was meant to match the floral print above, no? LOVE these colors! I also bought the bottom two fabrics, because I can hardly find purple fabrics that I like. I love the modern-y prints on both of them, but have no clue what to do with them yet. Typical sewing dilemma. 😛

I also bought my first quilting/sewing magazine.

I’m super stoked about this quilt in the issue. I just love the argyle. LOVE it.

Are y’all addicted to Hobby Lobby like me? What do you love to shop for there?

Filed Under: Crafts

14 bags of mulch later…

March 23, 2011 by Amy 1 Comment

Spring always gets me in an excited mood to pretty things up around the house. The bright colors, fresh air, sunny skies…I wish all four seasons were Spring! 🙂 Our garden is one of the larger projects that we work on when Spring starts, and man, this year was our biggest year to date!

Geraniums

In the past, we didn’t really make a budget. I just bought some 6 pack annuals, a few bags of mulch, some veggies and called it a day! However, when June would hit, those annuals would fizzle, our garden was just a nightmare to take on with the weeds, and the veggies…oh, don’t get me started on the veggies.

This year, we made a budget and a plan, which included plants that would come back year after year and could easily take on our crazy summer heat! Our house has three main gardens: the front yard, the side of the house and the back yard (if you even consider what we have a back yard lol).

Our front garden is the typical “pretty” garden. Flowers, pretty bushes, a fountain…gotta have curb appeal. 🙂 I blogged about our struggle with one area of the front garden. Sago palms + doggie? No…

Our side garden became a huge project that me, Joey and my Mom took on right after Hurricane Gustav hit a few years ago. We ended up losing power for over a week, so the house was very uncomfortable to stay in, but ironically, outdoors was much more pleasant for the first few days, so we took on this project. Before, the old homeowners filled it with dirt and landscape rocks (the large ones). When we started digging things up, we actually discovered they tried to put a pond in there, left a few random knick-knacks and all sorts of weird stuff….ugh. We decided this garden was just a huge undertaking, so we ended up filling in the dirt, completely mulching it and place plants in large pots on top of the mulch. Luckily for us, the old homeowners left a few rustic looking freebie pots, so, we used those for this garden!

Geraniums

I think it looks spectacular, and it’s a fun place to put a few random garden signs. 😛

Flamingo

Our back garden is primarily a veggie garden. I’ve learned a good bit the past two years with having a veggie garden. The biggest change this year is that there will be no ‘maters in our veggie garden. I’m willing to pay regular price for those precious creole ‘maters or steal a few from my Dad, who is a ‘mater growing pro! Those bugs were disgusting, and I never want to deal with them again! Instead, I’m planting pickle cucumbers, along with bell, poblano and jalapeno peppers. This is my first time growing cucumbers, and peppers have done really well in our gardens, especially in the summer, so I’m very optimistic about what this harvest will bring!

Pickling Cucumbers

Peppers

We also have our baby meyer lemon tree. I got the tree last year for my birthday, and man, that thing is flowering like crazy! I’m super excited to see what this winter’s harvest will bring!

Flowering Lemon Tree

Also, just for kicks…here’s the dog who thinks fresh mulch is the coolest thing since Beggin’ Strips. I literally have to take mulch out of her mouth every time we go outside. She seriously wants to eat it. Agh..oh well, she’s cute. 😛

Millie

What do you love about Spring?

Filed Under: Gardening

Strawberry Sorbet

March 22, 2011 by Amy 6 Comments

Strawberry Sorbet

I’m so excited about the Spring! The gorgeous flowers, extra daylight (hello, natural light!) and of course, strawberry season. Strawberry is my favorite fruit–hands down. Give me a bowl of strawberries and I’m a happy woman (ok, and perhaps a bowl of chocolate to dip them in?). Here in Louisiana, the strawberries are just amazing. They are super sweet and absolutely perfect.

A few weeks ago, the hubs and I went to Houston for a mini vacation and to see family. We ended up at this make your own frozen yogurt place, and the hubs went crazy over this strawberry kiwi sorbet that they offered. So of course, I had to show him that we could easily make our own sorbet at home. If y’all have an ice cream maker at home, seriously consider making sorbets. You’d be surprised at how quickly it comes together and how few ingredients you need!

Strawberry Sorbet
Source: The Perfect Scoop

Ingredients:

  • 1 lb. fresh strawberries, rinsed and hulled
  • 3/4 cup sugar
  • 1 tsp. fresh lemon juice
  • pinch of salt
  • 1 tsp. kirsch (optional)

Directions:

  1. Slice the strawberries and toss them in a medium bowl with the sugar and kirsch (if you’re using it), stirring until the sugar begins to dissolve. Cover and let stand for 1 hour, stirring occasionally.
  2. Puree the strawberries and their liquid with the lemon juice and salt in a blender (or food processor) until well blended and smooth. If you’d rather not deal with the seeds, you can strain them out at this point.
  3. Chill the mixture and freeze according to your ice cream maker’s instructions.

Filed Under: Frozen Desserts, Fruit

My first Vlog entry: Easy Pasta Salad!

March 12, 2011 by Amy 16 Comments

You may not know this, but in real life, I’m a fairly shy person. I love blogging because my voice comes across in my writing, however, the subject of vlogging has always made me nervous.

I will say, though, I really do love watching vlogs from bloggers I’ve followed for a while. I always have an idea in my head about how people’s voices sound, and usually I’m wrong. It’s always a fun surprise to actually hear a blogger for the first time, you know?

Well, I definitely had to bite the bullet when Foodbuzz informed me that a recipe idea I submitted for their Tastemaker’s Program was accepted! The criteria was to make a vlog featuring my simple (30 minute or less) recipe that uses Newman’s Own products. I couldn’t believe it when I saw the package at my door!! It included quite a few salad dressings, pasta sauces, and ::gasp:: a FLIP CAMERA!! So, thank you so much Foodbuzz and Newman’s Own for this amazing opportunity. You helped me take the giant leap into vlogging. 🙂

Hope y’all don’t laugh at me too much. I stumbled on my words a few times, but I think I actually want to do this again!

FTC disclosure: I was supplied Newman’s Own products and a Flip camera for free, but my opinions of this recipe are completely my own.

Filed Under: Poultry, Side Dishes, Skinny

Gotta love Amy…

March 8, 2011 by Amy 2 Comments

Man, I can’t help but LOVE Amy sometimes. No, not me. I mean, I do love ME, but really… I ::LOVE:: this Amy a lot, because her fabrics are so great!

A good while back, I took a quilting class in the NOLA area and the project was a simple fat quarter quilt. Thankfully, we got to choose our own fabrics, so when I saw the Amy Butler table in the shop, I went a little nuts. I wanted an Amy Butler quilt!

It took me way too long to choose the 6 fabrics that I wanted on the quilt, though. I’m really really slow when it comes to choosing fabric combinations, because I’m constantly second guessing myself. However, I’m super happy with the results, because I really love turquoise/aqua colors involved.

Amy Butler Quilt

(I really need to work on taking nicer overall quilt pictures, eh? ::sigh::)

While making this quilt, I found that I totally fell in love with one particular fabric on this quilt.

Quilt Backing

I love this fabric SO much…so much. I ended up making it the backing and the binding for the quilt, and I bought additional yardage for projects. I’ll be nice and link to it. I just love the grey/taupe background with the aqua and chartreuse. It’s so spring-y and just lovely.

Here’s a picture of the binding against the other fabrics.

Binding on Amy Butler Quilt

So so perfect.

I’m just so happy that this quilt is finally finished. It cheers me up when I stare at it, and since I’m cold in our house all the time (silly hubs), I’m staring at this quilt a lot! 🙂

Do any of y’all love Amy Butler fabrics as much as I do?

Filed Under: Crafts

S’mores for a Shower

March 2, 2011 by Amy 19 Comments

Homemade S'mores

I really think the idea for virtual blog parties is so great. I sort of wish food bloggers could have real life parties/potlucks/etc., because it would be some SERIOUS good eats! I was so flattered when I was asked by Amy of Sing For Your Supper to participate in this virtual bridal shower for Kelsey of Apple A Day, but of course, the dilemma was what to bring?

I wanted it to be a simple finger food, but also something that is pretty familiar to most people. That’s when the idea of homemade s’mores somehow popped in my head. I’ve made marshmallows before, so I knew that wouldn’t be a problem and homemade graham crackers? How hard could that be?

Of course, my assumptions were wrong. While cooking my first batch of marshmallows, my candy thermometer somehow SHATTERED in the pot. And before you ask the obvious, no, the thermometer was not sitting at the bottom of the pot. Things like this only happen to me, heh. Because of this, I ran out of one of the ingredients while measuring out my second batch, so the marshmallow flavor was completely an accident. Mixed berry. Not a bad accident, though. I promise. 🙂

To make the s’mores a little different, instead of using Hershey bars, I spread on a dollop of Nutella! Yummy…majorly…just sayin’.

If you’d like to check out the amazing food that other bloggers are making for Kelsey’s shower, check out Sing For Your Supper and Apple a Day!

Graham Crackers
Source: Smitten Kitchen

Ingredients:

  • 2 cups plus 2 tablespoons all-purpose flour
  • 1/2 cup whole wheat flour
  • 1 cup dark brown sugar, lightly packed
  • 1 teaspoon baking soda
  • 3/4 teaspoon kosher or coarse sea salt
  • 7 tablespoons unsalted butter, cut into 1-inch cubes and frozen
  • 1/3 cup  mild-flavored honey, such as clover
  • 5 tablespoons milk, full-fat is best
  • 2 tablespoons pure vanilla extract

Directions:

  1. Combine the flour, brown sugar, baking soda, and salt in the bowl of an electric mixer fitted with the paddle attachment. Mix on low to incorporate. Add the butter and mix on low, until the mixture is the consistency of a coarse meal.
  2. In a small bowl, whisk together the honey, milk, and vanilla extract. Add to the flour mixture and mix on low until the dough barely comes together. It will be very soft and sticky.
  3. Lay out a large piece of plastic wrap and dust it lightly with flour, then turn the dough out onto it and pat it into a rectangle about 1-inch thick. Wrap it, then chill it until firm, about 2 hours or overnight.
  4. Adjust the oven rack to the upper and lower positions and preheat the oven to 350°F.
  5. Divide the dough in half and return one half to the refrigerator. Sift an even layer of flour onto the work surface and roll the dough into a long rectangle about 1/8 inch thick. The dough will be sticky, so flour as necessary. Use a cutter to get the shape desired or cut into squares.
  6. Place the crackers on one or two parchment-lined baking sheets. Chill until firm, about 30 to 45 minutes in the fridge or 15 to 20 minutes in the freezer. Repeat with the second batch of dough. Finally, gather any scraps together into a ball, chill until firm, and re-roll.
  7. Mark a vertical line down the middle of each cracker, being careful not to cut through the dough (again, this is for the traditional cracker shape). Using a toothpick or skewer (I like to use the blunt end of a wooden skewer for more dramatic dots), prick the dough to form two dotted rows about 1/2 inch for each side of the dividing line.
  8. Bake for 15 to 25 minutes, until browned and slightly firm to the touch, rotating the sheets halfway through to ensure even baking.


Mixed Berry Marshmallows
Source: mildly adapted from Martha Stewart

Ingredients:

  • Vegetable oil or cooking spray, for pan
  • 4 envelopes unflavored gelatin
  • 2 1/2 cups granulated sugar
  • 1/3 cup seedless strawberry jam or jelly
  • 1/3 cup seedless raspberry jam or jelly
  • 2/3 cup light corn syrup
  • Dash of salt
  • Red food coloring
  • Cornstarch, for dusting

Directions:

  1. Brush a 9-by-13-inch baking dish with vegetable oil. Line dish with parchment paper, leaving a 2-inch overhang on 2 sides; oil parchment. Set dish aside.
  2. Pour 2/3 cup cold water into the bowl of a stand mixer fitted with the whisk attachment. Sprinkle with gelatin; let stand until softened, 5 minutes.
  3. Stir together granulated sugar, jam, corn syrup, salt, and 1/2 cup water in a medium saucepan. Bring to a boil, stirring often. Continue to boil until syrup registers 238 degrees on a candy thermometer (soft-ball stage).
  4. Add syrup to gelatin. Beat on low speed until slightly cooled. Gradually raise speed to high, beating until mixture is cool and peaks form, 10 to 15 minutes. Mix in red food coloring, one drop at a time, to achieve desired shade of pink.
  5. Pour mixture into prepared pan; smooth surface. Let stand, uncovered, until firm, about 3 hours or overnight.
  6. Dust a cutting board with confectioners’ sugar. Run a knife around edges of marshmallow to loosen; un-mold onto cutting board. Peel off parchment. Lightly coat a large sharp knife with oil; cut marshmallow into 1 1/2- to 2-inch pieces, coating knife with more oil as necessary. Dust with cornstarch; toss to coat completely. Marshmallows can be stored in an airtight container up to 1 week.

Filed Under: Candy, Chocolate, Cookies, Entertaining/Parties

  • « Go to Previous Page
  • Go to page 1
  • Interim pages omitted …
  • Go to page 41
  • Go to page 42
  • Go to page 43
  • Go to page 44
  • Go to page 45
  • Interim pages omitted …
  • Go to page 85
  • Go to Next Page »

Primary Sidebar

Hey Y’all!

Image Credit: Leslie Pendleton Photography


Hey y’all!

Thanks so much for reading! I’m Amy, and I live in south Louisiana with my husband and our rescue dog. I enjoy sharing my love for cooking, baking, crafts & more! Follow my daily adventures on social media!

Follow my Daily Adventures

  • Email
  • Facebook
  • Instagram
  • Pinterest
  • Twitter

Footer

  • Email
  • Facebook
  • Instagram
  • Pinterest
  • Twitter

Archives

Copyright © 2026 · Foodie Pro Theme by Shay Bocks · Built on the Genesis Framework · Powered by WordPress