• Skip to primary navigation
  • Skip to main content
  • Skip to primary sidebar
  • Skip to footer

The Nifty Foodie

  • Home
  • About
  • Recipes
    • Appetizers
    • Beverages
    • Breads/Muffins
    • Breakfast
    • Canning
    • Desserts
    • Dog Treats
    • Entertaining/Parties
    • Fruit
    • Holiday Recipes
    • Louisiana Cuisine
    • Main Dishes
    • Mexican
    • Nifty Foodie Original
    • Nifty Tricks
    • Project Food Blog
    • Pumpkin
    • Salads
    • Sauces/Dips
    • Side Dishes
    • Skinny
    • Slow Cooker
    • Spices
    • Stews/Soups
    • The Disasters
  • My Weight Loss Journey
    • Races
    • Running
    • Weight Loss Milestones
  • Crafts
  • Contact Me

Cakes/Cupcakes

Blueberry Cupcakes w/ Maple Brown Butter Frosting

September 15, 2010 by Amy 8 Comments

Blueberry Cupcakes with Maple Browned Butter Icing

I haven’t baked much lately. With the Summer being so dang hot, I just didn’t want to use the oven much at all. Now that the weather is starting to lend us small glimpses into the Fall, I decided that it was time to start baking again.

Would you believe me if I told you that I literally have 1/4 cup of flour left in my house and maybe a cup of sugar after this recipe was done? I’m usually very well stocked on the baking staples, but like I said, I haven’t been baking. I guess it’s time to hit the store sometime soon…oops!

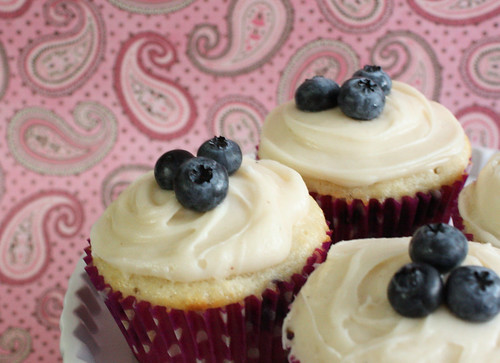
About a week or so ago, I read about a Bake -N- Blog challenge that Jesstagirl and her Officer was organizing. I thought this would serve as a great way to get back into baking. Cupcakes are quick and easy. I got to choose out of ALL of these cupcakes. When it came to choosing, I avoided chocolate, caramel, peanut butter…all the things that I love, but my husband does not. I chose #19: Blueberry Cupcakes with Maple Brown Butter Frosting, because I know my husband likes blueberries and if worse comes to worse, I can skip the icing on a couple in case he isn’t such a fan of it. 🙂

This cupcake was very simple to put together and pretty darn tasty! The icing reminds me a lot of a butterscotch candy, which was fine on its own, but together, I found that the cupcake/icing combination just wasn’t quite right. I think for next time, I would make a blueberry buttercream or plain buttercream with these cupcakes.

Blueberry Cupcakes w/ Maple Brown Butter Frosting
Source: Ming Makes Cupcakes

Ingredients:

  • 1 1/2 cups all purpose flour
  • 3/4 cup granulated sugar
  • 1/4 tsp. baking soda
  • 1 1/2 tsp. baking powder
  • 1/4 tsp. salt
  • 1/2 stick butter, melted and cooled
  • 1 egg
  • 3/4 cup buttermilk
  • 1/4 cup milk
  • 1 cup fresh blueberries
  • 1 stick butter
  • 3 cups confectioners sugar
  • 1/4 cup milk
  • 3 tbsp. maple syrup

Directions:

  1. Preheat the oven to 350 degrees.
  2. Mix flour, granulated sugar, baking soda, baking powder and salt in a bowl. In a separate bowl, mix the 1/2 cup of (cooled) melted butter with the egg and add the buttermilk and milk. Mix well.
  3. Add the milk mixture to the flour mixture and mix until blended. Fold in blueberries.
  4. Scoop into a cupcake pan and bake for 20 minutes or until a toothpick comes out clean. Allow the cupcakes to cool.
  5. For the icing: Put the 1 stick of butter in a small pot and cook on low/medium low until it it a golden brown color. Be careful not to burn the butter.
  6. Place the butter in a bowl and add the confectioners sugar. Mix well.
  7. Add the milk and maple syrup and mix until smooth.

Filed Under: Cakes/Cupcakes, Fruit

Strawberry Cake

July 14, 2010 by Amy 7 Comments

Strawberry Cake

I was very surprised to see that most of you were curious about the strawberry cake recipe. It’s probably the easiest thing to make out of the menu, but also a refreshing crowd pleaser!

I got this idea from a local bakery. In fact, I wanted to buy this cake since my party menu was ambitious enough. I had a Groupon type of gift card to redeem there for anything in the bakery case, and when I got there, sure enough, there were already made strawberry cakes in the case. However, my dreams of having one less thing to worry about came to a halt when the employee, who probably can’t legally drive a car yet, told me that the refrigerator case isn’t ::technically:: their bakery case, so I’d have to buy the cake for $31. I was totally aggravated that there were buttercream cakes in what she considered the “bakery case”, but the whipped topping strawberry cake that was in a different case, because it needed to be at a colder temperature, was not the “bakery case”. Seriously folks, what the heck?!

So, this cake is NOT entirely from scratch folks. This recipe involves boxed cake mix. I would have driven myself batty making a cake from scratch with everything else I was working on. Not one guest seemed to mind, and trust me, you won’t either. The whipped topping makes this cake!

Strawberry Cake
inspired by a local bakery that has a ridiculous definition for a “bakery case”

Ingredients:

  • Duncan Hines french vanilla cake mix
  • 1 1/3 Cups Water
  • 1/3 Cup Vegetable Oil
  • 3 Large Eggs
  • 2 cups heavy whipping cream
  • 1/3 cup confectioners sugar
  • 1 quart fresh strawberries
  • 1 tsp. vanilla extract

Directions:

  1. Bake cake in two 8″ or 9″ pans according to instructions. Allow layers to completely cool.
  2. Take 10 of the strawberries and puree them in a blender or food processor. Hull and slice the rest of the strawberries into fairly thin slices.
  3. Put heavy whipping cream in a mixer and just mix until it starts to thicken and barely form peaks. Add in confectioners sugar and mix until the whipped cream makes stiff peaks. Be careful not to overmix.
  4. Fold in 3 tbsp. of the strawberry puree and vanilla extract and allow to set in the fridge for a few minutes, while you carve the cake layers to be flat.
  5. Take the whipped cream out and carefully fold in sliced strawberries.
  6. Ice cake with the whipped cream/strawberry mixture. Allow to set in the fridge and serve immediately.

Note: This cake does really well  if you individually freeze leftover slices and allow to defrost at room temperature until ready to eat. That is, IF you have leftovers!

Filed Under: Cakes/Cupcakes, Entertaining/Parties, Fruit

4th of July Cupcakes

July 4, 2010 by Amy 14 Comments

4th of July Cupcakes

Happy 4th of July everyone! I hope y’all have a great holiday with family and friends!

Today, hubs and I are headed over to the in-laws for a seafood feast. I cannot wait! We volunteered to bring dessert, and I knew this would be the perfect opportunity to make some cute cupcakes!

I’ve been wanting to make a white cupcake from scratch for a while now, and when it came to finding the perfect recipe, a fellow blogger (The Way the Cookie Crumbles) wrote an amazing post comparing white cake recipes to find the best one! In the end, Cook’s Illustrated’s version was one of the front runners (no surprise there).

I decided to go all festive and make red, white and blue batter. Why not?

Festive Cake Batter

I had some fun assembling these cupcakes too. I tried layering (top cupcake) and marbling lightly with a toothpick (bottom cupcake). Both are equally fun and cute!

Cupcakes Dissected

I’ll admit, this recipe is very yummy! It wasn’t overwhelming, like wedding cake, and was surprisingly very moist as well. I topped the cupcakes with frosting that was another recommendation from The Way the Cookie Crumbles. It kicks Wilton frosting’s booty, for sure! Just really yummy and simple to make. I wouldn’t recommend this frosting for making decorations since it is very soft, but for spreading over a cake, heck yes! This is my new favorite. 🙂

Classic White Cupcakes
Source: The Way the Cookie Crumbles (originally from Cooks Illustrated)

Ingredients:

  • 2ÂĽ cups cake flour (9 ounces)
  • 1 cup whole milk, at room temperature
  • 6 large egg whites (Âľ cup), at room temperature
  • 2 teaspoons almond extract
  • 1 teaspoon vanilla extract
  • 1Âľ cups granulated sugar (12ÂĽ ounces)
  • 4 teaspoons baking powder
  • 1 teaspoon table salt
  • 12 tablespoons unsalted butter (1½ sticks), softened but still cool

Directions:

  1. Set oven rack in middle position. (If oven is too small to cook both layers on a single rack, set racks in upper-middle and lower-middle positions.) Heat oven to 350 degrees. Put cupcake liners in cupcake pan/pans.
  2. Pour milk, egg whites, and extracts into 2-cup glass measure, and mix with fork until blended.
  3. Mix cake flour, sugar, baking powder, and salt in bowl of electric mixer at slow speed. Add butter; continue beating at slow speed until mixture resembles moist crumbs, with no powdery streaks remaining.
  4. Add all but ½ cup of milk mixture to crumbs and beat at medium speed (or high speed if using handheld mixer) for 1½ minutes. Add remaining ½ cup of milk mixture and beat 30 seconds more. Stop mixer and scrape sides of bowl. Return mixer to medium (or high) speed and beat 20 seconds longer.
  5. Scoop batter into cupcake liners until 2/3 full. Arrange pans at least 3 inches from the oven walls and 3 inches apart. (If oven is small, place pans on separate racks in staggered fashion to allow for air circulation.) Bake until thin skewer or toothpick inserted in the center comes out clean, 14-18 minutes.
  6. Let cupcakes rest in pans for 3 minutes. Loosen from sides of pans with a knife, if necessary, and place on cooling rack. Let cool completely, about 1½ hours.

Easy Vanilla Buttercream
Source: The Way the Cookie Crumbles (originally from Cooks Illustrated)

Ingredients:

  • 20 tablespoons (2½ sticks) unsalted butter, softened
  • 2½ cups Confectioners’ sugar (10 ounces)
  • 1/8 tablespoons table salt
  • 2 teaspoons vanilla extract
  • 2 tablespoons heavy cream

Directions:

  1. In standing mixer fitted with whisk attachment, beat butter at medium-high speed until smooth, about 20 seconds.
  2. Add confectioners’ sugar and salt; beat at medium-low speed until most of the sugar is moistened, about 45 seconds. Scrape down bowl and beat at medium speed until mixture is fully combined, about 15 seconds; scrape bowl.
  3. Add vanilla and heavy cream, and beat at medium speed until incorporated, about 10 seconds, then increase speed to medium-high and beat until light and fluffy, about 4 minutes, scraping down bowl once or twice.

Filed Under: Cakes/Cupcakes, Holiday Recipes

Foodbuzz 24×24: The Best Things We Ever Ate

June 27, 2010 by Amy 15 Comments

IMG_1943

Summer officially started last Monday. However, being in Louisiana, we’ve been feeling summer-like weather since May. With the heat index hitting 110 degrees sometimes, we wanted to throw a summer party that was most definitely indoors!

I watch entirely too much Food Network. If it wasn’t for Food Network and reading food blogs, I’m fairly certain my husband and I would be living off of Hamburger Helper and take-out. One of my favorite shows lately has been The Best Thing I Ever Ate. Every show has a theme, and it features the cooks/hosts on Food Network and their favorite eats in that theme. So, when Foodbuzz emailed about this month’s 24×24 proposals, I figured it would be a fun party to feature the best things our families have eaten! Thanks so much to Foodbuzz for sponsoring this party! 🙂

To come up with the menu, I sent out an email to our families asking for their favorites in each category.

  • On the Grill (recipes that are done on the BBQ)
  • Dangerously Cheesy (major cheese in a dish)
  • No Utensils (finger foods/apps)
  • Keep it Comfy (comfort food)
  • Frozen Treats (any dessert from the freezer)
  • Mix it Up (a food that requires using a mixer—doesn’t have to be a sweet)
  • Louisiana’s Best (Louisiana food)
  • Cold and Colorful (like a salad or cold app with lots of veggies or fruit)
  • Under the Sea (favorite seafood dish)
  • Classic American (with 4th of July approaching, tell me a dish that screams American)

After getting many responses, here is the menu we came up with:

Drinks:
Strawberry Lemonade
Strawberry Daiquiris

Appetizers:
Cheese Fondue with Vegetables/Bread*
Bruschetta*
Boudin Balls

Entrees:
Steak Skewers with Chimichurri, Onion Cheese Sauce and Compound Butter*
Spicy BBQ Shrimp Skewers*

Sides:
Crawfish Fettuccine
Macaroni and Cheese
Vegetable Skewers*
Grilled Corn
Lettuce Greens with Honey Lime Vinaigrette

Desserts:
Strawberry Cake*
Assorted Cupcakes
Cinnamon Crumb Apple Pie
Fresh Berries with Ice Cream

* recipes will be featured in the blog in future posts

I will admit, I’m still getting the hang of entertaining for a large number of people. Despite doing a lot of prep, I felt fairly stressed in the last hour. Since the party was for family, though, I had loads of help at the last minute. 🙂 Whew!

The fondue was an absolute hit. I was nervous to make this myself, but this recipe came together beautifully! I served the fondue with day old po’boy bread, carrots and broccoli.

IMG_1962

We purchased the boudin balls at a local joint, since they are pretty much my husband’s favorite. The bruschetta was a lighter alternative to the other appetizers. I was super excited to use basil from our garden for this dish!

Appetizers

I need to thank the hubs for braving the sweltering disgusting heat to cook up this magic on the grill. The steak, especially was a real winner to family!

kabobs

We made 3 sauces available for people to dip/cover their skewers in: a chimichurri, onion blue cheese (not pictured) and a worchestershire chive butter. The chimichurri ended up being a huge hit (and I used parsley from the garden for it)!

Steak Butter/Chimichurri

Here is some lovely grilled corn that survived a few flare-ups on the grill. 🙂

Grilled Corn

Here is a semi-decent picture of the crawfish fettuccine before everyone digged in. The hubs’ parents made this dish and it was delicious. Perfect flavor with a little Louisiana kick!

Crawfish Fettucine

This is some macaroni and cheese that is my mother-in-law’s favorite. It was definitely pretty tasty (not to mention, cheesy). 🙂

Mac and Cheese

After enjoying some serious eats, we waited a good while before putting out desserts and just chatted, watched TV and played some games.

I will say the desserts were absolutely amazing.

Fresh berries (and ice cream, not pictured)

berries

Strawberry Cake (inspired by a local bakery). I would have just purchased one, but I had no idea an 8″ cake was over $30. What the heck?! I guess I’m just used to baking my own cakes to realize how expensive cakes have gotten!

Strawberry Cake

This was a welcomed surprise. A local cupcake bakery occasionally has giveaways on Twitter, and I won some cupcakes! They were seriously delish! Thank you Sweet Wishes Cafe!

Cupcakes

Here is the cinnamon crumb apple pie. This is one of those frozen pies you can find in the grocery store, but has quickly become a favorite with my hubs’ family.

apple pie

Of course, our puppy was very excited to get all of the attention she got at the party, and thanks to my mom, she tried a piece of steak for the first time. I think she enjoyed it. 🙂

IMG_1965

And of course, it wouldn’t be a party without family! Here are some pictures of our family.

Mom and Sis

family

IMG_1974

It was a great time to be had by everyone, especially in the milder indoors. Thank you so much to Foodbuzz again for the party! Everyone had a blast! 🙂

Filed Under: Appetizers, Beef, Cakes/Cupcakes, Entertaining/Parties, Frozen Desserts, Fruit, Louisiana Cuisine, Pasta/Rice, Pies, Sauces/Dips, Seafood, Side Dishes

Tall and Creamy Cheesecake

December 29, 2009 by Amy 1 Comment

I’m pretty much a novice when it comes to cheesecake making. The first cheesecake I made was about a month ago for a potluck, and since then, I’ve been wanting to do this again! When the opportunity came up, I definitely knew which recipe to try. This time around I made this cheesecake, because I had heard so many raving reviews about Dorie Greenspan’s cheesecake recipe in Baking From My Home to Yours.

So, I made this cheesecake, simply plain and brought it to the potluck. People LOVED it, as did I. Unfortunately, this was my first water bath experience and somehow water got in there, so the crust was a little soggy. I did, however, make this again Christmas Day, wrapping more layers of foil very carefully, and the crust was perfect!

Tall and Creamy Cheesecake
Source: Baking From My Home to Yours

Ingredients:

For the crust:
1 3/4 cups graham cracker crumbs
3 tablespoons sugar
Pinch of salt
1/2 stick (4 tablespoons) unsalted butter, melted

For the cheesecake:
2 pounds (four 8-ounce boxes) cream cheese, at room temperature
1 1/3 cups sugar
1/2 teaspoon salt
2 teaspoons pure vanilla extract
4 large eggs, at room temperature
1 1/3 cups sour cream or heavy cream, or a combination of the two (I used heavy cream)

Directions:

To make the crust:

  1. Butter a 9-inch springform pan—choose one that has sides that are 2 3/4 inches high (if the sides are lower, you will have cheesecake batter leftover)—and wrap the bottom of the pan in a double layer of aluminum foil; put the pan on a baking sheet.
  2. Stir the crumbs, sugar and salt together in a medium bowl. Pour over the melted butter and stir until all of the dry ingredients are uniformly moist.  Turn the ingredients into the buttered springform pan and use your fingers to pat an even layer of crumbs along the bottom of the pan and about halfway up the sides (I like to use a round glass to make it flat.). Don’t worry if the sides are not perfectly even or if the crumbs reach above or below the midway mark on the sides—this doesn’t have to be a precision job. Put the pan in the freezer while you preheat the oven.
  3. Center a rack in the oven, preheat the oven to 350°F and place the springform on a baking sheet. Bake for 10 minutes. Set the crust aside to cool on a rack while you make the cheesecake.
  4. Reduce the oven temperature to 325°F.

To make the cheesecake:

  1. Put a kettle of water on to boil (or microwave water in a bowl).
  2. Working in a stand mixer, preferably fitted with a paddle attachment, or with a hand mixer in a large bowl, beat the cream cheese at medium speed until it is soft and lives up to the creamy part of its name, about 4 minutes. With the mixer running, add the sugar and salt and continue to beat another 4 minutes or so, until the cream cheese is light. Beat in the vanilla. Add the eggs one by one, beating for a full minute after each addition—you want a well-aerated batter. Reduce the mixer speed to low and stir in the sour cream and/or heavy cream.
  3. Put the foil-wrapped springform pan in the roaster pan.
  4. Give the batter a few stirs with a rubber spatula, just to make sure that nothing has been left unmixed at the bottom of the bowl, and scrape the batter into the springform pan. The batter will reach the brim of the pan. (If you have a pan with lower sides and have leftover batter, you can bake the batter in a buttered ramekin or small soufflé mold.) Put the roasting pan in the oven and pour enough boiling water into the roaster to come halfway up the sides of the springform pan.
  5. Bake the cheesecake for 1 hour and 30 minutes, at which point the top will be browned (and perhaps cracked) and may have risen just a little above the rim of the pan. Turn off the oven’s heat and prop the oven door open with a wooden spoon. Allow the cheesecake to luxuriate in its water bath for another hour.
  6. After 1 hour, carefully pull the setup out of the oven, lift the springform pan out of the roaster—be careful, there may be some hot water in the aluminum foil—remove the foil. Let the cheesecake come to room temperature on a cooling rack.
  7. When the cake is cool, cover the top lightly and chill the cake for at least 4 hours, although overnight would be better.

Filed Under: Cakes/Cupcakes

A fun cake decorating trick….

December 17, 2009 by Amy 2 Comments

This past weekend, I made red velvet cupcakes for a local nestie GTG. I was so excited to make these from scratch for the first time, and so, I enlisted the help from another southern gal, Paula Deen. Sadly, Paula Deen let me down with some dry, flavorless red velvet cupcakes. I was a little embarrassed to bring these, since I hate presenting flop recipes to anyone, but I didn’t have time or ingredients to try again! So, what’s a girl to do? Make them look pretty!

I decided to make a simple cream cheese frosting (block of cream cheese, stick of butter, vanilla extract and powdered sugar until you get the right texture). Then, I colored the batch red and green. You know where this is going…

Yep, I wanted to swirl colors. Let me tell you..the pastry bag and I usually have a good fight over getting icing in the bag without getting it all over the top of the bag, my hands, etc. So, I found this tip on Cake Central’s forums about how to swirl with wayy less mess! Let me tell you…get your saran wrap ready, because you will want to make everything swirl colors after seeing how easy this is!

First, place a good sized sheet of saran wrap on your counter and plop icing in the center.

Roll the saran wrap into a thin log, cutting off excess wrap on the ends.

Slip the two colors (or three if you so dare) in the pastry bag, and squeeze icing out until the colors all appear.

Then, pipe!

Easy peasy swirl colors without the mess! 🙂

Filed Under: Cakes/Cupcakes, Wilton Decorating

Turkey Cake Pops!

December 4, 2009 by Amy 6 Comments

For Thanksgiving, I knew I had a great excuse to try one of Bakerella’s creations again. I thought these were so so cute, and looked easy enough, so I started my adventures across Baton Rouge to find these cute decorations to make my turkeys!

I found everything I needed at Wal-Mart and Michael’s, so thankfully, it was easy to find what was needed. 🙂

I decided to start with making a basic white cake and add golden yellow and orange food coloring to each 8″ cake for Thanksgiving colors.

Turkey Cake Pops
Source: Bakerella

Ingredients:

  • 9×13 baked and cooled cake (any flavor)
  • chocolate candy melts or bark
  • 2 cups of buttercream (any flavor)
  • espresso beans (makes turkey’s head)
  • rainbow chip sprinkles (makes turkey’s beak)
  • red heart sprinkles (makes turkey’s snood…and yes, I googled to find the correct term for that body part LOL!)
  • stick pretzels (makes turkey’s legs)
  • caramel candy corn (makes turkey’s feathers)
  • black gel decorating icing or black food coloring pen (to draw eyes)
  • lollipop sticks

Directions:

  1. Using your hands, crumble cooled cake into small crumbs in a bowl. Add buttercream, one dollop at a time, mixing thoroughly, until the mixture can form easily into shapes. Be careful, because putting too much icing will make the mixture very sticky and difficult to dip into chocolate.
  2. Form the cake mixture into balls and then stick them in the freezer for about 20 minutes to set.
  3. In the meantime, put your chocolate in a double boiler to melt it. Take the cake balls out a few at a time, and put the lollipop stick in through the bottom. Then, dip in chocolate and set on a cookie sheet to dry.
  4. After all cake balls are dry, using chocolate as a glue, affix the decorations onto the cake ball to turn it into a turkey!

Filed Under: Cakes/Cupcakes, Wilton Decorating

Pumpkin Cheesecake

December 1, 2009 by Amy 1 Comment


I remember how excited I was to finally have a springform pan. I could make cheesecakes galore! However, with being on a diet lately, I had no excuse to make one, until now. Work had a Thanksgiving potluck, and I thought, perfect excuse to make a PUMPKIN cheesecake. I have had my eye on this pumpkin cheesecake recipe that I found on The Way the Cookie Crumbles, and it did not disappoint. I was still getting compliments on the cheesecake a couple of days later!

I topped it with the caramel I made earlier that was a little too soft to be candy, and it ended up being a little too hard to be a topping too. It made a bit of a mess for people trying to slice up cheesecake, but oh well! 🙂

Bourbon Pumpkin Cheesecake
Source:  The Way the Cookie Crumbles, where (crust from Cooks Illustrated, filling adapted from Gourmet via Epicurious)

Ingredients:

(Crust)

  • 5 ounces graham crackers (9 whole crackers), broken into large pieces
  • 3 tablespoons granulated sugar
  • ½ teaspoon ground ginger
  • ½ teaspoon ground cinnamon
  • ÂĽ teaspoon ground cloves
  • 6 tablespoons unsalted butter, melted

(Filling)

  • 1½ cups canned solid-pack pumpkin
  • 3 large eggs
  • ½ cup (3.5 ounces) packed light brown sugar
  • 2 tablespoons heavy cream
  • 1 teaspoon vanilla
  • 1 tablespoon bourbon liqueur or bourbon (optional)
  • ½ cup (3.5 ounces) granulated sugar
  • 1 tablespoon cornstarch
  • 1½ teaspoons cinnamon
  • ½ teaspoon freshly grated nutmeg
  • ½ teaspoon ground ginger
  • ½ teaspoon salt
  • 3 (8-ounce) packages cream cheese, at room temperature

Directions:

  1. Adjust oven rack to lower-middle position and heat oven to 350F. Spray bottom and sides of 9-inch springform pan evenly with nonstick cooking spray. Pulse crackers, sugar, and spices in food processor until evenly and finely ground, about fifteen 2-second pulses. Transfer crumbs to medium bowl, drizzle melted butter over, and mix with rubber spatula until evenly moistened. Turn crumbs into prepared springform pan and, using hand, spread crumbs into even layer. Using flat-bottomed ramekin or drinking glass, press crumbs evenly into pan bottom, then use a soup spoon to press and smooth crumbs into edges of pan. Bake until fragrant and browned about the edges, about 12 minutes. Cool on wire rack while making filling.
  2. Working with a stand mixer, preferably fitted with a paddle attachment, or with a hand mixer in a large bowl, beat the cream cheese on medium speed, scraping down the bowl often, for about 4 minutes, or until it is velvety smooth. In a medium bowl, stir together granulated sugar, cornstarch, cinnamon, nutmeg, ginger, and salt. Add granulated sugar mixture to cream cheese and beat for another 2 minutes. In a medium bowl (or the same one), whisk together pumpkin, eggs, brown sugar, cream, vanilla, and liqueur (if using) until combined. Beat at medium speed until combined, about 2 minutes.
  3. Pour filling into crust, smoothing top, then put springform pan in a shallow baking pan (in case springform leaks). Bake until center is just set and measures 140 to 150 degrees on an instant-read thermometer, 50 to 60 minutes.
  4. Cool cheesecake completely in pan on rack, about 3 hours. Chill, covered, until cold, at least 4 hours. Remove sides of pan and bring to room temperature before serving.

Filed Under: Cakes/Cupcakes, Candy, Pumpkin

Birthday Cake-Palooza

October 26, 2009 by Amy Leave a Comment

IMG_0530

Last weekend, my husband’s family celebrated his Dad’s birthday! I was honored that my MIL asked me to make the cake for his birthday. Little did she know that I’d be bringing two cakes!

One being carrot cake, which my husband told me is his favorite. Apparently, he loved it so much that he was sad when it got stale, and he had to throw it away! That’s a big baking compliment right there!

I halved the original recipe to make a personal 6 inch cake, since everyone else in the family usually goes for the standard birthday cake.

I also made a different cream cheese frosting than the recipe indicates, which was inspired by this recipe which I used last year.

Carrot Cake with Spiced Cream Cheese Frosting
Source: Epicurious (Gourmet)

Ingredients:

  • 2 cups all purpose flour
  • 2 teaspoons baking soda
  • 1 teaspoon salt
  • 1 teaspoon ground cinnamon
  • 2 cups sugar
  • 1 1/4 cups canola oil
  • 4 large eggs
  • 3 cups grated peeled carrots
  • 1 1/4 cups coarsely chopped walnuts (omitted)
  • 2 tablespoons minced peeled ginger

Directions:

  1. Preheat oven to 350°F. Butter two 9-inch-diameter cake pans. Line bottom of pans with waxed paper. Butter and flour paper; tap out excess flour.
  2. Whisk flour, baking soda, salt and cinnamon in medium bowl to blend. Whisk sugar and oil in large bowl until well blended. Whisk in eggs 1 at a time. Add flour mixture and stir until blended. Stir in carrots, walnuts and ginger. Divide batter between prepared pans.
  3. Bake cakes until tester inserted into center comes out clean, about 40 minutes. Cool cakes in pans 15 minutes. Turn out onto racks. Peel off waxed paper; cool cakes completely. For my cakes, it took about 20-25 minutes in the oven, since they were 6 inch

IMG_0532

For the standard birthday cake, I used Duncan Hines French Vanilla mix with 2 tsp. almond extract added. Shocker, I know, but I was also preparing for a garage sale that weekend. I was pretty swamped! This is covered in Wilton Buttercream using ALL butter! 🙂

.

Filed Under: Cakes/Cupcakes, Wilton Decorating

My first tiered cake

September 13, 2009 by Amy 10 Comments

cake

I must be losing my mind! I could have SWORN that I blogged about my first tiered cake. This was the final cake that I made for Wilton Course 3 (Fondant & Tiered Cakes). Our instructor was super awesome, and let our minds run wild for the final cake. Since my family reunion was the next day, I decided to make a funky LSU colored cake.

This cake was made using boxed white cake mix (gasp!), Wilton buttercream and homemade marshmallow fondant. The filling was a homemade pineapple filling. My husband and I absolutely love this filling. It’s so simple to make too!

To explain why this baker used cake mix, I had a pretty busy week, so I wanted the baking day, which was a Thursday night, to be as simple as possible. I know from scratch isn’t much harder, but hey, I did add some extracts to make it a little more flavorful. Give a girl some credit! 🙂

My family LOVED the cake. They wanted to make it part of the reunion raffle, but I was too embarrassed for them to make it into a prize. (I have a lot of trouble getting compliments on my cakes…I’d just rather people dig in and enjoy!)

So, I made my dad make the first cut into it, because my aunts and uncles refused since they wanted it in the raffle so badly. Thanks Dad!

A cool thing that came out of it was that my cousin, who just had a precious baby boy, asked me to make her little boy’s 1 year birthday party cake and smash cake! I’m so flattered, and I cannot WAIT to do this next Spring! 🙂

Filed Under: Cakes/Cupcakes, Wilton Decorating

  • « Go to Previous Page
  • Go to page 1
  • Interim pages omitted …
  • Go to page 3
  • Go to page 4
  • Go to page 5
  • Go to page 6
  • Go to page 7
  • Go to Next Page »

Primary Sidebar

Hey Y’all!

Image Credit: Leslie Pendleton Photography


Hey y’all!

Thanks so much for reading! I’m Amy, and I live in south Louisiana with my husband and our rescue dog. I enjoy sharing my love for cooking, baking, crafts & more! Follow my daily adventures on social media!

Follow my Daily Adventures

  • Email
  • Facebook
  • Instagram
  • Pinterest
  • Twitter

Footer

  • Email
  • Facebook
  • Instagram
  • Pinterest
  • Twitter

Archives

Copyright © 2026 · Foodie Pro Theme by Shay Bocks · Built on the Genesis Framework · Powered by WordPress