• Skip to primary navigation
  • Skip to main content
  • Skip to primary sidebar
  • Skip to footer

The Nifty Foodie

  • Home
  • About
  • Recipes
    • Appetizers
    • Beverages
    • Breads/Muffins
    • Breakfast
    • Canning
    • Desserts
    • Dog Treats
    • Entertaining/Parties
    • Fruit
    • Holiday Recipes
    • Louisiana Cuisine
    • Main Dishes
    • Mexican
    • Nifty Foodie Original
    • Nifty Tricks
    • Project Food Blog
    • Pumpkin
    • Salads
    • Sauces/Dips
    • Side Dishes
    • Skinny
    • Slow Cooker
    • Spices
    • Stews/Soups
    • The Disasters
  • My Weight Loss Journey
    • Races
    • Running
    • Weight Loss Milestones
  • Crafts
  • Contact Me

Cakes/Cupcakes

Pumpkin Chocolate Chip Oatmeal Bundt Cake

December 12, 2012 by Amy 1 Comment

Pumpkin Oatmeal Chocolate Chip Bundt

This time of the year is just crazy. Sunday’s weather was well into the 80s and then Monday evening, the low was in the 30s. We had a party to go to on Saturday that I bought a sweater dress for, and of course, it was 70s/80s outside. I still wore the dress, but it was a little odd wearing a sweater dress with tights and boots, considering mosquitoes were biting like crazy outside. Thankfully, we’re in for a freeze warning, so that should get rid of the darn bugs. 🙂

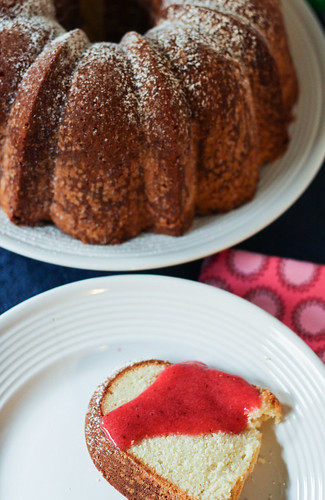
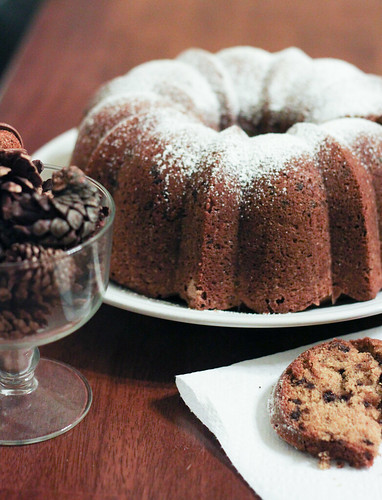
Since it finally feels like December again, it definitely feels more natural to bake up a storm. This past weekend was the big holiday bake-palooza, and after baking up dozens of cookies, I just feel like I should be baking something every day. This cake is one of those things…I love baking bundt cake. They’re so pretty right out of the pan, which makes decorating them super easy. You can easily decorate bundt cakes with a thinned icing type of glaze or sifted powdered sugar. I’m loving the powdered sugar topping lately, since it looks like a layer of snow. So festive, right?

This cake is a recipe that I had bookmarked for a while (story of my life), and I thought it sounded interesting…pumpkin with oatmeal in a cake. I decided to add mini chocolate chips to give it a little boost, and it came out amazing. I had some doubts since this batter was SUPER thick, but the cake came out beautifully.

Pumpkin Oatmeal Chocolate Chip Bundt Cake
Source: adapted from Erin’s Food Files, originally on Dine and Dish

Ingredients:

  • 2 cups granulated sugar

  • 1 cup quick cooking oatmeal

  • 1/4 cup boiling water

  • 1 cup butter, softened

  • 4 large eggs

  • 1 cup canned pumpkin

  • 2 tsp. vanilla extract

  • 3 cups all-purpose flour

  • 2 tsp. cinnamon

  • 1/2 tsp. nutmeg

  • pinch of cloves

  • 2 tsp. baking soda

  • 1 tsp. salt

  • 2 cups mini chocolate chips

  • powdered sugar

 Directions:

  1. Preheat your oven to 350 degrees. To prep the bundt pan, either spray it with non-stick baking spray (they usually include flour in them) or just butter/flour the pan.
  2. Place the oatmeal in a small bowl, pour in the boiling water over the oatmeal and stir the mixture together. Allow the oatmeal/water mixture to stand for 10 minutes.
  3. In the bowl of a stand mixer, add the butter and sugar and beat the mixture for about 2-3 minutes, until light and fluffy. Add the eggs in one at a time, and mix until everything is well incorporated.
  4. Add the pumpkin, oatmeal/water mixture and vanilla to the wet mixture, mixing on low until everything is well mixed.
  5. With the mixer still on low, add the flour one cup at a time, and then add the spices, baking soda and salt to the mixture. Mix everything until it’s well incorporated.
  6. Pour the cake batter into the bundt cake pan, and bake the cake for 60 minutes, or until a cake tested inserted into the center comes out clean.
  7. Cool the cake in the bundt pan for 10 minutes, then invert the cake onto a cooling rack to finish cooling. Dust with powdered sugar and enjoy!

Filed Under: Cakes/Cupcakes, Chocolate, Pumpkin

Pumpkin Cupcakes with Spiced Cream Cheese Frosting

November 19, 2012 by Amy 3 Comments

Pumpkin Cupcakes

I’m sitting here in disbelief that Thanksgiving is a few short days away. As much as I love this time of the year, I can tell it’s just gonna fly by all too quickly! For example, I’m currently knitting stockings for my husband, the pup and me, and I’ve been working on them since early October (which was just yesterday, right?). It just blows my mind that they’ll be on our mantel this weekend. I guess I should finish up my husband’s stocking ASAP, eh? 🙂

With this time of the year, I just can’t help but bake. I was asked to bake up some cupcakes (I’ll share the reason with y’all later…have to keep hush for now), and the first thing that popped in my head was pumpkin. I wanted to jazz them up a little bit, so I spiced up the standard cream cheese frosting and drizzled the cupcakes with my favorite caramel sauce. I made enough of these to also share with my coworkers, and a few of them asked for the recipe! Even my Mom is baking these up for Thanksgiving, which is a huge compliment since my Mom is pretty much my cooking/baking idol (along with my Memaw). 🙂

Pumpkin Cupcakes with Spiced Cream Cheese Frosting
Source: cupcakes adapted from Martha Stewart

Ingredients:

For the cupcakes:

  • 2 cups all-purpose flour
  • 1 tsp. baking soda
  • 1 tsp. baking powder
  • 1 tsp. salt
  • 1 tsp. ground cinnamon
  • 1 tsp. ground ginger
  • 1/2 tsp. freshly grated nutmeg
  • pinch of ground cloves
  • 1 cup packed light-brown sugar
  • 1 cup granulated sugar
  • 1 cup (2 sticks) unsalted butter, melted and cooled
  • 4 large eggs, lightly beaten
  • 1 15 oz. can of pumpkin puree

For the frosting:

  • 8 oz. cream cheese, softened
  • 8 tbsp. (1 stick) unsalted butter, softened
  • 3 cups confectioners’ sugar, sifted
  • 2 tsp. pure vanilla extract
  • 1 tsp. cinnamon
  • 1/2 tsp. nutmeg
  • pinch of ground cloves

For the caramel drizzle:

  • salted butter caramel sauce, cooled

Directions:

  1. Preheat the oven to 350 degrees. Line your cupcake pans with cupcake liners and set aside.
  2. In a medium sized bowl, add the flour, baking soda, baking powder, salt, cinnamon, ginger, nutmeg and cloves. Whisk the ingredients together until well-combined and set aside.
  3. In the bowl of a stand mixer, mix the sugars, butter and eggs together until fully mixed. Add in the dry ingredients, and mix on low until the mixture is smooth. Scrape down the bowl. Add in the can of pumpkin puree, and mix until everything is well-combined.
  4. Fill each cupcake liner about halfway full, and bake for about 20-25 minutes, rotating once after 10 minutes. You’ll know the cupcakes are done baking when  a toothpick inserted in the center of the cupcakes comes out clean. Allow the cupcakes to cool completely.
  5. To make the frosting, whip the cream cheese and butter for a full 2 minutes, or until light and fluffy. Add the vanilla extract, as well as the cinnamon, nutmeg and cloves, and mix until well-blended. Add in the confectioners’ sugar one cup at a time, mixing on low, until everything is mixed. Then, whip the frosting one last time on medium-high for about 30 seconds.
  6. To decorate the cupcakes, pipe the frosting on the cooled cupcakes, and then drizzle with caramel sauce. Enjoy!


Filed Under: Cakes/Cupcakes, Pumpkin

Golden Vanilla Cupcakes with Chocolate Buttercream

November 2, 2012 by Amy 2 Comments

Golden Vanilla Cupcakes

I can’t believe that the weather is no longer in the 90s. I have been so used to leaving work, getting in my car and immediately rolling down the windows to escape the sauna. It’s so nice to wear long sleeve shirts, and burn spicy candles when the weather is actually cool. The highest the weather has been lately is the mid 80s. I’m so spoiled by this weather right now…I wish Louisiana was like this for more than a few weeks a year!! 🙂

In fact, it was the most perfect night for trick or treating a couple of nights ago. We like to give out candy outside, because just one doorbell will make Millie go batty. It’s just not worth giving her the anxiety, so we dress her up (ha…she’s fine with it as long as it’s not a full sweater or something) and sit outside with the candy. The families in our neighborhood just love Millie, and she loves the attention (unless someone wore a mask…we found out this year that she’s scared of those).

Untitled

If you follow me on Instagram (username: niftyfoodie), you probably saw this last night. 🙂 The little hat eventually came off, since she kept trying to eat the string, but she was pretty much the cutest pumpkin in the neighborhood (in my HIGHLY unbiased opinion).

For our coworkers, I usually bake something festive for the day. These cupcakes were what I chose to make: a simple vanilla cake with chocolate buttercream. I had to make a double batch, so I wanted to keep things simple. I ended up throwing some sprinkles in the batter to give it a festive feel, and they were definitely well-received. 🙂 This cake leans towards the denser side, but the flavor was definitely there. This chocolate buttercream is pretty addictive, too and it couldn’t be simple to make. It comes together in minutes, which could be trouble…I had trouble resisting after having a spoonful, but I promise I did!

Golden Vanilla Cupcakes with Chocolate Buttercream
Source: cupcakes from King Arthur Flour, buttercream from Savory Sweet Life

Ingredients for the cupcakes:

  • 2 cups sugar
  • 3 1/4 cups all purpose flour
  • 2 1/2 tsp. baking powder
  • 1 tsp. salt
  • 3/4 cup unsalted butter, softened
  • 1 1/4 cups milk, at room temperature
  • 2 tsp. vanilla extract
  • 4 large eggs

Ingredients for the frosting:

  • 2 sticks  unsalted butter, softened
  • 3 1/2 cups confectioners  sugar, sifted
  • 1/2 cup cocoa powder, sifted
  • 1/2 tsp. salt
  • 2 tsp. vanilla extract
  • 4 tbsp. heavy cream

Directions:

  1. Preheat your oven to 350 degrees, and prepare your cupcake tins by placing a lining in each well.
  2. In a large bowl, add the sugar, flour, baking powder and salt and then whisk everything together. To that, add the softened butter and beat on low speed in a mixer, until the mixture resembles sand.
  3. Mix the milk and vanilla in a small bowl and add that to the butter mixture. Mix everything together on low speed for 30 seconds, and then mix on medium speed for another 30 seconds. Scrape the bowl down.
  4. Put the mixer back on low speed and add one egg. Once the egg is added, beat on medium for 30 seconds. Repeat this with the second, third and fourth egg, scraping the bowl down after each addition.
  5. After the last egg is added, beat the mixture on medium for another 30 seconds.
  6. Scoop the batter into the cupcake liners (about 3/4 of the way full), and then bake the cupcakes for 22-25 minutes, until a toothpick inserted into the center of a cupcake comes out clean.
  7. Once the cupcakes are done, place them on a cooling rack.
  8. While the cupcakes are cooling, prepare your buttercream by placing your 2 sticks of butter in the bowl of a mixer and beat the butter for about 2 minutes until fluffy and light.
  9. With the mixer on low, add in the confectioners sugar, as well as the cocoa powder and mix well. Add in the salt, extract and cream, and increase the speed to medium. Mix the frosting, scraping the bowl down a couple of times, until the frosting is light and fluffy.
  10. When the cupcakes are cool, frost with the buttercream (and add sprinkles, if you’d like). Enjoy!


Filed Under: Cakes/Cupcakes, Chocolate

Pumpkin Whoopie Pies with Salted Caramel Buttercream

October 30, 2012 by Amy 4 Comments

Pumpkin Whoopie Pies w/ Salted Caramel Buttercream

You may have noticed a little pattern here. Pumpkin, pumpkin and more pumpkin?

Yup.

See, the Fall in Louisiana is short-lived. Pretty soon it’s either going to be in the upper 80s again and before we know it, it’s gonna be stuck in the 30s. So, don’t judge me if I use pumpkin as much as possible in recipes. 🙂 I promise, I’ll get over pumpkin soon, but for now, I should be purchasing pumpkin in bulk. I’m not tired of it.

My husband asked me to bake something for his office, and who am I to turn down an opportunity to bake? Seriously, send me to a doctor if I refuse to bake. 😛 I’ve been wanting to make these whoopie pies for a while now, and of course, this was the perfect excuse to bake these little treats up. I didn’t want to use a cream cheese frosting, since I’m always paranoid about leaving cream cheese out for an extended period of time (I know…super paranoid), so I thought that this salted caramel frosting would serve just fine. 🙂

I love when my husband forwards me emails from his coworkers about what I bake for the office. It’s always good to hear when a recipe is good, and this one was GOOD. Pretty darn popular amongst the people in his office, and they are known to be very honest. I’ve never had a complaint, but one time, my husband was sent home with a recipe request haha!

I made these whoopie pies with a mini scoop so there would be more than enough for his office. Making this recipe with a mini scoop makes about 36 complete sandwiches.

Pumpkin Whoopie Pies with Salted Caramel Buttercream
Source: whoopie pies via Culinary Concoctions by Peabody (originally from Baked), buttercream from My Baking Addiction

Ingredients:

  • 3 cups all-purpose flour
  • 1 tsp. salt
  • 1 tsp. baking soda
  • 1 tsp. baking powder
  • 2 tbsp. cinnamon
  • 1 tsp. ground ginger
  • 1/2 tsp. ground fresh nutmeg
  • 1 cup granulated sugar
  • 1 cup dark brown sugar, firmly packed
  • 1 cup canola oil
  • 3 cups chilled pumpkin puree
  • 2 large eggs
  • 1 tsp. vanilla extract
  • Salted Caramel Buttercream (for filling)

Directions:

  1. Preheat the oven to 350 degrees. Line 2 cookie sheets with parchment paper or a silicone mat and set aside.
  2. In a large bowl, whisk your dry ingredients (flour, salt, baking soda, baking powder, cinnamon, ginger and nutmeg) together, until everything is well-mixed.
  3. In another bowl, whisk the granulated and dark brown sugars together, and add the canola oil in. Mix the ingredients well. Add the pumpkin puree to the sugar/oil mixture and whisk until everything is well-blended. Add the eggs and vanilla and whisk until everything is incorporated. Whisk the flour mixture into the wet mixture a little at a time, until everything is thoroughly mixed together.
  4. To make mini whoopie pies, use a tbsp. sized scoop to drop tbsp. amounts of batter onto the baking sheets, leaving 1 inch between each cookie for spreading.
  5. Bake the whoopie pies for 10-12 minutes, until the cookies just start cracking on top and a toothpick inserted in the center comes out clean (without crumbs). Remove the whoopie pies from the oven, and allow them to cool thoroughly on a rack before assembling.
  6. To assemble the cookies, drop a tbsp. of frosting on the bottom side of one whoopie pie, and then press together the flat sides of two whoopie pies. Enjoy!


Filed Under: Cakes/Cupcakes, Pumpkin

Cream Cheese Pound Cake with Strawberry Coulis

July 31, 2012 by Amy 3 Comments

Cream Cheese Pound Cake w/ Strawberry Coulis

Last week, my whole body got confused. For the first time since last fall, I felt the urge to bake something with pumpkin. The reason? I went out of town to San Diego for a work conference. The minute I stepped off the plane, I had to ask someone if this was real. I mean, c’mon. 70 degrees at 1pm? IN JULY??! No way. Down here, we get maybe 2 days like that, and they’re in the middle of October. I’m completely jealous of y’all who call San Diego home. When I came home, I was instantly reminded with the 105 degree heat index that it is definitely still the summer.

I guess I should embrace it, since it’s here for another month or so. When it comes to baking in the summer, I try to make things that aren’t super rich. I like to stick to using fruit and simple flavors, like this pound cake. While pound cake contains an unreal amount of butter, for some reason, it just works really well with fruits. This pound cake is perfectly moist on the inside, but on the outside, the cake bakes up to a nice, sort of crunchy crust (hard to describe, but I swear…it’s great). And the strawberry coulis (pretty much a fancy name for sauce) that accompanies this cake is just perfectly refreshing and light.

Cream Cheese Pound Cake with Strawberry Coulis
Source: Smitten Kitchen

Ingredients:

For the cake:

  • 1 1/2 cups (3 sticks) unsalted butter, at room temperature
  • 1 package (8 ounces) Philadelphia brand cream cheese, at room temperature (the brand is recommended in SK’s post)
  • 3 cups sugar
  • 6 large eggs
  • 1 1/2 tsp. pure vanilla extract plus 1/2 tsp. almond extract
  • 3 cups all purpose flour
  • 1 tsp. salt

For the coulis:

  • 2 cups quartered hulled strawberries (about 12 ounces)
  • 1/4 cup water
  • 3 tbsp. sugar
  • 1 tbsp. fresh lemon juice

Directions:

  1. To make the cake, preheat the oven to 325 degrees. Butter and flour a bundt pan very well to prepare it for the cake batter
  2. Place the butter and cream cheese in the bowl of a mixer and beat on medium speed for about 2 minutes, until the mixture is smooth. Add the sugar and beat the mixture on high for at least five minutes, until very light and fluffy. Add the eggs in one at a time, beating well after each egg and scraping down the bowl with a spatula regularly. Add the vanilla and almond extracts, as well as the flour and salt. Beat the mixture on low until the mixture is just mixed (be careful not to overbeat).
  3. Add the batter to the bundt pan and tap the pan to ensure that the top is even. Bake the cake for 75 minutes, until the cake is golden brown and a toothpick inserted into the center of the cake comes out cleanly.
  4. Take the pan out of the oven and allow the cake to cool in the pan on a cooling rack for 20 minutes, then flip the cake out onto a cooling rack, allowing it to completely cool there.
  5. To make the coulis (which can be made one day ahead), combine the coulis ingredients in a blender, and puree the mixture until it is very smooth. Optional: press the mixture through a strainer to remove the seeds. Chill the coulis until cold.

Filed Under: Cakes/Cupcakes, Fruit

Red Velvet Bundt Cake with Cream Cheese Frosting

June 25, 2012 by Amy 8 Comments

Red Velvet Bundt Cake

“Thank you. What is it?”

“It’s a bundt.”

“Bunn-t?”

“Bundt.”

“Bonn—bonnk??”

Name that movie. 😛

I can’t help it. Anytime I bake or eat a bundt cake, that scene pops in my head. As I was mixing this cake, I had the scene playing on YouTube at the same time. I’m a weirdo. I know.

Bundt cakes, to me, are a bake and pray type of cake. I say pray, because you know that moment where you’re holding a plate against the bundt pan getting ready for the infamous flipping of the pan? Yeah, I totally pray that the sucker comes out in one piece. It’s a huge bummer when you’ve worked so hard to bake a cake and the darn thing just sticks to the bottom of the pan. Of course the solution is to make a trifle, but a perfect, pretty bundt cake is so much more of a baking ego boost. 😛

I wanted to make a fun patriotic cake, and instead of making the red, white and blue cupcakes that I made a couple of years ago, I decided that this would be the perfect time to make a red velvet cake. Red velvet is one of my favorites. I actually think it’s sort of a requirement to love a red velvet cake as a southern gal. 😛 This recipe was moist, had the perfect crumb and the icing was a perfect mix between a glaze and a frosting, which was great to just drizzle all over the cake to make the fun patriotic look happen.

Just a note: If you make any red velvet cake, I highly recommend Wilton’s No Taste Red. When making red velvet cake, you usually need a good bit of food coloring to make the cake red, and sometimes regular red dyes can add a bitter after taste to your cake if you add too much.

Red Velvet Bundt Cake with Cream Cheese Frosting
Source: Kiss My Bundt Bakery (via LA Times)

Ingredients:

For the cake:

  • 1 1/4 cups vegetable oil
  • 1 cup buttermilk
  • 2 eggs, room temperature
  • 2 tbsp. red food coloring
  • 1 tsp. white vinegar
  • 1 tsp. vanilla
  • 2 1/2 cups flour
  • 1 3/4 cups sugar
  • 1 tsp. baking soda
  • 3/4 tsp. fine salt
  • 1 tbsp. cocoa powder

For the frosting:

  • 8 ounces cream cheese, softened
  • 4 ounces unsalted butter, softened
  • 2 cups powdered sugar (sift after measuring)
  • 1/2 tsp. vanilla extract

Directions:

  1. Preheat the oven to 350 degrees.
  2. To make the cake, in the bowl of a stand mixer, add the oil, buttermilk, eggs, food coloring, vinegar and vanilla. Mix on medium speed using the paddle attachment for about a minute.
  3. In another large bowl, sift together the flour, sugar, baking soda, salt and cocoa powder.
  4. With the mixer on low, add the dry ingredients 1/2 cup at a time to the wet ingredients. Make sure to do this slowly so that the batter doesn’t develop clumps.
  5. Pour the batter into a 10-12 cup bundt cake pan that has been greased and floured (or you can use simple baking spray…just make sure it’s meant for baking, since those contain flour). Bake the cake for about 45 minutes, or until a toothpick inserted into the cake comes out clean.
  6. Allow the cake to cool in the pan for at least 15 minutes. Then, (say a small prayer ha!) invert the pan onto a plate. (If the cake doesn’t feel like it’s going to come out of the pan, just let it cool for an additional 15 minutes.) Allow the cake to cool completely (about an hour) before frosting.
  7. To decorate the cake, I ended up just placing the frosting (one color at a time) in a ziploc bag and cutting the tip off. Then, drizzle the frosting over the cake and add sprinkles. Enjoy!


Filed Under: Cakes/Cupcakes, Holiday Recipes

Snickers Cupcakes

March 19, 2012 by Amy 8 Comments

Snickers Cupcakes

Snickers bars are my diet nemesis. The candy bars are 280 calories each (yep), and I could seriously destroy one in a couple of minutes. Now that I’m calorie counting, 280 calories is a lot when you get under 1600 calories each day, but in my opinion, calories don’t count for one day of the year. Your birthday. I turned 28 on Friday, and since Snickers are my favorite, I decided to make these cupcakes to celebrate. Now, of course, I could buy a cake at a bakery and spend $30+, but heck, where can you find SNICKERS cupcakes? Not any place around here, that’s for sure!

The hardest thing for me was bringing home two bags of mini Snickers to make these bad boys happen. I totally ate about 10-ish mini Snickers that week, so I obviously don’t have any willpower against this candy….at.all. Oh, and when it came time to make these Thursday and cut the candy up for the filling….yeah, totally snuck a few tiny bites. Whoopsie!

I will admit, these cupcakes were more time-consuming than I thought, but it’s worth it to give these a try. Just don’t do it on a weeknight, like I did. 😛

If you’re concerned about me completely killing my diet, I’ll let you know that since I could have totally eaten all 20 of these cupcakes, I ended up giving most of them to H to bring to his coworkers. His coworkers absolutely loved these, and some of these actually wanted to know how much they would be for me to make them. So, I guess they weren’t a flop haha! My opinion? Heaven in a cupcake. Oh yes…if you love Snickers like I do, just make these cupcakes.

Snickers Cupcakes
Source: mildly adapted from Annie’s Eats, cupcakes originally from Martha Stewart, frosting originally from My Baking Addiction

Ingredients:

For the cupcakes:

1/2 cup Dutch-process cocoa powder
1/2 cup hot water
2 cups all-purpose flour
3/4 tsp. baking soda
3/4 tsp. baking powder
3/4 tsp. coarse salt
16 tbsp. unsalted butter
1 1/2 cups sugar
2 large eggs plus 1 egg yolk
1 3/4 tsp. vanilla extract
2/3 cup sour cream, at room temperature

For the filling:

1 bag mini Snickers chopped into fourths (I found it easier to do this after the Snickers were in the freezer)
1/4 cup salted butter caramel sauce

For the frosting:

16 tbsp. unsalted butter, at room temperature
1 lb. confectioners’ sugar
1 1/2 tsp. vanilla extract
1/3 cup salted butter caramel sauce
Pinch of coarse salt
2 tbsp. heavy cream

**To garnish the tops, you’ll need 20 mini Snickers.**

Directions:

  1. Preheat the oven to 350 degrees. In a medium bowl, add the flour, baking soda, baking powder and salt and mix together until the ingredients are well-combined. In a smaller bowl, whisk the cocoa powder and hot water together until it’s a smooth liquid.
  2. In a saucepan, melt the butter and sugar using medium heat. Once the butter has melted, remove the mixture from the cook top and transfer the mixture to a mixer bowl. Using the paddle attachment on the mixer, beat the butter/sugar mixture on medium-low speed for a few minutes, until the mixture has cooled (you don’t want to cook the eggs when you add them). Add in the eggs and egg yolk, one at a time, beating the mixture well and scraping down the side of the bowl after you add each egg. Add in the vanilla and the cocoa mixture and mix until well-combined. Then, turn the mixer on low and add in the flour mixture in two batches, and alternating with the sour cream. You want to beat the mixture until just combined (don’t overmix).
  3. Using a medium cookie scoop, add the batter to your cupcake pans (lined with cupcake liners) until each cup is about 3/4 full. Bake the cupcakes for 18-20 minutes (rotating the cupcake pan once when the cupcakes are halfway done with baking), until a toothpick inserted into the center of the cupcake comes out clean. Allow the cupcakes to cool in the pan for a few minutes, and move them to a wire cooling rack to finish cooling.
  4. Once the cupcakes are completely cool, cut a cone shape out of the center of the cupcakes using a paring knife. Using cooled caramel sauce, add 1/3 cup of the caramel sauce to your Snickers pieces and mix until the candy is coated in caramel. Then, add a spoonful of the filling to each cupcake.
  5. For the frosting, using a paddle attachment on your mixer, whip the butter on medium speed until light and fluffy, about 2 minutes. Scrape down the bowl and add in the confectioners’ sugar with the mixer on low speed, a cup at a time (to avoid a mess), until the mixture smooth and creamy. Add in the caramel sauce (which should be just a tad on the warm side for this), vanilla and salt on low speed, and mix until well-blended. Add in the heavy cream, and mix the frosting on medium speed for a few minutes until fluffy and smooth.
  6. To finish the cupcakes, frost the cupcakes to your liking (I used a Wilton 1B tip), drizzle on some caramel sauce, and place a mini Snickers on the center of each cupcake.

Filed Under: Cakes/Cupcakes, Candy, Chocolate

Red Velvet Whoopie Pies

February 14, 2012 by Amy 1 Comment

Red Velvet Whoopie Pies

Happy Valentine’s Day everyone! I know that Valentine’s Day is really just a typical day where Hallmark and the flower shop make bank, but sometimes it’s fun to just give in and be gushy about the day. This past weekend, my husband and I decided to make our own Valentine’s Day dinner instead of wasting crazy amounts of money and time at a restaurant around here. We made an insanely indulgent dish (hello butter!) consisting of corn grits, crawfish etouffee and fried jump shrimp. I know…cheat day! Since H and I have been calorie counting for a couple of weeks now, it made us sluggish the rest of the day. I guess our bodies are getting used to this healthy thing.

So, today I figured I’d share with y’all something that would make your cheat day complete. 😛  The plan was to bring this dessert to work for a charity bake sale, so I knew if I made these, I could easily get them out of the house if they were too tasty and tempting. Thank goodness too, because in my quality control test (ha!), I found that these were extremely tasty! I hope they sell out, because I don’t want to bring any of these home! Or maybe I do, but MyFitnessPal might yell at me.

Just a note: I will say that one batch does not make many of these. I made a double batch for the sale, and ended up with 22 whoopie pies.

Red Velvet Whoopie Pies
Source: found on Big Apple Nosh (cookie recipe originally from Better Homes and Gardens)

Ingredients:

For the whoopie pies:

  • 2 cups all-purpose flour
  • 2 tbsp. unsweetened cocoa powder
  • 1/2 tsp. baking soda
  • 1/4 tsp. salt
  • 1 stick butter, softened
  • 1 cup packed brown sugar
  • 1 egg
  • 1 tsp. vanilla
  • 1/2 cup buttermilk
  • 1/2 of a  1-oz bottle red (preferably No-Taste Red by Wilton or Super Red by Americolor) food coloring

For the filling:

  • 1 8 oz. package cream cheese
  • 1.5 sticks unsalted butter, softened
  • 1 tsp. vanilla extract
  • 1 lb confectioners sugar, sifted (you may not need all of it) 
  • pink food coloring (optional)

Directions:

  1. Preheat your oven to 375 degrees. Line two baking sheets with parchment paper or a Silpat mat.
  2. In a medium-sized bowl, whisk together the flour, cocoa powder, baking soda and salt until well blended.
  3. In a large mixing bowl, beat the butter for about two minutes until light and fluffy. Add the brown sugar and mix until well blended. Add in the egg, vanilla and food coloring and beat the wet mixture until everything is incorporated.
  4. Add the flour and buttermilk mixture a third at a time (alternatively), until the mixture is just mixed. (Don’t overbeat)
  5. Using a cookie scoop, scoop out the whoopie pies on the baking sheet, giving about an inch in between each cookie for rising/spreading.
  6. Bake the cookies for 9-11 minutes, until the tops of the whoopie pies are set. Allow all of the cookies to cool before filling.
  7. To make the filling, beat the cream cheese and butter together for a couple of minutes until fluffy and light. Add the vanilla and optional food coloring. Then, in 1/2 cup increments, add the confectioners sugar until the frosting is fairly firm but still easily stirrable. (A good way to test this is to put an offset spatula in the frosting bowl. If the spatula remains standing, it’s firm enough.)
  8. Place the filling in a ziploc bag with the tip cut off and pipe some of the filling on the flat side of one cookie. Then sandwich that cookie together with another whoopie pie that isn’t frosted (where the flat tops meet).

Filed Under: Cakes/Cupcakes, Chocolate, Cookies

Favorite Party Recipes

February 2, 2012 by Amy 2 Comments

Part of me cannot believe that the Superbowl is Sunday. I mean, that’s the end of football season until next Fall. I have to wait at least six months to watch another game after this. Sad.  (If you know me, you know I’m being dead serious about how sad this is to me. Crazy football fan here!) A perk of Superbowl Sunday? Watching Millie run up to the TV when I randomly switch over to the Puppy Bowl.

To mourn celebrate the end of another football season, here’s some great recipes that will definitely disappear if you serve them at your Superbowl parties.

Queso Blanco
Restaurant Style Queso Blanco

Restaurant Style Salsa


Crawfish Pies


Crawfish Cheesecake

Jambalaya
Pork and Sausage Jambalaya

Berry Mash Bruschetta

Sugar Cookie Bars
Sugar Cookie Bars

Peanut Butter Cheesecake Brownies

IMG_4426
Oreo Cupcakes

Oh, and if you have an occasional puppy bowl break, I’m pretty sure the dogs at your party would love you for these!

Peanut Butter and Pumpkin Dog Treats

Pumpkin PB Treats

Filed Under: Appetizers, Brownies/Bars, Cakes/Cupcakes, Chocolate, Dog Treats, Entertaining/Parties, Fruit, Louisiana Cuisine, Mexican, Pork/Ham/Bacon, Pumpkin, Sauces/Dips, Seafood

Grasshopper Cheesecake

January 3, 2012 by Amy Leave a Comment

Grasshopper Cheesecake

It’s 2012! Even though it’s really just a date, it’s cool to mentally have a new start at things. I’m not going to make BIG resolutions anymore, because I tend to let myself down. So, I have my 101 goals in 1001 days list to look to every once in a while, and I’m hoping to reach a few of those small goals sometime this year.

Every New Year’s Day, my Memaw holds a spaghetti and meatball dinner. No, we don’t have black eyed peas or cabbage. We have spaghetti and meatballs. Sounds boring, but trust me, this isn’t your average spaghetti and meatballs. Oh man. We only have it once a year, and the sauce is just the most divine, flavorful red sauce. I haven’t had a comparable red sauce, to date. It’s the best. ever.

This family meal was so much different than Christmas for us. Since we hosted Christmas last week, it was good to just sit back and enjoy good food and family time. I’m not saying we didn’t have a good time, but of course, when you host anything, it’s really hard to sit back and fully relax. 😉

Whenever we’re invited to a meal or a party, I always offer to bring something. I’m usually told “no”, and I kind of was told “no” this year (oh well). Memaw mentioned, however, that she wanted me to find a recipe for her to give her at the party. Up until a few years ago, she used to order a grasshopper cheesecake (like the drink, not the bugs) from a company, but they discontinued making the cheesecake. She simply asked me to find a recipe for a grasshopper cheesecake, but I went a step further and brought her the cheesecake. That’s just how I roll.

Since my Memaw is diabetic, I used the Splenda baking blend in the filling instead of sugar. Keep in mind if you use Splenda to make this, you have to use 1/2 of the amount a recipe calls for. 🙂 Of course, I was worried about how the cheesecake would come out, since it’s a sugar substitute, but as you can see, the cheesecake came out just fine. In fact, my family could not stop eating this cheesecake and I had an empty cake stand to bring home, which always marks a good recipe.

I did mildly adapt a few things, based on comments I read on the recipe site. I also changed the crust to an oreo crust since I had some oreos to use up.

Grasshopper Cheesecake
Source: adapted from Betty Crocker

Ingredients:

For the crust:

  • 1 3/4 cups of crushed oreos (cream filling removed…about 20 oreos)
  • 2 tbsp. butter, melted

For the filling:

  • 4 oz. semisweet chocolate, chopped
  • 3- 8oz. packages of cream cheese, softened
  • 1 cup granulated sugar (or 1/2 cup Splenda baking blend)
  • 4 eggs
  • 1/3 cup creme de menthe liquer

Directions:

  1. Preheat your oven to 300°F.
  2. To prepare the springform pan for the water bath, wrap foil around the outside of the pan along the bottom and sides of a 9 inch non-stick springform pan.
  3. In a large bowl, mix crust ingredients with fork until crumbly. Press the crust on the bottom and about 1 inch up the side of the pan.
  4. Place the pan in the oven and bake for 12 minutes. Once the crust is baked, place the pan in the freezer to cool down while you make the filling.
  5. In a small microwavable bowl, microwave the chocolate on high for 60 seconds and stir the chocolate. Microwave in 30 second intervals until just melted and smooth. Set the chocolate aside to slightly cool.
  6. In a mixer bowl, beat cream cheese and sugar with an electric mixer on medium speed for about 4 minutes, until the mixture is smooth and fluffy. Scrape the bowl down frequently. Add eggs, one at a time, beating for about a minute, until the mixture is smooth. Stir in liqueur on low. Reserve 1/4 cup of the cheesecake mixture.
  7. Take the pan out of the freezer and pour the rest of the filling evenly over crust.
  8. Stir the 1/4 cup of cheesecake mixture into the melted (but cooled) semi-sweet chocolate. Drop 8 to 10 spoonfuls of the chocolate mixture randomly onto filling. With a knife or small spatula, swirl the chocolate mixture into the cheesecake mixture.
  9. Fill a roasting pan with about 1 1/2 inches of hot water to make the water bath for the cheesecake. Carefully place the springform pan in the roasting pan, and place the roasting pan in the oven. Bake for 70-80 minutes, until the edge looks set. Turn oven off and open door slightly (I just leave it open by placing a wooden spoon in the door). Cool cheesecake in the oven for 1 hour. Remove the cheesecake from the oven and remove the foil from the pan. Place the pan on a cooling rack and allow it to cool at room temperature for 1 hour. After it has cooled, refrigerate the cheesecake for 3 hours or overnight.
  10. To serve, carefully remove the cheesecake from the springform pan and enjoy!


Filed Under: Cakes/Cupcakes, Chocolate

  • « Go to Previous Page
  • Go to page 1
  • Go to page 2
  • Go to page 3
  • Go to page 4
  • Go to page 5
  • Interim pages omitted …
  • Go to page 7
  • Go to Next Page »

Primary Sidebar

Hey Y’all!

Image Credit: Leslie Pendleton Photography


Hey y’all!

Thanks so much for reading! I’m Amy, and I live in south Louisiana with my husband and our rescue dog. I enjoy sharing my love for cooking, baking, crafts & more! Follow my daily adventures on social media!

Follow my Daily Adventures

  • Email
  • Facebook
  • Instagram
  • Pinterest
  • Twitter

Footer

  • Email
  • Facebook
  • Instagram
  • Pinterest
  • Twitter

Archives

Copyright © 2026 · Foodie Pro Theme by Shay Bocks · Built on the Genesis Framework · Powered by WordPress