• Skip to primary navigation
  • Skip to main content
  • Skip to primary sidebar
  • Skip to footer

The Nifty Foodie

  • Home
  • About
  • Recipes
    • Appetizers
    • Beverages
    • Breads/Muffins
    • Breakfast
    • Canning
    • Desserts
    • Dog Treats
    • Entertaining/Parties
    • Fruit
    • Holiday Recipes
    • Louisiana Cuisine
    • Main Dishes
    • Mexican
    • Nifty Foodie Original
    • Nifty Tricks
    • Project Food Blog
    • Pumpkin
    • Salads
    • Sauces/Dips
    • Side Dishes
    • Skinny
    • Slow Cooker
    • Spices
    • Stews/Soups
    • The Disasters
  • My Weight Loss Journey
    • Races
    • Running
    • Weight Loss Milestones
  • Crafts
  • Contact Me

Holiday Recipes

Eggnog Macarons

December 28, 2010 by Amy 14 Comments

Macarons

The macaron. These are probably one of the most intimidating cookies out there. I’ve made them before, but it was in the summer, and humidity was raging. I guess the extra moisture in the air attributed to my macarons ending up with no feet. They tasted wonderful, but they were pitiful flat little cookies. 🙁

I sort of forgot about these little treats until my sisters and I visited Sucre in New Orleans. It was love at first bite. Pistachio was my absolute favorite out of all the flavors we tried.

IMG_3156
That evening, I was asked to bring all desserts for Christmas. I knew that I had to give these macarons another attempt. I mean, dew point was in the 30s and that’s SUPER rare in Louisiana. So, bye bye to the humidity for this attempt!

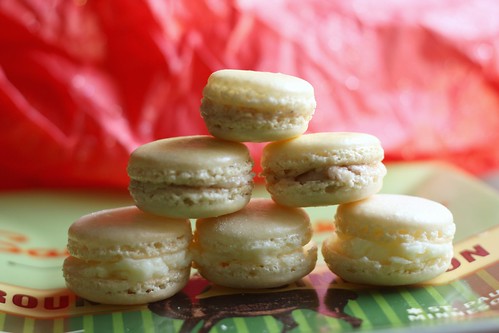
That first picture….yep, those were the macarons that I made! I was yelling in excitement to the hubs as I stared into the oven, watching those little feet happen. I totally had my first macaron success!! Best of all? My family thought they tasted just like the ones from Sucre! Win! 🙂

This was also my first time making some form of a meringue buttercream. Seriously y’all, I thought this was a massive fail, but I remember reading on blogs that it does take a while to come together. After several minutes, just like that, it went from a separated mixture to a gorgeous frosting! I’m in shock that a frosting with so little sugar tastes so much better, too! Definitely making a meringue-type frosting again soon! I ended up filling a few with plain buttercream to see how it would taste (as you can see in the bottom row), but after tasting both, I felt that the spiced eggnog frosting was the way to go here.

Eggnog Macarons
Source: Tartelette

For the macarons:

Ingredients:

  • 90 gr egg whites (use eggs whites that have been preferably left 3-5 days in the fridge)
  • 25 gr granulated sugar
  • 200 gr powdered sugar
  • 110 gr almonds (slivered, blanched, sliced, whatever you like)

Directions:

  1. In a stand mixer fitted with the whisk attachment, whip the egg whites to a foam, (think bubble bath foam) gradually add the sugar until you obtain a glossy meringue (think shaving cream). Do not overbeat your meringue or it will be too dry.
  2. Place the powdered sugar and almonds in a food processor and give them a good pulse until the nuts are finely ground.
  3. Add them to the meringue, give it a quick fold to break some of the air and then fold the mass carefully until you obtain a batter that falls back on itself after counting to 10. Give quick strokes at first to break the mass and slow down. The whole process should not take more than 50 strokes. Test a small amount on a plate: if the tops flattens on its own you are good to go. If there is a small beak, give the batter a couple of turns.
  4. Fill a pastry bag fitted with a plain tip (Ateco #807 or #809) with the batter and pipe small rounds (1.5 inches in diameter) onto parchment paper or silicone mats lined baking sheets. Let the macarons sit out for 30 minutes to an hour to harden their shells a bit. In the meantime, preheat the oven to 280F.
  5. When ready, bake for 15 to 20 minutes, depending on their size. Let cool. If you have trouble removing the shells, pour a couple of drops of water under the parchment paper while the sheet is still a bit warm and the macarons will lift up more easily do to the moisture. Don’t let them sit there in it too long or they will become soggy.
  6. Once baked and if you are not using them right away, store them in an airtight container out of the fridge for a couple of days or in the freezer.

For the eggnog filling:

Ingredients:

  • 1/2 cup (100gr) sugar
  • 2 large egg whites
  • 1 1/2 sticks (180gr)(6 ounces) unsalted butter, at room temperature
  • 1/4 teaspoon to 1/2 teaspoon ground cinnamon
  • 1/8 teaspoon freshly grated nutmeg

Directions:

  1. Put the sugar and egg whites in a large heatproof bowl over a saucepan of simmering water and whisk constantly, keeping the mixture over the heat, until it feels hot to the touch, about 3 minutes. The sugar should be dissolved, and the mixture will look like marshmallow cream.
  2. Pour the mixture into the bowl of a stand mixer fitted with the whisk attachment and beat the meringue on medium speed until it cools and forms a thick shiny meringue, about 5 minutes.
  3. Switch to the paddle attachment and add the butter, one tablespoon at a time, beating until smooth. Once all the butter is in, beat in the buttercream on medium-high speed until it is thick and very smooth, 6-10 minutes.
  4. Add the cinnamon and nutmeg to the buttercream.. Fill he shells with the buttercream and enjoy!

Filed Under: Cookies, Holiday Recipes

Chewy Sugar Cookies

November 29, 2010 by Amy 9 Comments

Soft and Chewy Sugar Cookies

I’m so excited that I can pull out the Christmas tree, blast my Christmas Pandora station and start the holiday baking (without getting judgey stares from others)! It’s officially CHRISTMAS SEASON!

I pretty much sang Christmas carols the whole time while making these. My sous chef, aka my four legged friend who just lays on the cold kitchen floor as I work, probably was not very pleased. I will say that the sous chef really couldn’t care less about the Christmas tree so far…whew! 🙂

Back to the cookies. The hubs LOVES a good chewy sugar cookie, so when I saw this recipe on Christen’s blog, I couldn’t wait to make these happen! The ingredients sound a little weird at first (cream cheese in sugar cookies?!), but trust me, it works. The hubs said these were probably the best cookies I’ve ever made! SCORE!

Chewy Sugar Cookies
Source: mildly adapted from Cooks Illustrated (Nov/Dec 2010 issue), as seen on Cooking with Christen

Ingredients:

  •  2 1/4 cups all-purpose flour
  • 1/2 tsp baking soda
  • 1 tsp baking powder
  • 1/2 tsp salt
  • 1.5 cups sugar, plus extra for rolling the cookies in
  • 3 oz cream cheese, cut into small pieces
  • 6 tbsp butter, melted and warm
  • 1/3 cup vegetable oil
  • 1 large egg
  • 1 tbsp milk
  • 2 tsp vanilla extract

Directions:

  1. Preheat oven to 350.
  2. Line a baking sheet with silicone mat.  Whisk flour, baking soda, baking powder and salt together in a medium-sized bowl.
  3. In a large bowl, place the 1.5 cups sugar and the cream cheese, then pour the warm butter over it and whisk to combine.  It will be slightly lumpy.  Whisk in oil, mix well then add the egg, milk and vanilla and whisk until smooth.  Add flour mixture and mix with a scraper spatula until dough forms.
  4. Using a medium cookie scoop, scoop cookies onto a baking pan, leaving adequate space for baking. Using the bottom of a drinking glass, gently flatten each cookie to make them uniform in size. Sprinkle additional sugar on top of each cookie (and sprinkles, if you’d like).  Bake 11-13 minutes, until edges are just set. (This step is much different from Cooks Illustrated, because I found the resulting dough to be too sticky to work with.) This made about 30 cookies.
  5. Cool on wire rack.

Filed Under: Cookies, Holiday Recipes

Happy (early) Thanksgiving!

November 23, 2010 by Amy Leave a Comment

Turkey Day Pops
Can you believe that tomorrow is Thanksgiving? It seems like just yesterday I found myself still writing 2009 on papers, when it should have been 2010. Now, 2011 is pretty much around the corner. Crazy, eh?

I hosted Thanksgiving for the first time last year. It was so wonderful to have our families in our home together, and at the time, I actually had the Christmas tree up for the family to see. My Dad gave me a hard time about it, but hey, what’s a little early Christmas cheer gonna hurt?

This year, we’re going to my in-laws’ for Thanksgiving, so the hubs and I are only making a couple of dishes to bring over, rather than coordinating a good portion of the meal. While I love hosting a good party, I’m a little relieved to just chill for the holiday. 🙂

I’ve noticed that I’ve gained some new readers since last Thanksgiving, so I thought it would be fun to share some of my Thanksgiving favorites with y’all. Some of the pictures will probably not look so great in these posts, but hey, I promise these dishes are super tasty!

Some of my favorites:

  • Mom’s Cornbread Dressing
  • Mom’s Sweet Potato Casserole
  • Green Bean Casserole
  • Pumpkin Pie
  • Pumpkin Cheesecake
  • Turkey Cake Pops

I hope you and your family have a wonderful Thanksgiving! What are your favorite dishes for Thanksgiving?

Filed Under: Holiday Recipes

4th of July Cupcakes

July 4, 2010 by Amy 14 Comments

4th of July Cupcakes

Happy 4th of July everyone! I hope y’all have a great holiday with family and friends!

Today, hubs and I are headed over to the in-laws for a seafood feast. I cannot wait! We volunteered to bring dessert, and I knew this would be the perfect opportunity to make some cute cupcakes!

I’ve been wanting to make a white cupcake from scratch for a while now, and when it came to finding the perfect recipe, a fellow blogger (The Way the Cookie Crumbles) wrote an amazing post comparing white cake recipes to find the best one! In the end, Cook’s Illustrated’s version was one of the front runners (no surprise there).

I decided to go all festive and make red, white and blue batter. Why not?

Festive Cake Batter

I had some fun assembling these cupcakes too. I tried layering (top cupcake) and marbling lightly with a toothpick (bottom cupcake). Both are equally fun and cute!

Cupcakes Dissected

I’ll admit, this recipe is very yummy! It wasn’t overwhelming, like wedding cake, and was surprisingly very moist as well. I topped the cupcakes with frosting that was another recommendation from The Way the Cookie Crumbles. It kicks Wilton frosting’s booty, for sure! Just really yummy and simple to make. I wouldn’t recommend this frosting for making decorations since it is very soft, but for spreading over a cake, heck yes! This is my new favorite. 🙂

Classic White Cupcakes
Source: The Way the Cookie Crumbles (originally from Cooks Illustrated)

Ingredients:

  • 2¼ cups cake flour (9 ounces)
  • 1 cup whole milk, at room temperature
  • 6 large egg whites (¾ cup), at room temperature
  • 2 teaspoons almond extract
  • 1 teaspoon vanilla extract
  • 1¾ cups granulated sugar (12¼ ounces)
  • 4 teaspoons baking powder
  • 1 teaspoon table salt
  • 12 tablespoons unsalted butter (1½ sticks), softened but still cool

Directions:

  1. Set oven rack in middle position. (If oven is too small to cook both layers on a single rack, set racks in upper-middle and lower-middle positions.) Heat oven to 350 degrees. Put cupcake liners in cupcake pan/pans.
  2. Pour milk, egg whites, and extracts into 2-cup glass measure, and mix with fork until blended.
  3. Mix cake flour, sugar, baking powder, and salt in bowl of electric mixer at slow speed. Add butter; continue beating at slow speed until mixture resembles moist crumbs, with no powdery streaks remaining.
  4. Add all but ½ cup of milk mixture to crumbs and beat at medium speed (or high speed if using handheld mixer) for 1½ minutes. Add remaining ½ cup of milk mixture and beat 30 seconds more. Stop mixer and scrape sides of bowl. Return mixer to medium (or high) speed and beat 20 seconds longer.
  5. Scoop batter into cupcake liners until 2/3 full. Arrange pans at least 3 inches from the oven walls and 3 inches apart. (If oven is small, place pans on separate racks in staggered fashion to allow for air circulation.) Bake until thin skewer or toothpick inserted in the center comes out clean, 14-18 minutes.
  6. Let cupcakes rest in pans for 3 minutes. Loosen from sides of pans with a knife, if necessary, and place on cooling rack. Let cool completely, about 1½ hours.

Easy Vanilla Buttercream
Source: The Way the Cookie Crumbles (originally from Cooks Illustrated)

Ingredients:

  • 20 tablespoons (2½ sticks) unsalted butter, softened
  • 2½ cups Confectioners’ sugar (10 ounces)
  • 1/8 tablespoons table salt
  • 2 teaspoons vanilla extract
  • 2 tablespoons heavy cream

Directions:

  1. In standing mixer fitted with whisk attachment, beat butter at medium-high speed until smooth, about 20 seconds.
  2. Add confectioners’ sugar and salt; beat at medium-low speed until most of the sugar is moistened, about 45 seconds. Scrape down bowl and beat at medium speed until mixture is fully combined, about 15 seconds; scrape bowl.
  3. Add vanilla and heavy cream, and beat at medium speed until incorporated, about 10 seconds, then increase speed to medium-high and beat until light and fluffy, about 4 minutes, scraping down bowl once or twice.

Filed Under: Cakes/Cupcakes, Holiday Recipes

Scotcharoos

December 28, 2009 by Amy Leave a Comment

A couple of weeks ago, I went to a local nestie GTG to meet up with some gals that I “talk” to on the forums. There was so much food to be had there, and I made sure to try a little bit of everything. One of the nesties brought these little bars, and WOW are these bars just amazing! She insisted that they were super easy to make, and boy, were they! I made a batch of these to include in the family holiday tins, and of course, snuck a few bars for me as well. 🙂

Scotcharoos
Source: MrsSpell of the Baton Rouge Nestie Boards

Ingredients:

  • 1 c. sugar
  • 1c. light corn syrup
  • 2 tbsp. butter
  • 1 c. peanut butter
  • 6 c. rice krispies cereal
  • 1 – 12 oz package semi-sweet chocolate chips
  • 1 – 12 oz package butterscotch chips
  • 1/2 tsp. vegetable oil

Directions:

  1. In a large pot cook sugar, corn syrup, and butter over med heat. Stir until completely dissolved and mixture comes to a low boil.
  2. Remove from heat and add peanut butter. Stir until melted together. Add cereal and stir until coated.
  3. Spread mixture evenly into a greased 9 x 13 pan and pat down using slightly wet hands.
  4. Melt chocolate and butterscotch chips with the oil together in the microwave approx. 2 minutes stopping to stir every 30 seconds. Pour over the top of cereal treats and allow to cool for min. of one hour. Cut into squares and enjoy!

Filed Under: Brownies/Bars, Chocolate, Holiday Recipes

Peppermint Marshmallows

December 21, 2009 by Amy 3 Comments

Ever since I found out that you could make your own marshmallows, I wanted to make them. The problem? I had a cheap hand mixer before our KA mixer. Now that we had the KA mixer, I had nothing holding me back from making these.

These are delicious, light and have a subtle peppermint flavor. I’m definitely putting the leftover ones from the gift tins in some hot chocolate ASAP.

Peppermint Marshmallows
Source: adapted from Alton Brown

Ingredients:

  • 3 packages unflavored gelatin
  • 1 cup ice cold water, divided
  • 12 ounces granulated sugar, approximately 1 1/2 cups
  • 1 cup light corn syrup
  • 1/4 teaspoon kosher salt
  • 1 teaspoon vanilla extract
  • 1/4 teaspoon mint extract
  • 1/4 cup confectioners’ sugar
  • 1/4 cup cornstarch
  • non-stick spray

Directions:

  1. Place the gelatin into the bowl of a stand mixer along with 1/2 cup of the water. Have the whisk attachment standing by.
  2. In a small saucepan combine the remaining 1/2 cup water, granulated sugar, corn syrup and salt. Place over medium high heat, cover and allow to cook for 3 to 4 minutes. Uncover, clip a candy thermometer onto the side of the pan and continue to cook until the mixture reaches 240 degrees F, approximately 7 to 8 minutes. Once the mixture reaches this temperature, immediately remove from the heat.
  3. Turn the mixer on low speed and, while running, slowly pour the sugar syrup down the side of the bowl into the gelatin mixture. Once you have added all of the syrup, increase the speed to high. Continue to whip until the mixture becomes very thick and is lukewarm, approximately 12 to 15 minutes. Add the vanilla during the last minute of whipping. While the mixture is whipping prepare the pans as follows.
  4. Combine the confectioners’ sugar and cornstarch in a small bowl. Lightly spray a 13 by 9-inch metal baking pan with nonstick cooking spray. Add the sugar and cornstarch mixture and move around to completely coat the bottom and sides of the pan. Return the remaining mixture to the bowl for later use.
  5. When ready, pour the mixture into the prepared pan, using a lightly oiled spatula for spreading evenly into the pan. To get red striping, add drops of red food coloring to the mixture in the pan and quickly swirl the coloring in. Dust the top with enough of the remaining sugar and cornstarch mixture to lightly cover. Reserve the rest for later. Allow the marshmallows to sit uncovered for at least 4 hours and up to overnight.
  6. Turn the marshmallows out onto a cutting board and cut into 1-inch squares using a pizza wheel dusted with the confectioners’ sugar mixture. Once cut, lightly dust all sides of each marshmallow with the remaining mixture, using additional if necessary. Store in an airtight container for up to 3 weeks.

Filed Under: Candy, Holiday Recipes

Rolled Gingerbread Cookies

December 20, 2009 by Amy 1 Comment

Gingerbread is one of those cookies that is just a standard to have during the holidays. They are spicy, chewy and can be cut in cute holiday shapes! My siblings and I used to get the Little Debbie gingerbreads and fight over them at the house. 🙂

I decided to include these in my coworker’s baked goodies tins because they looked easy and it was something new to bake. Being that I’ve never worked with molasses, I have to admit, I thought it was going to smell like brown sugar or something similar. No way folks…this has a very different smell than imagined. In fact, I thought I had a batch of bad molasses, but I kept going with the recipe and it turns out that molasses do indeed smell unpleasant normally.

This recipe is easy to work with and yields a delicious gingerbread cookie. You will not be disappointed at all.

Rolled Gingerbread Cookies
Source: Cookie Craft

Ingredients:

  • 5 cups all purpose flour
  • 2 tsp. ground ginger
  • 1 tsp. ground cinnamon
  • 1 tsp. ground cloves
  • 1/2 tsp. baking soda (if using this recipe to make a gingerbread house, omit the baking soda)
  • 1/2 tsp. salt
  • zest of one orange
  • 1 cup (2 sticks) unsalted butter, softened
  • 1 cup granulated sugar
  • 1 large egg
  • 1 cup molasses

Directions:

  1. Cream together the butter and sugar for 2 minutes or until light and fluffy. Add the egg and molasses and mix until blended.
  2. Put the flour, spices, baking soda, salt and orange zest in a medium bowl and whisk mixture together.
  3. With the mixer on low, gradually add the dry mixture to the wet mixture until the two are well blended.
  4. Put the dough in 3 even portions, formed into a rough disk and chill the dough in the fridge for a few hours.
  5. When you are ready to bake the dough, preheat the oven to 350 degrees.
  6. Cut the dough into desired shapes and place on a parchment/Silpat lined cookie sheet. ( I dipped one side of the cookie in sprinkles before placing on the cookie sheet.)
  7. Bake in the middle rack of your oven for 12-16 minutes for larger cookies; 7-9 minutes for smaller cookies or until the dough darkens a little along the edges.
  8. Cool cookies completely for decorating.

Makes about 36 3″ sized cookies, which equates to almost one double batch of sugar cookies.

Filed Under: Cookies, Holiday Recipes

Baking Gifts

December 18, 2009 by Amy 3 Comments

Coworkers are typically difficult to buy for. In college, I would really only buy for fellow female student coworkers. It was easy…Starbucks gift cards, bath stuff, etc. When I graduated and got thrown into the real world, I was introduced to working in a primarily male field. I can’t shop for males, at all. I have enough trouble shopping for  my husband, father and brother! So, I started making edible gifts.

Last year, I bought cute Christmas chinese take-out boxes and put decorated sugar cookies, oreo truffles and chocolate covered pretzels in them. This year, I branched out from those ideas just a little bit.

I had my first adventures of making homemade peppermint marshmallows. The KA definitely was put to use here! I couldn’t have even fathomed making these last year with a $10 hand mixer.

Another recipe from Cookie Craft that I’ve been wanting to try is their rolled gingerbread cookies. These did not disappoint.

Of course, the oreo truffles made an appearance, and this time, instead of putting a bunch in one bag, I bought cutesy Christmas foils to wrap them in!

Adorable right? I love you Hobby Lobby.

Of course, here is a small picture of the packaging in action. I will say my kitchen was a big ol’ mess after this, but it was worth it! My coworkers seemed to love the goodies. Of course, the easiest recipe (oreo truffles) became the hit of the gifts!

Filed Under: Candy, Cookies, Holiday Recipes

Mom’s Cornbread Dressing

December 5, 2009 by Amy 1 Comment

Since we were hosting Thanksgiving, I knew I was going to make my mom’s fabulous cornbread dressing. It’s so flavorful, moist and just delicious! I was afraid it wouldn’t be as good as mom’s, because the recipe she gave me was a lot of ingredients “to taste”. So, I was surprised to see that people actually gobbled (hehe..pun) it up!

I wrote ingredients down as I did it, and so this is my version of my mom’s dressing!

Mom’s Cornbread Dressing

Ingredients:

  • 1 large onion, finely chopped
  • 2 bunches of green onions, finely chopped
  • 2 stalks of celery, finely chopped
  • 1 green bell pepper, finely chopped
  • 4 cloves minced garlic
  • 1 9×13 pan of prepared and cooled cornbread (I did this using 6 packs of Jiffy cornbread mix.)
  • 1 lb. lean ground meat
  • 1 roll of Jimmy Dean reduced fat sausage
  • 2 cans of beef broth
  • Cajun spice, paprika, salt and pepper to taste (I didn’t measure these…sorry!)

Directions:

  1. Saute onions, green onions, bell pepper and celery in a dutch oven until transparent. Add garlic.
  2. Brown sausage and beef in another pot until fully cooked and drain fat.
  3. Add meat mixture to the onion mixture in the dutch oven.
  4. Cut up and crumble cornbread by hand and add it to the pot.
  5. Add beef broth about a half can at a time, until the mixture is moist.
  6. Add spices to taste.
  7. Refrigerate overnight to allow the flavors to meld. The next day, place the dutch oven (covered) in the oven at 350 degrees until the dressing is warm. Serve.

Filed Under: Beef, Holiday Recipes, Pork/Ham/Bacon, Side Dishes

Our Thanksgiving!

November 29, 2009 by Amy Leave a Comment

Top row: Cajun Smoked Turkey, Cornbread dressing, Honey-baked Ham
Second row: Green Bean Casserole, Sweet Potato Casserole, Cauliflower Au Gratin
Bottom Row: Homemade Yeast Rolls, Rice Dressing

After much planning and excitement, Thanksgiving with our families was absolutely wonderful. It was great to spend time with everyone, and to see the responses to the food we cooked. I’m going to share a couple of recipes with you, since our families insisted on bringing dishes as well. 🙂

I hope you also had a great Thanksgiving! I can’t believe it’s time to plan for Christmas now!


Filed Under: Entertaining/Parties, Holiday Recipes

  • « Go to Previous Page
  • Go to page 1
  • Go to page 2
  • Go to page 3
  • Go to page 4
  • Go to page 5
  • Go to Next Page »

Primary Sidebar

Hey Y’all!

Image Credit: Leslie Pendleton Photography


Hey y’all!

Thanks so much for reading! I’m Amy, and I live in south Louisiana with my husband and our rescue dog. I enjoy sharing my love for cooking, baking, crafts & more! Follow my daily adventures on social media!

Follow my Daily Adventures

  • Email
  • Facebook
  • Instagram
  • Pinterest
  • Twitter

Footer

  • Email
  • Facebook
  • Instagram
  • Pinterest
  • Twitter

Archives

Copyright © 2026 · Foodie Pro Theme by Shay Bocks · Built on the Genesis Framework · Powered by WordPress