• Skip to primary navigation
  • Skip to main content
  • Skip to primary sidebar
  • Skip to footer

The Nifty Foodie

  • Home
  • About
  • Recipes
    • Appetizers
    • Beverages
    • Breads/Muffins
    • Breakfast
    • Canning
    • Desserts
    • Dog Treats
    • Entertaining/Parties
    • Fruit
    • Holiday Recipes
    • Louisiana Cuisine
    • Main Dishes
    • Mexican
    • Nifty Foodie Original
    • Nifty Tricks
    • Project Food Blog
    • Pumpkin
    • Salads
    • Sauces/Dips
    • Side Dishes
    • Skinny
    • Slow Cooker
    • Spices
    • Stews/Soups
    • The Disasters
  • My Weight Loss Journey
    • Races
    • Running
    • Weight Loss Milestones
  • Crafts
  • Contact Me

Holiday Recipes

Cinnamon Rolls & A Giveaway!

November 26, 2013 by Amy 36 Comments

handmadeholidays

It’s amazing how quickly one can go through butter for holiday baking, so it’s essential for me to stock up when it goes on sale! Usually $2/lb. is my stock-up price, and when I stock up, I usually buy 10 lbs. at a time. I have to wonder what the cashier thinks of me when I purchase all that butter, and I’ve been asked if I own a bakery once. Nope…I just LOVE to bake!

This recipe for cinnamon rolls goes through some butter, y’all. At first, I thought there was no way all of that butter was going to go in the cinnamon rolls…no way. However….yup…I used over a pound of butter in a batch of cinnamon rolls. 4 sticks alone served as part of the filling! Now, this recipe isn’t just for 8 rolls…I got 48 rolls out of this recipe. It’s the perfect recipe for gift-giving, and it comes from someone who is always cooking for a crowd: The Pioneer Woman.
cinnamonrolls1

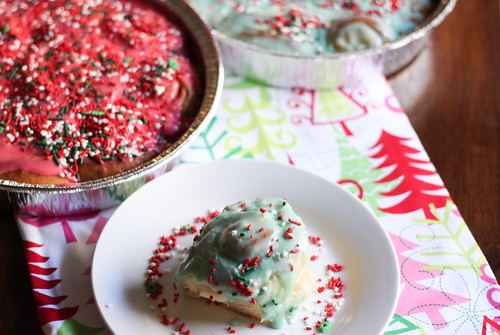
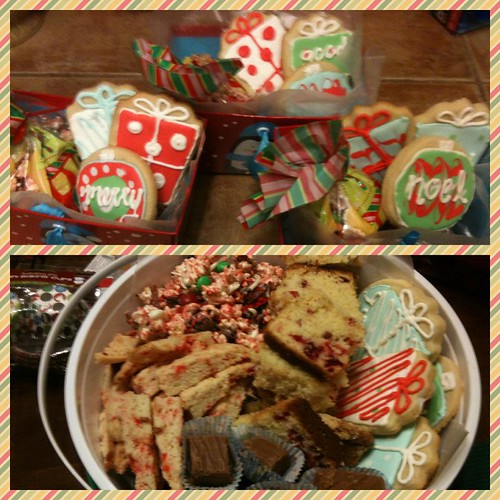
I’ve heard so many wonderful things about her cinnamon roll recipe, but since it’s such a large recipe, I felt like I needed an occasion to make these. Well, how about the holidays? When this recipe makes 6 pans worth, you could totally get away with gifting this to neighbors, family, friends….whoever you want! I took a tip from The Pioneer Woman, and baked them in cheap disposable baking pans. While they aren’t the prettiest, you can totally dress up the pan by dying the icing, adding sprinkles on top of the rolls & wrapping the pan in holiday cellophane paper! How awesome would it be to give something like this to a loved one?

cinnamonrolls2

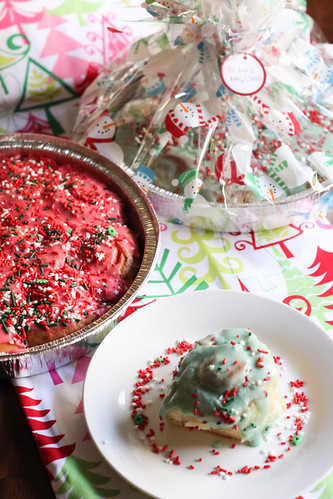
These cinnamon rolls were divine. Just…divine. This is my first time making cinnamon rolls from scratch, and I firmly believe that the scent of butter/sugar/cinnamon/dough needs to be in a candle. Holy moly…it smelled like king cake in our house! The rolls themselves were a tender, fluffy texture, thanks to Red Star Platinum yeast. I first heard about Red Star Yeast when I attended a King Arthur Flour seminar a couple of years ago. We were given samples at the seminar, and when I baked with the yeast, I was so surprised at how well the dough rose! I ended up purchasing a full 1 lb. block of Red Star Yeast the next week. I’m definitely a fan of their yeast.

…

Read More »

Filed Under: Breads/Muffins, Breakfast, Giveaways/Reviews, Holiday, Holiday Recipes

Lumps of Coal & A Giveaway!

November 25, 2013 by Amy 13 Comments

handmadeholidays

I’m ridiculously excited about this week’s posts. As you guys may already know, I’m a big fan of the holiday season. One of my favorite things to do during the holidays is to DIY some of the gifts, and this week is going to be all about homemade holiday gifts that you can easily make from the kitchen. So, everyday this week (with the exception of Thanksgiving), I’ll be featuring a fun homemade holiday gift idea, along with a giveaway from some very generous companies whose products I love to use!

Today, I wanted to share with you guys how easy it is to make these adorable “lumps of coal”.

candy2

…

Read More »

Filed Under: Candy, Chocolate, Giveaways/Reviews, Holiday, Holiday Recipes

Cranberry Crumb Bars with Mulling Spices

November 15, 2013 by Amy 1 Comment

cranberrycrumbbars

I’ve been waiting for months for fresh cranberries to be back in stores. As a few of you may remember, I used to contribute on Weddingbee (under the moniker, Mrs. Ballet Flat). Every year around this time, some of the bloggers exchange ornaments, making one of the giftee’s moniker. So, I have quite a few ballet flat ornaments on my tree that I truly cherish. 🙂 Last year, along with the ornament, I also got a few of these bars in the mail (an awesome surprise!). I was addicted….absolutely addicted.

After the holiday craziness, I went to the grocery stores to buy fresh cranberries to make these bars, since my exchange friend mentioned they were from Smitten Kitchen’s cookbook (which I had recently purchased). Well, all of the stores near me were sold out. Gone. No more cranberries. I promised myself that once they were back in the produce section, I was going to immediately make these bars. They’re just as good as I remembered…a subtle spiced crumb layer and cranberry filling with a hint of orange in it. It’s marvelous (as if I expected anything different from Deb of The Smitten Kitchen).

I brought these to my coworkers, thinking that cranberries are an iffy ingredient for some people…they probably wouldn’t go that fast. Um…these bars left faster than when I bring cupcakes to work! They were an absolute winner! If you’re looking for a festive holiday dessert that is a little different than the norm, give these a try. The recipe comes together fairly quickly, and any cranberry lover will probably go crazy over these. 🙂

Cranberry Crumb Bars with Mulling Spices
Source: Smitten Kitchen Cookbook

Ingredients:

For the crumb base:

  • 16 tablespoons (2 sticks) unsalted butter, chilled (saving the wrappers to grease the pan)
  • 3 cups all-purpose flour
  • 1 cup sugar
  • 1/2 tsp. table salt
  • 1 tsp. baking powder
  • 1/2 tsp. ground cinnamon
  • 1/4 tsp. ground nutmeg
  • 1/8 tsp. ground cloves
  • 1/8 tsp. ground allspice
  • 1 large egg

For the filling:

  • 1/2 tsp. freshly grated orange zest
  • 1 1/2 tbsp. orange juice
  • 3 cups (12-ounce bag) fresh cranberries
  • 1/2 cup sugar
  • 1 tbsp. cornstarch

Directions:

  1. Preheat the oven to 375 degrees F. Prepare a 9×13 inch baking pan by lining it with parchment paper and rubbing the butter remnants left on the inside of the butter wrappers on top of the parchment paper.
  2. In a large, wide bowl, add the flour, sugar, salt, baking powder and spices. Whisk the mixture well. Using a pastry blender or fork, work the chilled butter and egg into the dry flour mixture until the texture resembles a coarse meal. Pat half of the crumb mixture into the bottom of your prepared baking pan (note: the layer will be thin).
  3. In a food processor or blender, add the filling ingredients and pulse the mixture until the cranberries are coarsely chopped (but not pureed). Using a spatula or spoon, evenly spread the filling over the pressed crumb base. After the filling is evenly added, sprinkle the remaining crumb mixture evenly over the berry mixture.
  4. Bake the bars for 30-35 minutes, or until just lightly brown on top. Allow the bars to cool completely before serving, cutting the bars into 36 small squares.


Filed Under: Brownies/Bars, Desserts, Fruit, Holiday Recipes

Holiday Spritz Cookies & A Giveaway!

November 11, 2013 by Amy 55 Comments

bakingbook2

I am in hog heaven lately. It’s no surprise to you guys that Christmas is a holiday that I just adore, and with the holidays, there is always baking. Lots and lots of baking. I know I mentioned last week that I had to special order 28 blocks of cream cheese…well, when the butter goes on sale, I’m pretty sure I’m going to need 15 boxes. I’m not even kidding. I just love holiday baking, and truly enjoy sharing those treats with the ones that I care about.

America’s Test Kitchen recently came out with their newest book: The Cook’s Illustrated Baking Book, and sent me a complimentary copy to review. I just adore America’s Test Kitchen. I subscribe to both Cook’s Illustrated and Cook’s Country, as well as frequently cook from The Cook’s Illustrated Cookbook. So when they asked me if I’d like to review this book, I didn’t even have to think about it. I actually had this book on my holiday wish list when I first read about the book in this post (which is what encouraged me to bake those scrumptious sticky buns in the first place). 🙂 When I received it in the mail, I had my post-its in hand ready to mark the recipes that I wanted to make right away.

The book contains 15 different chapters, with 450 recipes total. The book also has a comprehensive section called baking basics, explaining pretty much anything you ever needed to know about basic baking ingredients and tools, as well as tips to become a better baker in the kitchen.

bakingbook1

It’s also beautifully illustrated. I’m usually a sucker for color photos when it comes to food photography, but the black and white photography just draws you in. Also, in true Cook’s Illustrated fashion, there are step-by-step illustrations for some of the more complicated recipes. I appreciate this, because while you don’t necessarily always need step-by-step photos, there are some recipes where you just need an illustration or two to guide you along the way. There’s also notes in the beginning of every recipe, explaining what the recipe is and how certain ingredients in the recipe work to make this recipe just perfect.

As I was skimming through the book, these holiday spritz cookies caught my eye. Really, it was the word “holiday”. 😉 I’ve attempted to make spritz cookies before, and sadly, the dough ended up being too thick to use in the cookie press. I haven’t attempted spritz cookies since, and that was a few years ago. While I own a cookie press, I wanted to try it with another method that they recommended: a star tip and a piping bag. Genius….

I was so excited when these cookies actually piped out, and they baked up perfectly. These cookies put those holiday tin cookies to shame. They’re perfectly buttery, not too sweet, and are so simple to make! I ended up adding some sprinkles to some before baking as well, and that gave them some extra holiday flair. Of course, they’re delicious on their own, but sprinkles make everything more fun, right?

…

Read More »

Filed Under: Cookies, Giveaways/Reviews, Holiday Recipes, Review

Sweet Potato Pie

November 8, 2013 by Amy 1 Comment

sweetpotatopie

I went to the grocery store tonight, since they had cream cheese for 99 cents. When it gets this low in price, I do the annual stock-up for cheesecake season. See, this cheesecake has made me famous between our families, and well, that cheesecake calls for 4 blocks of cream cheese. It can get spendy during the holiday season, so it’s always fun to go to the store to stock up and request 30ish boxes of cream cheese. A bit crazy, but I use every last bit of it. 🙂

I was thinking about cheesecake the other day when it came to brainstorming Thanksgiving recipes, and what bothered me is that I never make something traditional for the holiday. So, I wanted to try to make sweet potato pie.

When I went to Fresh Summit, I connected with a company called Frieda’s Produce, and they generously offered to send me one of their featured produce items for me try. When I saw these potatoes on their list, I just had to try them, and the first thing that popped in my head was to try pie. Yes, these are purple sweet potatoes, and I can’t tell you how many times I was asked if I used food dye to enhance the color. Nope…these potatoes are very purple. It’s gorgeous, and they taste great, too!

This pie was definitely the classic pie that I’ve loved for years. It’s not too sweet, but with the bourbon and molasses in there, the flavor was much deeper and richer. This dessert makes me want to curl up on the couch with an electric blanket and drink warm hot chocolate along with a slice of this.

Sweet Potato Pie
Source: filling from Cook’s Illustrated Cookbook, pie crust via Smitten Kitchen

Ingredients:

  • 2 lbs. sweet potatoes
  • 2 tbsp. unsalted butter, softened
  • 1 cup granulated sugar
  • 3 large eggs + 2 large yolks
  • 1/2 tsp. ground nutmeg
  • 1/4 tsp. salt
  • 2 tbsp. bourbon
  • 1 tbsp. molasses
  • 1 tsp. vanilla extract
  • 2/3 cup whole milk
  • 1/4 cup packed dark brown sugar
  • 1/2 recipe pie dough (this recipe is meant for a double-crust pie, so half will work for this single-crust pie), partially baked and still warm

Directions:

  1. Move the oven rack to the middle position and preheat the oven to 350 degrees.
  2. Poke each sweet potato several times with a paring knife or fork all over the entire surface. Place the potatoes on a paper towel-lined microwave safe plate and microwave the potatoes until they are tender, but not completely mushy (about 10 minutes…the purple potatoes need to cook longer so they took 15 minutes), being sure to flip the potatoes halfway through the microwaving. Take the sweet potatoes out of the microwave, and peel the skin off of each sweet potato carefully while holding the potato with a towel or potholder to prevent from burning yourself. You should end up with about 2 cups of sweet potato after peeling.
  3. While the potatoes are still hot, add the butter and mash the sweet potatoes with a potato masher until a few small lumps remain. In a medium bowl, whisk together the granulated sugar, eggs, egg yolks, nutmeg and salt. Add in the bourbon, molasses and vanilla extract, and stir those into the potato mixture. Whisk in the milk.
  4. Slowly add the egg mixture to the mashed potato mixture, stirring/whisking gently until just combined.
  5. Sprinkle the dark brown sugar evenly over the pre-baked pie crust, and then pour the sweet potato mixture on top. Bake the pie for about 45 minutes, until the edges are set, but the center will still jiggle slightly when shaken. Allow the pie to cool to room temperature before serving.

Disclosure: I was sent a 5 lb. case of Stokes Purple Sweet Potatoes at no cost to me to sample. All opinions are 100% my own.

Filed Under: Holiday Recipes, Pies

Smoked Turkey & A Giveaway!

November 4, 2013 by Amy 40 Comments

smokedturkey

Whew! What a busy weekend it was!

It all started with a good 3 miles of running after work on Friday. This half marathon training stuff is crazy. Just crazy. I’m only running 3-4 miles now, and I can’t imagine going 4 times as far!! Then, Saturday, we decided to do a practice holiday meal (since we’re probably hosting Christmas this year…YAY!) and invited the in-laws over…smoked turkey, potatoes, green beans, a twist on cranberry sauce that knocked everyone’s socks off (sharing that Wednesday) and a great dessert that I’m sharing with you guys Friday! It’s going to be a week of Thanksgiving…with a twist…on the blog. I hope you all LOVE it as much as we loved it!

Can I also brag a bit? As far as my side of the family goes…Christmas shopping is ALL DONE! I just have to get something for my husband, and of course, help him out with his family’s gifts. 🙂 Once I get started on shopping, I am a gift shopping machine. I kind of want to go in the attic and grab our container of gift wrap, but I think my husband would give me a permanent side-eye. Ah well…now to just relax and finish making the gifts that I plan on crafting.

So, that picture may not be the most picture perfect turkey (I think it’s because I didn’t butter the skin well enough and I tore it…womp wah), but OMG…it was SO tasty. And that’s all that matters, right? (especially once it’s carved up) Making the turkey in a smoker is a fun twist on the traditional oven-roasted turkey. It’s full of smoky flavor, and since the turkey is injected with a whole jar of marinade, the turkey is crazy moist.

NOTE: This recipe is intended for an electric smoker (we own a Masterbuilt one).

Smoked Turkey
Source: Dadgum, That’s Good

Ingredients:

  • one whole turkey, thawed
  • 1 bottle buttery creole injection marinade…make sure it comes with an injector or purchase your own (we used Tony Chachere’s)
  • cajun seasoning (we used Tony Chachere’s)
  • apple wood chips, for smoking
  • apple juice
  • water
  • 1 stick unsalted butter

Directions:

  1. Fill the smoker’s water pan 1/3 of the way full with half apple juice and half water (about 3 cups for our particular water pan). Preheat the smoker to 225 degrees F. Rinse out and dry the thawed turkey in the sink (don’t forget to disinfect the sink after this!). Using the injector, inject the turkey (in various areas) with one full jar of the buttery marinade.
  2. Liberally season the skin (and carefully underneath the skin) of the turkey with cajun seasoning, being sure to rub it well into the skin. Cut the butter into small pats, and carefully place them under the skin of the turkey.
  3. Add a small handful of apple wood chips to the smoker (we have a special loader for this). Open the smoker, and place the turkey on a rack high in the smoker (in the center of the rack) and close the door. Every hour or so of the cooking process, add another handful of apple wood chips to your smoker (no more than 5 times for the whole cooking process of the turkey). Smoke the turkey for about 30 minutes per lb., ensuring that the internal temperature of the turkey breast reaches 165 degrees.
  4. Remove the turkey from the smoker and place it on a rimmed baking sheet, covering the entire turkey with foil to allow it to rest. Allow the turkey to rest for about 30 minutes before serving.

…

Read More »

Filed Under: Giveaways/Reviews, Holiday Recipes, Poultry

The 9Chefs Baking Competition

January 3, 2013 by Amy 4 Comments

A couple of weeks ago, I posted about peppermint bark chess pie. I adapted the pie recipe for the 9Chefs Baking Competition, which was aired on WAFB (a local news station). I can’t tell you how many times I made that pie to practice, but it was to the point to where I pretty much didn’t need to look at the recipe for the competition.

I was INCREDIBLY nervous about this competition. The whole week of the competition, I would randomly get butterflies in my stomach just thinking about it. Would I drop my pie? Add salt instead of sugar? Look ridiculous on camera? I also had dreams about how it would go….I know it’s ridiculous sounding, but I’ve never done anything like this.

The morning of the competition, I left my house an hour early just to give myself ample time to settle in at the culinary institute (where it was held/taped). Well, typical Friday traffic didn’t happen, because there was a terrible accident on the Interstate, which, despite me leaving an hour early, I was 10 minutes late. I was the last one there…how embarrassing. 🙁 I seriously thought I was going to get kicked out for being late.

When I arrived, I learned that we were going to be wearing chef jackets. Um…WAY COOL. After that, it was a whirlwind, but I remember we had a few minutes to set up our stations (we were allowed to bring any tools/appliances from home, so I had a bit to unpack haha) before interviews. Then, right after, the competition would start.

The competition allowed us 3 hours to bake two pies. One for tasting and one for presentation. With the pie I wanted to make, I knew I had to get it in the oven within the first hour, to give it ample cooling time. One thing I didn’t expect was that there were culinary students there to help us gather ingredients, and while we were frantically rolling pie dough and making fillings, the students washed our dishes for us. It was so appreciated. I’m sure the students have no idea this blog exists, but if they happen to see this, Thank You. Also, a HUGE thanks to the Louisiana Culinary Institute (LCI) for allowing us to use their kitchen, their ingredients and their equipment. It was very interesting (intimidating at first) to use commercial equipment, but with the help of the students and instructors from LCI, it wasn’t bad at all.

That first hour, I was completely in the zone. The room was actually VERY quiet, and I thought it would be crazy/loud/hectic like you see on Chopped, but every competitor was quietly doing their thing. It was so cool to glance around to see what everyone was making, and to watch how everyone works differently in the kitchen. After the first hour, I relaxed a bit and worked on decorations/whipped cream topping. I also got to really take this whole experience in once the pies were in the oven….that first hour, the room felt so quiet, but after everyone had their pies in, we all would just randomly chat and it became a pretty friendly environment, which I didn’t expect at all. It was a relief, but we were all amateur home bakers…I think we were all pretty nervous about it. Once my pies were out of the oven (about 2 hours in), I concentrated on cleaning my station/packing my tools and letting my pies cool.

9Chefs Baking Competition

After 3 hours, this is the display that I left for the judges. My pies could have cooled a bit more, and man, I was SO nervous slicing the pie that quite a few of them just broke (compared to the blog photo from the recipe post). I was really hoping that the taste would make up for it. 🙂

9Chefs Baking Competition

Once the competition was over, we went to a waiting room to allow the judges to taste the pies and did our post-competition interviews. I think that’s when the butterflies really set in. My pies came out great but of course, I had to question if I did enough….

If you’d like to see how the competition went down, here’s the video on YouTube. If you want to skip to the results, just drag the player to about 20 minutes in. 🙂

One of the big questions my friends and family have asked me is if I would do this again. In a heartbeat. I really loved it!

Thanks again to WAFB and LCI for the wonderful opportunity, and congratulations to the winners!

Filed Under: Holiday Recipes, Other, Pies

Top 10 Recipes of 2012

December 28, 2012 by Amy 2 Comments

Man, what a year it has been! I hope everyone had a wonderful holiday season with their friends and family. 🙂

Most years, I feel like time has flown by, but for some reason, it feels like last January was truly a year ago. So many great things have happened to us this year (as well as some really crappy events).  

Some highlights and not so highlights:

  • It was our first full year in our new house, which has been such a blessing. It’s just awesome to finally have friendly neighbors, who don’t throw their trash in our backyard or play loud music at 2am (side-eye to the neighbors at the old house).
  • My husband and I have both decided to live healthier. Between us, we’ve lost over 150 lbs. this year. (I’m sure my husband is rolling his eyes at me sharing this, but seriously..I’m gonna brag here!) That’s just amazing to me. I’m so proud of us.
  • Another weight loss highlight. I fit into a clothes size that I haven’t been able to wear since 10th grade. That was 12 years ago. OMG!
  • A not so highlight. Hurricane Isaac…don’t want to go into too much detail with that one, but yeah, hurricanes suck. Oh, and for the record, labradors don’t care if the winds are 50 mph outside. If there’s rain/water, it’s playtime! (ugh)
  • I think I’m making some good progress on my 101 Goals in 1001 Days list.

And of course, it’s been another fun year blogging. I really appreciate all of y’all taking the time to read my tiny corner of the Internet. Thank you for your sweet comments, emails and tweets. In January, it’s gonna be this blog’s 5th anniversary, and I’m just amazed by all of the friends I’ve made and people I’ve “met”  through this blog. You guys are the best!

Just to round up the year, I wanted to share with y’all your top 10 most read posts from 2012.

Pumpkin Whoopie Pies w/ Salted Caramel Buttercream

10. Pumpkin Whoopie Pies with Salted Caramel Buttercream – These whoopie pies were made for a work fundraiser, and they were a huge success. Great pumpkin/spicy flavor, and the salted caramel buttercream just makes them super indulgent. Pumpkin + caramel is a wonderful combination!

Red Velvet Bundt Cake

9. Red Velvet Bundt Cake with Cream Cheese Frosting – I love anything red velvet. This bundt cake is a fun change from a regular cake, and it was pretty easy to throw together and bake!

Baked Oatmeal

8. Baked Oatmeal – My breakfast has been forever changed by this. This oatmeal is not soggy at all (which I hate about cooked oats), and it’s very sweet with the addition of bananas.

Peanut Butter Cookies

7. Peanut Butter Cookies – Just simple, classic peanut butter cookies. 🙂 Very good!

Candy Corn Oreo Truffles

6. Candy Corn Oreo Truffles – Oreo truffles are insanely good, and it was fun to make these with seasonal flavors. Always a favorite when I bring these truffles to work!

Fresh Strawberry Pie

5. Fresh Strawberry Pie – I’m SO glad strawberry season is back. I need to make this pie again…it’s not rich at all, and since it involves no cooking (except for the crust), it tastes so fresh!

Snickers Cupcakes

4. Snickers Cupcakes – Oh, I totally need to make these again. If you love Snickers, you will LOVE these!

Homemade Strawberry Lemonade

3. Homemade Strawberry Lemonade – Meyer lemon season + strawberry season? Um…guess I need to make this too and ASAP!

Red Velvet Swirl Brownies

2. Red Velvet Swirl Brownies – These were just delicious, and so pretty too! Perfect for Valentine’s Day!

Spinach Strawberry Salad with Feta

1. Spinach, Strawberry, Pecan and Feta Salad with Strawberry Vinaigrette – This is a huge favorite of y’alls. I think Pinterest made this a popular one, and it is VERY easy to throw together! This is a salad you want to make for your next party…it’s an awesome combination!

Thanks so much for reading this blog, and I hope everyone has a Happy New Year! Time to get used to writing/typing “2013”. 🙂

Filed Under: Beverages, Breakfast, Brownies/Bars, Cakes/Cupcakes, Candy, Chocolate, Cookies, Entertaining/Parties, Fruit, Holiday Recipes, Other, Peanut Butter, Pies, Pumpkin, Salads

Homemade Holiday Gifts: Part 3

December 2, 2012 by Amy 2 Comments

I think this is my favorite part of giving food for gifts: the packaging. There’s so many fun options out there, and I really enjoy choosing every aspect of how the food will be presented.

I like to package each recipe in their own bag, so my cellophane bag collection over the years has gotten a bit crazy. I decided this year is going to be a de-clutter year for sure, which is SO hard…so many cute designs out there! My favorite places to buy these printed cellophane bags are at the Dollar Tree, World Market and Michaels (Wilton brand).

Holiday Packaging 3

After that, I just simply choose some sort of box or tin to put everything in. When it comes to tins, I really love to purchase them at Hobby Lobby, especially when they’re 50% off that week (since they can be a bit spendy), because they come in many different sizes and so many different varieties of prints. I prefer to purchase smaller boxes/tins for coworkers and large boxes/tins for neighbors/families to share. 🙂

The ones on the left are treat bags (box material in a bag shape) from Wal-Mart, which were VERY affordable…3 for $1! The ones on the right, believe it or not, were from TJMaxx.

Holiday Packaging 1

I also went to World Market a while ago, and found these. I love the box material bags (obviously)…they look perfect for stacking cookies, and I think the parchment paper would work well to separate flavors or just act as a sort of food safe tissue paper in boxes/tins. 🙂

Holiday Packaging 2

I’m also a big fan of wax paper with baker’s twine. I’ve used that in the past as well, and I think it works well (especially for stickier foods).

Another pointer…if you want to get a little bit ahead and purchase your packaging for next year, check out the post-Christmas clearance! Some places, like Target, go down to 90% off on decor.

So, to show what I’ve done in the past for gifts, here’s a couple of pictures of gifts from previous years…

Two years ago, I wrapped oreo truffles in foil wrappers (usually found in the candy-making aisle of a craft store), and wrapped cookies in clear cellophane bags. The marshmallows on the right were wrapped in wax paper.

Two years ago packaging

Last year, I purchased these adorable boxes at Target (in the dollar bin area), and stuffed them with fudge, elf’s mix & decorated cookies. Below, I made a large tray for my husband’s office, which contained elf’s mix, eggnog cranberry bread, decorated cookies, fudge and candy cane biscotti (which I realize I never posted last year…oops). To cover it all, I just wrapped each gift in cellophane wrap (found at Dollar Tree).

Last year's packaging

In case you missed it, here’s the other posts in my mini-series:

Homemade Holiday Gifts: Part 1 (the prep)
Homemade Holiday Gifts: Part 2 (the recipes)

Thanks so much for following this mini-series, and I hope you consider making some food gifts this year. 🙂 Not only is it a great excuse to bake (and get rid of the food), family/friends will definitely enjoy the personal touch on homemade gifts!


Filed Under: Holiday Recipes

Homemade Holiday Gifts: Part 2

November 29, 2012 by Amy 8 Comments

Do you have your mixer and bowl ready?

A fridge full of butter?

Are you snacking on chocolate chips?…..No? That’s just me?!! 😛

Since I make gifts every year, I’ve come to learn that you don’t have to use super fancy recipes to impress. Based on feedback, those sugar cookies I’d spend hours decorating, while pretty, weren’t a favorite. Hilariously, the easiest thing to make (like dipped pretzels) usually won out. So, I wanted to share with y’all some tasty, yet not too time-consuming favorites for gifting.

First, here’s the favorites for cookies. These are the recipes you can make in advance, freeze, & bake when you’re ready.

Soft and Chewy Sugar Cookies
Soft and Chewy Sugar Cookies — These are just wonderful classic sugar cookies. Beats anything you can buy in the store!

Thick and Chewy
Thick and Chewy Chocolate Chip Cookies — Again, just a classic cookie, but for the holidays, I like to buy the chocolate chips with red/green white chocolate chips mixed in the bag. Makes these more festive. Hint: You can also omit the chocolate chips and substitute in Christmas colored M&Ms!

Peanut Butter Cookies
Peanut Butter Cookies — These aren’t very Christmas-y, but if you wanted, you could sprinkle the tops with Christmas colored sugars.

(I’ll also be posting another recipe for the chocolate cookies you saw in part one’s pictures next week, if you’re interested!)

Here’s some other past favorites that I’ve gifted:


Oreo Truffles — The condensed milk version of these doesn’t require refrigeration, and these are super easy to make/dip. Sprinkles hide imperfections, too!

Elf's Mix
Elf’s Mix — This was a FAVORITE last year. It’s a great salty/sweet combination, and so festive too! Super simple recipe too…gotta love how the easy ones are the favorites. 🙂

Fudge
Mom’s Peanut Butter Fudge — The picture just doesn’t do this fudge justice. It’s insanely good. I cut them into tiny 1×1 inch squares. They are just so rich, but delish!


Peppermint Marshmallows — These are perfect to add to a basket with hot cocoa mix!

Eggnog Cranberry Bread
Eggnog Cranberry Bread — This is a favorite for the holidays. I can’t tell you how many compliments I’ve gotten from this bread! The streusel puts it over the top!

Biscotti
White Chocolate, Cranberry & Pistachio Biscotti — This recipe is such an easy biscotti to make. It actually was my very first post on this blog. I love the red/green/white ingredient combination and the flavors just work so well together!
Peppermint Bark Cheesecake Truffles
Peppermint Bark Cheesecake Truffles — While these need to stay in the fridge (due to the cream cheese), I find that these truffles would be the perfect gift for neighbors. The mint taste isn’t too overpowering, and it’s just a cute twist on the classic peppermint bark.

I’d love to hear from y’all…what are your favorite recipes for gifting?

Stay tuned for a the last post in this series: food gift packaging.

Check out other posts from this mini-series:
Part 1: The Prep
Part 3: The Packaging (coming soon)


Filed Under: Holiday Recipes

  • « Go to Previous Page
  • Go to page 1
  • Go to page 2
  • Go to page 3
  • Go to page 4
  • Go to page 5
  • Go to Next Page »

Primary Sidebar

Hey Y’all!

Image Credit: Leslie Pendleton Photography


Hey y’all!

Thanks so much for reading! I’m Amy, and I live in south Louisiana with my husband and our rescue dog. I enjoy sharing my love for cooking, baking, crafts & more! Follow my daily adventures on social media!

Follow my Daily Adventures

  • Email
  • Facebook
  • Instagram
  • Pinterest
  • Twitter

Footer

  • Email
  • Facebook
  • Instagram
  • Pinterest
  • Twitter

Archives

Copyright © 2022 · Foodie Pro Theme by Shay Bocks · Built on the Genesis Framework · Powered by WordPress