• Skip to primary navigation
  • Skip to main content
  • Skip to primary sidebar
  • Skip to footer

The Nifty Foodie

  • Home
  • About
  • Recipes
    • Appetizers
    • Beverages
    • Breads/Muffins
    • Breakfast
    • Canning
    • Desserts
    • Dog Treats
    • Entertaining/Parties
    • Fruit
    • Holiday Recipes
    • Louisiana Cuisine
    • Main Dishes
    • Mexican
    • Nifty Foodie Original
    • Nifty Tricks
    • Project Food Blog
    • Pumpkin
    • Salads
    • Sauces/Dips
    • Side Dishes
    • Skinny
    • Slow Cooker
    • Spices
    • Stews/Soups
    • The Disasters
  • My Weight Loss Journey
    • Races
    • Running
    • Weight Loss Milestones
  • Crafts
  • Contact Me

Canning

Garlic Fridge Pickles

September 11, 2012 by Amy Leave a Comment

Fridge Pickles

I’m sure I’ve mentioned that my parents’ green thumbs never passed down to me. My mom is a horticulturist, and even teaches courses at a local college. My dad is a pro veggie gardener (learned from growing vegetables for years), and can grow a mean crop of tomatoes. My parents make gardening look easy, but for me? I’m the plant killer.

My mom will bring me plants and seeds from time to time, and even the plants that are supposed to be kill-proof, die. I give ’em water and plenty of sun, but they just fizzle. I like to think of gardening like cooking. When I started cooking, I could barely scramble eggs. However, with a few years of cooking and baking under my belt, I’m proud to say that I definitely can follow recipes, and I’m starting to experiment with writing my own! I’m in my 4th year of having a veggie garden, and while the bugs took over the tomatoes (AGAIN), I was SO excited to see these monstrous cucumbers growing in my garden. MY GARDEN..growing cucumbers…crazy y’all. I’m hoping this is a sign that I’m starting to catch on to this whole gardening thing. 😛

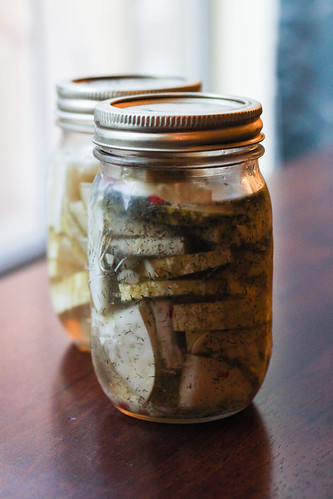
I really wanted to make my own pickles out of these cucumbers, and since the cucumbers were just ridiculous, it only took 1 to fill up 3 pint sized mason jars. I especially love the idea of making fridge pickles, because I could leave the canning supplies in the pantry and basically throw these together very quickly.

These pickles are just so flavorful, and the wonderful thing about fridge pickles is that they are just unbelievably crisp. They lend an awesome crunchy texture to an otherwise average sandwich, and are also a pretty awesome snack on their own.

Garlic Fridge Pickles
Source: Tasty Kitchen

Ingredients:

  • 2 whole cucumbers (make sure to use cucumbers with no waxy texture on the peel)
  • 2 cloves garlic
  • 1 cup apple cider vinegar
  • 1 cup water
  • 1/3 cups sugar
  • 1 tbsp salt
  • 1 tsp. dried dill
  • pinch of red pepper flakes
  • pinch of coriander
  • 6 whole peppercorns

Directions:

  1. Slice the cucumbers in 1/4 in.-1/8 in. thick slices and add them to mason jars or a large bowl. Cut the garlic cloves into quarters and using a knife, gently smash them. Evenly add the garlic pieces to the jars or bowl.
  2. In a small pot, heat the remaining ingredients until the sugar and salt are dissolved.
  3. Pour the liquid over the cucumbers and garlic and cover the containers. Refrigerate the pickles for at least 2 hours before eating.

Filed Under: Appetizers, Canning

Strawberry Freezer Jam

April 10, 2012 by Amy 1 Comment

Strawberry Freezer Jam

I’m fairly sure I mentioned before that when I was a kid, I had a terrible allergy to strawberries. It was an absolute bummer for years, because there’s nothing like a good strawberry, especially when they’re local strawberries. I ended up purchasing a flat this past weekend, and just couldn’t wait to dig in and make something fun.

I’ve been craving a good peanut butter and jelly sandwich (I know…I’m totally 6 years old right now.), but I just wasn’t in the mood to make shelf-stable jam. I’ve always been curious about freezer jam, though, since people insist it’s so much better & fresher tasting than the cooked/shelf stable jam. Freezer jam doesn’t require canning supplies, except for freezer safe jars, which they sell near the mason jars. No need to violently boil the cans and hope/pray that the lids “pop” revealing that you canned everything perfectly. You just cook the pectin, add it to your fruit/sugar mixture, let it set up and freeze/enjoy! It’s pretty darn fantastic and it really is much fresher tasting..if you want to make homemade jam easily, this is the way to go. 🙂

Strawberry Freezer Jam
Source: Kraft Foods

Ingredients:

  • 2 cups crushed strawberries (about 2 pints of ripe strawberries)
  • 4 cups of granulated sugar
  • 3/4 cup water
  • 1 box Sure-Jell pectin (in a yellow box)

Directions:

  1. Wash and rinse 5 (1 cup) freezer safe plastic containers and lids with boiling water. Dry the containers and lids thoroughly and set on a clean towel.
  2. Hull and crush strawberries really well with a potato masher or two forks, 1 cup at a time. Make sure to measure out 2 cups of crushed berries into a large bowl. Add the sugar and stir until well-mixed. Allow the mixture to stand for 10 minutes, stirring occasionally during that time.
  3. In a small sauce pan, mix the water and pectin together with a whisk. Heat the mixture, stirring often, until boiling, Keep stirring and allow the mixture to boil for a full minute. Remove the pan from heat, and add the pectin mixture to the sugar mixture. Constantly stir for 3 or so minutes, until the sugar is completely dissolved and everything is well-mixed.
  4. Working quickly, fill all containers with the jam, leaving a 1/2 inch head space. (The great thing about freezer jam containers is there is a line drawn in on the jar to show where to stop pouring.) Wipe the edges of the containers and cover with the lids. Let the jam stand at room temperature for 24 hours to set up, and then place the jars in the freezer or fridge to use.

Note: You can store the jam in the refrigerator for up to 3 weeks or in freezer up to 1 year. Thaw in refrigerator before using.


Filed Under: Canning, Fruit

Louisiana Strawberry Jam

April 26, 2010 by Amy 8 Comments

Louisiana Strawberry Jam

When I was 5 years old, I remember sharing some strawberry ice cream with my grandmother. Much to my surprise, I broke out in a horrible case of hives. I developed an allergy to my favorite fruit! For years, I’d block out this delicious fruit from my vision. I feared strawberries, but was secretly jealous of my siblings who were able to happily enjoy them. In Louisiana, the strawberries are grown locally, so they are just amazingly flavorful and sweet.

By the time I was in high school, I grew tired of it.  I remember holding a bowl of strawberries, lightly sweetened with sugar, in front of me. I told my Mom to have the first aid spray handy, because I wanted to see if my strawberry allergy was only a childhood allergy. I wolfed down the bowl, waited…waited…and the next day, I was still OK. Thank goodness!! I could eat strawberries again! I think I went through half a flat that day, just to make up for the years of lost opportunities with this tasty berry.

Every time April rolls around, I have to have a flat of them. This year, I decided to make some homemade jam. I wasn’t as intimidated this time, because I have canned before. This was easy to put together, and from the foamy jelly I skimmed off after cooking the jam up, I will say this stuff is REALLY tasty. Smuckers can’t touch this! 🙂

For canning, I use this kit. I find all of the tools in there almost essential for easy and safe canning.

Before you begin canning,  I recommend this website, since this explains in detail how to can safely. The recipe below is considered “high acid canning”.  I also purchased this book, which also has all of the directions for canning and bonus, has quite a few more recipes than their website provides.

Louisiana Strawberry Jam
Source: Ball Blue Book of Preserving

Ingredients:

  • 2 quarts fresh strawberries
  • 1 package powdered pectin
  • 1/4 cup fresh lemon juice
  • 7 cups sugar

Directions:

  1. Wash strawberries and drain. Remove the stems and crush strawberries a few at a time (I place them on a cookie sheet and used a fork to mash).
  2. Combine strawberries, lemon juice and powdered pectin in a pot. Bring mixture to a boil, stirring occasionally. Add in the sugar and stir until the mixture is dissolved. Bring this to a rolling boil. Boil hard for 1 minute, stirring constantly. Remove from heat. Skim off foam, if there is any (I used a slotted spoon to do this).
  3. Ladle hot jam into hot jars, leaving 1/4 inch headspace. Adjust two-piece caps, and process for 10 (for half pints)-15 (for pints) minutes in a boiling water canner.

Makes 4 pint or 8 half pint jars.

Filed Under: Canning, Fruit

Jalapeno Pepper Jelly

September 12, 2009 by Amy 16 Comments

jelly6

Last year, my husband surprised me with a full canning set that he found for 75% off at our local Target. I have been curious about canning, but very afraid of messing up and getting someone sick.

However, after reading through the Blue Book of Preserving that was included in the kit, I felt much more confident about the safety of canning.

jelly5

I found this recipe for Jalapeno Pepper Jelly on Pioneer Woman’s Tasty Kitchen website. I instantly thought that I could FINALLY use all those jalapenos growing in my garden for this.

jelly2

This will also make a great, unique gift for family and friends come Christmas season. 🙂

I learned that canning jelly can be very sticky so have damp towels ready, and you also have to work pretty fast when canning the preserves. The preserves will gel up quickly and you want those in the jars before they do or they’ll be a pain to pour.

That being said, I do recommend canning to foodies. It’s pretty tedious but the result is super cool. You get to say you MADE that jelly! 🙂

I’m submitting this recipe to What’s Cooking in the Orange Kitchen’s “So You Grew a Garden” blogging event.

Jalapeno Pepper Jelly
Source: Tasty Kitchen

Ingredients

  • 1 cup Jalapeno, Seeds And Membranes Removed, Finely Diced
  • 2 cups Apple Cider Vinegar
  • ½ cups Red Or Orange Bell Pepper, Seeds & Membranes Removed, Finely Diced
  • 6 cups Sugar
  • 2 envelopes Liquid Pectin, 3 Oz Each
  • ½ teaspoons Unsalted Butter

Directions

  1. Prepare canning jars and lids as directed by manufacturer’s directions. This recipe makes 6 8-oz 1/2 pint jars…so have at least 8 jars ready, just in case.jelly3
  2. Do not use seeds in your jelly (if you’d like it hotter then put seeds into a piece of cheesecloth or muslin packet and put into the sugar mixture, but remove before you put the pectin in!). You can mix up the peppers if you’d like…habaneros, jalapenos, bell peppers.
  3. In a large stainless-steel pan combine the vinegar, peppers and sugar. Bring to boil over medium heat, stirring until the sugar is completely dissolved. (add the unsalted butter here if you want to use it…it helps to keep the foam down to a minimum)jelly4
  4. Increase the heat to medium-high and bring to a full boil, at this point stir constantly. Once a rolling boil has been reached, pour in the pectin. Return to a full boil and stir constantly for 1 full minute. Remove from heat.
  5. Immediately ladle the jelly into your jars leaving about 1/4″ headspace. Wipe rims off and screw on bands.
  6. 4 to 8 oz jars need to be processed for 10 minutes. 1 pint jars for 15 minutes. Adjust for elevation. (I live at sea level, so 10 minutes was fine for me.)
  7. Remove from canner and place on paper or cloth towel.
  8. Wait about 15-30 minutes and then carefully twist or tilt jars to distribute the pepper pieces throughout the jelly while cooling. (I did not do this since the preserving book said NOT to move the jelly for 12-24 hours, thus interrupting the sealing process. The pepper pieces were dispersed well anyway.)

I wrote myself a little reminder so I’m not tempted to move these as I clean the kitchen.

jelly7

Filed Under: Canning

Primary Sidebar

Hey Y’all!

Image Credit: Leslie Pendleton Photography


Hey y’all!

Thanks so much for reading! I’m Amy, and I live in south Louisiana with my husband and our rescue dog. I enjoy sharing my love for cooking, baking, crafts & more! Follow my daily adventures on social media!

Follow my Daily Adventures

  • Email
  • Facebook
  • Instagram
  • Pinterest
  • Twitter

Footer

  • Email
  • Facebook
  • Instagram
  • Pinterest
  • Twitter

Archives

Copyright © 2025 · Foodie Pro Theme by Shay Bocks · Built on the Genesis Framework · Powered by WordPress