• Skip to primary navigation
  • Skip to main content
  • Skip to primary sidebar
  • Skip to footer

The Nifty Foodie

  • Home
  • About
  • Recipes
    • Appetizers
    • Beverages
    • Breads/Muffins
    • Breakfast
    • Canning
    • Desserts
    • Dog Treats
    • Entertaining/Parties
    • Fruit
    • Holiday Recipes
    • Louisiana Cuisine
    • Main Dishes
    • Mexican
    • Nifty Foodie Original
    • Nifty Tricks
    • Project Food Blog
    • Pumpkin
    • Salads
    • Sauces/Dips
    • Side Dishes
    • Skinny
    • Slow Cooker
    • Spices
    • Stews/Soups
    • The Disasters
  • My Weight Loss Journey
    • Races
    • Running
    • Weight Loss Milestones
  • Crafts
  • Contact Me

Amy

New Bathroom Curtains

February 6, 2012 by Amy 2 Comments

We’ve lived in the new house for about four months now. It’s sort of weird to think that it’s really been four months already. Back when we viewed this house, I took a ton of pictures and decided that some things needed to change.

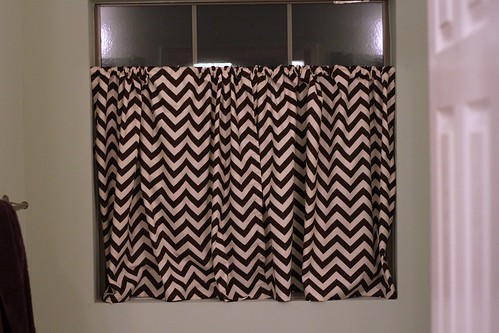
These curtains were one of them.

Bathroom Curtains (before)

These curtains just aren’t our style at all. I’m into modern, geometric patterns and sheer lace-y sage green just doesn’t fit the bill.

It stinks that it took me four months to get to this, but I’ve been trying to get in the craft room more often to de-stash. I think I own way too many craft materials, especially since my husband nearly panicked when he saw how full the closet in the craft room was. Yikes!

So, I need to get some projects done. The bathroom curtains were one of them. I’ve had this fabric sitting in a folded pile for almost a year now. I won a giveaway on a blog, and the credit got me two yards of this super cute home decor chevron fabric.

This morning, I decided today was the day. Two hours later, our bathroom had new curtains. 🙂 What do you think? (Note: our bathroom windows are not see-through…they’re frosted, so no one can see in.)

Bathroom Curtains

My next personal project to help me de-stash? I think it’s time to attempt my college t-shirt quilt. Just getting that project done will move a huge laundry bag full of shirts out of the craft room’s closet. 🙂 I’ve been really looking forward to making that quilt too, so I can’t wait to get started on it!

Filed Under: Decor

Favorite Party Recipes

February 2, 2012 by Amy 2 Comments

Part of me cannot believe that the Superbowl is Sunday. I mean, that’s the end of football season until next Fall. I have to wait at least six months to watch another game after this. Sad.  (If you know me, you know I’m being dead serious about how sad this is to me. Crazy football fan here!) A perk of Superbowl Sunday? Watching Millie run up to the TV when I randomly switch over to the Puppy Bowl.

To mourn celebrate the end of another football season, here’s some great recipes that will definitely disappear if you serve them at your Superbowl parties.

Queso Blanco
Restaurant Style Queso Blanco

Restaurant Style Salsa


Crawfish Pies


Crawfish Cheesecake

Jambalaya
Pork and Sausage Jambalaya

Berry Mash Bruschetta

Sugar Cookie Bars
Sugar Cookie Bars

Peanut Butter Cheesecake Brownies

IMG_4426
Oreo Cupcakes

Oh, and if you have an occasional puppy bowl break, I’m pretty sure the dogs at your party would love you for these!

Peanut Butter and Pumpkin Dog Treats

Pumpkin PB Treats

Filed Under: Appetizers, Brownies/Bars, Cakes/Cupcakes, Chocolate, Dog Treats, Entertaining/Parties, Fruit, Louisiana Cuisine, Mexican, Pork/Ham/Bacon, Pumpkin, Sauces/Dips, Seafood

Weight Loss…rewarding myself

January 31, 2012 by Amy 16 Comments

I feel like I write about weight loss a lot. It’s a big goal of mine to live a healthier lifestyle, since I’ve been a larger gal most of my life. I’m at that age where it’s time to start thinking about starting a family, and it sort of hit me.

I can’t keep living like this.

This time, I can’t keep living like this, because one day, I might get blessed with a kid. And that kid doesn’t need to learn from Mom’s unhealthy habits. That kid needs to learn healthy habits, and the best way to do that? You learn from your parents.

Now, this isn’t a jab at my parents. In fact, I was eating fairly healthy under their watch. I love almost every fruit and vegetable, because of them. I CAN eat healthy, y’all! (They totally did things right!)

So what happened? Well, independence happened. Once I got the freedom to eat on my own, I made mistakes. Mistake after mistake formed unhealthy habits, and those habits led me to my current overweight/unhealthy status. Some of those mistakes included eating unhealthy every day, eating WAY too much food, and no longer exercising as much as I used to.

So, now that I’m at the stage where my husband and I have a TTC date in our heads, it’s gotten more real. I have to change for our kids. I must. I’m really good at deadlines, because if you remember, I lost a good chunk of weight before the wedding. That dress HAD to fit, and I made darn sure it fit comfortably.

Then, the bad habits reared their ugly head, and I gained back a lot of that weight plus some! So, I’m back. I’m calorie counting. I will be exercising soon, and I will make a healthy lifestyle my new habit.

Since the New Year, I’ve lost 9.5 lbs. (what??!) Yup. 9.5 lbs. So, I’m doing this. I really am.

Of course, I can’t do this without some motivation. I offered myself rewards last time I lost weight, and this time will be no different.

Once I lose:

    • 5% of my weight (or 15 lbs.), I’ll treat myself to a pedicure.
    • 10% of my weight (or 30 lbs.), I’ll treat myself to a mini $50 fabric buying spree.
    • 50 lbs., I’ll treat myself to a pair of fun, fancy shoes.
    • 20% (60 lbs.), I’ll treat myself to a mini-makeover at Sephora or MAC. Once I lose 60 lbs., I’ll be back to my wedding weight. 🙂
    •  75 lbs., I’ll treat myself to some new workout clothes. I figure at this point, I SHOULD fit in XL/XXL in regular sized workout clothes, so BYE BYE plus sized workout clothes!
    • 30% (or 90 lbs.), I’ll treat myself to a fun Victoria’s Secret trip. I’ve never fit in VS before, but hopefully once I”m 90 lbs. down, I can get a few fun things there.
    • ONEDERLAND (or 99 lbs.), I’ll treat myself to my first designer handbag.
    • 110 lbs., I’ll treat myself to my first pair of fancy designer jeans.
    • GOAL, which is 40% (or 120 lbs.), WE’RE (my husband and I, obviously) GOING TO DISNEY WORLD!! 

Lots of fun things to work for, right? I’m a measly 5.5 lbs. away from my first reward, and my toes CANNOT wait! 🙂

Filed Under: About Us, Health/Weight Loss

The BIG news!

January 30, 2012 by Amy 17 Comments

This is our first house. We lived here about three years, and it was an amazing little starter home. So many memories here…to name a few:

  • we planned the majority of our wedding here (lots of DIY projects)
  • this was our home after our honeymoon
  • we hosted our first holiday here
  • this was Millie’s first home
  • this was where I learned how to sew
  • this was where we had a LOT of DIY house projects

After a lot of thought, we decided it was time to move to a different area of town. We wanted to live in an area that had great schools for when we start a family. We also wanted a newer home with a good backyard. So, we moved here:

New House

Since we got such an excellent deal on our house (and we weren’t sure how long those awesome interest rates would last), we decided to just scoop up this house and wait for our old house to sell.

And wait….for about four months. (yuck)

Well, today we CLOSED on our old house. We’re back to one mortgage, y’all!

So yeah…BIG HAPPY NEWS for us!

(Ok, so I have to know….how many of y’all thought the big news was a baby?)

Filed Under: About Us, House

Blogiversary Giveaway WINNER

January 25, 2012 by Amy Leave a Comment

Thanks to everyone who entered the giveaway! I loved reading about your first kitchen adventures. Some of you had me laughing (I’ve been there with the disasters) and some of your stories warmed my heart.

The winner of the cookbook giveaway is:

Cece who wrote:

And I remembered to tweet :)
https://twitter.com/#!/PicklePicnic/status/160090998872088576

Congratulations, Cece! To redeem your prize, please email me within 48 hours at niftyfoodie@gmail.com! Congratulations!


Filed Under: Giveaways/Reviews

Cinnamon M&M Oatmeal White Chocolate Chip Cookies

January 23, 2012 by Amy Leave a Comment

Cinnamon M&M White Chocolate Chip Oatmeal Cookies

A couple of weeks ago, I was scouring Target’s 90% off post-Christmas sale. By the time that sale comes around, all of our Christmas stuff is put away in the attic, but I usually don’t have my sights set on decor at that point. I go to the 90% off sales for birthday wrapping goods. I know that sounds weird, but when you can buy bright colored curling ribbon, white or kraft tissue paper, and/or solid colored gift bags for pennies on the dollar, it’s completely worth it. Sometimes I also go in hoping to score some hidden treasures to keep Lane Bryant in business, like a bag of Ghirardelli holiday candies or in this case, a bag of cinnamon M&Ms.

When I originally saw these, I was hesitant to purchase them, because I didn’t know if these M&Ms were a subtle cinnamon spice or red hot cinnamon-like chocolate candies. I’m not a big fan of red hots, so I didn’t want to take a chance. Well, that is, until the bag was 90% off. Who can refuse a big bag of M&Ms for thirty cents?

So, I gave them a try one night and was pleasantly surprised. These M&Ms had just a hint of cinnamon spice, which proved to be a little addictive. So, before I ate the whole bag, I got to googling and saw these cookies on Picky Palate.

I thought my problems were solved. Bake up these cookies to bring to coworkers and use up all the M&Ms. However, the quality control side of me took over, and before I knew it, 3 of these cookies were gone. There’s nothing like a freshly baked cookie…just couldn’t help myself here…these were insanely good!

To prevent myself from no longer fitting in Lane Bryant (they have size limits, too haha!), I put these cookies away in a container to bring to coworkers. Thankfully, these cookies were so awesome that by the time I went back in the break room to heat up my lunch, my cookie plate only had crumbs remaining. I’d say these were a winner. 🙂

Cinnamon M&M Oatmeal White Chocolate Chip Cookies
adapted from: Picky Palate

Ingredients:

  • 2 sticks softened unsalted butter
  • 3/4 cup granulated sugar
  • 3/4 cup packed light brown sugar
  • 2 eggs
  • 1 tbsp. pure vanilla extract
  • 3 cups all purpose flour
  • 1 tsp. baking soda
  • 1/4 tsp. salt
  • 1 tsp. ground cinnamon
  • 1 cup rolled oats
  • 1 bag white chocolate chips
  • 1 9.90 ounce bag Cinnamon M&M’s

Directions:

  1. Preheat the oven to 350 degrees F.
  2. Using a mixer, beat the butter, brown sugar and white sugar in a bowl for 2-3 minutes on medium to medium-high speed, until the mixture is light and fluffy. Scrape down the bowl and add the eggs and vanilla extract. Mix for about a minute on low, or until well combined.
  3. In another bowl, mix the flour, baking soda and salt together with a whisk. With the mixer on low speed, slowly add the dry mixture to the wet mixture. Add the cinnamon, rolled oats and white chocolate chips and mix on low until the mixture is just combined.
  4. Line a baking sheet with parchment paper or a silicone mat. With a medium sized cookie scoop, scoop out the dough and place each cookie about an inch apart on the sheet since these cookies spread a little. Press the cookies down slightly, to just flatten them, and press 4-5 M&Ms on each cookie.
  5. Bake the cookies for 9-12 minutes (I let them go for 12 minutes, which made them barely brown along the edges), and allow the cookies to cool for a few minutes before moving the baked cookies to a cooling rack.

Just a quick reminder. Today is the last day to enter to win one of these four awesome cookbooks! Your chances are great, so check out this post to see how to win!

Filed Under: Candy, Chocolate, Cookies

Pain Perdu with Louisiana Strawberry Sauce

January 18, 2012 by Amy 3 Comments

Pain Perdu with Louisiana Strawberry Sauce

::lifts pinky::

Doesn’t pain perdu just sound so fancy? It feels like one of those breakfast dishes that just screams “I’m fancy! Order me!” when I see it on a menu. But really, pain perdu isn’t that fancy. It’s french toast made using day-old french bread (rather than sliced bread). Now that I wrote that out, I no longer feel fancy after eating that on Sunday morning. Oh well.

The last time I enjoyed some pain perdu was at the Ruby Slipper in New Orleans. Their pain perdu is not just your average pain perdu….it’s BANANAS FOSTER pain perdu. If you’re ever in New Orleans, I highly recommend this place for a delicious brunch. It’s one of those places that you want to get there early for, though. We locals (well for me, former local since I live an hour away from NOLA now) know about this place, so it’s always packed as the morning goes on. 🙂

Since we had some leftover french bread from dinner the day before, I thought it would be a great start to our Sunday to enjoy some pain perdu. Also, it’s strawberry season out here, so there’s always a pint of local strawberries in the fridge. It was completely meant to be.

This pain perdu was just awesome. Next time, I might add more cinnamon and nutmeg though, but otherwise, this was delicious. It’s also a Cooking Light recipe which to me, made this dish even better.

Pain Perdu with Louisiana Strawberry Sauce
Source: mildly adapted from Cooking Light

Ingredients:

  • 3/4 cup 2% reduced-fat milk
  • 2 tbsp. sugar, divided
  • 1/2 tsp. ground cinnamon
  • 1 1/2 tsp. vanilla extract
  • 1/4 tsp. grated whole nutmeg
  • 1/8 tsp. salt
  • 3 large eggs, lightly beaten
  • 8 (1-ounce) slices diagonally cut day-old French bread (about 1 inch thick)
  • 2 cups of sliced strawberries
  • 2 tsp. orange rind
  • 4 tsp. butter
  • 1 tbsp. confectioner’s sugar

Directions:

  1. In a large bowl, add the milk, 1 tbsp. sugar, cinnamon, vanilla extract, nutmeg, salt and beaten eggs. Stir well with a whisk. Place the bread slices in a 13×9″ pan and pour the wet mixture evenly over the bread slices. After a minute or so, turn the bread slices to coat the other side with the wet mixture. Allow the bread to sit at room temperature for about 20 minutes, turning the slices a couple of times, until all of the wet mixture is absorbed in the bread slices.
  2. Place the strawberries, remaining 1 tbsp. sugar and orange rind in a small pot over low heat. Cook the strawberry mixture for 20 minutes, stirring occasionally.
  3. In a large non-stick skillet, melt half of the butter over medium heat. Place 4 of the bread slices on the skillet and cook for about 3 1/2 minutes on each side (or until the bread is golden brown). Remove from the pan, melt the remaining 2 tsp. butter and cook the other 4 slices the same way.
  4. To serve, sprinkle each serving with confectioner’s sugar and top with the strawberry sauce.


Filed Under: Breakfast, Fruit

Four Years Ago (+ A Giveaway)

January 17, 2012 by Amy 50 Comments

Thanks to everyone who entered the giveaway! I loved reading about your first kitchen adventures. Some of you had me laughing (I’ve been there with the disasters) and some of your stories warmed my heart.

The winner of the cookbook giveaway is:

Cece who wrote:

And I remembered to tweet :)
https://twitter.com/#!/PicklePicnic/status/160090998872088576

Congratulations, Cece! To redeem your prize, please email me within 48 hours at niftyfoodie@gmail.com! Congratulations!


Four years ago, I started this blog as a challenge to myself. I wanted to be able to do more than boil hot dogs or cook a mean scrambled egg. At the time, I moved back in with my parents after finishing my degree, and I felt that I should contribute more in the house since my parents both worked fairly late.

I wanted to cook dinner.

I remember the day before I started my blog, I went to the Winn-Dixie near my house and purchased everything necessary to make turkey meatballs that evening. I kept thinking that there was no way I’d mess this up. I mean, meatballs. How can you mess up meatballs? And thankfully, I didn’t mess up the meatballs. They were delicious.

The next day, I got a little bolder and bought everything I needed to make biscotti. That evening, those came out without causing the smoke alarms to go off. 🙂

I was hooked. So, that evening I started a food blog, because I knew I could do this. I could learn how to cook.

I started watching Food Network more, and bought my first cookbook. I wanted to learn terminology in recipes. What the heck is folding anyway? Saute? Braise? So confusing. To give you an idea of how rough the beginning was, I used to cook my chicken in a layer of water, wondering why it didn’t brown. ::sigh::

At some point, my Mom noticed my efforts in trying to learn, so she gave me hands-on lessons too. I think I learned the most from my Mom. To me, she’s completely a pro. I’ll never forget the time we went to a local craft festival, where they served this amazing crawfish sauce on top of fried eggplant. She replicated it perfectly.

I want to be just like her someday.

After four years of challenging myself in the kitchen, I can safely say that I’m perfectly comfortable with trying almost any recipe. There are still some kitchen fails, but that’s what carry-out pizza is for, right?

It’s been so amazing to watch this little chunk of cyber space grow into a blog that actually comes up when you search it on Google. 🙂 Google knows I exist. That’s pretty darn cool.

It’s also been wonderful to become friends with so many of you. I haven’t met you in real life, but sometimes I feel like I can tell y’all anything. Not anything like my social security number, but still, I can share a lot with y’all. 🙂 I want to thank y’all by offering one of you a copy of one of my favorite cookbooks.

Source: Barnes and Noble

…

Read More »

Filed Under: Giveaways/Reviews

A different kind of needle…

January 3, 2012 by Amy 5 Comments

I have an interesting attention span with crafts. When I find myself tired of one craft, I just move on to another. I never want to hate crafts, so it’s good to just jump around when one of them becomes boring or tedious. Sewing sort of became that for me. I don’t sew everyday, but I was just getting bored with it and wanted to do something different. Since the weather was cooling down, I forked out the knitting needles.

I haven’t knit in a while, so I had to refer back to my books and some Youtube videos, but it was completely like riding a bike. I was knitting like a mad woman in no time flat.

I told my husband that if he needed any gifts, I could knit some scarves up. He told me he would need 5, so I knew exactly what pattern I needed since I had about three weeks to make these. I bookmarked this pattern 2 years ago, because the design looks great and since you’re using BIG needles, it knits up fairly quickly.

Luckily, the next day Michael’s was having a major sale on Lion’s Brand Thick & Quick yarn, so I stocked up and got started.

Knitting Progress

As you can see, even the dog helped out (not really), but she was a cute cuddle buddy.

Instead of making these into a cowl, I just knit using double the length of yarn (since these skeins were more than double the length the pattern calls for) into a long, thick scarf.

Since I was in a bit of a time crunch, I would knit every day during my lunch breaks, in the afternoon and before bed. I’m pretty sure I knit one purl one in my sleep at some points. 😛 It was worth it in the end, though. Look at how beautiful they came out.

Christmas Scarves

I absolutely loved seeing the reactions of my husbands aunts and grandmothers as they opened these. You could tell at first that they appreciated the scarves, but when I sort of hinted that I made them, their appreciation grew so much more. I love it when people appreciate handmade gifts. It was all worth it! 🙂

Did you go handmade with some of your gifts this Christmas?

Filed Under: Crafts, Holiday

Grasshopper Cheesecake

January 3, 2012 by Amy Leave a Comment

Grasshopper Cheesecake

It’s 2012! Even though it’s really just a date, it’s cool to mentally have a new start at things. I’m not going to make BIG resolutions anymore, because I tend to let myself down. So, I have my 101 goals in 1001 days list to look to every once in a while, and I’m hoping to reach a few of those small goals sometime this year.

Every New Year’s Day, my Memaw holds a spaghetti and meatball dinner. No, we don’t have black eyed peas or cabbage. We have spaghetti and meatballs. Sounds boring, but trust me, this isn’t your average spaghetti and meatballs. Oh man. We only have it once a year, and the sauce is just the most divine, flavorful red sauce. I haven’t had a comparable red sauce, to date. It’s the best. ever.

This family meal was so much different than Christmas for us. Since we hosted Christmas last week, it was good to just sit back and enjoy good food and family time. I’m not saying we didn’t have a good time, but of course, when you host anything, it’s really hard to sit back and fully relax. 😉

Whenever we’re invited to a meal or a party, I always offer to bring something. I’m usually told “no”, and I kind of was told “no” this year (oh well). Memaw mentioned, however, that she wanted me to find a recipe for her to give her at the party. Up until a few years ago, she used to order a grasshopper cheesecake (like the drink, not the bugs) from a company, but they discontinued making the cheesecake. She simply asked me to find a recipe for a grasshopper cheesecake, but I went a step further and brought her the cheesecake. That’s just how I roll.

Since my Memaw is diabetic, I used the Splenda baking blend in the filling instead of sugar. Keep in mind if you use Splenda to make this, you have to use 1/2 of the amount a recipe calls for. 🙂 Of course, I was worried about how the cheesecake would come out, since it’s a sugar substitute, but as you can see, the cheesecake came out just fine. In fact, my family could not stop eating this cheesecake and I had an empty cake stand to bring home, which always marks a good recipe.

I did mildly adapt a few things, based on comments I read on the recipe site. I also changed the crust to an oreo crust since I had some oreos to use up.

Grasshopper Cheesecake
Source: adapted from Betty Crocker

Ingredients:

For the crust:

  • 1 3/4 cups of crushed oreos (cream filling removed…about 20 oreos)
  • 2 tbsp. butter, melted

For the filling:

  • 4 oz. semisweet chocolate, chopped
  • 3- 8oz. packages of cream cheese, softened
  • 1 cup granulated sugar (or 1/2 cup Splenda baking blend)
  • 4 eggs
  • 1/3 cup creme de menthe liquer

Directions:

  1. Preheat your oven to 300°F.
  2. To prepare the springform pan for the water bath, wrap foil around the outside of the pan along the bottom and sides of a 9 inch non-stick springform pan.
  3. In a large bowl, mix crust ingredients with fork until crumbly. Press the crust on the bottom and about 1 inch up the side of the pan.
  4. Place the pan in the oven and bake for 12 minutes. Once the crust is baked, place the pan in the freezer to cool down while you make the filling.
  5. In a small microwavable bowl, microwave the chocolate on high for 60 seconds and stir the chocolate. Microwave in 30 second intervals until just melted and smooth. Set the chocolate aside to slightly cool.
  6. In a mixer bowl, beat cream cheese and sugar with an electric mixer on medium speed for about 4 minutes, until the mixture is smooth and fluffy. Scrape the bowl down frequently. Add eggs, one at a time, beating for about a minute, until the mixture is smooth. Stir in liqueur on low. Reserve 1/4 cup of the cheesecake mixture.
  7. Take the pan out of the freezer and pour the rest of the filling evenly over crust.
  8. Stir the 1/4 cup of cheesecake mixture into the melted (but cooled) semi-sweet chocolate. Drop 8 to 10 spoonfuls of the chocolate mixture randomly onto filling. With a knife or small spatula, swirl the chocolate mixture into the cheesecake mixture.
  9. Fill a roasting pan with about 1 1/2 inches of hot water to make the water bath for the cheesecake. Carefully place the springform pan in the roasting pan, and place the roasting pan in the oven. Bake for 70-80 minutes, until the edge looks set. Turn oven off and open door slightly (I just leave it open by placing a wooden spoon in the door). Cool cheesecake in the oven for 1 hour. Remove the cheesecake from the oven and remove the foil from the pan. Place the pan on a cooling rack and allow it to cool at room temperature for 1 hour. After it has cooled, refrigerate the cheesecake for 3 hours or overnight.
  10. To serve, carefully remove the cheesecake from the springform pan and enjoy!


Filed Under: Cakes/Cupcakes, Chocolate

  • « Go to Previous Page
  • Go to page 1
  • Interim pages omitted …
  • Go to page 34
  • Go to page 35
  • Go to page 36
  • Go to page 37
  • Go to page 38
  • Interim pages omitted …
  • Go to page 85
  • Go to Next Page »

Primary Sidebar

Hey Y’all!

Image Credit: Leslie Pendleton Photography


Hey y’all!

Thanks so much for reading! I’m Amy, and I live in south Louisiana with my husband and our rescue dog. I enjoy sharing my love for cooking, baking, crafts & more! Follow my daily adventures on social media!

Follow my Daily Adventures

  • Email
  • Facebook
  • Instagram
  • Pinterest
  • Twitter

Footer

  • Email
  • Facebook
  • Instagram
  • Pinterest
  • Twitter

Archives

Copyright © 2026 · Foodie Pro Theme by Shay Bocks · Built on the Genesis Framework · Powered by WordPress