• Skip to primary navigation
  • Skip to main content
  • Skip to primary sidebar
  • Skip to footer

The Nifty Foodie

  • Home
  • About
  • Recipes
    • Appetizers
    • Beverages
    • Breads/Muffins
    • Breakfast
    • Canning
    • Desserts
    • Dog Treats
    • Entertaining/Parties
    • Fruit
    • Holiday Recipes
    • Louisiana Cuisine
    • Main Dishes
    • Mexican
    • Nifty Foodie Original
    • Nifty Tricks
    • Project Food Blog
    • Pumpkin
    • Salads
    • Sauces/Dips
    • Side Dishes
    • Skinny
    • Slow Cooker
    • Spices
    • Stews/Soups
    • The Disasters
  • My Weight Loss Journey
    • Races
    • Running
    • Weight Loss Milestones
  • Crafts
  • Contact Me

Amy

The season of giving..

December 29, 2011 by Amy 2 Comments

Things have been a little quiet here. Oops! With two blogs, I usually find my stride with one and the other kind of just suffers. Since it’s the holiday season (aka baking season), I’ve been a little busy in the kitchen, so I’ve had a good bit to share on the other blog because of it. At the same time, I’ve been working on quite a few things non kitchen-wise, which I want to share with y’all.

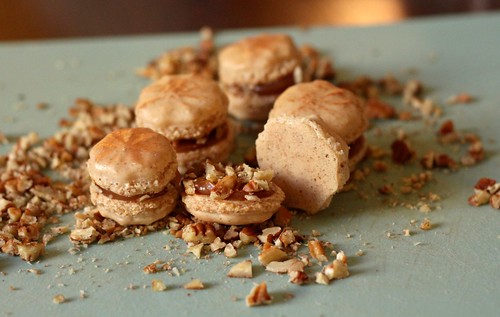
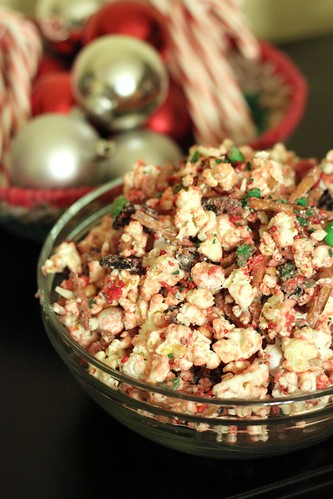
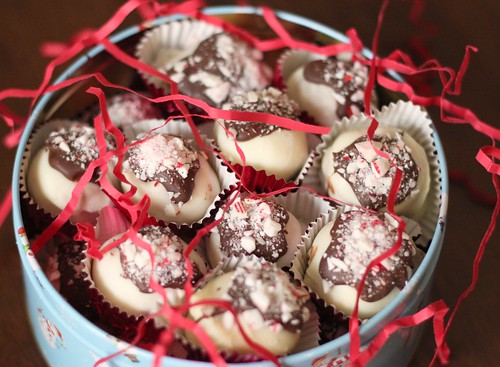
One of the biggest pieces of news I have is that I entered a recipe contest. It was a local one that my newspaper held, and I stumbled upon it sitting in traffic reading one of those billboards that seems to flash from one ad to another. I immediately started brainstorming in my car when I saw “Holiday Dessert Recipe Contest”. I had two ideas in my head and the idea I tested out was a peppermint bark cheesecake truffle.

I ended up making one batch and brought it to my coworkers. I thought it was a decent dessert, but I mean, you are your own worst critic…I just thought it could be better. However, my coworkers started raving about these truffles and quite a few of them wanted the recipe. So I thought, maybe this truffle is perfect just the way it is. So that evening, I submitted the recipe.

To become a finalist, you had to be in the top 10 popular vote-wise. The hard thing about it was that if you wanted to vote, you had to register on the website. So, that made begging for votes even harder. I was in 7th or 8th place with votes in the end, so I barely squeaked by as a finalist. Whew!  (Thanks to all of you who voted for me!)

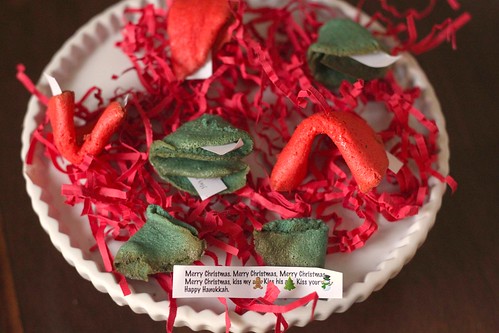
After I was selected as a finalist, I had to bring my truffles to the newspaper’s office for a taste test. I can’t tell you how nervous I was to bring those truffles to the office. What if they all HATED them? I started to doubt my recipe. So, I thought…maybe if I put them in a cute tin with some paper shreds, I might get some presentation points? (I have no clue if this was part of the judging criteria, but to me, a pretty dessert never hurts!)

Peppermint Bark Cheesecake Truffles

I was told that they were announcing the winners on Saturday at a furniture store, which was 40 minutes away from our house. H offered to bring me, since he knows that I ::really:: needed to know and waiting until Monday for a possible phone call would just KILL me. So, we went.

I can’t tell you how nervous I was. My palms were sweaty, I had butterflies in my stomach and I kept telling my H that there was no way I placed. No way. Listening to some of the finalists, you could tell they knew what they were doing.

They announced 3rd place (wasn’t me)….2nd place (wasn’t me)…so, at this point, I told H at least I tried. The 2nd and 3rd place winners won gift certificates to a local grocery store, which to me, would have been completely awesome to put towards the Christmas dinner we were hosting! But yeah, didn’t win 2nd or 3rd place.

They go to announce 1st place, and my H is just smirking. I was 99% sure I was just going home empty-handed, because the 2nd place winner made a cheesecake. Why would they choose another cheesecake-type dessert to win? However, they said “Peppermint Bark Cheesecake Truffles”.

WHAT?

I WON?

I looked at H and started tearing up like a dork. I’m such a dork. I couldn’t BELIEVE I won!

The prize for 1st place was a $1000 for Paula Deen furniture at the store. I already discussed with H that if I won, I really wanted to get my family a new sofa for Christmas. He was totally on board with the idea since my family’s sofa is/was about 20 years old and had DEFINITELY seen better days.

Sadly, the store didn’t carry Paula Deen sofas, but thankfully, the clerk who helped me allowed me to use the credit towards ANY sofa. SCORE!

So, my H and I finally found this sofa set that was discontinued on major sale. Not only were we able to get a sofa, but we also got my family a loveseat. I tried to keep it a surprise from my Mom as long as I could, but in the last few minutes, I had to spoil it, since we had to clear the old sofa and the stuff around it before the delivery people arrived.

Blurry shot, but here is the new set!

My family absolutely loves the new furniture, which makes me so happy. When it comes to the holidays, I care more about giving gifts than receiving them. I truly love to see the reactions of those I give gifts to, and this one just had me beaming.

Thanks so much to The Advocate for having this contest! Winning this contest was one of the big highlights of 2011 for me, and I’m sure it was for my family too!

Filed Under: About Us, Holiday

Top 10 Recipes of 2011

December 29, 2011 by Amy 6 Comments

Am I the only person who is shocked that Christmas just passed? I can’t believe it. Neighbors are taking down lights, and our tree looks SO empty without gifts under it. My favorite holiday is over, and crazy enough, it’s time for a new year. 2012.

Time to take the shrink wrap off of the new planner and get used to writing “2012” on papers/emails/etc. This is just crazy.

Also crazy…sometime in 2012, my 4 year blogiversary is happening and my 3 year wedding anniversary is happening too. WHAT?

It’s a lot to look forward to, but before everyone rings in the new year, I just wanted to share with y’all the top 10 posts of 2011. 🙂

Yellow Cupcakes w/ Strawberry Swiss Meringue Buttercream

10. Strawberry Swiss Meringue Buttercream – This was my first time making SMBC, and I swear, if you haven’t tried SMBC before, just do it. Please?

Pecan Pie Macarons

9. Pecan Pie Macarons – Gotta love macarons. These were really a huge favorite for Thanksgiving, and the star shape (which was a happy accident) made them super cute and festive!

Queso Blanco

8. Restaurant Style Queso Blanco – This is it. The ultimate queso blanco. If you’re as addicted to queso as me, you’d understand how wonderful it is to FINALLY have a recipe for this!

Strawberry Cream Cake

7. Strawberry Cream Cake – I’m actually glad I compiled this top 10, because I sort of forgot about this cake. Since it’s currently strawberry season in Louisiana, I think I MUST make this cake again. Yum!

Peppermint Bark Cheesecake Truffles

6. Peppermint Bark Cheesecake Truffles – This is the recipe that made my year, basically. I still can’t believe I won that recipe contest, and I’ve been told by a few friends who made this that these little truffles were a hit at their holiday parties! So happy to hear that!

Banana Nutella "Ice Cream"

5. Banana Nutella “Ice Cream” – Two ingredient “ice cream”. It’s basically awesome and couldn’t be any easier. Your food processor does all the work!

Corn Grits

4. Grilled Corn Grits – I can’t be from the South, and not have a post about grits. I promise you if you make this, your hips may never be the same again, but your taste buds will tell you it’s completely worth it!

3. Easy Pasta Salad – My first (and so far, only) vlog. I might get the courage to make one again, since you guys seemed to like it so much!

Diet Cupcakes

2. Cooking For Kids – The infamous post. Yup, who’da thought that a soda cupcake would get so much response from you guys (both good and bad)…yikes!

Homemade S'mores

1. S’mores for a Shower – Nutella S’mores. I can see why you guys loved this one so much. I’m sort of craving s’mores right now, actually. 😛

I hope you have a wonderful New Year with your family and friends, and thank you so much for reading The Nifty Foodie! See y’all in 2012!

Filed Under: Cakes/Cupcakes, Candy, Chocolate, Cookies, Frozen Desserts, Fruit, Other, Pasta/Rice, Sauces/Dips, Side Dishes

Merry Christmas!

December 25, 2011 by Amy 1 Comment

Cookies

I can’t believe it’s Christmas Day! This is my favorite holiday of the whole year, so of course, I had to make cookies for the occasion.

I know this is random, but I just wanted to share a local Christmas carol that just doesn’t feel like Christmas to me unless I watch this during the season. If you’ve been to NOLA (or, of course, lived in NOLA), you might have heard of a few of these things/places.

Hope you and your families have a wonderful holiday! Merry Christmas!

Filed Under: Cookies, Holiday Recipes

Elf’s Mix

December 19, 2011 by Amy 3 Comments

Elf's Mix

This past weekend was what I call my annual “bake-palooza”. When it comes to coworkers and neighbors, I just find it much easier to gift food. My idea is…when in doubt, give food. 🙂

Every year, I have so much fun coming up with the recipes for gifts. I have so many ideas written on paper, but I usually narrow things down to 5-6 recipes, just to remain sane. This was a new recipe for gifts, and it couldn’t have been easier. I based it off of bunny bait, which I bookmarked on my friend Amy’s blog. Of course, I changed the mix up to make it more Christmas-y and added holiday oreos for an even more fun Christmas colored addition.

The mixture of sweet and salty ingredients is what makes this mix so awesome, and just to let you know, it makes a LOT. I thought I’d have to make a double batch, but after making one batch, I realized I had more than enough for gifts.

Of course, I wasn’t going to call this bunny bait since, well, it’s not Easter. I had to call it something else. When I had it cooling on a silicone mat, I kept telling myself it looked like a Christmas elf barfed in my kitchen. Kinda gross, I know. Since I don’t have to guts to name a dessert “Elf’s Barf”, I decided to play it safe and call it “Elf’s Mix”. 😛

Elf’s Mix
inspired by Sing For Your Supper‘s “Bunny Bait”

Ingredients:

  • 1 bag of popped microwave popcorn
  • 6 oz. almond bark
  • 1 bag of mint M&Ms
  • 15 holiday oreos, chopped
  • 2 cups of pretzel sticks, broken into small pieces
  • Christmas sprinkles

Directions:

  1. Place the popped popcorn, pretzel sticks, M&Ms and oreos in a large bowl or pot. Place 4 oz. of almond bark in the microwave in 30 second increments, until well-melted.
  2. Add the melted almond bark to the popcorn mixture and stir the mixture thoroughly. Spread the mixture out on a large silicone mat or wax paper. Top with Christmas sprinkles.
  3. At this time, microwave the additional 2 oz. of almond bark in a disposable plastic piping back in 30 second increments until well-melted. Then, snip the end off of the bag and randomly pipe the almond bark over the popcorn mix. Allow the mixture to cool.
  4. To serve, break up the mix into pieces and place in a bowl. Enjoy!

Filed Under: Candy, Holiday Recipes

Peppermint Bark Cheesecake Truffles

December 15, 2011 by Amy 16 Comments

Peppermint Bark Cheesecake Truffles

I absolutely love making holiday treats. You know it’s the holiday season in our house when our fridge has at least 5 lbs. of butter, 8-10 packages of cream cheese at any given time and 2 extra bags of flour and sugar in the pantry to ensure that I don’t run out of the essentials. 🙂

The big bake-palooza (as I like to call it) is this weekend. There’s quite a few coworker and neighbor gifts to make this year, which has me super excited! This year’s packages are going to have some old favorites and new ones too, which I plan on sharing with y’all next week.

While this particular recipe won’t be with the gifts this year (since they need to be refrigerated), I wanted to share these truffles with y’all, since this is still a delicious recipe if you’re looking for something to include with your holiday parties. I came up with this recipe for a local recipe contest with the newspaper. I was actually torn between an eggnog inspired dessert and a peppermint bark inspired dessert. This recipe idea won out though, because after asking some friends, it seems like a peppermint bark inspired recipe would be more popular, since quite a few people hate eggnog. Fair enough.

The great thing about these truffles is that they come together pretty quickly. It’s definitely an easy dessert recipe to add to your holiday menu! Just keep in mind since the recipe involves cream cheese, these truffles can’t sit out for too long without needing to be refrigerated. They actually taste a lot better cold anyway.

So, I’m sure you’re wondering how these little truffles did in the recipe contest! I won first place! FIRST PLACE! I still can’t believe it. The prize was a big deal too… $1000 to a local furniture store! (I can’t wait to share with y’all what we used that generous prize on, but I’ll save that for another post once it’s delivered.)

I’m also supposed to be in the paper tomorrow. Crazy, right? I’m completely giddy about that! I’m sure I’ll buy multiple copies for family. 🙂

Peppermint Bark Cheesecake Truffles
Source: an original

Ingredients:

For the filling:

  • 1 pkg cream cheese, slightly softened
  • 5 candy canes
  • 1/4 cup confectioner’s sugar
  • 1 cup (appx. 6 large) ground graham crackers
  • 1/4 cup white chocolate chips, chopped

For the coating:

  • 2 cups of white chocolate chips or almond bark
  • 1/2 cup of semi-sweet or milk chocolate chips
  • 2 crushed candy canes

Directions:

  1. With a spatula, whip up the cream cheese to a stirrable consistency.
  2. Using a food processor, grind 3 of your candy canes to a powder. Stir the ground candy canes, powdered sugar and ground graham crackers into the cream cheese with a spatula until everything is well-incorporated.
  3. Place the last two candy canes in a quart sized plastic ziploc-type bag, and using a heavy bowl, crush up the candy canes into small pieces (not quite a powder, since you want these to add a bit of a crunch to your truffles). Add the candy canes, along with the chopped white chocolate to your cream cheese truffle mixture.
  4. Chill the mixture well, for four hours or overnight.
  5. When ready to assemble the truffles, divide the mixture into tbsp. sized balls and put the balls on a cookie sheet. By the time you’re done making the truffle balls, the mixture probably warmed up a bit, so place the cheesecake balls in the freezer for 5-10 minutes to firm up.
  6. In the meantime, melt your white chocolate for the coating (either in the microwave or with a double boiler).
  7. Take your cheesecake balls out of the freezer, and individually dip each ball in the white chocolate mixture. Place the finished dipped balls on a cookie sheet lined with wax paper for the chocolate to set.
  8. Once the white chocolate has set, melt your milk or semi-sweet chocolate chips and add a small amount on top of each truffle, along with some crushed candy canes for decoration.
  9. Enjoy these cheesecake truffles right out of the refrigerator and keep the truffles cold, since there is cream cheese in the recipe.

Filed Under: Candy, Chocolate, Holiday Recipes, Nifty Foodie Original

Fortune Cookies

December 12, 2011 by Amy 5 Comments

Christmas Fortune Cookies

Christmas Vacation is my all-time favorite Christmas movie. To me, it’s not Christmas without hearing cousin Eddie say “Merry Christmas! Sh***er’s full!” or watching Aunt Bethany bring the beloved (meow mix) jello mold. I remember watching it as a child, pretty much missing half of the comedy and dirty jokes (since they went over my head), and just enjoying the funny family bloopers. However, it makes me laugh that my mom let me watch that movie every year as a child, especially since she thought Ren & Stimpy was “trash TV’. (love you, Mom) Ren & Stimpy has nothing on Christmas Vacation, “trash TV” wise.

A few weeks ago, one of my friends brought up the idea of a cookie swap. This would be the first one I’ve attended, so I was super stoked about this! I thought about how fun it would be to make these cookies with Christmas movie quotes inside. I decided to feature “Christmas Vacation” and “Elf” quotes. Elf has quickly become a recent favorite of mine, and really, how could it not? It’s such a cute Christmas movie AND Will Ferrell is in it!

These cookies put the average fortune cookie to shame. They have a fabulous vanilla flavor, and heck, homemade is always better, right? While this recipe can be tedious, since you can only make 3-4 at a time, the results are so worth it. I had fun putting these little quotes in the cookies, and watching my friends see which quotes they got. 🙂

Fortune Cookies
Source: AllRecipes

Ingredients:

  • 1 egg white
  • 1/8 teaspoon vanilla extract
  • 1 pinch salt
  • 1/4 cup all-purpose flour
  • 1/4 cup white sugar
  • Food coloring, optional

Directions:

  1. Preheat oven to 400 degrees F. Place parchment paper or a silicone mat on a cookie sheet. Write or type fortunes on strips of paper about 4 inches long and 1/2 inch wide.
  2. Mix the egg white and vanilla until the mixture is foamy. In another bowl, sift the flour, salt and sugar. Add the flour mixture to the egg mixture and mix until well incorporated. Add food coloring if you’d like and mix until well blended.
  3. Doing this in batches of 3-4 cookies, place 1 teaspoon of batter for each cookie on the baking sheet, at least 4 inches apart. Using a spoon, spread the batter in a circle, about 3 inches in diameter, making sure the batter is as even as possible (to avoid thin spots).
  4. Bake the cookies for 5 minutes or until cookie has turned a golden brown color around the edge of the cookie. If you want, you can use 2 cookie sheets and prepare the other sheet with cookies while the other one is baking.
  5. Once the cookies are done baking, remove the sheet from the oven and working quickly, flip the cookie with a spatula (it might take a bit of work to get the spatula under these cookies). Then, quickly put the fortune on the middle of the cookie and fold the cookie in half. Pull the pointed edges together and place in the cups of a muffin tin for them to hold their shape as they cool. Once they have cooled, enjoy!


Filed Under: Cookies

Meyer Lemon Bars

December 8, 2011 by Amy 1 Comment

Lemon Bars

One of the last things you think about in December is citrus. To me, citrus screams bright colors and summery flavors, but in Louisiana, the end of the Fall/beginning of Winter is our citrus season. Satsumas and Louisiana Navels and Meyer Lemons…oh my! I’m crazy about the local citrus, for sure!

A couple of years ago, my husband bought a Meyer Lemon tree for our little backyard, and I couldn’t have been more thrilled! Meyer Lemons are a special lemon…they are a lot sweeter and way juicier than your average lemon. They just scream, “Make me into a dessert, woman!” When our tree made 10 lemons this year, I was more than happy to make these into a dessert!

When I think about lemon desserts, I think about lemon bars. Since I’m personally not a fan of lemon desserts (I know, I’m a weirdo!), I made a batch of these for my husband and his coworkers. My husband told me that his coworkers absolutely loved them, and I need to send desserts more often! (In case they’re reading this, that’s definitely not the last of the desserts that I’m sending him with!)

Meyer Lemon Bars
Source: Ina Garten

Ingredients:

For the crust:

  • 2 sticks unsalted butter, at room temperature
  • 1/2 cup granulated sugar
  • 2 cups flour
  • 1/8 teaspoon kosher salt

For the lemon filling:

  • 6 large eggs, at room temperature
  • 3 cups granulated sugar
  • 2 tablespoons grated meyer lemon zest
  • 1 cup freshly squeezed meyer lemon juice
  • 1 cup flour
  • Confectioners’ sugar, for dusting

Directions:

  1. Preheat the oven to 350 degrees F.

  2. To make the crust: Cream the butter and sugar in your mixer for about 2 minutes, until fluffy. In another bowl, whisk together the flour and salt. Turn the mixer to low and slowly add the flour mixture to the butter mixture until the crust is just mixed. Take the dough out of the mixer and roll into a ball on a well-floured surface. Pat some flour on your hands and flatten the dough. Then, press it into a 9×13 cake pan and make sure there’s about a 1/2 inch edge of crust along the edges of the pan. Chill the dough in the fridge for about 30 minutes.

  3. Bake the crust in the oven for 15-20 minutes, until it just starts to brown. Allow the pan to cool on a wire rack, and keep the oven preheated.

  4. To make the filling: whisk the eggs, sugar, lemon zest/juice and flour in a bowl until well combined. Pour the mixture over the crust once it has cooled, and bake for 30-35 minutes, until the filling has set. Place the cake pan on a wire rack and allow to cool. Before serving, lightly dust the bars with confectioners’ sugar.

Filed Under: Brownies/Bars, Fruit

Pork and Sausage Jambalaya

December 5, 2011 by Amy 4 Comments

Jambalaya

Around here, Jambalaya is a staple. If you live in Louisiana, you’ve had it. If you live in Louisiana and you haven’t had it, let’s just say you haven’t fully lived yet. 🙂

The best jambalaya is usually cooked in huge quantities in a large cast iron pot. If you’re going to a tailgate out here, they’re probably serving jambalaya. Same goes for huge family reunions. Heck, we had jambalaya at our wedding. It’s one of my favorite foods for a gathering and with good reason. It’s absolutely delicious!

Now, at home, we usually would make jambalaya from a mix. I really had no idea how to make jambalaya from scratch….until now. My friend Kayla, who used to have a food blog (hint hint, Kayla…), posted this recipe for jambalaya, which comes from her husband. When my husband and I tasted this, we were absolutely floored! This recipe tastes just like the amazing jambalaya that is made in those huge cast iron pots. I call it tailgating jambalaya in a much more manageable amount. However, be warned (in a good way)…..this makes enough jambalaya to completely fill a 5 qt. dutch oven. We had leftovers that filled up a gallon ziploc bag, which we happily ate throughout the week and even shared with the in-laws.

So yes…make this. For those of you who are wondering, there are no ingredients in this jambalaya that are regional (to my knowledge). Anyone can make this! Just do it. 🙂

On an unrelated note: If you have a minute, I would really appreciate your vote for my entry (Peppermint Bark Cheesecake Truffles) in a local holiday dessert recipe contest. Voting ends on Wednesday, and the top 10 entries (by popular vote) move on to be finalists! I know that you have to register to vote, but I’d completely appreciate the support! You can also vote once/day if you wanted to be extra nice. 😛

Jambalaya
Source: Scrumptiously Sassy (recipe posted on Cooking with Christen)

Ingredients:

  • 2.5 lbs. boneless pork shoulder, cut into 1.5″ chunks
  • 1 lb. smoked sausage, sliced
  • 1/2 cup vegetable oil
  • 1 bell pepper, diced
  • 1 onion, diced
  • 2 ribs celery, diced
  • 3/4 cup green onion, diced
  • 1/2 cup fresh parsley, chopped
  • 4 cups long grain rice
  • 8 cups water (for rice)
  • 3 tbsp. Kitchen Bouquet browning & seasoning sauce
  • Seasoning (salt, red pepper, garlic powder, onion powder, etc.)
  • Extra water (for meat)

Directions:

  1. In a 5-6 quart cast iron pot, heat up the vegetable oil.  Season pork to taste and brown thoroughly (do this in small batches, putting the browned pork in a bowl as it’s done browning).  If the pork starts to stick to the pan, you can add a little water to the pot.
  2. Once you’ve browned the pork and removed it from the pot, add the sliced sausage to the pot to brown it as well. Once it’s browned, add the vegetables and cook until tender and translucent. Add the pork chunks back in the pot and stir to combine. Add enough water to cover and simmer on medium-low until almost all of the liquid has evaporated.
  3. Add the 8 cups of water to the pot and season to taste. You want the liquid to taste spicier and saltier than your preference, since the rice will soak up those flavors. After the liquid is spiced to your preferences, add the Kitchen Bouquet to darken the liquid.  Once the liquid starts to boil, add rice, parsley and green onions. Keep stirring the pot until most liquid is absorbed, then turn the fire to low and cover for 20 minutes. During those 20 minutes, do not remove the lid.
  4. Remove the lid and stir to fluff. Once the mixture is well stirred/fluffed, put the lid back on and cook on low for 10 more minutes.  Again, do not remove the lid.
  5. Once the jambalaya is finished, uncover the pot and once again, stir/fluff the mixture. Serve and enjoy!


Filed Under: Louisiana Cuisine, Pork/Ham/Bacon

Happy Haulidays with Chronicle Books!

December 1, 2011 by Amy 9 Comments

Happy Haulidays
Book Collage Source: Chronicle Books

I absolutely love the holiday season. While it gets dark at 5pm around here, and that’s sort of depressing, I can’t help but feel happy. I love giving the ones I care about gifts and watch their reactions! Most importantly, I always love to help others out in some way, whether it be choosing a child to “adopt” and give them gifts for Christmas.

Chronicle Books is offering something amazing this year to one lucky blogger: up to $500 in books for the blogger, one of their readers AND a charity/library of their choice!

While I don’t read novels (high school honors classes ruined novel reading for me), I’m a huge fan of books that support my hobbies, which are mostly cooking/baking and crafts. So, here’s the list of books I would absolutely LOVE to have from Chronicle books. 🙂

…

Read More »

Filed Under: Giveaways/Reviews

Pecan Pie Macarons

November 30, 2011 by Amy 12 Comments

Pecan Pie Macarons

It’s one of the hugest compliments when someone asks you to bring the same dish for a holiday, year after year. When it comes to my coworkers, they always just expect that I’m bringing a cheesecake again. Cheesecakes are easy, so I have no problem with making them for work potlucks.

However, with my family, I decided to take a leap last year and make eggnog macarons. Little did I know that these would be a hit. I was intimidated by these cookies, and there was a great reason. When you live in humid place like Louisiana, you can’t help but be intimidated by something that relies heavily on egg whites. So, fast forward to November. I asked my mom if my husband and I should bring something for Thanksgiving, and at first, she said that nothing was necessary. Then, three days before, she, along with my aunt, requested macarons. Guess they’re spoiled now!

I didn’t want to repeat eggnog macarons, since it’s Thanksgiving. So, I looked through a few sites until I decided on this idea: pecan pie macarons. Living in the South, pecan pies are a staple in the Thanksgiving feast, so this was going to be absolutely perfect!

So, the day I start to make the macarons, I go to look for my round piping tip. Uhhh…turns out it was another victim of the move since it’s gone. 🙁  So, I tried the star piping tip. I figured it would flatten out within the hour that the macarons had to sit out before baking, but they didn’t. I’m sort of happy they didn’t flatten out though…the star shaped macarons turned out pretty darn cute!

Instead of doing both the caramel sauce and pecan brittle for the filling, I ended up using the caramel sauce with chopped pecans in the filling. These were definitely a popular item on Thanksgiving Day, since by the time I was picking up leftovers, they were pretty much all gone. Yay!

I guess that means I should start thinking about what macarons to make for the next holiday get together with my family, eh? 🙂

Pecan Pie Macarons
Source: Tartelette

Ingredients:

Note: With macarons, it’s definitely important that your ingredients are weighed, so all measurements are in grams. 🙂

     For the macarons:

  • 3 egg whites (about 90 grams)
  • 40 grams granulated sugar
  • 200 grams powdered sugar
  • 55 grams almonds
  • 55 grams pecans

     For the filling:

  • chopped pecans
  • one recipe of salted butter caramel sauce, well chilled in the fridge

Directions:

  1. For the egg whites, 2-3 days before separate your eggs and store the whites in a covered container in the fridge.
  2. In a stand mixer with the whisk attachment, beat the egg whites until they foam, gradually adding granulated sugar until you reach a glossy meringue. Be careful not to overbeat, since the meringue can easily dry out.
  3. Place the almonds, pecans and powdered sugar in a food processor and pulse the mixture until the nuts are finely ground.
  4. Add the mixture to the meringue, give it a quick couple of folds to break down some of the air and then, slow down and fold the mass gently until the batter flows like magma or thick ribbon. The whole folding process shouldn’t take more than 50 strokes.
  5. Fill a pastry bag fitted with a round tip (or star one if you’re crazy like me) with the macaron batter and pipe small cookies (about 1.5 inches in diameter) onto a Silpat or parchment paper lined baking sheet.
  6. Let the macarons sit out for 30 minutes – 1 hour to allow the shells to harden a bit. In the meantime, preheat your oven to 300 degrees. Once the shells have hardened, bake the macarons for 15-20 minutes.
  7. Allow the macarons to cool a bit (until the pan is warm) before removing the macarons. If your macarons are stuck to the pan, pour a couple of drops of water under your Silpat or parchment. This should help the macarons lift off the pan more easily, due to the moisture. However, don’t let the macarons sit with the water for too long or you’ll risk the macarons becoming soggy.  
  8. Once the macarons are fully cooled, spread some of the caramel sauce on the bottom of each of your macarons, add chopped pecans on top of the caramel on one of the macarons and sandwich the two macarons together. If you want to be super fun, brush some pearl dust on the top of the macarons.

Just a small side note….Did you win the Butterball giveaway? You have to email me to claim your prize and you have until tonight! Neither of the winners have emailed me. 🙁 You want free turkeys, don’t you?


Filed Under: Cookies, Holiday Recipes

  • « Go to Previous Page
  • Go to page 1
  • Interim pages omitted …
  • Go to page 35
  • Go to page 36
  • Go to page 37
  • Go to page 38
  • Go to page 39
  • Interim pages omitted …
  • Go to page 85
  • Go to Next Page »

Primary Sidebar

Hey Y’all!

Image Credit: Leslie Pendleton Photography


Hey y’all!

Thanks so much for reading! I’m Amy, and I live in south Louisiana with my husband and our rescue dog. I enjoy sharing my love for cooking, baking, crafts & more! Follow my daily adventures on social media!

Follow my Daily Adventures

  • Email
  • Facebook
  • Instagram
  • Pinterest
  • Twitter

Footer

  • Email
  • Facebook
  • Instagram
  • Pinterest
  • Twitter

Archives

Copyright © 2026 · Foodie Pro Theme by Shay Bocks · Built on the Genesis Framework · Powered by WordPress