• Skip to primary navigation
  • Skip to main content
  • Skip to primary sidebar
  • Skip to footer

The Nifty Foodie

  • Home
  • About
  • Recipes
    • Appetizers
    • Beverages
    • Breads/Muffins
    • Breakfast
    • Canning
    • Desserts
    • Dog Treats
    • Entertaining/Parties
    • Fruit
    • Holiday Recipes
    • Louisiana Cuisine
    • Main Dishes
    • Mexican
    • Nifty Foodie Original
    • Nifty Tricks
    • Project Food Blog
    • Pumpkin
    • Salads
    • Sauces/Dips
    • Side Dishes
    • Skinny
    • Slow Cooker
    • Spices
    • Stews/Soups
    • The Disasters
  • My Weight Loss Journey
    • Races
    • Running
    • Weight Loss Milestones
  • Crafts
  • Contact Me

Amy

M&M White Chocolate Chunk Cookies

March 13, 2012 by Amy 4 Comments

M&M and White Chocolate Chunk Cookies

Happy early St. Paddy’s Day y’all! When I was a kid, my family used to go to the St. Patrick’s Day parade in New Orleans. The parades for St. Paddy’s Day aren’t anything like the ones at Mardi Gras. The prized throws are vegetables. That’s right, y’all. They throw vegetables at these parades. Cabbage, carrots, potatoes…you name it! I remember catching these things as a kid, and thinking that these were the most boring throws ever. Of course veggies are boring to a kid! The tradition is that you take home your catches, and then make a stew for your family for the holiday. 🙂

The fun part for me was when some older men would walk in the parade carrying these huge displays of fake flowers, and they would hand them to the ladies and little girls. My sister and I used to compare bouquets at the end of the parade, and man, it was so much fun to get flowers as a little girl!

Sadly, I haven’t been to a parade in a long time, which really should be remedied next year, but the memories I have from my childhood just make me so psyched for the holiday. Not to mention, St. Paddy’s Day is the week of my birthday (as well as my sister’s)! Her birthday is actually today! If you’re reading this, Happy Birthday Sis!

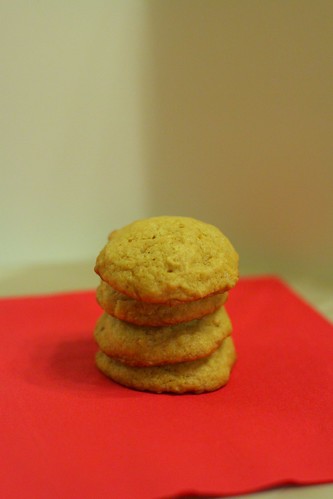
As far as these cookies go, I’ve been wanting to make these M&M cookies for a while, and since I had a bag of Christmas M&Ms leftover from the holiday bake-palooza, I took a few minutes to take out the green M&Ms, add some white chocolate chunks and make these cookies finally happen. I have no idea how that bag of M&Ms lasted this long in our house, actually, but I guess I’m getting some willpower from the good ol’ diet. 🙂

Strictly for quality control purposes, I had to try one of these bad boys. 😛 It took a lot for me to not grab a second or a third, because I just LOVE M&M cookies! This recipe couldn’t be easier either, since it only requires one bowl. I’m all about doing less dishes, so these cookies are even more awesome because of that!

M&M White Chocolate Chunk Cookies
Source: mildly adapted from Sing For Your Supper, originally from King Arthur Flour

Ingredients:

  • 1/2 cup butter
  • 1/3 cup & 1 tbsp. granulated sugar
  • 1/3 cup packed brown sugar, light or dark
  • 1/2 tsp. salt
  • 1 tsp. vanilla
  • 1/4 tsp. baking soda
  • 1/2 tsp. baking powder
  • 1 large egg
  • 1 1/2 cups all purpose Flour
  • 2 tbsp. milk
  • 1.5 cups M&Ms
  • 1/2 cup white chocolate chunks

Directions:

  1. Preheat the oven to 375 degrees and prepare two baking sheets lined with parchment or Silpat sheets.
  2. Cream the butter and sugars together until light and fluffy, for about two minutes. Add the baking soda, baking powder, salt and vanilla and mix until well-incorporated. Add the egg and mix until blended. Scrape the bowl down, add the milk and mix again.
  3. Add the flour and beat the mixture until just mixed together. Do not overbeat.
  4. Using a spatula, lightly stir in the M&Ms and white chocolate chunks.
  5. With a regular cookie scoop, drop the cookies on your sheet, allowing 2 inches between each cookie. Bake the cookies for 14-16 minutes, until the cookies are a light golden brown and slightly browner along the edges. Allow the cookies to fully cool on the cookie sheet before serving.

Filed Under: Candy, Chocolate, Cookies

Motivating me to do better: BodyMedia Fit Review

March 5, 2012 by Amy 4 Comments

Last month, I reached out to the folks at BodyMedia, and asked them if I could review one of their armbands. I have to admit, I was pretty ecstatic that someone in their PR got back to me and told me they would send me one for review!

The product I’ve been using is the BodyMedia Link armband. ($199) I chose to review this one, because it’s bluetooth enabled to give you real time results on your phone through their BodyMedia app. It’s perfect for me since I’m all about using my smart phone!

They also offer the Core armband ($179), which is 1/3 smaller, but is not bluetooth enabled so you can either see your results on your computer or through their optional display.

I’ve been using this armband for about 3 weeks now, and I can tell y’all that this little armband is definitely helping me stay motivated to do better on this diet. I’m down 24 lbs. as of this morning, which is 6 measly pounds away from 10%. 10%…that’s another reward, y’all!

As far as wearability, I have no problems wearing this to work or out at night. You really can’t tell that I’m wearing it when I’m wearing a cardigan or a shirt with longer sleeves.

I also have no issues wearing this in my sleep. It’s not bulky at all, so I can sleep right on the armband without any discomfort.

The app displays the following on a daily basis:

  • calories burned
  • calories consumed
  • the total calorie deficit (calories burned – calories consumed = ….)
  • minutes of moderate activity (which for me has been like taking a walk or fairly heavy cleaning)
  • minutes of vigorous activity (which for me has been jogging/workout videos)
  • amount of steps taken
  • duration of sleep


(This is an example of a typical rest day for me. Crazy how much your body burns on its own!)

When you plug the armband into your computer, though, you get more details like when you were active/how long and when/how much you slept vs. lying down. I found this to be pretty neat to look over.

After using this product for a couple of weeks, I figured the best way to review this is to write about the pros and cons of the product.

Pros:

  • The armband isn’t really a bother. After a couple of days, it feels weird when I’m NOT wearing it.
  • I found this armband is very simple to use and set-up. You just set-up your account (which it will guide you through doing that online), install the software for syncing the band to your computer, and enable the bluetooth on your phone to connect the armband. Then, let the system charge fully, put it on, and you’re good to go!
  • I love that I can see the calories my body is burning in real time on my phone. It really motivates me to push for a certain calorie deficit in a day.
  • I really like the goal-making feature for workouts on the app. I especially love the calories burned goal. Regret eating that chocolate bar? Well, this will show you just how much work it takes to burn that chocolate off!
  • The sleep feature. I really like seeing how much I’m sleeping through the night, and it’s cool to see my sleep efficiency too (you can see that via the website). I kind of had a hunch that once I’m out, I’m out, and I’m right…my sleep efficiency is almost always over 90%!

Cons:

  • Logging my food. When I started this diet, I was logging my food on the MyFitnessPal app. I love that app, because the food diary is very extensive. However, I’ve noticed quite a few times where BodyMedia’s app (and website) don’t have some of the foods I’m looking to log on there. However, you can manually enter your nutritional information on the app when you find that out.
  • The BodyMedia Fit armbands do have a membership fee after the first 3 months of membership ($6.95/month), which kind of stinks. However, if you think about it, it’s the cost of a coffee and pastry at a coffee shop. I’d rather spend $6.95 on my health, personally.
  • It can take some time to charge the armband on my computer, so I just try to charge it while I know I’ll be on the computer for a while.

Even though I didn’t pay for this product, I have to admit that this thing is completely worth the $199. I know that’s easy to say, but I can’t really put a price on how motivating this product is for me. I’ve lost a steady amount of weight, and I honestly think that the weight loss has a lot to do with using this tool.

Do any of y’all own/use the BodyMedia Fit armbands? What do you think of yours?

Disclosure: I was sent this product at no cost to me, as well as three months of free membership for a fair and honest review. All opinions expressed about this product are my own.

Filed Under: Goals, Health/Weight Loss

Roasted Tomatillo Salsa

March 1, 2012 by Amy 1 Comment

Tomatillo Salsa

Man y’all. The past couple of weeks have been crazy. I haven’t really gotten sick in a few years, and on Valentine’s Day, as luck would have it, I caught some sort of cold-like virus. Ugh. Lesson learned…do not stop taking Vitamin C gummies. (yup, I totally take gummy vitamins) I’ve recently started feeling better, which means I’m back in the kitchen! It felt so weird not cooking for two weeks, but thankfully, my husband is pretty darn awesome in the kitchen, which helped immensely when I didn’t feel like getting off the sofa.

I made this salsa one night to try a green salsa with the chicken taquitos that we fairly regularly make, which is actually the salsa intended for this recipe. However, usually I just throw in some red salsa when I’m in a hurry, but I had some time to make this. I have a confession, though…I’ve never worked with or even had tomatillos before this. I remember being in the produce section, overwhelmed by how to tell a good tomatillo from a bad one (I’m a worry worm…what can I say?), but I think I survived haha! I was very surprised at how flavorful this salsa was. I was worried I’d hate tomatillos, but it was quite the opposite! This salsa was fantastic, and really wasn’t that bad to make either!

Roasted Tomatillo Salsa
Source: Pink Parsley, originally from Rick Bayless Mexican Everyday

Ingredients:

  • 4-5 medium tomatillos, husked, rinsed, and halved (about 8 ounces)
  • 2 large garlic cloves, peeled
  • 1 jalapeno
  • 1/3 cup loosely packed, roughly chopped cilantro
  • 1/2 small white onion, chopped
  • juice of 1/2 lime
  • salt

Directions:

  1. Heat a large, nonstick pan over medium-high heat. Place the tomatillos (with the cut-side down), garlic and jalapeno in the pan and cook for 3-4 minutes, until the tomatillos are well-browned. Also, watch the garlic to ensure that you don’t burn it…it will taste bitter once burned. Flip the ingredients in the pan and take a couple of minutes to brown the other side of the vegetables.
  2. Remove the tomatillos and garlic and add them to a food processor or blender. Brown the jalapeno on all sides and then move it to a cutting board to cool.
  3. Once cooled, peel off the burned skin (which should happen very easily) and scoop out the ribs and seeds (unless you REALLY like spicy). Chop the jalapeno and add to the food processor or blender with the tomatillos and garlic.
  4. Add 1/4 cup of water, the chopped onion and chopped cilantro to the food processor/blender until it’s a coarse puree. Feel free to add a little water if the salsa is too thick. Add lime juice and salt to taste and serve.


Filed Under: Mexican, Sauces/Dips

A slight obstacle

February 29, 2012 by Amy 6 Comments

I feel like the past couple of months have been just flying by. It’s cool to watch the scale numbers constantly drop, but last week reminded me more than anything that life can throw some unexpected obstacles your way.

I caught a cold.

Now, I know that sounds like barely a big deal, but y’all, I assure you, this cold knocked me off of my feet. I haven’t had a really good night’s sleep since almost two weeks ago, and I could barely do 15 minutes of housework at a time until this past weekend. I haven’t done a C25K workout (or really any workout, except for moderate paced walking) since Week 2 Day 1’s workout either, so I just feel like a weight loss bum.

Just to note, I haven’t even gotten my 5% pedicure yet. It was that miserable to leave the house!

Now, weight-loss wise at first, the scale was dropping like crazy. When your throat is so sore, you can barely sip down a bowl of soup, of course the weight was going to drop. Even MyFitnessPal warned me that I was putting my body in starvation mode when counting calories. (about 700 cals/day at my worst!) So, once I introduced real food back into my diet, of course the weight jumped up again (sigh). However, I’m happy to say as of this morning, I’m back to my lowest weight on the diet so far. I’m barely in the 270s, but that’s a new weight decade for me! Whee!

I had huge plans to hit 10% by my birthday, but at this point, I’m sure that won’t happen. I’m 16 lbs. away from that and I only have 16 days until my birthday. Ha! I’ll try, but I know it’s just not going to happen. 😛

I’m so motivated at this point, though. I need to find my belt for my pants, because I’m constantly pulling them up, which makes me SO happy! I never thought my work pants would be loose! I keep staring at my size 20 shorts from the honeymoon, hoping that sometime this Summer, I might be able to wear them again. That would be way awesome, because I loved those dang shorts!


Filed Under: Goals, Health/Weight Loss

5%

February 16, 2012 by Amy 22 Comments

Before: 298.5
This morning: 283.6 (close enough, darnit)

Y’all. 15 lbs. is the most weight I’ve lost since trying to lose weight for the wedding. I know 15 lbs. isn’t a lot when you have 105 more to lose, but to me, I no longer have 120 lbs. to lose. I have 105 lbs. to lose, and that’s exciting stuff to me!

Back at my highest weight, my husband took “before” pics of me. I wanted to curiously take a picture of myself today to compare, and whoa…there’s results y’all.

To note: both of these are XL shirts and 18/20 workout pants at Lane Bryant. I’m not sucking in for either one, I swear.

5% down

In the before, my XL shirt was super tight. I would be embarrassed to wear an XL unless I or my H pulled my shirt to stretch it out. Now, it’s getting loose, and no longer riding up because it is too tight to wear. (Sorry XL shirts for the months of torture.)

You guys, I know this isn’t much weight, but look at the difference. I didn’t take my before measurements until last week (stupid, I know), so right now, this is what is driving me to that 10% of your weight lost. The benefits of losing just 10% of your weight is completely worth it. Google what losing 10% does, y’all. You’ll see.

So, since I reached my first goal, it’s time for a pedicure. YAY! I can’t wait to make that appointment. 🙂


Filed Under: Health/Weight Loss, Weight Loss Milestones

Red Velvet Whoopie Pies

February 14, 2012 by Amy 1 Comment

Red Velvet Whoopie Pies

Happy Valentine’s Day everyone! I know that Valentine’s Day is really just a typical day where Hallmark and the flower shop make bank, but sometimes it’s fun to just give in and be gushy about the day. This past weekend, my husband and I decided to make our own Valentine’s Day dinner instead of wasting crazy amounts of money and time at a restaurant around here. We made an insanely indulgent dish (hello butter!) consisting of corn grits, crawfish etouffee and fried jump shrimp. I know…cheat day! Since H and I have been calorie counting for a couple of weeks now, it made us sluggish the rest of the day. I guess our bodies are getting used to this healthy thing.

So, today I figured I’d share with y’all something that would make your cheat day complete. 😛  The plan was to bring this dessert to work for a charity bake sale, so I knew if I made these, I could easily get them out of the house if they were too tasty and tempting. Thank goodness too, because in my quality control test (ha!), I found that these were extremely tasty! I hope they sell out, because I don’t want to bring any of these home! Or maybe I do, but MyFitnessPal might yell at me.

Just a note: I will say that one batch does not make many of these. I made a double batch for the sale, and ended up with 22 whoopie pies.

Red Velvet Whoopie Pies
Source: found on Big Apple Nosh (cookie recipe originally from Better Homes and Gardens)

Ingredients:

For the whoopie pies:

  • 2 cups all-purpose flour
  • 2 tbsp. unsweetened cocoa powder
  • 1/2 tsp. baking soda
  • 1/4 tsp. salt
  • 1 stick butter, softened
  • 1 cup packed brown sugar
  • 1 egg
  • 1 tsp. vanilla
  • 1/2 cup buttermilk
  • 1/2 of a  1-oz bottle red (preferably No-Taste Red by Wilton or Super Red by Americolor) food coloring

For the filling:

  • 1 8 oz. package cream cheese
  • 1.5 sticks unsalted butter, softened
  • 1 tsp. vanilla extract
  • 1 lb confectioners sugar, sifted (you may not need all of it) 
  • pink food coloring (optional)

Directions:

  1. Preheat your oven to 375 degrees. Line two baking sheets with parchment paper or a Silpat mat.
  2. In a medium-sized bowl, whisk together the flour, cocoa powder, baking soda and salt until well blended.
  3. In a large mixing bowl, beat the butter for about two minutes until light and fluffy. Add the brown sugar and mix until well blended. Add in the egg, vanilla and food coloring and beat the wet mixture until everything is incorporated.
  4. Add the flour and buttermilk mixture a third at a time (alternatively), until the mixture is just mixed. (Don’t overbeat)
  5. Using a cookie scoop, scoop out the whoopie pies on the baking sheet, giving about an inch in between each cookie for rising/spreading.
  6. Bake the cookies for 9-11 minutes, until the tops of the whoopie pies are set. Allow all of the cookies to cool before filling.
  7. To make the filling, beat the cream cheese and butter together for a couple of minutes until fluffy and light. Add the vanilla and optional food coloring. Then, in 1/2 cup increments, add the confectioners sugar until the frosting is fairly firm but still easily stirrable. (A good way to test this is to put an offset spatula in the frosting bowl. If the spatula remains standing, it’s firm enough.)
  8. Place the filling in a ziploc bag with the tip cut off and pipe some of the filling on the flat side of one cookie. Then sandwich that cookie together with another whoopie pie that isn’t frosted (where the flat tops meet).

Filed Under: Cakes/Cupcakes, Chocolate, Cookies

Cinn-ful Sweet Potato Cookies

February 10, 2012 by Amy 3 Comments

Sweet Potato Cookies

I love sweet potatoes. I usually eat the heck out of them around the holiday season, but heck, even in the Spring, I could go for a baked sweet potato with tons of cinnamon, a dash of sugar and of course, butter. This recipe for sweet potato cookies reminds me so much of those baked potatoes, except in a fluffy, cake-like form.

These cookies aren’t too indulgent, because they are pretty darn tiny and have a very light texture. You could totally make these a little healthier using the whole wheat flour (I’d do half white, half whole wheat though, since I’ve never really had luck completely subbing whole wheat for white flour.) as well as subbing straight up applesauce for all of the butter.

I made this for a recipe exchange on a cooking forum that I frequent. The theme was potato, and I was relieved to get a dessert. (Can’t go wrong with a dessert!) The only thing I added was an egg, because I just felt like that would make the cookie a better texture.

Cinn-ful Sweet Potato Cookies
Source: adapted from Cookies on Friday

  • 2 cups AP flour or 1 cup AP flour & 1 cup whole wheat flour
  • 1 tsp. baking powder
  • 1 tsp. baking soda
  • 3/4 tsp. cinnamon
  • 1/2 tsp. salt
  • 1/2 cup butter, room temperature
  • 1 cup cooked, mashed sweet potatoes
  • 1 cup brown sugar, packed
  • 2 tbsp. maple syrup
  • 1 tsp. vanilla
  • 1 large egg
  • Optional: Pecan halves, for topping
  1. Preheat the oven to 350 degrees. In large bowl, beat the butter until fluffy and light, about two minutes. Add the brown sugar and whip the mixture until well incorporated. Scrap down the bowl and add the sweet potato, maple syrup, egg and vanilla. Beat the mixture until everything is well blended.
  2. In a separate small bowl whisk together the dry ingredients (flour, baking powder, baking soda, cinnamon and salt). Put the mixer speed on low and slowly add the flour mixture until just combined. Chill the dough for one hour.
  3. Once chilled, drop the dough by the heaping tablespoonful onto a parchment or Silpat lined baking sheet.  For an optional twist, you can top each cookie with a pecan half.
  4. Bake the cookies for 11-13 minutes, until the cookies just start to brown along the edges. Allow the cookies to cool on a rack before serving.

Filed Under: Cookies

A bunch of randoms

February 9, 2012 by Amy 7 Comments

  • I have a weird self-conscious confession. I really want to go to a local running store to get fitted properly for a pair of shoes, but at my weight, I’m afraid of getting stares in a store where mostly fit people go. I know you’re thinking…shut up, stupid, things will be fine, but I’m very self-conscious. Ugh. Now, I did just buy a nice pair of Saucony shoes on RueLaLa, but I’m wondering if there’s a better shoe out there since I tend to walk on the outside of my feet (if that makes sense) looking at the way my shoes wear out.


  • On a rare make-up note, I finally found some lip butters at the Walgreens near my house. Since I’ve been reading raving reviews about “The Balm” on various blogs, I bought two of them, one in pink satin and one in nourishing nude. Since I don’t like too much color on my lips, I absolutely LOVE these lip butters. LOVE. I also saw Revlon’s Lip Butters at the store, but I’m waiting for them to go on sale. L’Oreal’s were BOGO 50% off this week, so that’s why it was easy to take the plunge and buy two. 🙂 (cheap cheap)


  • My husband decided to start calorie counting with me this week. Things are going a lot better for me since he’s also on board. There’s no junk in our house anymore, and so far this week, I’ve cooked every night. Wanna be jealous? Two days after starting calorie counting, the husband lost 2 lbs. Lucky duck.


  • I’m super stoked that JoAnn’s is finally opening a store in Baton Rouge. Since we moved to the other side of town, it takes me a good 20 minutes to get to the nearest craft store. When JoAnn’s opens, they will be 10 minutes away from our house and also easily convenient to go to on the way home from work. This is awesome and bad.


  • We’re getting a tax refund this year, and I secretly just want to splurge it. However, since I’m an adult (or something like that), the only responsible thing to do is to throw it in the ol’ savings account. ::sigh::


  • Since the other house sold, we’re slowly starting to work on projects we want to do with our current house. We’re getting gutters on Friday, and also hired a contractor to vent our kitchen outside. Since our kitchen is against the brick outside, this should be seamless/easy. A couple of small changes, but all awesome! There’s also a couple more projects in the works, but they aren’t anything major. Since our house is only 5 years old, so there really isn’t much to do.


  • I’d currently like to eat a pint of cake batter ice cream. I won’t buy it, but a girl can dream, right?


Filed Under: Random

“Zapp’s” Crusted Baked Chicken

February 8, 2012 by Amy 5 Comments

Zapp's Crusted Chicken

I absolutely love finding new ways to cook chicken. Most of the time, we try a recipe once and we’re like eh, not doing that one again. But, once in a while, we find ourselves a keeper. I was a little skeptical of this chicken recipe, because we just don’t have the best luck making baked boneless chicken into something flavorful. However, this recipe called for kettle chips and well, they know how to make kettle chips down here in Louisiana!

Zapp’s chips are sort of a staple here. My favorite flavor is the Spicy Crawtators, which is reminiscent of the flavors you get from a crawfish boil. If I could send all of y’all a bag of Zapp’s chips, I would. They’re just that good. So, it was a no-brainer to use this flavor for this chicken. It just made for the perfect coating. Now, while potato chips aren’t the healthiest, I’m sure this chicken is better for you than eating fried chicken! (Sorry Popeye’s…) I served this with some mashed potatoes, since there’s nothing like dipping your chicken in mashed potatoes. 🙂

Note: While I’m using Zapp’s in this recipe, if you want to make this recipe and Zapp’s aren’t in your store, you can use any spicy kettle chip.

Different note: Zapp’s has no clue who I am, so while it sounds like this is a promotional post, I swear it isn’t at all.

Zapp’s Crusted Baked Chicken
Source: adapted from My Life as a Mrs.

Ingredients:

  • 2 large boneless chicken breasts
  • 1 bag of spicy kettle chips
  • 1 cup low fat buttermilk
  • 1 tsp. salt
  • 1 tsp. garlic powder
  • 1/2 tsp. Tony Chachere’s (or any other cajun seasoning)
  • pinch of cayenne pepper

Directions:

  1. Preheat the oven to 375 degrees.
  2. Slice the chicken breasts in half, thickness-wise to result in 4 pieces of chicken. Pound out the chicken to an even 1/2 inch thickness.
  3. In a gallon size ziploc bag, pour the buttermilk in and add the spices. Close the bag and give it a good shake to distribute the spices. Add the chicken to the buttermilk mixture and allow it to marinate for 10 minutes.
  4. In the meantime, crush your kettle chips to a flaky looking consistency and place the crushed chips in an 8×8 pan.
  5. Place a metal (oven safe) cooling rack inside of a rimmed foil-lined cookie sheet. Take the chicken pieces out one at a time and sort of shake off the excess buttermilk while still in the bag. Then, pat the chicken in the pan to coat with chips and flip to coat each side well with the crushed chips. Place on a baking sheet. Repeat with the other three pieces.
  6. Bake in the oven for about 30 minutes or until the chicken is cooked through.

Filed Under: Poultry

Couch to 5K Week One

February 7, 2012 by Amy 10 Comments

Since I started counting calories almost two weeks ago, I decided to add physical activity to this whole lifestyle change. The simple concept of “Eat Less, Move More” has been on my mind, and I figured heck, if I can lose almost 10 lbs. just changing my eating habits, just IMAGINE what adding exercise in will do.

Back in the ol’ wedding planning days, my workouts were a mix of kickboxing, strength training and couch to 5k workouts. I was dropping weight so fast, the seamstress told me I needed to drink milkshakes or my weight loss would lead to her having to mess with the beadwork on my dress to take it all in.

So, I drank milkshakes. And…gained a lot of weight back when I couldn’t get back on track. (womp wah)

Anywho, I decided since we no longer have a YMCA near us, I’d take advantage of our quiet neighborhood and start Couch to 5K again.

Back when I did Couch to 5K, iPhones weren’t all the rage. I think the 1st generation was out, but I was still using an iPod Nano for my workouts. There used to be a podcast of the C25K program, where it played annoying techno music, but heck, there was someone telling me when to run, walk, etc. so I used it.

Now, there are apps for the C25K program. The app I use was $2.99, but well worth it. I can run/walk to whatever music I want, and the app just fades in every minute or so to remind me what’s coming up, when to start running/walking/etc. I love it. It also tweets for me when I’m done with my workout, so I can be an attention w***e about this stuff. Y’all, it takes a lot of energy to move this 300 pound body, (well currently 289, but close enough) so I want to brag! 🙂

This is my favorite part of the whole workout…COOL DOWN. AKA done! Finished. Go home.  

Now, here’s how my three runs went for week one.

First run – I took Millie with me. Hello stupid. Don’t take your dog with you unless they know how to run at a decent pace. My dog’s speeds are walk and sniff or RUN RUN AS FAST AS YOU CAN. It wore me out and wore her out 2/3rds of the way into the workout. At one point, she stopped in front of the house and wouldn’t move (she knows where home is…smart dog). She was done. So, I brought her inside and finished the last two runs on my own. At that point, I was just dragging my feet and just struggling to get through to the end. The next day I was super sore in my left arm (where I had her leash) and my legs. I learned an important lesson that stretching needs to happen. Has to…or my thighs will feel terrible the next day.

Second run – Millie did the warm-up with me (I extended it to 10 minutes so she can get a good pulling/walking workout in), then I brought her inside. These runs seemed to drag, but I tried to challenge myself to run a little faster and walk with a little more pep in my step. My neighbors saw me mid-run #7, and I’m sure I looked like death. I stretched more that evening, and discovered that Millie likes to lick sweaty arms and legs (ugh). The next day, the soreness I had from run 1 was gone. 🙂

Third run – Millie did the warm-up with me again for 10 minutes, and back inside she went to lay that belly on the cold floor. 🙂 This time, the runs weren’t so bad, but I had to slow down my between-run walks because I was just gasping for air for some reason. I was a little embarrassed that people in my neighborhood who were outside could probably hear me trying to catch my breath. Oh well. At the end of the third run, I had this pretty scenery to stare at.

Gorgeous sunset, no?

So, my thoughts. I knew this week would be hard, and whoa….it was. I also know that I’m running very slow at the moment, but I know I’m taking baby steps in the right direction. I’m a little unsure if I should move on to week 2, or do week 1 again, but I’m so excited that this is the beginning of something great. I know I can do this!

Filed Under: Health/Weight Loss

  • « Go to Previous Page
  • Go to page 1
  • Interim pages omitted …
  • Go to page 33
  • Go to page 34
  • Go to page 35
  • Go to page 36
  • Go to page 37
  • Interim pages omitted …
  • Go to page 85
  • Go to Next Page »

Primary Sidebar

Hey Y’all!

Image Credit: Leslie Pendleton Photography


Hey y’all!

Thanks so much for reading! I’m Amy, and I live in south Louisiana with my husband and our rescue dog. I enjoy sharing my love for cooking, baking, crafts & more! Follow my daily adventures on social media!

Follow my Daily Adventures

  • Email
  • Facebook
  • Instagram
  • Pinterest
  • Twitter

Footer

  • Email
  • Facebook
  • Instagram
  • Pinterest
  • Twitter

Archives

Copyright © 2026 · Foodie Pro Theme by Shay Bocks · Built on the Genesis Framework · Powered by WordPress